Thursday, May 31, 2012

Review: LazerBrite Tactical Pouch

I realised that I had not gone back and done a review for something I showed you, way back at the end of last year. It is an item that I keep on my Platatac Young Guns belt for when I am adventuring in one way or another. This is the LazerBrite Tactical Pouch which is produced by LazerBrite Tactical Solutions, who also make one of my favorite lights, the MultiLux LED light-sticks, which I reviewed a while back.The pouch is a means to secure the LazerBrite to your belt, vest or pack, and integrate it with your loadout, whilst keeping it safe and secure.


The pouch is constructed of a medium weight Cordura type material, with good stitching finishes throughout. The "coyote brown" option matches up with my khaki kit nicely. Roughly the same size as a flare pouch, the pouch features a main compartment that fits the LazerBrite, including the "glow-dome"-head, and a "loop" end under a hook-and-loop closure flap. Two additional compartments beside the main one house respectively individually sealed replacement batteries in a strip of OD plastic foil, and the very clever Iris accessory which allows the central tube of the LazerBrite to be "choked down" uni-directionally, from about a third, down to a pin-prick of light. This is a great feature.

This allows the user to focus the light of the tube to provide some light-discipline or just not blinding yourself when doing some work in the dark.When the iris is in use, the main "clear" tube can be popped into the same compartment, and nothing gets lost or left behind. The pouch is PALS/MOLLE compatible, with two sewn-in tabs and three rows of webbing to interlock it to your kit. One thing I noted was that whilst the webbing was securely sewn into the pouch, at the edges, the middle is not sewn in to make distinct channels. This doesn't seem to have any deleterious effect on the attachment, but I suppose it does effect the overall toughness of the connection.
However, I'm not intending to rappel off my light-pouch... Press studs affix it as per most PALS/MOLLE pouches I've seen. Here it is on my Young Guns belt, which seems as good a place as any to wear mine. One thing to note, if anyone is looking to get one, the "bundled" kit includes LazerBrite's "single mode" light, which is to say it comes in the same colour ranges, but only an "on/off" setting, rather than the "high/low/blink/off" of the "Multi-Lux.

Anyway, it's a totally fit-for-purpose pouch, that lets me keep one of these very versatile and rugged lights on my person, and blended in with the rest of my kit. I will probably stitch those middle webbing gaps to the body, forming more regular PALS/MOLLE channels.


Wednesday, May 30, 2012

Review: Maxpedition - SITKA-S Gearslinger Pack

A friend of mine recently "downsized" his regular daypack, and tells me he's very happy with the choice he made, so I wanted to have a look at the pack, and share his feelings and my own observations. This is the Maxpedition SITKA-s Gearslinger. The "S" is for "sinister", as this is the "lefthander" version of the pack. The regular version is exactly the same, just mirrored for ease of use for righties. That was a really nice touch right off the bat, and i was impressed that they offered this version as standard. It may need to be ordered in, but the fact the manufacturer offers it is a big tick in my books. The good folks at LE Gear got this one in for my friend.

The idea of this particular pack is that it will carry all your needfuls, without bulking up or weighing you down. It is jam packed with attachment points, pockets and pouches, but most importantly, it compresses and packs your gear down to reduce bulk. Very important if you have a lot of traveling to do, which is one of the reasons my friend got it, for a long trip OS.
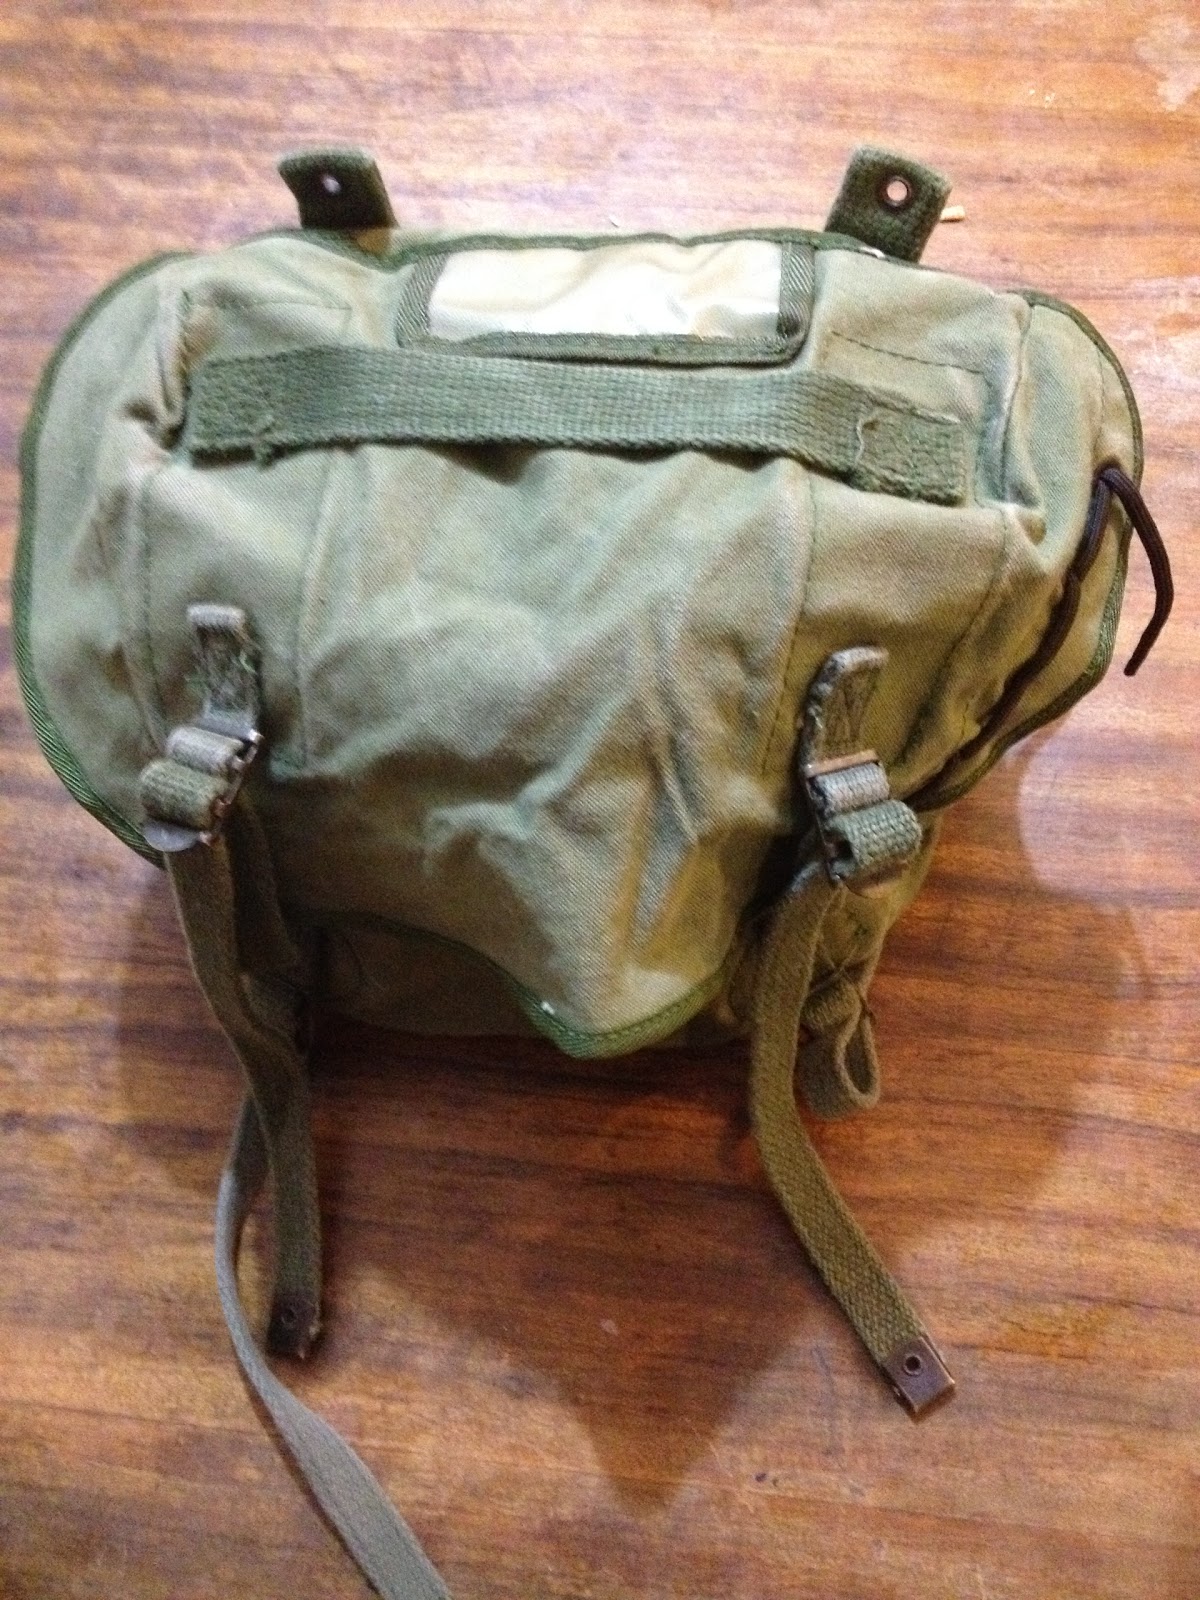
Right from the get -go you can see that the pack has a lot of features, and I'm going to try to cover them as best I can. It is made from the same 1000d Cordura, triple polyurethane coated for water resistance that features in a lot of the gear that I have reviewed. I love this stuff, its hard wearing, and when coated with Du Pont Teflon® fabric protector, sheds rain and crud and takes a beating. Its single-sling layout puts the strap crossing your body, and it sits nicely. When tightened there was no feeling of it slipping around when walking about, but for additional security, there is a "third-leg" strap tucked away in the bottom to make an inverted "Y" of strapping should you feel the need.

The padding at the back is really nice, and the top handle is also padded.


Behind the padded backing is a pocket with ports for a 3L / 100oz hydration bladder, with all the fittings, including retention cords and loops on the main shoulder strap for the tube. There is also a 1L / 32oz Nalgene bottle pouch off to the shoulder-side edge. It looks like it would also fit my 1L SIGG bottle too. (Although the dimensions are different).

As well as the hydration bladder pocket, there are three main equipment pockets: The large compartment is 15"x 8" x 3" and features a variety of internal storage, including a Fastex stule compression strap, a zippered pouch and a wide  loop-field panel for presumably attaching a concealed-carry holster, or your collection of patches, in my case... A small laptop might fit, my iPad certainly would.


The top-front pouch is 7.5” x 4”  x 2”  and features internal organization in the form of wide elastic loops, and a pocket, as well as externally, with  a wide belt of hook-and-loop loop-field running the width of the pocket, over which is stretched a loop of shock-cord. This pocket sits up high and is good for a lot of smaller items, as you can see, my friend left his iPhone earbuds in one of the loops, to give you an idea of scale.

The "Y" shaped compression strap has its arms crossing this top pouch, with a Fastex style clip joining the leg between the two front pockets.

All the zipper pulls feature a paracord toggle, rather than a metal tab, removing  the metal-on-metal noise generation these can otherwise give, a great addition I thought.

The bottom front pouch measures 8” x 7”  x 2”  as is also jam-packed with internal organization, pockets and pouches in the lid and the body of the pocket, as well as a retention lanyard give you a wide range of locations to stash your needfuls and keep them in place for when you need them.


Another great feature of the bottom front pocket is that it has a theft-deterrent  press-stud, which holds the zipper in place to reduce the success of a "yank-and-grab" thief.

The bottom front pocket also features a four row, 2" wide tow-channel band of  PALS/MOLLE loops, as well as running the compression strap through to the base of the pack.

Ther is also a channel of the same 2" wide PALS/MOLLE loops along the "off-shoulder" side which, as well as two at the base of the shoulder strap, giving a wide variety of accessory attachment points.


One of the outstanding features of this pack though, is its ability to be accessed whilst still being worn. Being a single-shoulder pack, it can be slid around the body, much in the same was as my Crumpler Messenger bag, allowing access to all the pockets and pouches, one-handed, to get at your needfuls, (or those sneaky CCW panels) without dropping your load, or having to unsling anything you might have loaded up over your other shoulder.

My friend is really happy with his pack, and I was impressed too, it was really well put together, with all the internal finishings well-sealed and stitched, I expect it will last him a long time. Apparently it makes a good pillow too, there is something to be said for a daypack that you can rest your head on when the opportunity arises. As the man said "Somebody wake up Hicks"
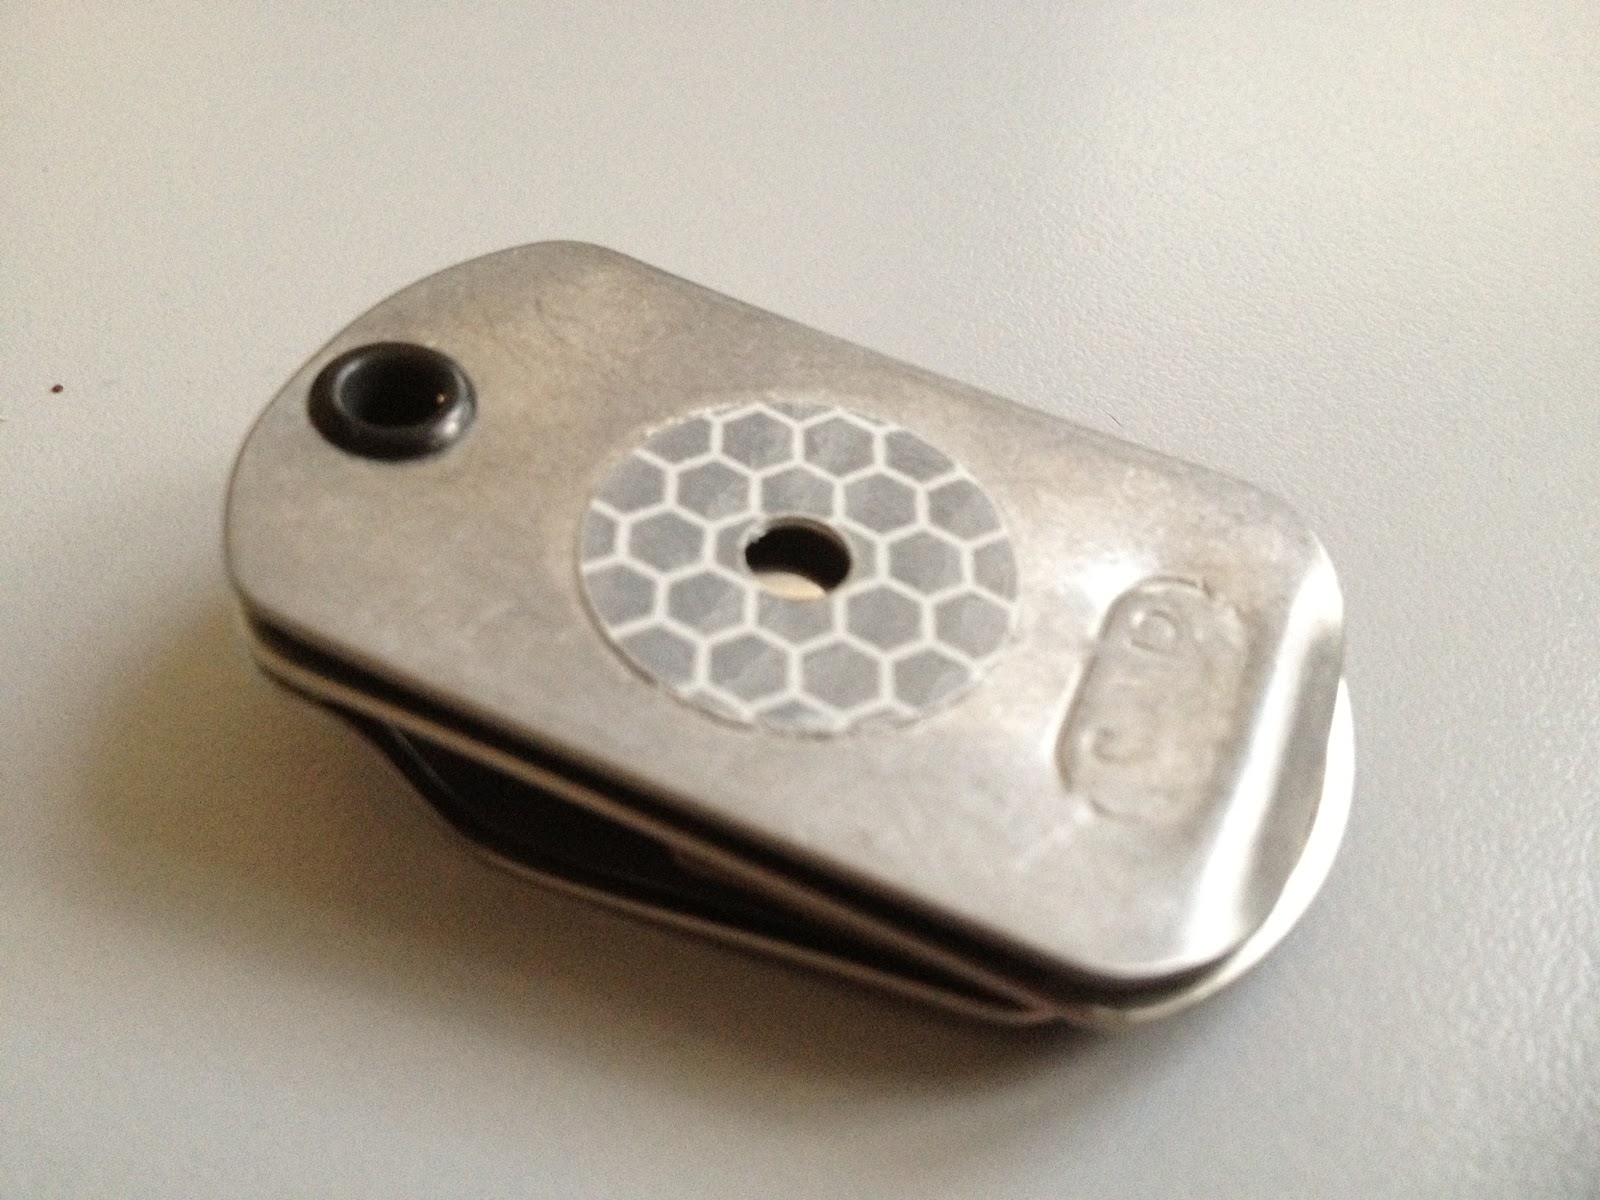


Tuesday, May 29, 2012

Review: Hibben style throwing knives

Normally I am a firm believer in the "don't throw your weapon away" school of thought, but there is a great truth in the words of Drill Sergeant Zim "the enemy can not press a button, if you disable his hand". So, I've dabbled in the throwing of knives for some time now. I've had a few over the years, but these ones, and ones like them caught my eye after seeing Under Siege (at (8:56) yes, it's in Spanish) and they turned out to be a "real' product. These are knock-offs of the UC-454 Hibben Throwing Knives.

I acquired the big one from a disposal store, and the smaller is one of a pair, presented to me by a friend on my 21st birthday. They used to be diamond sharp and mirror edged, but I lent them to someone, who seemed to have practiced somewhere stony or something; the edges are pitted and dinged. I have not had the heart to take them to a grinder and get them smoothed out again, but I will in time. Still pointy, still fit for purpose, just ... dinged.
So, these are made of what I presume is 420 J2 stainless steel, like the originals, and are one piece in construction. 420 J2 is considered a "low end" of stainless steels. It is very stain and corrosion resistant, and tough due to being very soft. However, it is also very weak, and not very wear resistant. In a throwing knife, which is essentially a disposable piece of kit, by its very nature, this isn't such a big concern, as long as you bear that in mind. No matter what Steven Seagal may make you believe, these do not make good kitchen knives. Passable letter openers, to be sure, and nicely balanced throwers to boot. The hollow grind of both the real and false edges gives them a very clean look, and they fit the curve of the hand nicely. The simple blade geometry lends itself to keeping as good an edge as you can hope to with 420 J2 steel, which is to say, chopping sharp, but not slicing sharp. If you want a kitchen knife, get one. These are for "thunking" into targets, not sushi.

You can see that I have bound the larger of the two with a cord-wrap (badly), which gives it a little bit of a nicer grip in the hand. This adds a little mass to the back of the blade, but my knife throwing skills are such that it really doesn't matter what I do to the blade, nothing really increases or decreases my ability, which is to say, I could either do with some more time at the range, or leave it in my hand. Inexpensive at easy to come by at the time, (although less common in disposal shops around where I live these days due to the Weapons Control Act) I'm glad I have these, and wish I had somewhere wide, open and soft-floored to practice with them again.


Saturday, May 26, 2012

Review: Platatac Half Med Pack

I popped in to Platatac a while ago and the guys said they had something new for me, which always perks my ears and puts some extra fluff in my tail. This was no exception. As you might have noticed, I'm quite a collector of pouches, as indicated by my FUP's, SR25's, the 60rnd pouch, modular radio pouch, an iPhone pouch, a wrist mounted map pouch, a camera pouch and a utility pouch, the two twin 40mm pouches, the butt-pack and the 3x30 M16 pouch all of which I have reviewed. I'm quite the pouch enthusiast. The Platatac guys know this well. So, when I came in getting advice on one of my new day-pack options, they introduced me to the Half Med Slot pouch, in Multicam. This is my first piece of Multicam kit, and I must say, it is a nice pattern, looking at it up close. A drier, arid version of "woodland", with more depth of colour than DPCU AUSCAM, whilst keeping the "flowing oilslick" pattern rather than "hearts and bunnies" of AUSCAM, or the static blur of the Digi-cams.

I like it, quite a lot. Perhaps that's a topic for another post, what say you?

So, on with the Half Med Slot pouch. Firstly, the pouch is fronted with a nice broad loop field for putting indicator patches on, like I've done here. The long, broad grip-tab at the front gives a good purchase, without being a snag-risk. The pouch hasn't popped open whilst I've been slinging it around. The top sides of the pouch are held snug with a wide elastic strip. The grip-tab is more than just the opening tab for the pouch, however, it is integral to the internals. A swift yank of the tab tears free the hook-and-loop, and out pops this neat bundle.


There in your hand is a long strip of nylon, bundled in elastic tape, that is jam packed with loops for stowing all manner of small medical aid gear. There is a second loop-field, along with a metal grommet, presumably to act as a means of hooking the kit up once it's "drawn". There are also two looped tabs, one on each side of the bottom, also for post-pull attachment. I've put a roll of z-folded compression bandage on the medium elastic loop, and the large loop holds the bundle together in this picture. However, its in what is underneath that is really the key here.
Here is what options these loops provide, according to Platatac:


  • 1x Large Elastic Loop for FAD or Equivalent


  • 1x Medium Elastic Loop for CAT (tourniquet)


  • 3x Small/Medium Elastic Loops for smaller items such as bandages


  • 6x Small Elastic Loops for other items such as scissors, cyalume or similar items


  • 1x Hidden Pocket for gloves, iodine or similar items


  • I've put a couple of cyalume sticks in mine, along side a couple of rolls of 5cmx3m bandage, as well as a supply of band-aids, sterile would dressings, a sterile eye-patch and a pair of forceps. Four safety-pins through one of the loops of elastic give me something to keep bandages on. The hidden pocket is a great addition, for longer items that need to be stowed away, like gloves. The main body of the pouch has a couple of interesting features, namely another metal eyelet and two winglets which seem to be for closing off the pouch keeping rain and incidental ingress of crud.

    This is a really cool pouch, and I think I will be taking some time to modify this pouches layout and contents, but I will be certainly keeping it on my day-pack as an ongoing trial of a very useful piece of kit.


    Friday, May 25, 2012

    Review: 3x30 M16 magazine pouch

    Following on from my review of a "vintage" butt-pack I did a little while back, here is another piece of old kit that still serves really well. This is a 3x30 M16 magazine pouch, which I collected from a disposal store a few years ago. These are based on a Vietnam era pattern, and the ones I have are made of a woodland camouflage pattern nylon and it seems these had a NSN of 8465-00-001-6482. It is designed to hold three 30 round M16 magazines, and has two "wings", one on each side which after doing some research I see are for hanging grenades.

    So, what can I tell you about them? They are constructed of a light nylon, with tape sewn around the edges to contain any fraying. The front and back panels also feature a stiff plastic plate, sewn onto the nylon, which gives the pouch some rigidity and presumably protected against the material  tearing and the strain put on it by the hard magazines.  Internally the pouches originally had two strips of nylon tape dividing the mouth of the pouch into three, one for each magazine.

    The lid has a plastic clip, the teeth of which are pinched to release. As you can see, I stuffed this one open with a ubiquitous Nerf magazine which is a bit too long for the width of the pouch. but you get the idea. This is an ALICE pouch, and has two clips at the back for attachment. The grenade clips are press studs (although one of mine has torn through the nylon). I also cut one of the internal straps, so that I can fill this particular pouch with larger items, such as the electronics pouch for my Stargate laser tag kit.

    These are cheap, light and fairly sturdy pouches. They are quite easy to come by and with a few modifications (cutting the internal straps) give quite a large storage capacity, as well as the two wing pouches on the sides, even if they are oddly shaped and open.


    Wednesday, May 23, 2012

    Home Front: Licensing

    In the process of making my own laser-tag tagger, I ordered and imported some parts that were seized by Australian Customs. Woops. It didn't occur to me that certain paintball accessories, namely a
    SCAR-H stock mockup and a magazine mockup would trip the rules (not being actual markers, but accessories) but I was wrong. I was given the option of giving up my goods and going I record as having been warned, or going through the licensing processes to import paintball markers (and/or parts). This is a two tier process where one needs to apply for an import permit, and to do so requires either a retailers license as a reseller, or a Class P long arm shooters license.

    There are a variety of classes of shooters license in Victoria, each covering a particular variety of firearm;
    A-(Airguns,rimfire, non pump/semi shotguns),
    B-(Muzzle loaders, center fire but not semi or full-auto rifles),
    C-(semiauto rimfire with no more than 10rnd mag, semi-auto or pump shotguns with no more than 5 rnd mag, tranq guns),
    D-(semi-auto rimfire with more than 10rnd mag, semi-auto or pump shotguns with more than 5 rnd mag, center-fire semi-auto rifles)
    E-(military or paramilitary weapons MG's, mortars, RPGs, carbines (less than 75cm))
    H- (handguns)
    P- (Paintball markers)
    Its worth noting that as far as legislation and enforcement is considered, all the above weapons are all treated the same. A paintball marker left in the back-seat of your car is apparently no different to an M-249 LMG, a SPAS-12 shotgun or Dirty Harry's "most powerful handgun in the world" so, I want to do the right thing.

    As I've mentioned before, I'm not much of a gun-nut; we don't have any large terrestrial carnivores where I live, armed violent crime is pretty much a non-event here, we are unlikely to ever be invaded, I don't do sport hunting. I have probably an inordinate affection for militaria and I don't routinely hunt. So apart from a casual interest in collecting firearms of the world which I may well peruse to complement my collection of swords, knives and daggers, I don't have what I would consider a -pressing- need for a firearm, especially for my own day to day well-being, as I might were I back living elsewhere in the world. (Libreville, Houston, Dubai). I do like my Stargate LRP Lasertag pew-pew-pew and I have enjoyed paintballing in the past. Bush-ball, rather than tournament style.

    So, in order to get my paintball parts, to build my laser-tag marker (which in and of itself doesn't yet require a license, but may soon, as an "imitation firearm" depending how the laws go) I fronted up, and sat a paintball safety course exam, and joined a paintball club as a financial member. I have filled in the forms to get my Class P license, and to import my parts. I already have a suitable storage container (being a steel locker, which can be "permanently affixed" to the place of storage, as it is less than 150kg empty). I will also submit my "Permit to Acquire a Longarm" form and THEN apply for customs to release my parts, which they may, or may nor do. They may also bill me for their trouble if I am unsuccessful.

    A lot of trouble for a trumped up toy, perhaps, but I want to do things by the book.

    I did so in getting my Governor in Council Exemption Order for the Control of Weapons Act 1990, as a bona fide collector of swords, knives and daggers, which along with my membership to the Australian Kendo Renmei keeps my collection of pointies above-board.


    Tuesday, May 22, 2012

    Review: Platatac twin 40mm pouches

    I've had a lot of meetings and coding to be doing in the last few weeks, so have been neglectful of my blogging, let alone my preparedness. We've hit a bit of a rough patch financially, so have been living a bit more frugally than previously. This means less toys for me, but full bellies and happy house. One little extravagance I had was picking up these pouches.

    These are designed to each carry a 40mm grenade launcher projectile, which as it happens, I don't have much need to do (desire, sure, but no need) but the design of the pouch suited itself to adaption to my other needs.


    These are again the standard 1000d Cordura nylon construction, but there is some design variation between the two sets. The key similarities are that both sets feature independently openable compartments, which are closed by a tongue of hook-and-loop, on a belt of Cordura. This belt loops through the compartment allowing an adjustable length for the item to be stowed, by affixing the tongue of the pouch higher or lower on the body, which in turn. "tightens the belt". One of the two designs augments the hook-and-loop with a press stud on the tongue, and two points on the body to fix it to.

    Both pouches have PALS/MOLLE loops built in, although the footprints are different between the two designs. The non-press-stud version also has a strap loop at the top, as an extra attachment option.


    When I got these pouches, my plan was to empty out some of my other pouches, like the SR25 and FUP pouches that I put on my MAC armour carrier, and also affix to my packs. The reason being that small items stuffed into a larger pouch are difficult to locate and extract. Taking these items, like hand wash and pairs of examination gloves and bundling them into individual compartments makes them easier to find and use, without spilling your goodies to rummage at the bottom of a bigger pouch.

    I like modularity, I like the options these pouches give me and I like the fit. I look forwards to affixing these to my kit and having more storage options available to me, grenades or not. :)

    Friday, May 18, 2012

    Review: compass

    For many years growing up, I would respond to a call of "Get lost!" with the smart-ass reply "I've got a compass", which as you might imagine always made me friends. However, it was true, and a compass has been part of my collection of kit for as long as I can remember. I probably had a Swiss Army Knife first, but a compass was right up there. When I lived in Calgary, and did "Outdoor Ed" at Dalhousie Junior High I picked up this Silva base plate compass, which has been with me since. We did orienteering and map reading, navigation and the like. No one ever really pays attention to those things at school, but some of it stuck with me, and I soaked that class up eagerly. Being evacuated from Dubai at the lead up to Desert Storm, fairly unnecessarily, it was fairly daunting for a young teenager to face the prospect of navigating the badlands and desert of the Arabian Peninsula without an adequate means of navigation. I was taught to drive the 4wd in the desert, in order to get away in case of invading Iraqi hordes, and was probably one of the key events in my desire for preparedness.  The lensatic compass came years later, a Christmas present.

      First the base-plate compass. The hard clear plastic base features three rulers, in mm and two in common map scales, for ease of estimating distances as well as a "direction of travel" indicator arrow to take bearings off. The fluid filled needle chamber is patterned on its base with a series of guide-lines, to assist with aligning to grid-lines om a map when relating true-north to magnetic north when taking readings. The bezel is stiff enough to not slip, but moves smoothly. Neither the magnetic needle or the numbers are luminescent but they are clear and easily viewed in dim lighting.


    Here is my lensatic compass, it is a knock-off of a US Army M-1950 model and for what it is, is a pretty good tool.  One of the features of this kind of compass a powerful tool is that they are powerful means of taking a bearing on a distant point. It accomplishes this by means of a sighting wire, and a sighting notch, much like the iron-sights of a gun. You align the wire in the notch on a far away point, and you get a very accurate line to that point. The lens in the sighting armature which allows the user not only to see the measurements from the internal protractor without moving the sighting arms from the bearing, but also enable a much finer markings to be read, again increasing the accuracy of the reading.  Tips on how to do this can be found on the Lensatic Compass Guide or from old army manuals such as here easily enough.

    Being a fairly cheap knock off, my lensatic compass lacks the a tritium dial or markings, but the four points of the compass are luminescent. The making lines and the bezel are functional enough, and there are 120 "notches" on the bezel, giving a 3 degree "click" for each turn. A second lens over the long line allows for close inspection of the bearing.

    The one problem I have found after quite a few years of owning it is that the fluid in the chamber has leaked, and a large collection of bubbles have entered the chamber, and press down on the plastic disk of the protractor. This causes the needle to be pushed off line, with a real risk of erroneous readings. I'm going to try to repair this, but I'd say that this is the risk you take using cheap knock-off pieces of measurement equipment. Good to practice with, or dangle off my gear when I am doing Stargate lasertag LRP, but not something I would stake my life on in a survival situation. 

    Get quality compasses. They needn't be expensive military grade pieces, as my Silva shows, but they need to work dependably.


    Wednesday, May 16, 2012

    Home front: tool building tools

    When I made my 100th post, I posed the question: what would you like to see me review or discuss? Omega's dad, Des, replied with "something about the tools you need to make more tools". I am happy to admit, this isn't something I had previously given much thought to. The situation is this: in the event of a collapse of consumer infrastructure, (i.e. shops not being stocked, factories not running, distribution cut off) how do you go about acquiring tools needed to rebuild, when disaster strikes? What do you do when you need to fix something, and you don't have "the right tool"? You have to make one! Enter the realm of the smith.

    I'm a hobbiest tinkerer, I have a small collection of power tools, like a saber saw, circular saw, drills, sander, grinder, a Dremel and the like, but in a disaster, electrical power isn't something you can count on. I also have a variety of mis-matched hand tools; saws, files, hammers, pliers and drivers. Could I fashion a new tool from my collection of tools? perhaps. I've often "made-do" with what I've got on hand, sometimes effectively, but usually such measures are only temporary and rarely last a few uses. However, in order to really -make- something, there is one key element I am missing. Fire.
    This is a picture of a workshop in Kenya, which is like one of several I saw when traveling there (I didn't take this pic, credit to The Atlantic) but it's a great example. I've seen similar workshops in Gabon, Thailand, Egypt, Greece. The key is that with very few "modern" tools, and what is essentially "junk", many things can be made, repaired and re-purposed. In the event of a disaster that perhaps doesn't "knock us back to the stone age" but instead "knocks us back to 3rd-world conditions", this is the kind of setup that you could expect to need, and see cropping up wherever someone with the smithing skills and equipment can set up.

    I came across an interesting link, to a post-apocalyptic blacksmith and if you can get past the dogma, he has some really insightful things to say about boot-strapping yourself back into the advanced-tool-use game. I know some people with better equipped tool-shed than I, and a couple of sword and armour smiths, I know where a historic railway workshop is. If I needed to have something built, those are where I would turn. In the mean time, it would be a case of rolling the Deathmobile through the barricaded doors of your local massive hardware warehouse.

    Monday, May 14, 2012

    Review: Lazy Patch Duvet Suit

    Winter is Coming. I am really not fond of the cold. I have lived in Denver in the US, Surrey in the UK and Calgary in Canada, so I am no stranger to "proper" winters, with snow, sleet, black ice and exploding water pipe misery. That's one of the reasons I am so pleased to be living in Melbourne, all in all, we have very mild winters here. The temperature rarely drops below freezing. The weather is however, very changable and the butt of many jokes....

    Either way, I dont enjoy being cold. I'm usually happy to put layers on, with a t-shirt, a vest, a polar fleese jumper like the ones I have reviewed, and the like, but there are times where I just want to rug up, sit at my computer and watch hilarious people hurt themselves whilst family records it for YouTube. Thats where the Lazy Patch Duvet Suit comes in perfectly. They also get called Doona Suits, but thats a cultural thing I think :)


    I  got mine a few years ago, a gift after spotting them online, these are in fact made by a Melbourne based comapny, which pleased me to no end. What they are is a set of pants and jacket, made of fluffy doona material, with a cotton inner and outer laer, stuffed with 100% polyester. The great thing is that they are made as an "all over" outfit, being extra long in both wrist and ankle length, which is especially good for a long limbed critter such as myself, regular pajamas usually leave me with bare chilly skin.The Lazy Patch suit jacket also is cut long to ensure you have good coverage and no sneaky drafts stealing away your precious body heat. The jacket features a large pectoral pocket, and two good-sized hand pockets as well as a very high collar, giving you doona all the way up to the cheeks for that all-over body warm feeling.

    The zipper on the jacket is double ended, so you can regulate your airflow, for when things start to warm up. The pants have a drawstring closure, which normally would perturb me as I don't have much in the way of hips, but tying them up , combined with the squishy nature of the doona-pants, have never given me pause to worry about loosing them. They also feature a set of pockets, which is great. Lazy Patch have recently started shipping their suits with a clip on hood to reduce the loss of heat from the head (but please note the old "75% of your heat loss is through your head" myth was busted). My suit pre-dates this however, so I can only guess at their awesomeness. They also make booties of the same material to complete the all-over body cocoon of warmth. Now, obviously, my suit is in Woodland Cam, but they offer a variety of other colours, mens/womens/kids cuts and the like. These aren't weatherproof, being cotton based but for those times when you are going to be cold but dry, they are really exceptional for keeping you warm, not weighed down with layers and layers. Purpose built to keep you snug, indoors. That said, I've taken these camping frequently, great for those nights around the campfire and the early morning dashes to the calls of nature.

    They have a new product, an all encompassing suit they call the Pouch Suit. This looks a bit more rugged,
    outdoors capable. I'd love to give one a try. However, till then, I will be spending more evenings in my Duvet Suit, trying to remember not to wander to the shops in it, more for the cammo than anything else.

    So, come the storms, snow-drifts, blackouts, I'll be ready. And warm.


    Thursday, May 10, 2012

    Review: Australian Army Butt Pack

    I've reviewed a lot of modern packs and pouches, almost all of which I use regularly, or plan to in the event of an emergency. Cordura, nylons and all the modern trimmings. However, there is a lot to be said for the packs that were cutting edge or at least fit for purpose in yesteryear. These are the pieces of kit you find in op-shops, and in discount-barrels at Army Surplus and Disposal stores. This is one such piece. The OD Canvas Butt Pack one of several I have, from a variety of sources but here is the one that I use more often. The name comes from the position you wear this on your belt, right at the back, at the small of your back. Silly name, good pouch.

    The heavy "government issue" 20 oz canvas pouch comes with a fold-over lid-flap that features a name-tag pocket as well as a carry handle. The lid-flap is secured by two metal fittings through which thick canvas pull-straps feed to give a easily fastened and openable lid. A series of riveted eyelids line one side of the lid, I'm uncertain what this is for, but i threaded a length of paracord through them. You never know. It also serves as an attachment point for other kit.


    The back of the pouch features two sewn-in Alice keeper clips, another pair of canvas pull straps, which act as compression straps matching with another set of metal fittings found at the front of the pouch. A set of eyelets can be found at the top of the pouch, on a pair of reinforced canvas toggles. I've used these to fit a shoulder-strap to turn the belt-pouch into a slingable one. Useful if you have several of them, want to pass the contents from one person to another or any other reason to not have it physically attached to yourself, but still hands free. Simple really. The wide canvas belt around the pouch looks like standard 50mm webbing, and has a couple of extra loops for Alice keeper clips, and two extra wide loops for slinging other kit, one on each side of the pouch.


    The inside of the pouch is really quite spacious, and I can fit two of the "3L dead people jars" in a pinch, with a little extra room, with measurements of 23cm x 21cm x 15cm (9" x 8.5" x 6") or around 7.5 L (2gal) giving you an idea of the capacity. Nothing to be sneezed at. The inside of the pouch is lined with plastic, making a pretty waterproof container. There aren't any drainage grommets and it doesn't seal shut, but is certainly dunkable and rain resistant. I expect it could act as an improvised bucket as needed. This may not be what you want after falling into a lake though.


    One interesting feature is the large turtle-neck sleeve of the plastisised lining, which allows the user to fold and cover over the top of the pouch, before closing and securing the lid, to offer some water resistance. It also acts as a secondary means of securing your load, even when the lid-flap isn't fastened. I previously used this as part of my Stargate lasertag LRP kit as a dump bag, which I replaced with the Platatac gas-mask bag but I still take a couple of these with me, with shoulder slings attached. I also gave one to my step-daughter to use as a bug-out-bag when she expressed an interest, following Season 1 of Walking Dead.

    These are great pouches for what they are, tough, dependable, and if you can find one in good condition, that hasn't been trashed by it's previous owner, I expect they will see you through pretty much anything you care to throw yourself into.


    Wednesday, May 9, 2012

    Review: Platatac Nomad Daypack

    I've been searching for a replacement for my venerable Crumpler Messenger Bag for some time now. Partly due to it's having taken a considerably soiling over the years, partly due to ergonomics and partly because I've been told I carry too much stuff. So I put the word out that I was looking for a daypack, basically, something I could carry my daily load to and from work. That basically means including my "emergency" EDC load, my lunch, my iPad and my note-folder. My good friend recently showed me his Maxpedition STIKA which is a great pack, but I also put my question to the guys at Platatac, and this is what they had for me: 
    This is the Platatac Nomad their answer to my question. Firstly I was surprised that they stocked such a generic and every-man looking pack, but that in fact is part of the point of the Nomad. This is the pack you pack when you -don't- want to look like you are ready for anything. Almost every element of this pack screams "I'm just a backpack" but it is oh so much more. However, that's not to say that there is anything less than I have come to expect from a Platatac product. The shoulder straps are well padded and highly adjustable, both top and bottom. They come with a sternum strap that recesses into pockets  fitted in the outer of the straps when not in use. An adjustable waist strap also stows away in the bottom of the pack when not needed. The entire shoulder strap system is also detachable, and can be stored behind the top flap, under a zipperable compartment. A webbing handle on the side of the pack gives a brief-case like carry option, or the main handle at the top, which is padded and fills the hand nicely. A narrow band of hook-and-loop is unobtrusive but gives me some room for some fun.

    The front of the pack offers three pocket options. The grey panel is an elastic pouch, good for water bottles and the like. Next up is a deep zippered pocket, fitted with a keychain retaining hook, and is sizable enough for me to put a book in, even if George R.R. Martin wrote it.The second zipperable pocket is the felt-lined glasses / goggles pocket. This is a great idea, and although I have left my spare specs in a case, I really appreciate the thought that was given to that kind of feature.


    This leads us to the two large segments of this pack. I'll start with the "secondary" one. Under the felted glasses pocket, which hangs free, freeing up valuable real-estate on the inner side of the segment, are two mesh pockets. The upper of the two is zippered and the majority of my EDC lives in there. The second mesh pouch is larger,  elasticized, and carries my over-stuffed and soon-to-be-replaced First Aid Kit. This is as good a point as any to mention the construction of this pack. Again it features a 1000d Cordura outer, which is treated to repel rain, and features all taped and sealed inner seems, keeping your gear snug and dry. Both the large compartments feature lips over the zipper, to further shield the contents from water invasion.


    The "inside" of the secondary compartment features several pen-pockets (one of which keeps my eating irons) and also a larger pocket for maps, a PDA, or what-have-you. A retention strap crosses the 55cm x 40cm compartment, allowing you to compress and secure bulky jackets and the like. I've used mine to secure my keiko-gi and hakama for kendo as well as spare clothes when I have spent the night away from home. A really clever feature. One thing I've found though, is that if I leave this compartment partially unzipped, the weight of the contents of the mesh pouches can drag the front of the pack open. Something to consider when it comes to packing and humping it places. Again, all of the features are no different to those I'd expect of any other well made backpack.
    The main compartment is where the magic happens, however. The entire back panel is made up of PALS/MOLLE webbing, with 7 rows of 8 channels, there is a lot of real-estate for attaching internal pouches. I've installed one of my FUP pouches, for my bottle, and piggie-backed my paracord filled Crumpler Thirsty-Al pouch to that. Below that is my microfiber towel. This whole compartment can be expanded by unzipping an expansion panel giving you a lot more capacity (from 45L to 50L total) , but even then, there is more to this pack. True to their design aims of this pouch, which is to say, covert transport, this pack is designed to accommodate the HK-G36C and Short Barreled M4 Carbine variants, and can still accommodate larger barreled options with its hideaway extender sleeve. This sleeve zips shut on the bottom of the pack, and props the bottom out beaver-tail style to extend the length of the pack from 55 cm to quite the lengthy 75cm. The two attachment straps are included.

     Now, far be it from me to try to demonstrate this capacity in anything other than silly NERF style, as I did whilst demonstrating my 215Gear Sling, so here again is my Nerf Stampede which fits the bill nicely at 74cm long. Combined with the included straps,  I was able to stow my foam-spitter, unloaded, with no troubles whatsoever. Good to know before the next Humans vs Zombies Melbourne event comes along, but it also happens to fit my favourite piece of gardening equipment as well.


    I'm very pleased with this pack, it's certainly a considerable upgrade on both utility and presentation on my old messenger bag, I think my only concern is that it is still quite large, and I will be tempted to load more into it, just because I can. Wearing a two-strap bag has already proven itself to help my back, regardless of the weight I haul, so that's a win right there.

    Tuesday, May 8, 2012

    Review: SAR Eclipse Signal System/Knife

     So, a while back I did a review on my very cool SAR Eclipse Signal System dog-tag which I have greatly enjoyed having in my kit. It features a 3M SOLAS ring for signalling at nighttime, a mirrored steel dog-tag to use as a heliograph for day-time signaling. The backing is a bent steel clip that allows you to clip the tool to your pocket, PALS/MOLLE, a shirt, or whatever.
    I've really enjoyed having this tool, and took it with me on my recent trip to New Zealand, having had to leave most of my EDC behind but this stayed with me. But then there was this!


    Talking with Spencer, he reminded me that he also makes a SESS with an extra feature: a 6LA4V titanium tag which comes equipped with a tungsten carbide reinforced cutting edge. This is the SAR SESS/with knife. I really like having an extra blade one me, preferably more than on, and I have long been known in my circle of friends to be the go-to guy when somebody needs a knife. With this in my collection, I have one more to add to the pool. The blade fits neatly between the mirrored heliograph and the clip tag at the back. A word of warning, the titanium blade is very keen on both the tip and leading edge, and no wasted space has been included in this tool. Be careful which slide you open it all up from, as this is a tool that means business! There is a well placed finger notch below the leading edge so you can guide the blade effectively.

    Spencer, demoing the clips

    That's how you do it, folks!
    Related Posts Plugin for WordPress, Blogger...