Showing posts with label food. Show all posts

Thursday, February 8, 2024

Prepping shed

As the final part of our move from the original home of Apocalypse Equipped Actual, we installed a garden shed in order to store my copious accumulated camping and prepping gear. No room in the new house or garage. My parents were kind enough to gift us this flat-pack, DIY ABSCO 3x3 shed. We built it over a couple of weekends, in a quiet corner beside the house, which was a nice project for me and my good-father. The shed consits of a frame to which pannels are afixed. Assembly is made easier with the help of pre-drilled holes and Absco’s patented SNAPTiTE technology that allows panels to lock into channels without the need for screws. (note, it came with screws and is screwed together, but self-tappers all the way.)

We found there was some manufacturing variance on the pre-drilled holes that needed occasional modification to set things secure and square. The shed is designed to be bolted onto a pre-poured concrete slab, but rental property constraints meant that we instead used a treated pine sleeper frame we anchor-plated together and bolted down to star-picket anchors we pounded into the soft ground. The bare grass we built over was covered in places by salvaged pallets or timber sleepers to set things upon. I put a long table in, along the back wall and a couple of ‘duckboards’ to avoid any seepage that might occur. 

I loaded my collected camping gear ( tents, sleeping systems, cookware and other needfuls, into some old ikea shelves on the table, and many, many stacked Tactical Milk Crates full of my other preps (canned goods, MRE's, and the like) that i'd collected before and during the Covid years. I also have spare tools, crockery and other super-numerate supplies. I also had a number as as-yet unpacked boxes of stuff from the previous house. Initially I just tetras-packed it all in, floor to ceiling in order to get it all in so I could free up other spaces and make them functional. This didn't lead to a very accessible and orderly storage system. 

A process of consolidation and rediscovery over a couple of sunny weekends enabled me to make a little more sense out of my collection, both for ease of access but also to make room to store more stuff and even use the space for additional supplies and furniture, like this cupboard unit, which makes for good assorted pack and kit storage (I have sleeping bags, hydration systems and some tools). 

I also managed to collect all our only occasionally used cold weather snow gear, as well as my various cammo outfits. Under the big table, I've been able to stack my foldable tactical crates. which makes good use of that space whilst having these easily available in the event of a bug-out or camping trip.

 The placement of the shed puts it in the shadow of our side fence and beside some trees and the back corner of our house. It's in the full daylight ark, but has some wind shelter. We placed it on a flat spot but the area is in a slight depression so the duckboards and pallets  keep all the stuff off damp ground. (I open the doors of windy/ sunny days to ensure it doesn't get too humid in there).

I'd noticed condensation on the roof and walls, so I made sure to space my stacks so there was some clearance on all sides (which also improves ventilation)and even though I have  a mix  of storage containers ( crates, chests and bags) I've managed to make an orderly store for my preps, in a safeish, dryish, dark place. I haven't yet put a thermometer in there. but I expect it gets pretty warm in there  (which will obviously affect shelf life of my food preps) but that's a next stage concern. 

How do you store and organise your preps?


Sunday, March 8, 2020

Home Front: COVID-19 bug-in cache

With the current COVID-19 pandemic scare going on, I thought it prudent to supplement my food stored in case we needed to enact the self-quarantine the Australian government is recommending in the case of exposure.  I suspected something like this might occur so as soon as i heard of an outbreak in China. Mostly due to the risk to supply chains.  Given the reported nature of the virus, in both infection rates and morbidity and mortality, I'm not overly concerned about the disease itself, but rather the disruption to supply lines.

This is the kind of prepping anyone can do and its as simple as picking up a few extra items each time you go shopping. Long lasting staples.  I chose things I like to eat, and things I will take camping.  I didn't pre-stockpile toilet paper which was the panic-buy item of choice  reported and experienced, but some judicial and crafty shopping saw us stocked without issue. Something to note for next time.

That said, here is a quick look at my very quickly and inexpensively put together bug-in food cache. Nothing too exciting, nor anything that will go to waste. this is all stuff  I will eat over time and replenish and build on as time goes on.

Red Feather Butter cans: Providing energy rich fats and good taste, for frying, baking, spreading on bread.
Spam cans 340g A traditional prepping staple. Long lasting, tasty and versatile, has its own opening  system and a Weird Al song and Monty Python skit. 3 year best-by date.  I prefer it sliced or diced and fried but its palatable enough eaten from the can with a spoon if you're in a bind.
https://en.wikipedia.org/wiki/Bully_beef, this mechanically reclaimed potted meat and rendered lard in a can. Bully Beef. Not a very exciting food, nor especially sophisticated but it is meat, long lasting, ready to eat and can be added to many other foods. 'Pocalypse Stew as well as the traditional 'shit on a shingle". (served on toast like pate) It kind of looks like pet food. 
Noodles: Ramen. packs Two-minute pre-fried noodles in a packet.  Comes with its own seasoning sachets. Best eaten as noodles in soup  (ready in just  2 minutes give or take) or eat dry sprinkling the seasoning on top as you munch. They also make excellent fire starters being dry and greasy. I prefer the "mi goreng" flavor which it includes a chili/sauce/oil sachet for added flavor variety and use in other dishes as needed as well as fortifying the meal.
Baked Beans  555g cans: Beans Beans ,good for the heart. Best served hot, "Fine like this" if you shun compromise and wear an ink blot mask. 
Stew cans, Braised steak and onion;  425g cans. A meal in a can, simple and tasty. good texture and serves two per can.
Soup cans, Chunky bacon and potato x3 505g cans. Another meal in a can, though not quite as satisfying as the stew cans. Better when combined with other foods.
MRE's: from a variety of sources.  Pre-packaged military style meals ready to eat. not fancy but very carefully put together and long lasting.
Water jugs: Every time I go camping I buy one of these 10L-20L bricks and take them to ensure I have clean water for drinking, cooking and even wash-ups. Afterwards I keep the jugs and with some simple cleaning and refilling with tap-water they're good to go for long term water storage.
Powdered Egg mix: 150g, equivalent to a dozen fresh eggs when reconstituted with water. can be used to make scrambled egg or omelette or as a binding agent in baking. 
Sauces/Soup Mix:  I keep the excess sauce packets from fasts food meals and also the soup sachets from ramen packets to act as soup stock and seasoning for other meals, especially the otherwise bland Spam, beans and corned beef. What otherwise might have been throw away I've kept and stored to supplement my meal stores. 
Mac and Cheese kits: x4 boxes 380g "serves 3. contains pasta packet and canned cheese for use as a sauce. Requires only water to cook. The canned cheese can be eaten separately or combined with other supplies. 
Pasta sauce, Jars of tomato paste with flavorsome herbs, good for making stews, pasta and adding flavor and nutrition to any meal.

Can Pie; Steak and Kidney. Pie including pastry in a tin. Designed to be cooked in the tin (Lid off) it is possible to bake the pie in coals, with some coals on top, by partially opening the tin.

In addition to these specific canned good stores i've stockpiled, I have routinely built up supplies, preserved foods like jams and jerky. Dry-goods like rice, beans, flour and sugar i've kept well stocked and stored in DPJ's  along with fruit preserves and even some pickled eggs.


Friday, March 6, 2020

Review: Red Feather Brand canned butter

I had heard and read about canned butter as a survival and prepping resource for years but had never seen it until doing some shopping at my local IGA super market (a small locally owned chain of community oriented markets) where I saw them stacked on a display. I grabbed one and took it home to try and have made a point to pick one up each time I go in as part of my on-going prepping.

This canned butter was from the Red Feather brand, which is an Australian company which takes Australian and New Zealand milk to make fine and traditional butter and have done so for over  70 years. Red Feather butter has no artificial colours or flavours, Each 10 oz ( 340g ) can is made only Pasteurized cream and salt. Sealed airtight for maximum freshness, this canned butter delivers convenience in the form of extended shelf life and easy storage without the necessity of refrigeration, with a manufacturers recommendation of a 2 year use-by, In ideal, cool conditions, an unopened can could be expected to last much longer than that and it is purported to be shelf stable for 10 years. I may put a can aside to see how this holds out. Time capsule anyone?


The can itself  comes with a plastic cap which allows you to re-seal the can after opening with  a can-opener. The conveniently stackable cans have one lip larger than the other.  One thing I found is one end of the can opens better than the other. The bottom end of the can has a better lip for engaging the can-opener and once open, the plastic cap closes the can up to maintain freshness. With regular butter I tend to leave the pat out to stay room temp for ease of spreading. In an Australian summer this occasionally leads to a puddle but being in a lidded can I've avoided this with the Red Feather butter. 

This also makes it camp-safe  to keep bugs and crud out of the butter and  also keeps it dry in you store it in an icy cooler.


As far as taste goes, I'd go as far as to say it's sweeter and creamier than the regular butter I buy from the grocery.  It spreads nicely at room temperatures, it fries well and is excellent on pancakes, an essential attribute.

I haven't tried powdered or freeze-dried butter but I think the Red Feather butter would make a very fine addition to your long term food stocks. It's a little more expensive than regular packet butter but the added value of long term shelf-life, stackability and good taste means I will be buying it for regular use as well as prepping needs.
I can believe it's long life butter.


Monday, March 25, 2019

Home-Font: campfire Chocolate cake oranges

cooking examples (source unknown)
I like camping, mostly for the campfire cooking options. There's a certain magic to smoking woodfire and sizzling cast-iron leading to a picnic style al fresco dinner. I do a mean pot of chili and a spit-roasted ham is favorite. However for the sweeter-toothed amoungst us a dessert option presents a potential problem. There is a trick to getting foil -wrapped potatoes done evenly and not overly charcoaled, but if you can mange that, you might want to give this a try: Chocolate cake! Be the envy of all your neighbors and blow the "smores" people away.

It is possible to cook chocolate cake in cast-iron dutch oven, they have a habit of sticking and burning quite easily. A number of years ago I stumbled upon the idea of baking cake in the hollowed out shells of oranges. They are delicious and easy!

What you need: a sachet of instant chocolate cake mix (needn't be anything fancy)
cooking examples (source unknown)
components required for the cake mix (typically: eggs, oil)
aluminium foil (for wrapping)
bag of oranges (I prefer Valencia over naval)

1) cut the tops off the oranges, retain.
2) gut the oranges, Jack-o'lantern pumpkin style, retain.
3) remove extra pith bits from the pulp. Macerate pulp with a folk.
4) mix chocolate cake mix, substituting water/milk for macerated orange.
5) fill empty orange shells 3/4 with chocolate mix.
6) cap oranges with retained tops.
campfire cooked by the author
7) cover with foil

8) place in coals
9) let cook for 25-30 minutes, turn 2-3 times.

The rind and pith of the orange will protect the cake and steam it from the edges, whilst cooking the cake will "pop up" the cap, be careful not to rotate the cooking oranges so they open into the fire.

The end result should be a delightfully moist, orange skin oil infused chocolate cake in a warm cup you can hold in your hand and eat with a spoon! After stripping the foil away, the empty orange shell can just go into the fire.

Chocolate cake! That's nutrition
So, from very simple and quite portable ingredients you can make a delicious and uplifting dessert. Oranges keep well and are an excellent camping fruit, chocolate cake mix is light and packs easily. Thicker skinned and pith'd varieties work better for this method, as they act as sturdier and more ablative cook-pots.

You could also try cooking other things in orange cups, different cake, or a duck stew to finish off in oranges for a "duck a l'orange" type effect on the trail.

Friday, October 5, 2018

Review: PRC Compressed Ration Biscuts

I was lucky that one of my contacts Jayson Moloney of Blade and Stone AU started stocking a very unique product I had to get in on. These are a long shelf-life survival ration biscuit that looks to provide long term reliable food source as an emergency backup, much like the Mainstay Survival ration bricks I've reviewed in the past.

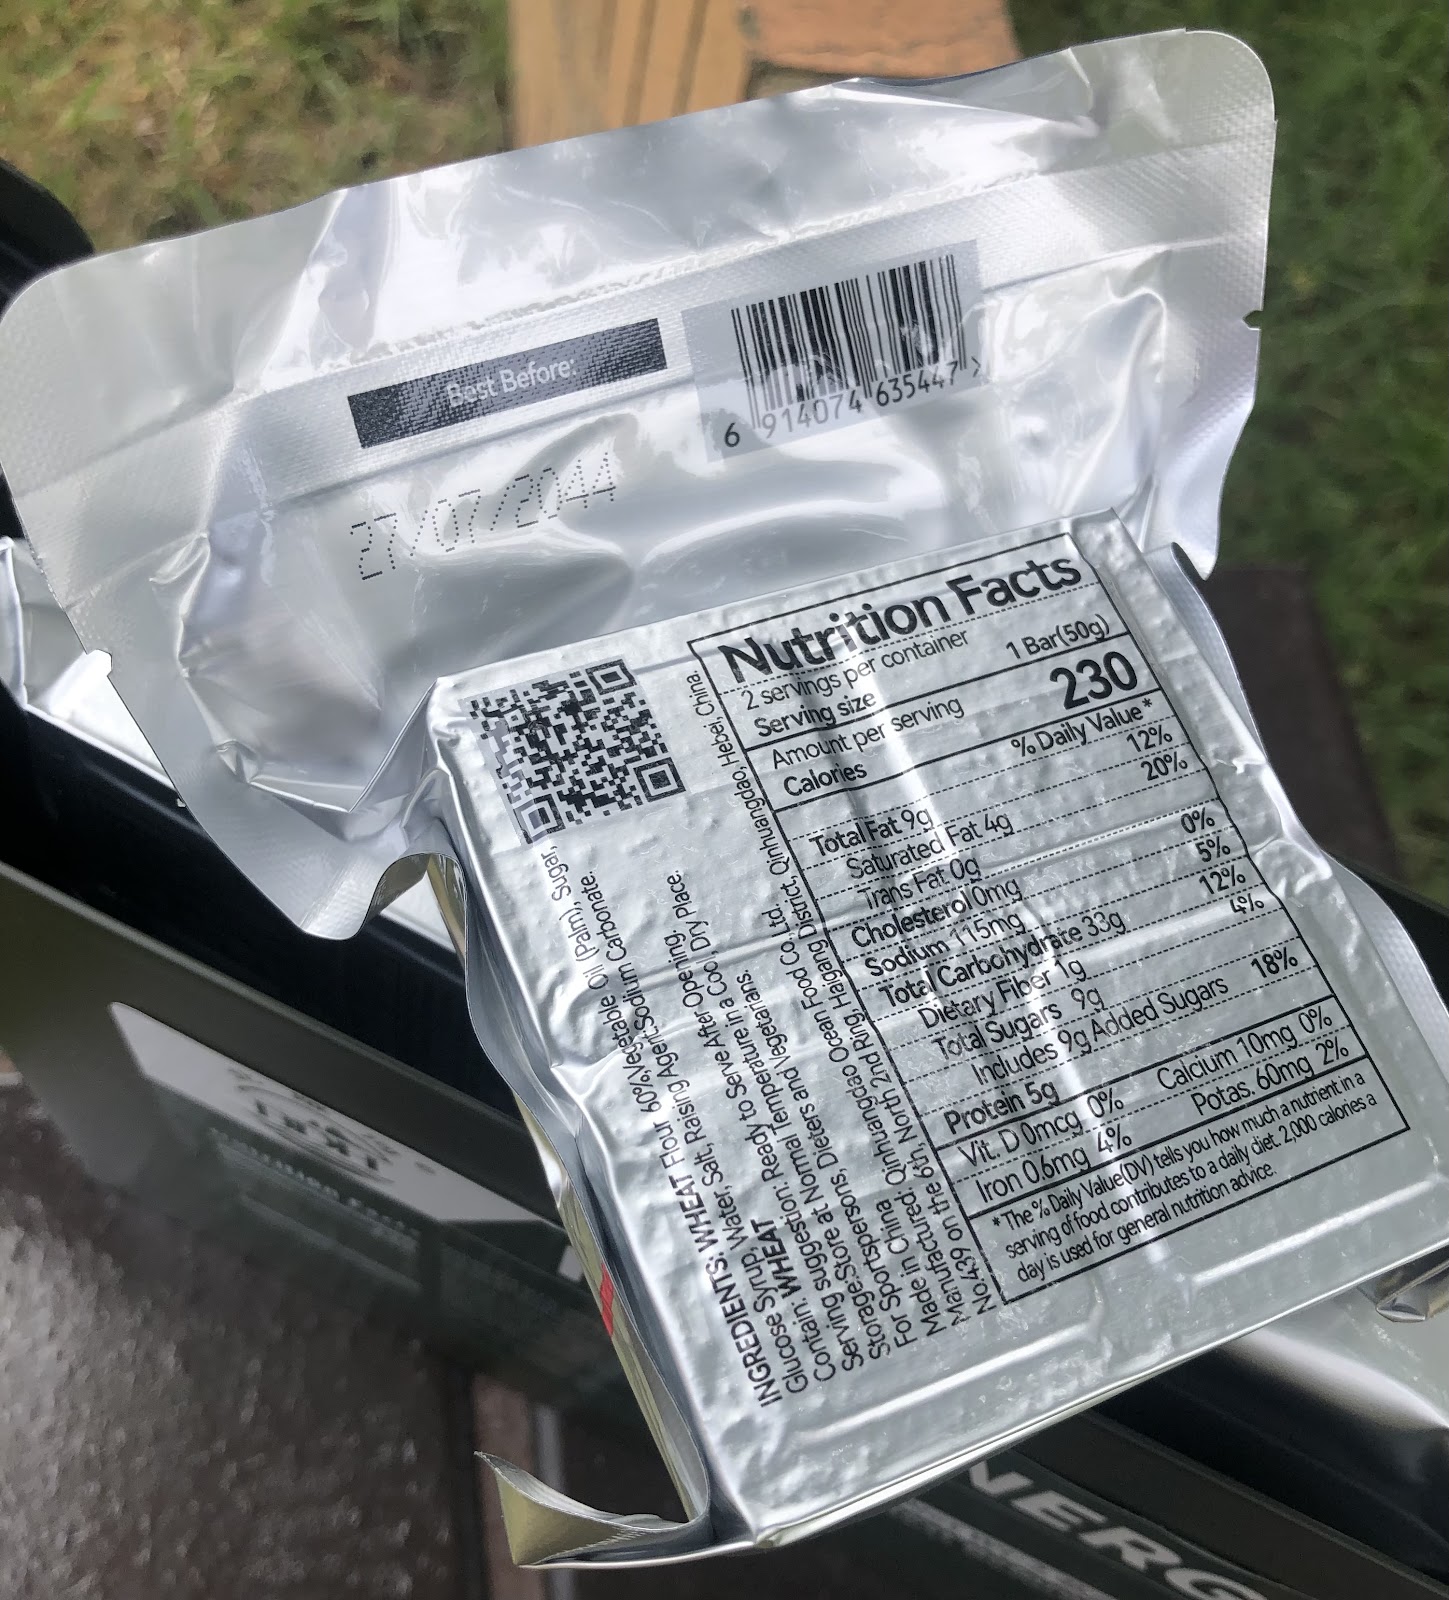
The rations, produced by ;Qinhuangdao Ocean Food CO.,LTD.formerly known as the Chinese people’s Liberation Army No.4003 factory a supplier for the Peoples Republic of China's military, https://qhdhysp.en.alibaba.com The rations themselves are in the form of compressed biscuits individually wrapped and stored in Mylar foil bags. The 4kg tin carries 20x 200g vacuum wrapped packets. When kept in optimal storage conditions; stored at normal temperature in a cool, dry place they have a minimum 24 month shelf life.

The ingredients are Wheat Flour, Palm oil (uh oh, that's not eco-friendly) sugar, glucose syrup, salt, and sodium bicarbonate. These are mixed into digestive style biscuits and compressed into blocks. They have been heat-treated but don't appear to have been baked. Following high temperature and high-pressure sterilization, they are suitable for long-term storage and transportation, The biscuits are tightly plastic wrapped and outer-layer foil bagged plastic bag packaging  creating a package  both hygienic and convenient, suitable for military and civilian use.

Each foil sachet holds four individually wrapped biscuit each pressed into two distinct portions easily  cracked to share or for ease of eating or sharing.  The vital statistics are listed as follows:

The  unopened sachets are 8cm (~3") square and 3cm (~1") thick.


Per 100g
/NRV%
Energy
1988kJ
24%
Protein
7.1g
12%
Fat
19.4g
32%
Carbohydrate
67.6g
23%
Sodium
238mg
12%
Given that each sachet is 200g and has four biscuits, each 50g portion has half these values. So two whole sachets gives you 100% of the daily recommend intake and most of the daily protein and carbs. That's not bad for 400g of dry biscuit. Obviously you'd want water to go with it and I found they go very well with a nice cup of tea.

The compressed biscuits are non-moisture absorbent, soft, and easy to break up and eat. but not mushy or crumbly. They are a high energy,  rich source of nutrition, making them anti-fatigue, and promote the rapid recovery of physical strength. They are dense with a tight texture which leads to you being more likely to feel full after eating.


Although they are made of same flour used to make wholemeal cookies, but because the high quality of the  material used which is more closely refined, the use of the anti-orangutan palm oil softener to lower its moisture content, and not easy bibulous (moisture absorbing) which means even minor punctures to the protective covers will not be too much of a concern , make cookies in the active ingredients can supplement physical strength (ingredients) under the same volume content more, so to make it more resistant to hungry. A long-lasting, sustaining Digestive Biscuit.

The foil sachets are small and sturdy enough to be put in a pocket, or stuffed into the bottom of a bug-out bag. They also fit four into a Platatac FUP dual magazine pouch.  That's 800g of nutrition ready to carry your adventure on over hill and dale for a bit longer.

The biscuits are tasty and wholesome, my kids liked them and even put smiles on our faces after some arduous crafting on the couch.

They're tastier than the Mainstay rations and have a much nicer mouthfeel. Apart from the palm oil I have no qualms recommending these as survival rations and suspect  they will  become a hiking and camping loadout staple for us.


BREAKING NEWS: Jason tells me he will be getting in a new order including the pork jerky flavour through the Blade and Stone site. If your dietary restrictions allow you should check it out!

Tuesday, July 17, 2018

Home Front: Rules of Threes (or more)

In survival, the rule of threes is a quick reference guide for how long one can generally stay alive in a survival emergency.

Originally posted on my birthday on Breach Bang & Clear you should go check out the other good reads there too! go there t orea dthe full article. 

Normally, it contains the following:
  •   You can survive three minutes of severe bleeding, without breathable air (unconsciousness generally occurs), or in icy water.
  • You can survive three hours in a harsh environment (extreme heat or cold). Think blizzards, the North Sea, at a Celine Dion concert ...
  • You can survive three days without drinkable water.
  • You can survive three weeks without edible food.


    Monday, May 14, 2018

    Home Front: "pocalypse stew"


    Having a hot meal is a simple way to both bolster morale but also provide much needed nutrition and energy, especially in adverse conditions. Being able to reliably produce a meal can be as good as magic in the field. I had the chance to do so at a recent post-apocalyptic Live action role playing camping trip, whee we had to set up themed camp with a deadline, and a pot-luck dinner had been planned. There was a total-fire ban in place so no campfires were allowed, but portable gas burners were allowed if supervised. I had brought along my SOLIDteknics AUS-ION Noni pot and some apocalypse themed austere ingredients.


    2 x cans corned 340g Hamper Corned beef
    1 x can 822g Edgell potato tiny taters
    2X McDonalds tomato sauce
    2x instant noodle sachets bumbu & fried onions

    The corned beef cans come with a key to open them by twisting the top off. The Tiny Taters can didn't have an easy open option, however, I had my trusty p-51 opener and made quick work of the can. I up-ended the cans of corned beef, which had the texture and appearance of cat-food and set it to sizzling. when the fat had rendered, I poured in the whole can of tiny taters, water and all (waste not, want not) and then stirred it through. This made for a very wet stew so I was glad I had the noodle sachets to add. in they went and then the McDonalds / KFC ketsup. (I save everyone of these I get for just this reason.)


    After a little cooking down, I served it up into the mugs and mess-tins of my compatriots and we had cooked, adult meal to go with the tear-aparts and dips we had combined. It was quite salty (the noodle-bumbu is mostly salt) but palatable and by the next day, there was only half scoop worth at the bottom of the pot.
    Not a pretty meal by a long shot, but it was fast, (taking less than 10 minuted from pile of ingredients to edible food in mugs).

    Different spice and sauce mixes could change the palatability if available but could even be skipped entirely. Canned corned beef has an approximate shelf life of 2-5 years but who knows how long it could last and be safe to eat? Certainly worth considering if outfitting that cabin-in-the-woods or bunker. I certainly keep a couple of cans in my bug-out food crate and you should to!

    Some additional variants that would make improvements to an otherwise very plain meal. A handful of rice, or oats would give additional body, as would dry beans or split peas. Some jerky or even fresh meat scraps would be additional and offer a delightful surprise in some mouthfuls. Bear in mind to soften beans, rice and jerky additional cooking time (and water) will be required. As well as the Bumbu powder sachets saved from ramen noodles, I also save the sauce and oil sachets which can add flavour and body to just about any meal. Remember that fats and oils are an important dietary requirement and energy rich as well as carrying flavours. They also aid in the cooking process if you fry things, so keeping some in your supply is multifunctional.

    Wednesday, November 1, 2017

    Home Front: camp cooking staples

    I took a solo camping trip a few weeks ago and in doing so got to try out some camp cooking without he worry of the fussy or more gourmet members of my household that I might have otherwise needed to cater for. Wanting to keep it simple and easy to pack I pre-packed some of my food, using the Dead Person Jar Pathopak's. My primary pre-packed meal I set up was porridge. I raided the baking shelves and made up a jar of rolled oats (for quick cooking) to which I added a handful of currants, almond slices and crystallized ginger. I also packed a jar of powdered milk and sugar for both my cups of tea and to add to my porridge. They worked out great. I used a cup of this mix, and made it up with a cup of boiling water, before adding a spoonful of my milk-sugar mix. Delicious, sustaining and warming on a cold damp morning.
    My other campfire staple is chilli. This may provoke disputes among aficionados, some of whom insist that the word "chili" applies only to the basic dish, without beans and tomatoes but when i camp, I take cans of baked beans, chopped tomatoes and pre-mixed sachets of seasoning. A couple of onions in my cooler bag, and some frozen diced pork, this time. If I'd been camping longer I might have taken cured, dried sausage or salami as my meat component. Diced the onions and braised it in my cast iron pot over the coals, then the same for the pork. Seasoning went in next before adding the two cans of tomato and the three cans of baked beans. and some slow cooking with the lid on to reduce it all. I ate mine out of my Optimus-Terra solo cook set mug and shared my meal with a couple of friends who came up to join me in the evening. Five cans, one packet of frozen meat, a couple of seasoning sachets and two onions. Pretty simple. Not too heavy for a drive-in camp, and probably not that bad for a hike-in either, especially if those cans were shared around a little. We had plenty to eat with heavily seasoned leftovers I ate next next day too. After serving I added a dash of water, put he lid back on and put it back over the fire to heat up again to a low roil to kill off any germs introduced during serving up.
    Porridge and beans make two excellent staples when camping, but some other items can find their way into your larder easily enough. Things that add both variety and value. Eggs. Eggs are great, self contained, long lasting and generally not requiring of refrigeration. In an austere setting, if you find yourself in an egg-glut, there are a number of traditional methods for preserving the quality of eggs. Packing in salt, wheat bran or cool clean ash. Eggs packed in box and buried in ash are reported as remaining fresh after 8 months in 80% of cases. Not only does it give the eggs shock and crush protection but having leftover wood-ash at a camping trip once you've eaten your food is no drama, just dump it into your fire pit and off you go. That said, cardboard egg cartons make good fire starters. When I pack eggs, its usually because I plan to make pancakes and then pack them in my flour mix, again, in a sealable jar. They stay safe, insulated and ready or when i'm ready to cook.

    Not so much cooking as snacking, I also like to take hard cheese, like a block of Parmesan and salami  or slab of salt cured meat like Prosciutto. They keep well un-refrigerated and are a very tasty addition to an al fresco snack-plate after a hike or as an addition to most meals.

    Wednesday, May 31, 2017

    Review: Savoury Tooth - Not-Sweet bars

    Whilst getting ready to get back to work, I went and got some new pants, as I'd lost enough weight that my pant-size had changed. Whilst in Kathmandu looking or suitable pants, I came across some interesting snack-bars and thought I'd give them a go. Given that my job entails me sitting at my desk tapping out code and putting out electronic fires, I eat a lot of food-bars as it's fast and easy. However, mindful of my diet, I was intrigued to see these are not sweet-candy bars like many trail snacks are, I've covered some in the past. The Bounce food-balls and the Blue Dinosaur Paleo Bars which are both good products, but both pretty sugary.


    These protein bars are primarily made of a whey protein concentrate purported to lower blood sugar levels when consumed before a high glycemic meal and is the most complete protein.


    They feature a polydextrose binding agent, where something like treacle or molasses might be used in other food. The one used in the Savoury Tooth bars is a low GI soluble fiber with prebiotic properties.


    It helps to slow down the digestion process alleviating blood sugar spikes. Reducing sugar rush effects.


    Heavily spiced, with woo-seeming ingredients like turmeric for its active polyphenol known as curcumin purported to help provide an ideal intervention for type 2 diabetes. Ginger, chilli, cinnamon, coriander, lemongrass and garlic have also been shown to help lower blood sugar levels.


    Importantly, these bars taste amazing, and had a really nice texture: Not too hard to bite or chew, but not mushy or pasty. Dense and rich. The seeds included gave each bite a variety of texture. Food fatigue is a real thing, and having some variety makes a lot of difference, remember that when you're loading up your bunker or bug-out bag.


    The Svoury Tooth bars come in "Thai Green Curry" and "Thai Peanut Stay". Both really do taster like they are described. For me, after a few chews, and rolled the bite around in my mouth, the flavours emerged and I found myself recalling street meals I had in the streets of Bangkok and Singapore I had growing up. I'd go as far as to say these were authentic flavours, from my non-native pallet. Jut a hint of spice, certainly enough to get the mouth juices flowing, but not so much as to drive me to rinse my mouth out or reach for he milk. Certainly enough to satisfy the Texan in my culinary history. Not Jakarta Crazy-Wings hot, by a long shot, but not Vanilla thickshake either.

    From a nutritional perspective, the


    Savoury Tooth protein bars are great after any workout. Each 50g bar offer s 870kJ of energy, or 10% of a 2000cal daily diet. 21-19% of the protein intake 13% of the fat and 6% of the carbs. There is quite a lot packed into these little bars, but the heavy seed and spice content, the bars come with a reasonably short best-before dates, ofonbly a few months as the rich aromatics would age poorly.

    I've found the couple I bought to be very tasty and fun to eat and a perfect break from other sweet snacks. Not as satisfying as beef-jerky, but still, a good pre-packaged snack.


    The advertising was great too, these post-cards made me chuckle even months later when I pulled them out.


    Low in sugar, with complex carbs, high in protein, and dietary fiber, Gluten free these seem to be really viable healthy alternatives to other candy-like sports and protein bars. I'm not a big fan of woo, and straight edge vegan, paleo lifestyles, but these healthy bars don't wrankle me as soy-based, cruelty-free fair-trade hippie-bars might, they are more the granola eating, merino-wool beanie mountain climber food. plenty of bang for your mass!


    Thursday, November 3, 2016

    Wish Lust: Green Traveler


    Here is a neat container that is being Kickstarted that I was quite keen on.

    I have a number of survival caches, but they are all pretty small, such as the neat aluminium Sentinel-X by Ti2 and of course, the PathoPak "Dead People Jars" but having a purpose built food-storage, especially with rugged and dependable construction. Having enough storage components to make a whole meal or meals worth of food travel with you, up and down mountains, and along the trail. Something like the Green Traveler from My Green Traveler is in order.

    It is only in its pre-production state currently, and I haven't had one in hand as yet, but here is what they say about it, and what I think about that. Made from injection molding out of ABS, and is made from 8 pieces. Two flat bottomed tray sections, each with a sealing lid, and two cup end pieces, with screw caps.

    The tray sections, called Nooks, each hold 355 ml (12oz), and the cups hold 237 ml (8oz) for a total of 1.3 L (44 fl.oz) with overall dimensions of 34.5 x 9 cm (13” x 3.5”) and weighs 500g (1.1lbs) on its own. Solid. Heavy is good, if doesn't work, can hit them with it.


    When sealed up, the Green Traveler has four isolated compartments, is reliably liquid tight, so won’t come apart inside a bag. It has two sets of clips on the top side of the nooks, to allow it to be clipped to be the outside of any bag, strap, sling or belt loop and fits in the beverage net on the side of most backpacks. It can keep items inside dry as well as hold liquids in.
    It is designed for everyday uses such as around a city during your daily life to carry food, while traveling on airplanes, or driving to the park and is rugged enough for hiking, skiing, rafting, kayaking, canoeing, climbing and other adventure sports.

    I suspect it wont like a rapid altitude change, such as on an airplane of a sea to summit trip, so be sure to burp it, if that's you plan, but the combination of screw clips on the cups, latch clips on the nook lids suggests

    •Pack a lunch for a day trip
    •Take food to-go or meal leftovers
    •Pack a lunch for your kids
    •Fill with pre-made food at a hot bar or food truck (this sounds excellent)
    •First aid or other supplies to keep dry while boating
    • Prevent soggy food from melted ice in a Esky

    The Green Traveler looks like it will be a good sturdy food container, not to mention other supplies that can be stowed in it: medical supplies, fire starting kit, or electronics might well work in it, for kayaking trips or the like. ABS is a great plastic for this kind of build, and I think it will hold up well. I have LEGO that's almost 35 years old and still kicking around and going strong. I'll be curious to see how well the seals hold up, but as a one-piece set of food carriage gear, I'm impressed.


    Related Posts Plugin for WordPress, Blogger...