Showing posts with label tool. Show all posts

Wednesday, August 28, 2024

Review: titanium pry bar

Time to cover another piece of EDC that has slipped beneath my reporting radar for too long. Its no secret that i'm fond of titanium tools, they're strong, light and non-magnetic. I'm also very fond of pry-bars. Remember kids, your knife is not a pry-bar. Nor is your screw-driver. 

I've always been "the knife guy" in my circle of friends, because I always have at least a pocket pen-knife on my person. More and more these days, environments are less and less permissive when it comes to knives, so I've looked to alternatives. A quick self-audit showed me that I open a lot more boxes than I do cutting food,  and the leading edge of a pry-bar can do a number on most packing tape I've encountered. So I've added more pry-bars to my collection than knives of late. I also find myself making adjustments to equipment and storage units to make things fit more often that I am cutting things. In my search for a more perfect EDC pry-bar, I came across this listing right ebay link for this very functional tool. 

Machined from a solid billet of TC4 titanium alloy it lays 11cm long by 1.6cm wide and 1cm tall. It has a stiffening channel milled down it length on both sides a set of two crenellations at the tip end and three at the butt end as well as a deep scalloping for ergonomic grip. A lanyard hole at the butt end adds a good retention and draw option. The working end of the pry bar comes down to a symmetrical edge with a 2cm slope ending at a flat 1cm wide,  2mm final bevel. 

Its not a chisel, its a pry bar and that final edge is strong whilst being fine enough to slip in to most locations I've needed to pry up. That said, some jobs have required a little persuasion either lifting, wedging or just tapping the tool in to get that wedge started. Once started though, the tool performs nicely, lifting with the sturdy and ergonomic body. After a long period of it living in my pocket along with other elements of my EDC I whipped up a small leather belt pouch from some scraps, where it has been a handy tool for all my prying, tape cutting and even occasional flat-head screw driving need. All in a mere 45g item.

This is a lovely tool that I've enjoyed using and just nice in the hand as a fidget toy.


Saturday, July 20, 2024

Review Oceanus Brass - Cablelaid cordage cutter

Here's another solid brass tool to add to my loadout of adaptive hardware. I'm always looking out for tools that can help me adapt to my environment or supplement my resources, especially if normal resources are unavailable or scarce. This particular tool turns plastic drinking bottles into cordage!

You'd be pressed pretty hard to wander too far anywhere and not find modern trash. Plastic drinking bottles get thrown out of cars along roadways, get blown or dumped into waterways and turn up all over the place. The trick is to turn this abundant waste into useful product! Thats where a tool like the Cablelaid by Oceanus Brass comes in. Machined from solid brass bar stock, the tool is based around a simple principle; a razorblade, held in place behind a channel to feed the leading edge of the plastic through and cordage out the other side. 

The top plate of the tool is held in place by three inset Alan key screws, to facilitate swapping out of the simple razor blade in the event it dulls, though flipping it would double your cutting mileage, before replacement or sharpening is required. 

The tool has three channels built into the side that both guide the bottle in to the razor edge but also set the width of the cord produced. Notches set at 8mm, 6mm and 4mm to the blade with a 2mm guide slot along the top of the tool. The tool works by cutting the end of a plastic bottle off, then feeding the edge into the desired notch and the razor begins to cut the bottle into cordage. the notch then feeds the bottle in measured width to the razors edge and cordage exits out the back of the tool. 

In order to maintain a constant pressure on the cutting edge and even bind-free cutting, it is beneficial to mount the bottle to the tool, such that it spools.


To facilitate this, the tool has a hole bored through it, that fits a pen, pencil or the purpose made telescoping feed rod, its also helpful to anchor the tool in place, and a couple of nails serve the purpose well. Thus braced, its a matter of cutting an even strand, which takes a little finesse, and more than a few false starts. The more even the initial cut of the bottle is the better the start will be. as notched cord is weak and often snaps as it is drawn off the bottle. 

I found that gripping the end of the cord in some pliers made for a good method, allowing me to focus on keeping an even tension on the cord, such that an even cutting would take place, free from pinching and mis-angled cuts. 


From a standard 1.25L soft drink bottle, with a good clean start and careful processing i've been able to reliably cut 10-12m (32-40') of 8mm wide cord.

I've found that removing the label and washing out any sticky residue helps keep the cutting smooth and steady, but the first, initial cut to remove the base of the bottle seems most important. I also found that cutting from bottom to top is most successful.


The tool is pocket sized, at 114mm (~4 1/2") long,  23mm~15/16") wide and  11mm(~7/16") tall weighing a solid 184g (~6.5oz) but it'r rock solid and comfortable in the hand the way that solid brass is.

It can take either standard razor blades or alternatively box cutter blades, which fit into machined spots inside the tool. 

The tail end of the tool features a lanyard hole, and comes fitted with a brass Bow-Shackle that is the signature of Oceanus Brass products. Versatile and useful on its own. A final nice touch is that the tool came with replacement blades, spare screws and Alan key as well as the telescopic rod in an all-included package.

Though the art of bottle-cordage conversion requires a certain finesse and practice, it's well worth attempting as an alternative to bought cord and thus far I've found a number of uses around the house and in the garden. More to follow.


Tuesday, January 9, 2024

Review: Rose Kuli hammer multitool

Multitools have a special place in the heart of all preppers. They make for a resource rich bundle that can provide a lot pf utility in a small package. whilst the ubiquitous Swiss Army Knife is probably the first multi-tool for many ( it certainly was for me), the Leatherman or Gerber belt tool has taken the place in the eyes and EDC of many and whilst these paragons of utility assuredly have their place, they don't do everything. That's were something like  the Rose Kuli hammer tool comes in. 

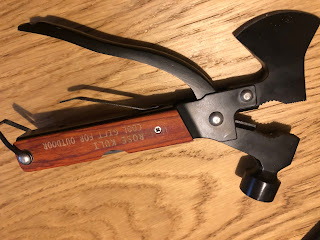
Prominently featuring a split hatchet head and a hammer head, the jaws opening up to expose pliers and cutters, with a spring assist for the plier arm. The Rose Kuli tool features red wood scaled handles, screws recessed in at the high end and riveted at the bottom end, the plyer-arm retaining loop seats into a notch in the bottom of the plyer arm, preventing the plyer head from opening up unexpectedly. 

The hammer-head sits directly in line behind the hatchet head to maximize impact efficiency for both tools. I found that the small hatchet head being only 4cm (1 1/4") broad but was plenty enough tool to carve a notch in some logs i have seasoning at the back door. You wont be felling any mast logs with it, but it'll work nicely delimbing small logs, and even baton splitting, the hammer head providing a good strike face. I worried that the hatchet head appeared riveted in place and would come loose but it turns out that top rivet only holds the sides in place and the hammer/hatchet pieces were secured by the pivot rivet and marry up tightly when the plyer arm is closed. 

The plyer jaws have both a fine toothed and a broad toothed section, for both fine and coarse tasks as well as a 1cm (2/5") cutting jaw, for wire or nail cuttings. 

The hammer itself drives nails quite well, for such a light tool at 400g (14oz), and I could tap one into my new treated-pine fence-posts with ease. The wood scales and plyer arm make for a comfortable grip on the palm and fingers. the hammer-side handle-face holds a surprise in the form of a selection of folded tools.There are 5 fold-out "blades" to further supplement the tools over-all utility.  From left to right there is a simple leaf-point single edge blade, a Phillips head screw-driver, a wood-saw with fish-hook disgorger tip, a 4-size hex nut wrench (5,6,7,10mm) with bottle-opener and pry head, and a serrated blade  with a file and flat-head driver tip. I would have liked a can-opener, and none of the tools lock, but each are functional.

As Corb Lund would sing "Well it's a vise grips for pliers, and pliers for a wrench
A wrench for a hammer, hammers everything else
"

It came in a flimsy nylon sheath with a hook and loop flap that barely covers the heads, leaving the edge of the hatchet somewhat exposed. 


For a light-weight tool, it certainly bridges the gap between belt-multitool and camp-hatchet.


Thursday, April 27, 2023

Review: restored Folding entrenching tool

 A couple of years ago, between lockdowns, I went for a bushwalk with the family, in the Churchill National Park just near my parents place, and on the way back we passed a couple of items, sitting rusting beside a tree. I'm a firm believer in the old Marine adage of "Gear adrift is gear a gift", and as it had obviously been left in the elements for some time, snapped them up. A good sized Dutch oven, and a wooden handled cast iron pot with lid, and beside them: a rusty entrenching tool. After some soaking, scrubbing, heat-cleaning and re-seasoning the pots have become a welcome addition to my outdoor cookware collection.

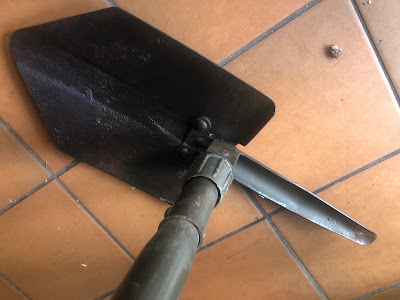
The entrenching tool appears to be a Bushtracks folding entrenching tool with Pick' which had seen better days. The screw-down locking bracket had partially seized but with a little elbow grease and liberal WD-40, I got it worked loose enough to unfold the shovel-head and the pick head, with a little extra work I cleared the screw threads of grit and get it working smoothly. 

The next step was to wash and scrub the rusted  shovel face and pick. Luckily the hinge and locking bracket were not especially rusted. Once the loose crud and dust was removed, I heated the shovel head over the gas range hood to drive off any remaining moisture and coated it liberally with linseed oil as a seasoning mechanism. I did this outside as the hot steel vaporized the oil into old-timey smelling white clouds.

The scrubbing and seasoning paid off  and the surface has remained rust-free despite quite a lot of digging, both in the garden and trips to the beach where I use it to fill ballast sand-bags for our sun shelter. I have previously reported on my black tri-fold e-tool and the much smaller tactical-dump trowel but i'll be comparing the two e-tools, as they're in the weight-class.

I'll start by breaking the tool down into its major elements: the shovel, the pick and the haft. 

The working end of the shovel is a triangular tipped square side shovel, with  a gentle scoop. The tip is rounded and the edges are quite wide for durability, unlike the tri-fold which has a decidedly sharpened edge. One of the square sides has a sawtooth edge cut into it. The shovel face is riveted onto the hinge piece with three hefty rivets. The shovel has three positions, folded flat, 90 degree "Pick mode" and full extension. when folded flat the "head" of the shovel between the rivets makes a half decent hammer face, perfectly suitable for driving tent stakes in, not so much for fine carpentry. 

The screw-down locking bracket features  a big washer to aid in keeping  a tight fit when tightened which has stood up to some enthusiastic hammering and digging.

When folded out in "Shovel mode" the tool stretches to a fairly decent 62 cm (24 2/5") length, slightly longer than the delta-handled tri-fold. Length is leverage and leverage is force, both have utility when digging, and the extra length has little impact on its pack-ability  at 42cm (16 1/2") fully folded.


The shovel face itself a little smaller than that of the tri-fold,, but the tri-fold has an inch or so "behind the shaft" so the usable length is all but the same. it certainly digs well and scoops tailings out of the way smartly.  It lacks as pronounced  a rolled-over back-edge to support a diggers boot-assist, and if you really wanted or needed to you could use the pick, folded down.  

At 860g (lbs 14oz) its a reasonable tool to carry around, especially if you know you'll need to dig more than a trowels amount (be it a fire-pit, latrine pit-trap or fighting position.) The wide edge does not lend itself to axe-like chopping in the way the tri-folds per-sharpened edges do ,though they could take an edge without too much effort (either hand file or powered grinding tool). The saw teeth could be sharpened up without degrading the robustness of the tool, but that's a project for another day. I have been primarily using this in the vegetable garden, tilling soil, digging up potatoes and shifting delivered soil into our raised beds.

The Pick tool folds and locks in place the same way as the shovel does. The most useful position being at 90 degrees to the haft. The spike itself is curved along the whole length of the pick for strength and extends out  21 cm (8 1/4") from the haft. 

It is possible to operate the tool with both shovel and pick extended, but its a bit cumbersome. Easier to use one tool and swap between the two.  The pick isn't sharp-tipped, featuring the same robust edge as the shovel, but its not expected to be a mining tool. 

The pick, when folded flat against the haft, can also serve as a hammer, though the rounded back face of the pick makes for a tricky strike surface, but possible.

The pick can also be folded "upwards" into a "spear" configuration, extending the tool into a length of 58cm. Good for getting to the bottom of a hole, reaching the top shelf or possibly ventilating an unwanted visitor to your trench.

Lastly, this tool can, when set into soft enough soil, make for a halfway decent stool, with some balance and practice. better than sitting in the dirt or mud, not as good as a proper chair. 

The original haft was held in place by a rivet through the throat of the locking bracket, and whilst giving the tool a good bash test, trench-club style, I managed to snap it off at the bracket. After sitting unloved in a pile of scraps for half a year, including a house move, I dug it out, ground down the rivet head with an angle grinder, whittled a new head to the shaft, fitted it after a little char-hardening and set it with a clinch-nail. This cost me 2-3 inches of over-all length, but with my longer than average wingspan, it's none the worse. 

Though it doesn't fold down as small as the tri-fold, nor stow away in its own belt pouch (though military surplus canvas pouches exist), this is a solid tool rich with utility and with years more life in it, both in the garden and on the trail.

At some stage I may throw a sharp edge on the shovel for root/brush chopping and i'm certainly going to try my hand at sharpening the saw edge, but all in all I'm very happy with this restoration and salvage of a "lost" tool.

For the God-Emperor! For Krieg!


Thursday, March 23, 2023

Review: Scotch eyed auger


I started seeing ads for these a while ago and got one a couple of years ago for bushcrafting adventure and general utility. Having manual tools on hand is good, both for emergency power-down use but also off-grid crafting. Hand saws, hammers and hand-drills are all reliable, if sometimes arduous tools to make use of.

A scotch eyed auger bit is a type of tool you can use to create holes either dry or wet woodworking applications. The “scotch eye” is the hole at the end of the auger and its purpose is to enable easy handling and additional leverage. 

This particular one has a 20mm auger bit (8/10th") with a single flute that runs for 9cm (3.5") for  a total shaft length of 15 cm (6") and terminating at a round pipe eye of 18mm (7/10th"). It appears to have been made from a 20mm hex ended drill bit welded onto the eye segment. 

The cutting tip of the tool starts of with a self-tapping screw-head that ensures good purchase and correct placement of the auger for optimum boring. 

The cutting face of the auger is set back from the leading edge of the flute, which has the effect of being a scoring/ cutting edge, around the circumference of the bore being cut, this ensures a clean cut and smooth finish.

The eye is set perpendicular to the auger shaft, such that a branch can be fitted through it  in order to make a handle to easily turn the auger and bore into even hard, seasoned timber. Once the tip has bitten, and the cutting face engages, the long flutes will guide the auger on a straight path through the wood, so be sure to get the initial line straight. 


The eye is also a means for producing peg ends that will fit into the hole bored by the auger. These can be  whittled manually and test-fitted in the eye or hammered through the eye to shave/ scrape the pegs down to size. The remaining hex of the original drill  haft is lined up to nicely  be hammered upon, which was also a nice touch. 
The eye is sightly narrower than the auger bit, which means that pegs cut with it will be -slightly- loose, which can be a good thing depending on the situation, but a long as you take it into account you  would be fine. If I were making a pole and branch ladder, i'd be lashing the rungs in, regardless. The length of the tool allows for quite deep (6") cuts to be made. This is plenty deep enough to make a rocket fire from a log like a Swedish Fire torch. Deep enough that you could probably pin log cabin logs together, though that would be a lot of hand cranking. pegs used in this fashion are called treenails or trennals and have been documented back as far as 7000 years.

I've seen some Scotch eyed augers with one face of the eye being sharpened to bite into the peg-wood, whilst the rear face is hammered and mine lacks this. I'm not certain it would be necessary and have done just fine without, but if you were intending to make a lot of pegs out of cut lumber it might be advantageous. I whittled down this segment of green branch the power company lopped from one of our cub-side trees, and its made a very good handle in less than a minute. I did this when my previous branch/peg handle snapped whilst mid way through boring a hole through a particularly seasoned piece of recycled timber. A minor setback, quickly addressed with a field expedient replacement and I got the job done. 
One thing that hadn't occurred to me until I was well into my boring task was that the swerf material (wood chips) I was boring out would make excellent kindling, even in wet conditions ,the inside of most wood stays dry.  This would be even more true with more resinous woods. I've used the auger on branches and logs I've found trail-side as well as dressed timber both fresh and reclaimed. 
One word of advice, ensure your leverage stick is a good fit and smooth or you'll hurt your hand whilst boring. Wear gloves. Be sure your angle is correct when starting off and check for drift. All in all its a very simple and elegant tool and at only 175g (6.3 oz) its an easy add to your bushcrafting carry. 
I made a simple leather pouch for it with belt loops, so I can take it with me along with my belt knife and trail hatchet. I imagine myself making tripod stools and even legged benches with this tool, as well as through-holes for future furniture projects. 


Thursday, February 16, 2023

Review: ChinLin spade trowel

Whether it's putting in crops, digging up a secret-squirrel cache, taking care of some business in a back-woods latrine or just some old fashioned fox-hole digging, having  a good digging tool comes in very handy and saves the old fingernails. I have a couple of folding entrenching tools in my camping/bug out kits, but even compact as they are, they can add a bit of bulk and weight. Sometimes they're even a bit too much tool for the job. A full-sized e-tool will make a big Dakota-fire hole, where a trowel sized tool would be more economical. I love multi-function tools, especially when they don't add function at the expense of the primary function. 

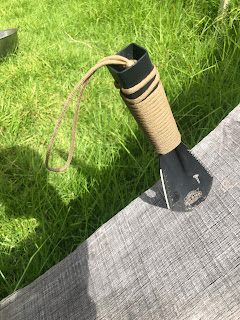
This little beauty is the ChinLin HW-901 spade and I originally picked a couple up on Wish.com but it looks like they are no longer sold there. I did find them on this Indonesian clone ( buyer beware). What it is is a 26.3cm ( 10 1/3") trowel with a para-cord wrapped box handle. Made from a  single piece of 420 Stainless steel, the handle has been welded along the middle of the upper face, obscured by the cord wrap. The trowel has a sharpened edge around 3/4 of its edge, with the final quarter being a serrated saw-edge. The spoon face of the tool has a nail puller cut in as well as a set of four hex-head wrench cut-outs. 

The edges aren't super-sharp but they're sturdy enough to chop with, which will be good for clearing brush, weeds or stubborn roots whilst digging. Weighing in at only 80g (2.8oz) it's not going to cut it as an axe, but it makes for a lively and light digging tool. The sharp edges and serrations do make digging through turf easy, and the tool-cut-outs don't effect digging and scooping output significantly.

There is a 7cm ruler printed on the inside of the spoon which is  a nice addition. The pressed steel has a spine ridge pressed in for stability and the tool is very stiff, which makes it very good when sawing or prying (splitting cracked wood or perhaps stone), especially handy when pulling nails with the nail puller or applying torque with the hex wrench holes. 

The cord-wrap is made of 290cm (9'6") of paracord, secured to the handle through four sets of holes drilled into the sides of the handle, and terminating in a lanyard loop at the bottom end. The handle has a slight taper which keeps the cord from sliding off either ends. 

Those side lashing holes and the hole in the spine of the spoon near the handle of the tool can also act as attachment points to fix a pole fitted into the hollow handle, either acting as a extension to the handle, or to turn the tool into a spear. 

The tool comes in a hand if pretty flimsy nylon pouch with a belt loop. I've found it very useful to have on hand when picnicking or hiking. The pouch keeps the sharp edges secure. 

I bought one for myself as a tactical hand shovel, and another for my veggie-garden planting partner. We've both put it to  good use and they've never failed us. 


Panjang Handle: 10.4 cm


Tuesday, February 7, 2023

Review: Stilletto titanium nail puller

I do love a  good salvage. Whether it be road-side junk-swap, flea market bargain or dump-harvest the idea of junk salvage strikes a deep chord in me from both a 

post-apocalypse survivor point of view  and 80's kids sci-fi. That said, sometimes having the right tool for the job, especially if you're working with aged or non standard materials. I do like to recycle timber, for garden-beds and storage shelf construction, and getting the nails out can sometimes be a real pain, especially in well seasoned hardwood pallets.  

Previously I have made do with my pair of  demolition hammers (the Dead-On Annihilator and the Stanley Fat-MAX FUBAR) which are brute force tools, even when paired with pry tools such as Jimmy and the ever rugged Breacher bar. I've had a lot of success with this combination of tools but they're inelegant. I'm also a sucker for titanium. I know its not a miracle metal, neither mithril nor vibranium/ adamantium but its pretty rad.

Now on to the tool!

This is the original Stiletto Titanium framing nail puller with the Patented nail removal feature! In essence it is a 30.48cm ( 11.5") pry bar, made of one piece of titanium. It has an open-truss design to cut weight but retain rigidity, weighing in at 300g (8.5 Oz)


One end features a standard cloven hoof pry edge, which is quite pointy, for aggressive purchase finding, and the other end its a cat's paw, 90 degree pry bar, with a similarly pointy tined  cloven end, and a smooth, rounded fulcrum for mark-free nail-pulling. The key feature of the cats-paw end is the perpendicular dimpler. This open-ended conical protrusion is used to punch a circular indentation into the wood,below the level of the head of the nail, in order to allow either of the pry ends to find purchase and pull them out. This is achieved by centering the open end of the dimpler around the had of the nail and striking the back face with a hammer, hard enough to drive a dimple into the wood around the nail-head. 

The dimpler has an internal diameter of 1cm (0.4") which should be plenty big enough for common nails found in timber. Stiletto specifically state it be used for "common nails" only


The divot allows the tines of the nail pullers to be worked under the nail-head without gouging the wood too much ( divot aside). I found that for especially stubborn or embedded nails ( or punched down, or otherwise deep) that the tines can be driven in by hammering in the tool from the other end. It should be worth noting that Stilleto claim the titanium strike faces outlast steel bars 3X longer - doesn't spall, crack & mushroom like steel bars. I also use the back face of the cats-paw to drive some nails, and though it took some transfer marks, the satin matte finish was un-marred. It's a bit light to act as a hammer effectively but in a pinch, just fine. 


The open truss body is clean edged and smooth to the hand, allowing a strong grip be taken without roughing up your hand.
The shaft of the tool is slim enough to be threaded through PALS/MOLLE channels, for belt, pack or carrier  carry, but I wnt through my leather scraps bag and whipped up a quick holster with a belt loop for my use. I look forward to easy break-down of pallets and furniture for firewood or lumber needs.

Its a great tool, multi-functional, rugged and fit for purpose. 


Tuesday, August 2, 2022

Nano Oil for your Knives, Tools, and Firearms

Another Guest Author, by way of BB&C,  Jim Davis presenting Nano Oil:


Always on the lookout for cool, different ideas, I happened upon a product that caught my eye. Not just for the content of what's in the containers, but the way the containers deliver it to the target. Nano Oil offers some unique and innovative methods of dispensing lubricant onto firearms, knives, and anything else where you want to deposit a controlled amount of oil into a small space.

They have a few various dispensing containers that I'll outline here.

Nano Oil containers
Nano-Oil comes in handy, syringe-like containers. Here is a package with three different weights: 5, 10, and 85 weights.

What Is It And What's It Good For?

First, though, a bit about Nano Oil. It does not contain any of the following: Silicone, PTFE Resins, Graphite, Molybdenum Disulfide know as Moly, Teflon, Copper, Lead, or Silver. They state that there are "absolutely no metals or harmful solvents."

StClair claims that Nano Oil is suitable for high temperature applications, extreme pressure (load bearing metal to metal), roller bearings, chains/sprockets, machine tools, marine equipment, metal working, mining and printing equipment, armaments, knives & multitools, and a ton of other uses. The list is quite expansive.

It works on bicycles, motorcycles, cars, tractors and farm equipment, and RC racers.

Regarding armament, they claim that it increases muzzle velocity and smooths all moving parts while protecting from rust and corrosion. The oil adheres to microscopic crevices and penetrates metals, which provides a very low friction dynamic.

Weights

There are a couple different weights that are offered for various uses.

*5 Weight. This is the lightest weight oil that is offered, noted for deep and fast penetration. They refer to it as "WD-40 on steroids."

*10 Weight. This is a light weight oil that is suitable for guns, flashlight threads, knives, fishing reels, locks, hinges, bicycles, bearings, cables, chains, sprockets, motorcycle forks, electric motor bushings, model railroads, and more. This one seems to be the most useful weight, in general, as it addresses a lot of different uses.

*85 Weight. This is a heavy weight formulation, developed for the M-14/M-1A and other rapid fire firearms.

I ordered and received one each of these weight lubricants in the Micro Oiler with stainless blunt needle, which contains 8cc/ml of oil. These are extraordinarily handy because that needle can get the lube precisely where you want it. Note that the same weight oils can also be had in 1/2 ounce and one ounce bottles.

Nano Oil containers and applicator tip
One of the beautiful aspects of Nano-Oil is the blunt metal applicator tip that allows the user to get the oil where it needs to go. These are the micro oiler containers.

I also received an applicator of Nano-Grease NGL, which is a Lithium Complex Hi Temp & Extreme Pressure lubricant. The uses for it include bearings, boats, buses, cars, bicycles, chains, conveyors, dozers, excavators, graders, laundry equipment, and a bunch of other items. And since the M-1A/M-14 series of weapons are supposed to be lubed with grease, that was my main intention of buying this, as I am using it with my M-1A Scout Squad Rifle.

Grease syringe M-1A
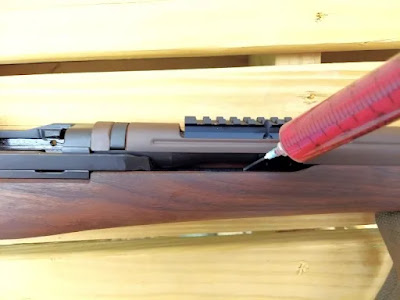
With the grease syringe, getting into the chamber area of the M-1A Scout Squad Rifle a snap.

Chamber area of the M-1A
Greasing up the operating rod on the M-1A is no longer difficult either.

Operating rod on the M-1A
Nano Oil states that adding its formulations to other existing lubricants will improve their anti-friction qualities.

I have not tried the following, but they are listed on Nano Oil's website:

Gasoline Engine Oil Treatment, Diesel Engine Oil Treatment, Manual Transmission Oil Treatment, 4-Stroke Engine Oil Treatment (Motorcycle, ATV, Snowmobile, Outboard Motors), Small Engine 4-Stroke Oil Treatment, Automatic Transmission Oil Treatment, and Marine Outboard Drive Treatment.

Dispensers

The first is a pen that has something similar to a ball point. The user presses the tip onto the surface where he wants to deposit oil, and the oil comes out. It's fairly controllable too, so you can get a small dot, a larger puddle, or a line. The pen container I received contains 16cc is 10 weight oil, which is listed as "All Purpose." I'd say it would work great for firearms, knives, and anything with moving parts in general. The cap even has a protrusion for hooking onto the user's pocket, so it can be conveniently carried anywhere. The container is white and not see-through. At the time of this writing, one of these pen dispensers costs $27. It appears that it should last quite a while.

Nano oil Applicator
The pen is a very handy container to have around!

Tip of Nano Oil Pen Applicator
The tip of the pen is similar to a ballpoint pen, in that when the tip is pressed, it dispenses oil. The user determines how much oil he wants to come out.

The next type is a Micro-Oiler, which is see-through and has a long, blunt, metal needle for getting the lubricant just where you want it.  This is especially useful if oiling knives and firearms. Normally, I run my knives dry or nearly so because oils tend to attract dirt and other gunk. The 5 Weight oil will be especially useful for knives because when it dries, it leaves very little residue behind, yet still retains lubricant qualities. This is good stuff!! A 3-pack of these dispensers with 5, 10, and 85 Weight lube, at the time of this writing, costs $49.00. At the rate in which I use lube, I believe these will last me for quite a while.

Finally, the grease dispenser is like a giant syringe that comes complete with a long, blunt metal needle, which gets the grease into those hard-to-reach places. This is especially useful when applying to the M-1A rifle, as it allows the user to get the grease into the areas where the bolt rides in the receiver. Those little grooves can be a pain to reach by other means, but with this setup, it becomes very easy. At the time of this writing, this one costs $21.75.

Nano Oil Grease syringe metal tip
The grease syringe has a large volume and the metal tip is perfect for getting the grease where you need it to go!

Does It Work?

Naturally, I went totally overboard trying Nano-Oil out on most of my firearms. Those that know me will not be surprised, as I tend to go all-in on my endeavors.

So far, I've used Nano-Oil on my S&W CSX 9mm, S&W Airweight .38 Special Revolver, Glock 43X, Ruger MK IV .22 Long Rifle pistol, Two AR-15s, an AK-47 (AK-63D) Underfolder, and my M-1A Scout Squad Rifle from Springfield Armory. I plan to use it on my bolt action rifles and my Henry Arms Survival Rifle (AR-7). In other words, I will use this stuff on all my firearms and knives.

 AR Pistol and AK-63D Underfolder
This AR pistol by Xtreme Gun Worx (of Emmaus PA) and the AK-63D Underfolder benefitted from an application of Nano-Oil.

Ruger MK IV .22LR, Glock 43X, S&W CSX, S&W Airweight 642 .38 Special revolver
The pistols that I tried Nano-Oil on, from top to bottom: Ruger MK IV .22LR, Glock 43X, S&W CSX, S&W Airweight 642 .38 Special revolver. They all said they liked Nano-Oil!

Speaking of knives, I've used it on my Emerson Knives Desert Roadhouse. Some of my Spyderco folders will also see Nano-Oil. The nice thing about the 5-weight oil is that it dries up and doesn't leave a gunky residue on knives, but the lubricating benefits still remain.

Nano Oil being applied on a Emerson Desert Roadhouse knife
Getting oil into specific points of a knife action is now easy! Here we see the Emerson Desert Roadhouse getting some care.

I can honestly say that Nano-Oil is good stuff; my firearms' actions were nice and smooth after using it on them. So the quality of the oil and grease itself is sound. Beyond that, what I really found refreshing is the applicators that come with the oil. These really made all the difference when I used them to apply the oil, and they made the job so much easier on most of the guns.

Glock 43X Frame Rails with Nano Oil
Glock 43X frame rails getting a dose of Nano-Oil. Nano Oil is an obvious choice for gun care, but works well on a variety of other things as well - particularly knives and tools. 
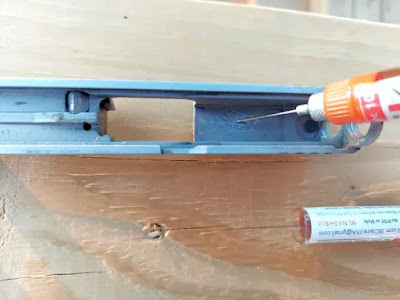
Inside of the Glock 43X Slide
And don't forget the inside of the slide where parts create friction.

Those hard-to-reach places that used to be a pain to get oil into now are easy to reach, so I expect this will improve the reliability and longevity of my firearms.

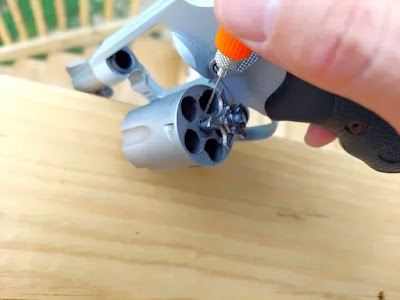
Cylinder of the S&W 642
The cylinder of the S&W 642 getting some lube.

Ruger MK IV bolt being coated with Nano Oil
The Ruger MK IV bolt being coated with 10-weight Nano-Oil. Getting oil inside the receiver is now easy as well.

A special mention here goes out to the Nano-Grease. Applying it to my M-1A Scout Squad rifle is so much easier than trying to get grease into the area where the bolt goes than using a Q-tip. The metal syringe tip placed the grease precisely where I needed it, not only for the channel where the bolt goes inside the chamber and on the receiver, but also onto the operating rod. Kudos to Nano-Oil!

M-1A Scout Squad Rifle
The M-1A Scout Squad Rifle from Springfield Armory is basking in the glory of being freshly lubricated by Nano-Oil.

The Ruger 10/22 will function smoothly with Nano-Oil applied. This is the compact model.

As well, applying it to knives also becomes a breeze, getting the oil in those hard-to-reach places without saturating the entire action of the knife in oil. The user has good control over how much oil comes out of the needles.

All in all, Nano-Oil has a successful product that really delivers (no pun intended). The price is not too high for what the user gets, and the supply should last quite a few cleaning and lubes for one's firearms. This is a great product that I wholeheartedly endorse.

About the Author:

Jim Davis served in the PA Dept. of Corrections for 16 ½ years as a corrections officer in the State Correctional Institute at Graterford and later at SCI Phoenix. He served on the Corrections Emergency Response Team (CERT), several of those years as a sniper, and also the Fire Emergency Response Team (FERT). For 25 years, he was a professional instructor, teaching topics including Defensive Tactics, Riot Control and Tactical Operations, Immediate Responder, and cognitive programs as an adjunct instructor at the DOC Training Academy. He was then promoted to the title of corrections counselor, where he ran a caseload and facilitated cognitive therapy classes to inmates. His total service time was close to 29 years. He was involved in many violent encounters on duty, including incidents of fatalities.

Jim Davis


Related Posts Plugin for WordPress, Blogger...