Wednesday, September 25, 2013

Review: Spyderco Byrd - Harp tool

A very touching gift was given to me recently, for an anniversary, and because my tastes are well known, it was something i wanted to blog about!

This is the Spyderco-Byrd "Harp Tool" so named because of its resemblance to the musical instrument in its layout.

The tool consists of a C shaped bar of steel, filled with eight separate tools, held in place by a pin under tension from the ring itself. The tools in the array are  held in place by having a ridge and slot on alternate faces, such that the tension "snaps" them in place.


Available tools are: a flat-head and Phillips-head screwdriver, a  punch/awl, a gimlet (I had to look that one up, but it is a small hand drill) , a wood-saw, corkscrew (always a favorite and plain essential if operating in the European AO), a light-use file and a small/"large"-head hammer that doubles as a bottle cap opener.

Lacking a knife, this is definitely a secondary tool-kit addition, but you can never have too many tools stashed away. The tools are all functional enough to get little jobs done, but are obviously not up to a lot of hard labour, especially given the ridge-and-slot locking design. I'm not sure what I would use the hammer for that I wouldn't just use a rock for, but For Want of  a Nail...


With an overall length of 16.5 cm (6.5") and a closed length of 9.5cm (3.75") and weighing only 117g (4..6oz.) this is a light weight addition to a pack, picnic basket or glove box. That's where I will be stashing this little guy, perfect for a three hour tour.


Tuesday, September 24, 2013

Guest Submission: hardware conversions


One of my old friends and readers shot me a message a while back saying "I went to Bunnings (read: Home Depot, USAnians) and got a bunch of things to try out for the Apocalypse ..." and I thought it was high time that I gave them a bit of a write up. This is a decided departure from regular store-bought "tactical" gear, and look towards what "found items" might be converted into impromptu hand to hand weapons.

Such as this driveable post-socket spear which is lashed to a whittled post, and lashed on with leather strapping. With some rudimentary sharpening this makes a big two handed spear / axe / mace. These can be found holding up many street signs, fence posts and the like, and once pried from the ground make quite a formidable hand to hand weapon, or even giant ballista bolt head.

The second piece was a fence-post-topper, the kind of thing you see decorating fancy fences which my friend decided would make an excellent mace-head.

I've got to admit, whenever I pass a wrought iron fence, especially old, cracked or loose, I wonder how easy it would be to wrench a length free, and use as an ad-hoc melee weapon. This example is mounted to a long bolt, but could also be mounted directly to a post. I'm thinking the threading might lead to a weak point, especially under the heavy impacts a mace might expect, but hey, this is impromptu at its best. Use what you have, when you have nothing else, and Adapt, Improvise, Overcome. Thanks Karl!

Friday, September 20, 2013

Review: UVPaqlite


I had a comment left for me by a reader on my Facebook page (g'day LCpl Thralls!) following on from my Lazerbrites post I dropped by UVPaqLite to check out their glowsticks.

I'm a sucker for lights, as my regular viewers would know, and have an enormous affection for glow-in-the-dark products, having decorated many childhood bedrooms with constellations and have expanded that into my adult life with the SAR GlobalTool Moon-Glows. I was impressed by the range of rugged, practical items that UVPaqLite had on offer, and snapped up their mixed collection Scout Pack.
 I put my Moon-Glow down beside the collection for a comparison as well as a wrapped cyalume stick, for scale. I super-charged all of these with my Jil-Lite Jenyx UV torch

The scout pack consists of four different elements; the UVGlowStik, the 6" ToobLite, a UVO ring necklace and the flexible signature UVPaqLite sheet

The UVGlowStik, ToobLite and UVO are solid pieces, consisting of solidified clear epoxy, in which crystals of
glow-in-the-dark strontium aluminate are suspended. Being solid-state, these pieces can be cut or drilled and can also be taken to ANY depth. 


Unlike traditional GITD products, the large crystals are clearly visible but apparently this large granularity increases the brightness, duration and speed of charging, they certainly appeared to do so.

The 4"x1/2" UVGlowStik is not quite as bright overall as the 6" ToobLite, but is "ruggedised", lacking
the tube, plastic cap, and key chain ring of its larger cousin, but features a drilled lanyard hole.
Picture
Swiped from UVPaqLite webpage.

The UVO is 1.75" in diameter, and comes in both the traditional greenish GITD hue, but also in their "Ice Blue", but subtly adjusting the chemical composition of the crystals. Spinning the UCO on its lanyard produces a signalling method of contrasting of light and movement which would make it easier for rescue crews to see from the air.


The UVPaqLite flatpack is a vacuum sealed roll-able, stuff-able, pouch measuring 20cm x 15cm (8"x6") and weighing only 36g (1.3oz) and can be dangled or laid flat to provide a tents forth of illumination all night long.  Better yet they have an essentially infinite shelf life, unlimited recharge cycles. Perfect for a disaster, where resupply, or even infrastructure is doubtful.

I found that the whole set could be exposed to electric room lights for "getting ready for bed" durations, and still be visibly glowing in the pre-dawn gloom, when Tactical Baby comes calling. Daylight exposure for just a few minutes makes them light up visibly even in lit environments, thanks broken ozone layer! UVPaqLite suggest that they would still be visible as markers even after 4 days of cave-darkness. These are super cool, and I think I will be adding more to my collection as soon as budget allows, great gift ideas are forming ...

Thursday, September 19, 2013

300 posts! Tonight we dine in THE BUNKER!

Hi all, I just noticed that yesterday was my 300th post, and I wanted to drop a quite post in here whilst I am compiling to say thank you to all my readers, commentors, vendors who send me cool things, friends and family who let me test things on and with them, train with me and generally support me in my quest to be Apocalypse Equipped!

In the almost three years of doing this blog I have had the good fortune to make a bunch of great connections, friends and learn a whole lot.

If anyone out there wants to join me in my adventures, guestwriter-spot, try some of my gear and ideas out, drop me a line and we'll make something happen!

Wednesday, September 18, 2013

Events: Tough Mudder #3 September 14th


Last weekend I participated in my third Tough Mudder challenge. Previously I reported on what I wore on my first and then subsequently, for the Stampede and then earlier this year, my second Tough Mudder. I see the Tough Mudder challenges as more than just an Endurance Sport event, but as a training and testing opportunity for me. Training myself to overcome obstacles, and go the distance, but also in anticipating the hardships my team-mates will face, and either preventing or mitigating them.


The Tough Mudder Pledge is a good starting point for this:
  • As A Tough Mudder, I Pledge That ....
  • I Understand That Tough Mudder Is Not A Race But A Challenge.
  • I Put Teamwork And Camaraderie Before My Course Time.
  • I Do Not Whine, Kids Whine.
  • I Help My Fellow Mudders Complete the Course.
  • I Overcome All Fears.

My team mates did not feel up to running the length of the course, which is fine, I hate running, but I can, and I have been training to do so. However, the discipline of NOT running, of not leaving a team-mate behind for personal glory, was what it was all about.

Here's the course for this time: MelbourneSpring2013-CourseMap
There were all the old favourites, as well as some new ones.
 One set of Berlin Walls was replaced for forwards sloped walls, giving no purchase to climb over. There was a "Warrior Carry" where team mates had to carry each other for a distance. A couple of different "over and under" climbs and my favourite, the Cage Crawl, where you had to navigate a long caged-in, water filled trench.

I took my iPhone along, in its SLXtreme waterproof case which unfortunately suffered a non-spectacular failure, with one of the hinge-caps breaking off, causing it to leak. This took my phone offline for a couple of days (rice in a take-away-tub, by a heater recovered it) but I managed to track half of our progress with it here: 11.84 km run with @RunKeeper.

That was a bit sad, but that's the way these things go. I also trialed a couple of other pieces of kit: I fitted my Contour GPS to my shoulder via the Picatinny adapter and fixed it to an ITS Picatinny-MOLLE adapter which in turn I mounted to my trusty First Spear OAGR vest.

Knowing there would be dark tunnels, I fitted my Princeton Tech Switch MPLS light to my MOLLE on my chest, along with my ill-fated SLXtreme case, and a  glow stick from UVPaqLite. I also tried out my newly-acquired rejected prototype Platatac hydration carrier that I scored from eBay, filled with Gatorade. I'll cover that separately, but it served its purpose adequately. TAD Amphibian shorts and my x-strapped (this held them on, but rubbed me raw) Blackhawk kneepads rounded off my regular load.

I kitted out with my Z-E-R-T patch and call-sign tab, as well as another off-market Platatac prototype admin pouch, which I kept a laminated copy of the course map, and a spare cyalume stick in case my team-mates needed some encouragement in dark places, when all other lights go out.

Lastly I wore my GoST Paleo Barefoot PRONATIV's along with their Lining Socks, which, after a 2km walk from parking to the event, 18km of course, and another 2km back to the car, were amazing.

This time I decided to collect loot, and picked up two discarded hydration packs, one I gave to a team-mate, the other I slung, as well as several "technical shirts" and a bunch of gloves. We'll see if any are salvageable.

I had a really good event, it was lots of fun, cold, wet, dirty fun. I feel that again I have proven to myself that I can not only achieve this kind of goal myself, but can also aid others in doing so too. Orange Headband ahoy!

Tuesday, September 17, 2013

Wish Lust: GUTS HM1 helmet mount

I stumbled across a very cool Kickstarter project, which marries three of my most favourite things: Helmets, lights and preparedness!

This one comes from a Firefighting crew, rather than my more usual geeky or tacticool sources, and I have to hand it to them, when it comes to getting it done, on very little, our First Responders are often at the pointy end of state and federal budgets. I'm very happy to promote this really cool idea, and hopefully get a very cool looking tool into their hands (and mine). Or rather, our of their heads, and hands, and ONTO their heads!

This is the GUTS HM1 fully adjustable helmet mount for lights and tools, by Kris Nagy, Ed Machen & 3LS

 It is a bolt on bracket, that non-invasively mounts to the side or front, above or below the rim, of standard fire helmets as well as hard-hats, but probably also to bump helmets without rails, or even sporting helmets....


The GUTS HM1 is designed to accommodate AA, AAA or CR-123, sized flashlights, small tools or video cameras. Essentially any item that that range in size from ¼ to 1 ½ inches in diameter. and allows the easy fitting and removal without tools, in the field.The body of the bracket is made from aircraft grade aluminum, with two stainless steel ¼ inch set screws to secure the platform to the helmets front or side brim. The strapping is the really exciting part.

The QuickStrap™ is made from ARA- Shield and fire retardant Hook & Loop both are NFPA rated materials. These are the same NFPA fire retardant materials used in firefighting bunker gear. The rubbery property of ARA-shield® grips and keeps your equipment secure even when it gets wet. The strap anchor point is reversible. This feature allows the user decide the best way for them how to tighten the strap, by pulling up, or downwards, whichever suits the user.

3LS are offering the GUTS HM1 in either "clear" silver or anodized in red or black.  The entire system weighs 70g (2.5oz) so would be no burden to most helmets, especially if you're already used to fitting lights or cameras to your head.

I really hope these guys make their funding goal, and perhaps some of YOU out there can help ...


Friday, September 13, 2013

Review: Tough Hooks

I've been remiss, and failed to give you all a review of some really great kit I've just taken for granted! (That's praise and an apology in one).

I backed the Tough Hook Kickstarter by Tarik Lazri after browsing across it looking for new cool things. Tarik has used his experiences "in the field" to find and fill a gap in the market, for people who wear a lot of gear.

This is a coathanger ... no, really, a coathanger, but one that can take over 65kg of load (150lbs) of hung gear without even sweating. Who in their right mind has that much gear?
 Well, actually a lot of people in a lot of roles might.

I have three of the Tough Hooks, and have swapped them into carry several sets of my own exciting collection, that have till now had makeshift hangers of lumps of wood, and pipe.

First up is my o-yoroi, the Japanese armour I made from 7mm belt leather, on a 16th century pattern. Its a full body set, (kabuto-helmet is off-screen) and without a great deal of floor space at my place, (so much gear) I've needed to hang it. This has been problematic! Until now! The broad shoulders of the Tough Hook both accommodated the shoulder straps, but the flying hooks at the edges of the Tough Hook captured the various extra parts, like the waist band, the thigh plates, wrist and shin guards. These were forever slipping and falling off, every time i picked it up to move it (or don it).

You can see that even under a load, the hanger just hangs! No buckling, swaying or listing. It is a rock solid hanger, even under this bulk (if not weight).

You can also see here that there are various accessories sling over the main hanger hook, and again, this has been a problem in past, but the wide and long neck simply carries it, without struggle or tangle.
The awesome folks at ITS Tactical did a great demonstration of just how much of a load you can put these through, which they posted here: I recommend you check it out for a better idea of how tough these things really are.

How does it manage to take all this load and battle on? Good design and materials.


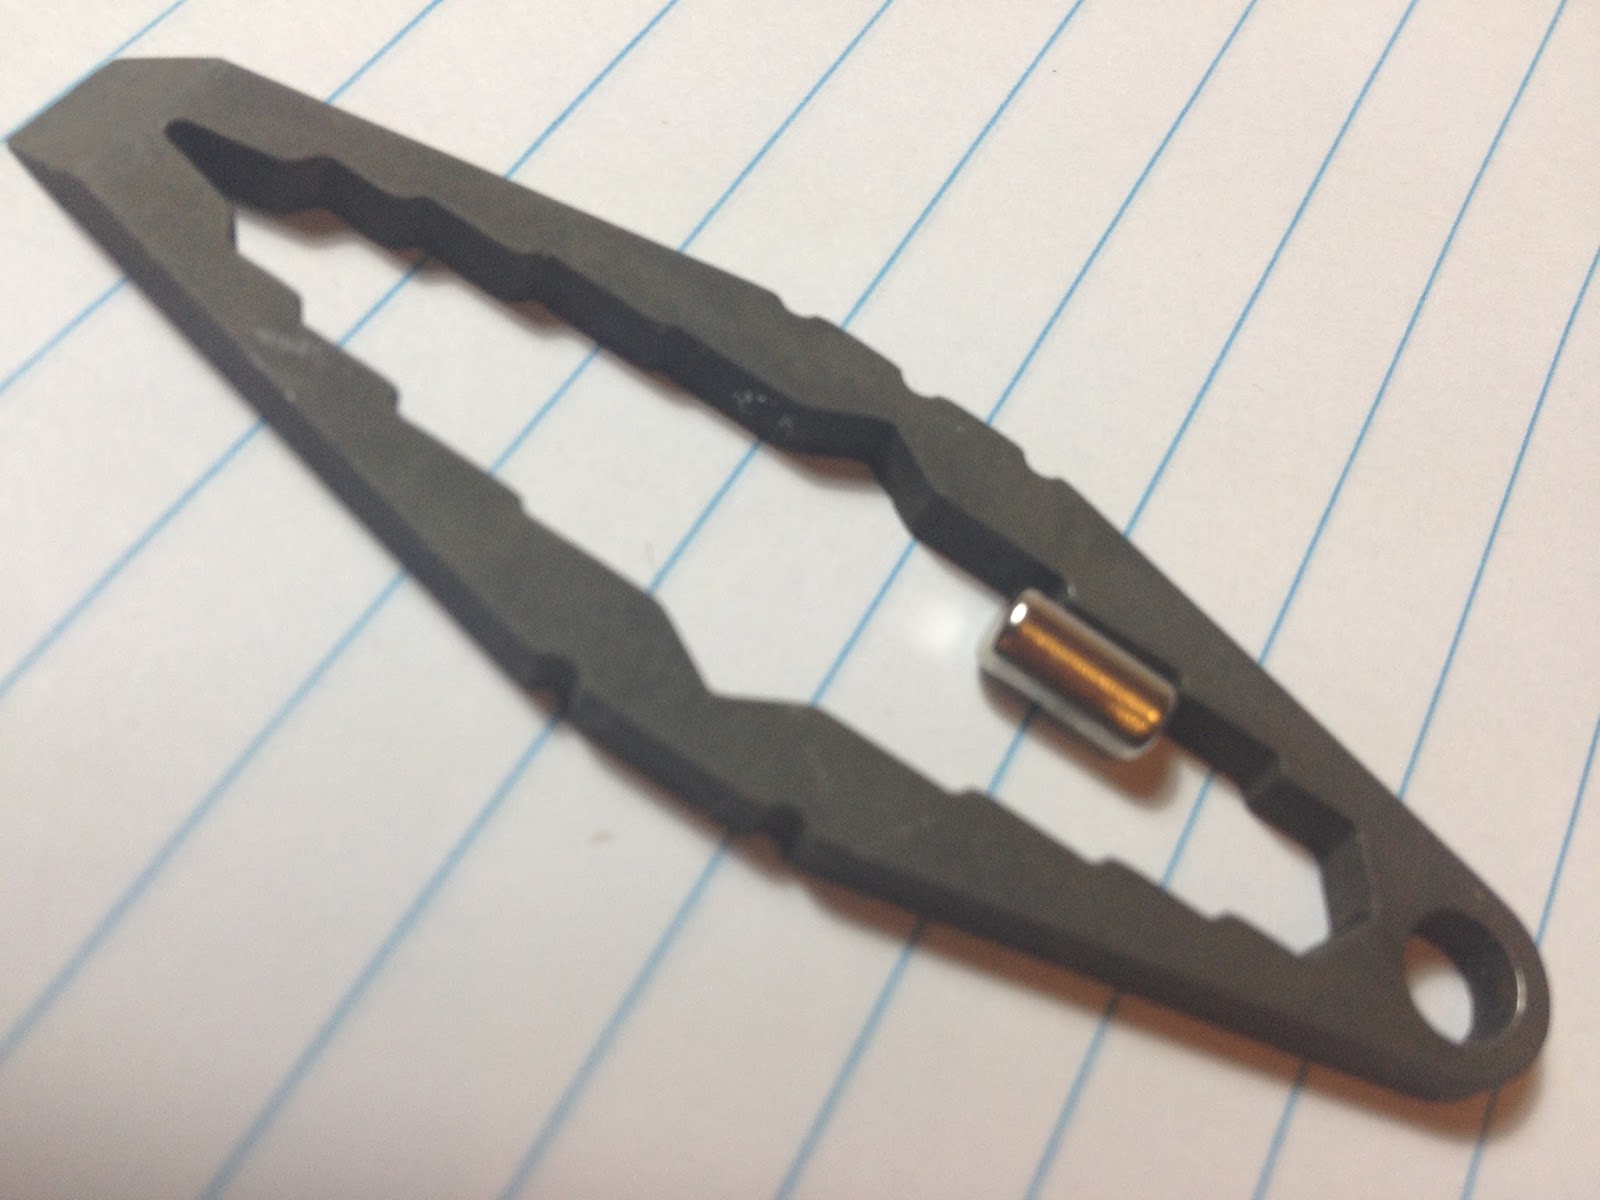
Starting from a pretty basic 2D design (ignoring the awesome winged hooks at the edges for a moment) Tarik took a leaf from structural engineering books, included an I-beam philosophy. This massively increases the bending and shearing stresses, with the flanges adding a real buffer to what ever is being stowed on it, as an added side note.

This translates to less compression for those padded shoulders and spreads out the weight over stitches or seams that might be under it.

My second Tough Hook  bears up smashingly under my small collection of ring-mail for when I need to let off some steam but also carries my spurs, and other boot-type accessories. Again, this is a pretty heavy standing load, and again, makes for a great display.

You can see more clearly how the wings snag and retain gear, and are mirrored, such that no matter how the hook is oriented (hook up or handle up) your gear is held fast.

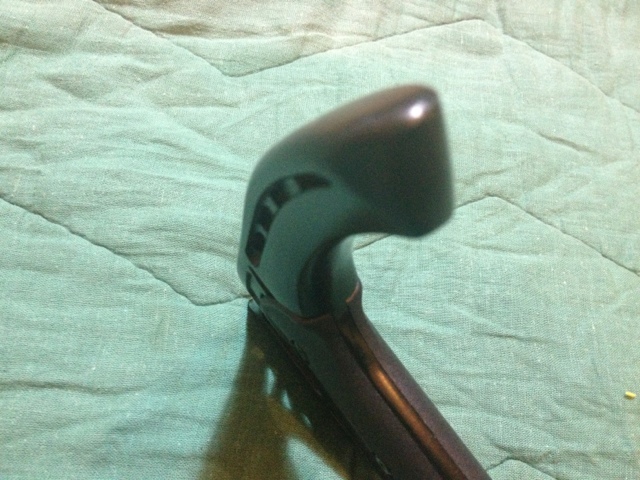
Handle side? oh yes!


As well as a traditional coat-hanger hook, the Tough Hook features
a built in handle grip for easily transporting your gear! This features ergonomic finger grips as well as plenty of clearance for even the meatiest of gloved hands.

Made of a GP22 high impact ABS plastic, the Tough Hook site suggests that whilst designed for a 55kg (120lbs) load, they have had (informal) tests of up to 90 kg (200lbs), that is a whole lot of gear.

So, Samurai and silly Medieval-esque armour aside .... Who else might use it?

There are loads of people who as part of work or play have heavy, bulky kit.

I've done S.CU.B.A. diving, and can tell you, BDC, regulators, wetsuit, goggles, and fins are big heavy and bulky.

Firefighters, with their heavy jackets, pants, gloves and other kit, including breathing gear, especially when wet.

Then there is the tactical gear for LEO or Military users (or like me, enthusiasts): plate carriers, load bearing vests, battle belts, drop legs, slings, all that kit. All fits perfectly on the Tough Hook, as you can see here on my black one.


The last thing I felt I needed to say, is that the hook and handle can be swapped from one to the other, rotating around to go from "hanging" to "carrying" without dropping your items, because of those winks on the edges of the Tough Hook.

If you have heavy loads to hang up, be they work or play related, I really suggest you look these up, they are fully worth the investment, all but indestructible and ready for anything!

Thursday, September 12, 2013

Review: Jil Lite - Jenyx UV torch

My friend Tay from Hornest tipped me off that he was getting a new light from Jil Lite coming into his shop, and being the luxophile that I am I jumped at the opportunity to pick one up. The reason I was so keen on this particular one, was that it was a UV emitter.

I have a UV laser pointer (from LazerShirts.com) which is pretty damn cool, but there are times when having a wide spread of UV light can be very useful for identifying a variety of materials as well as spotting scorpions, hidden UV ink messages and giving a low-impact tracking tool if you have the right markers... More on that later.


The Jenyx UV light from Jil Lite features a 2-chip controlled LED emitter producing 80 Lumens at 400nm. The light is powered by a single AA battery, and has a reported burn-time of 3 hours, with a constant brightness control circuit built in to ensure a steady beam.


The light distribution is quite good, with a room filling "orange-peel" aluminium reflector, behind the B270 optical glass AR coated on both sides lens. The entire unit is housed ay 6061 aircraft aluminium, giving a very sturdy little package. Activation is by tail-cap clicky button, which is inset below the butt-end of the housing, with a lanyard hole built in. Water resistance is achieved with o-rings, but the model is not dive-rated.I like the removable steel pocket clip as well, always good to have that as option.

 I was able to take some pictures with my iPhone  and was very happy with the intensity and reach of the light, illuminating my rather staggering NERF collection, as well as the "Toxic Green" handles of my KA-BAR Zombie Killer knives . UV lights are also very powerful chargers of glow-in-the-dark items such as Ranger Eyes and my SAR Moon Glow disk. It also picked out the green paracord that shipped with my Fishbones and Piranhas  as well as the orange paracord I use as well.


UV ink such as found in highlighters, or in anti-counterfeiting can act as a tracking or messaging system. UV reactive paracord or even NERF darts can act as inexpensive "breadcrumbs" to mark a trail, an alternative to IR or other "your-eyes-only" methods.

This is a cool little torch, and I'm enjoying having it on hand to charge my glowies, and to spot new UV reactive materials I come across in my adventures.


Tuesday, September 10, 2013

Update: WTF mini wrench and pry bar

A little while ago I reported on my pre-release WTF Ti mini-pry bar that I managed to sweet talk Brad of TacticalKeyChains into sending me, as it was a second. Just recently my full order from the Kickstarter campaign arrived, and thought I should show off the pre-production version against the production models.

 I ordered both titanium and the chromium/molybdenum  chromoly 4130 steel "stealth" version which has been Parkerized for shine and corrosion resistance. The main physical difference between the Ti and chromoly is the machining, in that the face of the pry-edge of the Ti versions is textured from the machining, where as the chromoly  version is smooth finished, due to the requirements for working the different metals. I like them both, and have had no discernible difference in performance when prying, they both bite nicely.

I had the production WTF anodized to a rose-gold colour, as it was going to be a gift for Omega (which she put straight onto her key chain, along with her NuKo Tool TiGBi Skully ). The only real difference between the the production version of the Ti WTF, and my "seconds" version is the lanyard hole is not quite centered in the second. In theory this might weaken that end, but I can't imagine putting enough force on the lanyard hole to make that an issue.

The Ti WTF's (made of Ti-6Al-4V) weigh 7.8g and the Stealth WTF (made of AISI 4130) weighs more at 11.5 grams, which is a small price to pay considering the benefits.

Brad has kindly provided some metallurgical stats on the materials he uses for the WTF's. The Ti-6Al-4V - has an Ultimate Tensile Strength of 138,000 psi and an elasticity modulus of 16,500 ksi, which means it is very very resilient, and springy. It will flex under stress.
TheChromoly 4130 has a Ultimate Tensile Strength - 97,200 psi but has an elasticity modulus of 29,700 ksi meaning it is not quite as resilient but VERY stiff.
Compare that against the aluminium 6061-T6 used for the basic WTF's which has an Ultimate Tensile Strength of only 45,000 psi and an elasticity modulus of 10,000 ksi  which is to say, relatively soft.

The cromoly WTF has the advantage of being ferromagnetic, and the wrench bits will not "give" when working stubborn nuts.  I really like my WTF's, i wear the golden "second" around my neck as a part of my EDC, and the chromoly version has found a place in my ZuluNylonGear CAOS admin pouch. These are brilliant little tools, and I'm glad I made the investment. 


Monday, September 9, 2013

Review: United Cutlery - M48 Walking Axe

Here's something I've been sitting on for a little while, and wanted to bring into the light, now that we are on the cusp of spring.

Much like Gimli The Dwarf I do enjoy the heft of a good axe in the hand. I've been chopping wood since I was 8 or 9 I think, off and on (our current house doesn't even have a fireplace), but I do have a brazier and the Pot Belly Stove project. I've previously reported on my other axes, including my outstanding FISKARS log splitter and my little United Cutlery M48 Ranger Hawk. In addition, I have at least one other traditional wood-hafted chopping axe, and two hatchets. Lots of axe-action. So when I saw that Global Gear was stocking the big sister of the Ranger Hawk, the "Tactical Axe" I thought I just had to get my hands on it.

The toxic green "zombie apocalypse" version of the axe is called a walking axe, referring to it being walking stick height. You can see here that this is pretty much the case, and for people shorter than me this would probably even be a comfortable option. It's just not quite long enough for me in this role. More on that later. (Check out my new 5.11 Tactical Kilt, too)


Here I've lain the two M48 axes side by side so you can get an idea of the differences between the heads.

They both share the "bearded axe" design that I am very find of, and you can see that the Walking Axe has a more pronounced curve to the head, as well as being longer edged.at around 12cm (5") of blade, and being 20cm (8") long. Wielding it brings out my Viking heritage more than I care to say ...

The other features of the head differ between the tomahawk and the walking axe, which was interesting. It wasn't simply a matter of putting the same head on a different shaft. Instead of three circular holes running backwards from the head, three triangular holed run down the length of it. These sit well past the secondary grind, and add to the liveliness of the blade considerably.

This is probably a good thing, because instead of the sharpened pick at the back of the axe, the Walking Axe features a curved hammer/handle end. With these considerable differences this really is a stand-alone piece. You can also see the differences in the shaft, which I'll cover in a moment.

The 91cm ( 36") super strong, black handle is made of a 30% fiberglass composite and is both light and quite rigid, whilst still having some flex to absorb the shock of impact.

There are two sets of ringed groves set into the haft, one down at the butt, the other about midway, which is a slightly larger set having two sets of 8 groves, the lower set just a single set of eight. As well as these there is the "knuckle" bump at about three quarters of the way up the haft, a features shared by the Ranger Hawk, as well as a set of finger grip lumps behind the beard that the Ranger Hawk does not have.

The cast 7Cr17 stainless steel blade is quite sharp and has considerable bite, good for chopping as well as whittling, if you can manage the long haft. As with the Ranger Hawk, the axe head is attached to the haft with three separate metal hex bolts.

The fittings are exactly the same between the two, and I suspect I could swap them out without any trouble at all.

You can see here the hammer/handle end is actually quite curved, and lacks a flattened striking face, more like a ball-peen hammer.

The fact that the hammer/handle end has a downwards curve lends itself to the idea of using it as a "break and rake" tool for clearing window frames, in the event you need emergency entrance (or exit). It, like the head of the blade, is quite thick, surprisingly so given the over all weight of the axe, which is only 1.4kg (3lbs) or so.

It also gives a nice, ergonomic place to rest your palm whilst hiking with the axe, in its walking-stick aspect.

The slight skeletonisation of the head drops the weight again, and adds a double line of gripping points to add to your ability to retain the tool when holding it.


The axe comes with a synthetic rubber "guard" which in theory pegs itself closed through the top of the cut-aways in the head. In my one, this didn't quite work, and I had to run a twist tie through the loop in order to snag it shut. With drain holes a-plenty, and covering the bitey tops and bottoms the of the beard, this does a good job in protecting the user, the environment and random passer-s by from feeling the bite of the axe.

This is a fun piece, and very lively in the hands. The play from gripping it, swinging it, and the slide of hands along its haft makes it a very quick and light tool, a far cry in feel from my FISKARS log splitter, and felt much more like a sword than a hammer, so to speak.

The lightness of the head will play a part in its usefulness when it comes to chopping and splitting, but for brush clearing, and the lopping of limbs, I suspect it will do just fine.

The fiberglass reinforced handle, as I say, is a tad too short for me to use as a walking stick, personally, but I have a big household, and I'm sure someone will find it useful in our upcoming camping and adventuring summer!

Til Valhall!


Thursday, September 5, 2013

Review: Mudlarks - All-In-One

I took the family up to the snow recently (yes, there is snow in Australia, not very much, and not very long, but it we do get it) at Mount Baw Baw, and in my planning to do so, I wanted to ensure they would be adequately protected from the environment. I posted about what I wore, here)

Triceratops Girl (in pink) has previously been a model for the Muddlarks "Bib'n'Braces"  so I was prepared to make an investment in a set of their all-in-one coveralls for her and Tactical baby. Cold, wet and miserable children are NEVER a good thing, especially in hazardous and adverse conditions.

The whole Muddlarks range is constructed from waterproofed  breathable polyurethane coated, 150gsm nylon rated to 6000mm+. (See this guide to understand what this rating means)  . The fabric has also been Teflon® proofed on the outer facing of the material which helps resist staining and acts as a Durable Water Repellent (DWR). Water, snow and slush just beads and rolls off.


One of the important aspects of staying warm and dry in the snow is not to become wet in the first place, so this is a great material, especially as it retains its breathability. This ensures that the wearer doesn't steam too much on the -inside- which could lead to dampness and chilling.  The all-in-one Muddlarks provide a single piece coverall that ensures no "puddles and snow down the back" moments, with its ankles to crown coverage.
 Moving from outside to in , just unzipping improved their comfort considerably, especially with the polar-fleece lined larger version. This was child-sized hardshell wear at its best, i think.

The attached hood has an elasticised bill, to keep it snugly fitted in high winds, with a press-stud closure at the neck to keep the wide plastic zipper from sliding open. In the "Size 2" option, there are some press-studs at the nape of the neck to adjust the fit for smaller heads.

The hood, and shoulder/back have reflective piping, to assist in locating and safety in low-light situations. 

The back of the suits also feature elastic gathers, to ensure a better fit, with all the seams being taped for additional waterproofing. This was so effective that when Triceratops Girl fell backwards into a calf deep puddle (for her) that she was still bone dry inside even after sitting in it till i could haul her out.

With elasticised ankle and wrist cuffs, the biggest concern I had was that the girls would get snow and slush into their gumboots, but the Muddlarks design had catered for that as well. The fleece lining in the larger size ensured a warm Triceratops Girl, whilst we bundled Tactical Baby with a insulating mid-layer, and she fared just as well.

 Tapered and fitted cuffs, along with the elastic produced a snug fit, without constricting. but it is the button-closed adjustable elastic loop that really makes these a winner. Able to stretch around the ankle of a gumboot then affix, gater-style under them. This combination really ensures a good seal against incidental soaking, especially for little people. Again, cold, wet, miserable little people are not just a burden in an outdoors adventure,but in a survival situation, it becomes an even more serious risk.

I was really pleased with how these performed in the snow, but I've also seen how well the other items in the range (the bib'n'braces, specifically) perform in the mud, sand and forest floor. I really liked these for my kids.


Tuesday, September 3, 2013

Review: Propper - Adventure Tech, Level V APCU softshell pants

I took the family up to the snow recently (yes, it DOES snow here in Australia, just not very much, or in very many places) and I got to try out a few pieces of kit that I have been waiting for an opportunity to pull out in public.

My last trip to the snow, some three years ago was a very unfortunate event; sleet and hail fairly ruined out outing, and I had passed on most of my snow gear to the others in my party, and as a result ended up cold, wet and miserable. Not to mention a touch hypothermic. Having lived in the snow several times (Denver, USA / Surrey, UK / Calgary, Canada) I was kicking myself for my lapse of judgement, but as I say, the others in my party were ok, and looked after me.

However, THIS time, there would be no repeats! I payed attention to my ever growing collection, and selected not only a range of layers, but also spares, in the event that I needed them. 

The key piece that I tried out, however, were my new pants from Propper. I picked these up from an eBay sale, and as it turns out they appear to be a discontinued range from Propper. However, the Propper Adventure Tech, Level V APCU softshell pants were a welcome addition to my wardrobe, and certainly proved their worth on my trip to Mount Baw Baw for the weekend

I wore a Tough Mudder/ Under Armor shirt and my Platatac Half-zip fleece top  on top, with my HeadSox on my noggin.

I have very long legs, which usually means that I go for a size larger waist to ensure the right length, for pants which don't have a W/L sizing, but in this case that played in my advantage, as I chose to wear these as over-pants, over the top of a base layer of my Platatac sniper pants fleece layer in the first instance, with my Urban Dax as a mid layer, in the event of unpleasant weather.

I found that the mid layer was unnecessary for the beautiful crisp and dry conditions we faced on the mountain, so I felt I could really throw myself about in the snow. 


The material of the pants is a very light, 4-way stretch fabric which is extremely comfortable, both on the skin, but also from a breathability and wicking perspective. This is due in no small part to the Schoeller Nanosphere Treatment that Propper applied to the fabric. This treatment apparently mimics the natural self-cleaning effect of some plants whose leaves always remain clean, because particles cannot adhere to the finely structured surface, and is easily washed off when rinsed, without allowing water to penetrate. It combines with the weave of the fabric to offer a high level of protection from wind, rain as well. It certainly shed snow and slush well, as well as the mustard and BBQ sauce I exposed it to at the chalet. It also seems to resist washing out, so should retain its abilities when I do need to give them a wash.

Also, they were in Multicam! I haven't had many opportunities to wear Multicam. I tend not to wear camouflage "for fashion", (although I got a MC Tactical Kilt from 5.11 .... review to follow! ) so having an outdoorsy activity to test it out in was great too.

The pants have a wide padded waistband, as well as pretty standard belt loops. I actually felt that the softness and lightness of the fabric would have warranted thicker belt loops, just to make them a bit more substantial. but really, I didn't have any problems with them.

The main front pockets were almost horizontally cut into the front of the pants. This was an unusual feature, and it did mean that when using these pockets, I needed to dive my hand straight down in front of me, but certainly did ensure that my pocket goodies remained safely stowed.
 
The pockets are lined with mesh, rather than the same material as the rest of the pants, or some other full-weave liner, which was an interesting addition, but certainly didn't hinder me in any way. The overlap between the front and back lips of the pocket were constructed such that they overlapped nicely, and I didn't experience any wind-bite or water logging as a result of the pocket placement.

The just-above-the-knee cargo pockets were small for this kind of pant, but certainly functional. (they fail the "will it take my iPad test", but I certainly didn't want to be lugging that through the snow), but they were billowed at the back, for extra capacity, and the left set included a zippered side pocket as well. 
 

Whilst tromping about in these on the mountain, I found that I could easily stow my phone in its SLXtreme case as well as my Contour cam, in ITS waterproof case, as well as two to three sets of gloves and or mittens, without a spill or lost technology all day. I did find that the knee-pads I wore sat very close to the cargo pockets, and this impinged on their ability to be filled fully. This was a little annoying, but the knee-pads were -very- large.

The cargo pocket have hook-and-loops closures, and the top of the lid-flap had an opening for pen, light or knife clips, or could also trail a cable.


One thing that I found with these pants is that they stopped the wind dead. Whether I was standing on the top of a ridge, or zipping down a slope on a toboggan with the little ones, they simply cut the wind right out. They did so without the "zitch-zitch-zitch" that Gore-tex "hard-shell" pants might. 
 

This leads me to post this little guide to assist anyone else who occasionally gets mystified by ll the "hard-shell/soft-shell" jargon ... 

I've tried to find an explanation or scale to describe the "Level V" portion of the Propper scale (which goes to at least VII) but this might go some way to describe what different levels and ratings of waterproofedness and breathability mean.

One thing I found interesting about these pants are that not only do they totally lack any pockets at the back, but are also fitted with a wide elastic section, the full width of the waistband, for the entirety of the back of the pants.This meant that they did sit fairly snugly, even with the "slightly too large" size I got, and stayed snug when i was crouched, squatting on a toboggan, or kneeling to pick up and carry my small people. 

I really liked wearing these pants. I stayed snug, warm and dry. I tromped through snow and slush, picked up squealing kicking offspring and sat them on my legs , sat in the snow, built snow-dinosaurs and generally had a good time, all without a single sad, soggy moment.

It's a real shame these are no longer being made, but can still be picked up by searching for Propper Adventure Tech, Level V with the product code F7220, online. Good luck, stay warm and dry!
Related Posts Plugin for WordPress, Blogger...