A place for me to review the various rugged, nifty and needful kit that I've accumulated, for every-day preparedness in the event of accident, disaster or world-shifting end-times Apocalypse, be it zombies, triffids or Mayan divide-by-zero errors.
What is it all about I hear you ponder?
The tPod came stands for thermoelectric-power-on-demand. This is a tea-light candle powered unit, (there is also a bigger, propane powered version, the tPod5) but this one runs off the standard tealight candle, which we happen to have a glut of, as it seems we buy a slab of them each time we visit Ikea.
Tellurex tests indicate that a continuous output of 0.25 to 0.35 watts over a 4
hour period using a paraffin candle in an environment of 20oC (70oF)
ambient temperature. The cooler the ambient air the better the tPOD1
will perform, conversely, the higher the ambient temperature, the less output that can be expected. They also conducted trials using bees wax candles
resulting in a higher peak output. Something to look into ....
The thermoelectric effect is coupled to an output port which allows the included 25 LED light to dock, which comes at the end of a swan-necked adjustable metal cable. The base is a silicone shoe, keeping the candle in place and maintaining an easy to transport package, when it is all hot. This adds a safety element to the usual "bare-flame" worries of tealights.
The soup can sized thermoelectric converter's heat-sink fins are encased in a protective plastic case, and delightedly anodized in Ferrari red.
The whole unit is about the size of a can of soup, and only weighs 340g (12 oz).
As well as the LED lamp, the tPod comes with a USB adapter, (along with a warning from Tellurex that they wont be held accountable for changing-related damage to devices charged from the unit), but for purposes of charging a needful device in the event of being off-grid (or as they put is, "denied-grid"), the risk would probably be worth it. Similarly for camping situations, when you had to get a message out on an otherwise unchargable-device. Tellurex indicate however that the tPod will not charge a phone directly however, but will trickle charge a battery recharger and the battery recharger can then be used to charge a a smartphone.
We lost power over Friday night, when a truck clipped our overhead lines, and the power company cut our power for "safety's sake" till lunchtime the next day. This was the perfect time for me to break out my tPod, and you can see here how well it performed in our 35oC (95oF) conditions we have been facing this weekend.
Here is a comparison, with the LED lamp off and the same scene illuminated by tealight alone.
Having the source of electric light, produced by our ample stock of 4hour tealights was a real boon to us, and it would similarly be useful during other blackouts, when camping, or for any other reason find yourself off (or denied) grid. This is a very cool item, and I'm glad to have added it to my stock of alternate power and light sources.
I really am a sucker for shiny Kickstarter projects, and this was no exception. A -tactical- whistle you ask? Well, the Cybernetic Research design engineers built a whistle that meets many aerospace and MIL-spec standards, and designed it to perform in all kinds of environments, conditions and do so well.
It features a "three flute" design which provides three specific "voices" which were designed to increase audible recognition over long distances, cut through the background noises caused by weather, rushing water, air and ground traffic, as well as other noises.
According to Cybernetic Research the primary central frequency is 3150 Hz which they cite government regulations as producing the most piercing sound over the widest range of detrimental conditions. The other two voices are designed to fill what they call the "overall acoustical profile at frequencies between the primary 3150 Hz output and its various harmonics both above and below the primary".
With no moving parts, no rattle, a stepped knurled surface for positive grip under poor conditions, and a really low-breath requirement for sounding it, this is a great little whistle. They offered it in anodised aluminium, stainless steel, brass and titanium. I opted for the OD green aluminium, which weighed in at 14.6 g, and sits all but unnoticeable in my pocket, waiting for a need to be heard. The split ring allows for lanyard or pack-attachment, and I think i'll be adding mine to my keychain.
Here is a video of my testing it, with my iPhone volume app, "Sound Level" , and as you can see, (and hear) it gives a 100+dB scream, and the clip doesn't give the ear-ringing multi-phasic tone justice.
Signalling with a whistle is one of the simplest, easiest and most recognizable means of survival communication, and I can't recommend them enough. This is a whistle that will certainly make an impression should I have the need, and I think I'll be able to depend on it to always be ready, no matter what.
I was very pleased to see when I got my email newsletter from Global Gear that they were going to stock a fun new line, the Zombie Outbreak: Tactical Response Gear. I got in touch with them to see what they could tell me about the line, and they were kind enough to send me a few examples, which I'll be reviewing over the next few weeks.
Here is the first example, a Plate Carrier called the Zombie Outbreak Grunt in multicam.
I was really excited as I haven't looked at a quick-release/cutaway plate carrier before, and this one looked feature packed, which is something I always value.
This is a fun set, and I am really glad to have added it to my costuming collection, it will give me some great additional costuming for my MilSim and Stargate Lasertag LRP events.
Here are some of the things that I can tell you about the Zombie Outbreak Grunt plate carrier:
It comes with a front and back section, which includes flank flaps, in place of a cummerbund. Those flaps connect with hook-and-loop as well as having Fastex-style buckles (which are part of the Quick Release Cutaway system, and I'll get to that later). The shoulder connections are again hook-and-loop, with additional adjustable nylon webbing fastening to add to the security and load-bearing of the set.
The front and back are fully PALS/MOLLE webbing covered, but unfortunately the top four set of strips don't match up fully to the bottom four sets, either in rows, or the 1" gap between channels, making cross-linking of accessories a bit difficult, but not impossible. You can see the drag handle at the top of the back, it is nicely reinforced and bar-tacked onto the shoulders of the back panel.
Some of the stitching was a little off, too, but again, you'd have to be looking pretty close for this to matter.
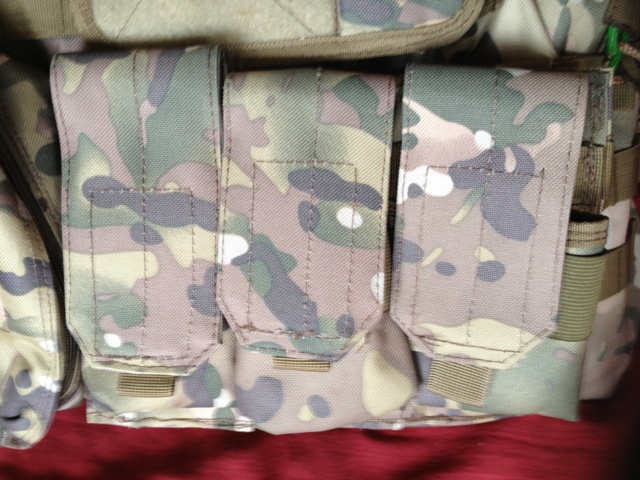
The first set of accessory pouches that come with the Grunt are a three- M16/M4 magazine style set of pouches, half-magazine sized sides, with elastic siding and a hook-and-loop closure on the lids. The backing features plastic reinforced PALS/MOLLE strips, to allow it to be connected immediately, without any accessories like the ITS Tactical MOLLE Stix.
The second accessory pouch included is an admin panel, which features two paperwork pockets, eyelets for threading dummy-cording, and a GPS/phone/flashlight pouch, with a hook-and-loop webbing strap. The admin panel also features a broad square loop field for affixing patches. As with the first pouch, the backing features plastic reinforced PALS/MOLLE strips for attachment.
The third and final included accessory is a utility / flashbang pouch, which was originally mounted on the back panel, but I prefer to have my pouches around the front for ease of access. Elastic webbing pockets, on the back and front of the pouch give plenty of storage options, drainage grommets and webbing hinge-holders add to the functionality of this zipper closing pouch.
As with the first two pouches, this accessory features plastic reinforced PALS/MOLLE strips for attachment.
The inside of this pouch is also a little informative. You can see the pale green backing of the backside, which shows what appears to be the textured, heavy vinyl construction of both the pouches, and the entire plate carrier itself, rather than the woven 500-1000 denier nylon that companies like Cordura produce, and is the mainstay of tactical gear and apparel.
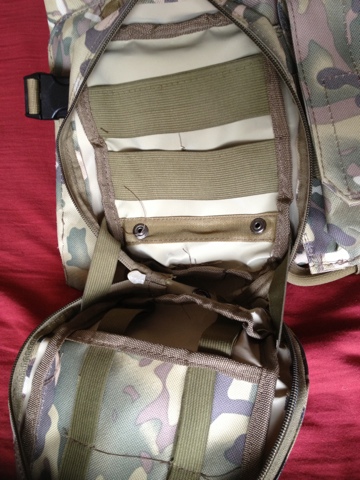
The plate carrier pouches inside the front and back panels were a nice touch. They included a sheet of closed-cell foam padding, as well as a sewn-in webbing strap to assist in removing the plate, and a hook-and-loop closing pouch style closure. You can see here that I've included my typical plate substitute polyethylene cutting board. You can also see the internal finishing, and again, the vinyl material the set is made of.
Here is the inside view of the front plate carrier pocket, obscured by the Quick-Release Cutaway cables (yes, in lurid Toxic Zombie Green, much like the scales of my KA-BAR Zombie Killer knives.) The strapping for the Cutaway system sort of closes off this access, which means to load it with plates, you'd need to activate this system first, then replace it.
Lets have a look at that Quick Release/Cutaway system now. For those of you who have worn body-armour of any description for a length of time, you will probably agree that getting it off in a hurry can be a real pain. More so when having to do it in an emergency. (boo hulu) Injury, accident and duress add to this, so having a system that does it swiftly is a real boon.
The system is that a pull on the webbing loop at the bottom of the front of the plate carrier pulls these plastic coated steel cables, releasing the cords thread through eyelets that hare holding the sides, and tops of the plate carrier together. Here you can see the wire nestled in its seating, and the cords looped around it.
Once the cable is pulled free, the buckles and webbing holding the plate carrier together can be bypassed, letting the user tear the hook-and-loop free, and clearing the way to treatment or escape.
Here is the same system at the shoulder, where the cords wrapped around the cable, and fed under webbing to keep them out of the way, when pulled free, allow the shoulder pieces to tear away.
This is a really ingenious system, and whilst it is a pain to put it all back together, I'd rather have those extra seconds of medical aid/egress or mobility in almost any situation, to have the time to spend putting it all back together when needed.
here's me giving it a test.....
So, to finish off, here are some pictures of me in it. As I've said, I was really pleased to receive these (and other items, to come) and they have certainly added new dimensions to my wardrobe and costuming options. It was great to get to see how a quick-release system works, and definitely has some nice features, but I was a little surprised by the construction, both in the materials and care put into finishing. However for a substantial fraction (along the lines of 1/3 - 1/4) of& the price of leading lines, this is a option that really looks the piece, without breaking the budget.
Don't get me wrong, this is an excellent costume piece, and would probably even suit paintball, airsoft and recreational hunters as well for those who are happy with form over function, but it isn't what I'd stake my life on. A real bargain for what it is, especially with all the included accessories, and it certainly "looks the part". I expect to see a bunch of these at IRL Shooter events coming up!
I have been wanting to make better use of the resources at my disposal for a while now, and grow more veggies at home. The problem being, we live in a very sandy location, and a lot of things that we like to eat just don't grow well. That or the possums, and snails, not to mention tiger slugs eat them before we get a crop out.
In order to avoid these pitfalls, and make better use of our bright sunshine, the water barrel I have out the back, and a lot of recyclable bottles I had had ready to go, I wanted to use the same kind of design as seen in a Kickstarter I backed in 2011 (but haven't yet seen) : Windowfarms.
The idea is pretty simple, plastic bottles, 1.25, 2 or 3L bottles, with the bottom cut off, have holes punched around the base, and then strung together in a stack.
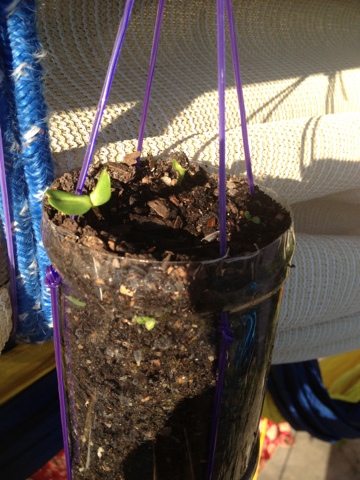
Here is the top of my stack, and you can see the potting mix is already sporting some growth, sunflowers for Triceratops Girl.
I used just simple potting mix in my bottles, beccause it's what we had on hand from seedling planting to stock up the front veggie patches. I am hoping to keep building up our collection of these and get the most from the summer sun. I think a vermiculite substrate would be awesome but until I have a cheep source, its potting mix already-on-site for this project.
The line I used for these was the 2.4mm star sectioned trimmer line from Ryobi that I had on hand from my mostly unused line-trimmer. This thick, strong and sharp-edged line seemed ideal for stringing these up, bot for stability, but also giving the creeping vines something to hold onto, as well as possible deterring unwelcome mouths.
Below the sunflowers, are a mixture of carrots and onions. Yes, I know that being root vegetables, hanging gardens will become packed with them, but my thought was to germinate and establish in the hangers, then transfer and replant as needed. All going well, I'll do this in the next batch of bottles we collect.
Again, a big root vegetable that will need to be thinned out in order to get the best crop, but we go through a lot of plastic bottles, and I have lots of surfaces to hang vertical gardens from. One great thing about Daikons are that you can eat the leaves as well as the root, and both tops and bottoms pickle really well, which I hope to do with as much of the crop as I can manage to make successfully.
I strung the bottles before filling them, from top to bottom, knotting the trimmer line as I went and adjusting the tension to ensure that the spout of the bottles pointed directly down to the bottle below. Once filled with potting mix, I poured a quantity of water into the top bottle to moisten it, and add weight to gauge the tension. Some minor adjustments to the knots leveled everything up, and I loosened the cap, just enough to allow water to pour through, without being in danger falling off and washing my soil out.
After a few days of hanging and watering, without any catastrophic failures of bottle, cord or lids, I got the family together and we planted the seeds.
You can see in this shot that the sunward side of the bottles have developed a lovely green moss carpet, and there is a clear divide between the dry inch on top and the moist lower soils, even after 40oC days of summer sun here in Melbourne. This was a big test, and I'm pleased to say that not only is there life in these hanging gardens, that the system is sound. I only water the top bottle, every other evening or so, and each bottle below gets its fill, from the dribbling through from the bottom above.
The water than comes out of the bottom bottle is brown and peaty, so i know i'm loosing some nutrients along the way, but its hardly worth worrying about at this scale. I have a number of bottles of carp-based fertilizer to bolster my crops, when it comes time to do so.
Here is the crowning (can you say this, when it's the bottom rung?) jewel of our hanging gardens, the peas.
We've tried growing sweet peas in the front gardens for the last few years, and have managed the sum total of three pods, before snails, slugs and possums have killed the plants. This time it will be different!
Our hope is that the peas will climb up the cords, and give us five sets of four cords worth of climbing pea-laden vines.
All in all, this was a really good project, the kids love looking at it, it made use of useless space, recycled materials on hand and otherwise being thrown out, and will hopefully start putting food on our plates in the next couple of months.
More planned, possibly with other crops, and I also have an old cargo strapping net to use as a watermelon vine trellis!
A running joke at our place is whenever I come home with a new piece of kit, i get asked "its not another BAG is it???" This isn't a bad thing, I get a lot of support about both my prepper leanings and my avid collecting of gear (hi all my peers at GHA). It is however a fairly regular occurrence that I will start waving a new piece around and get the grins and eye-rolls as I say "but this one is DIFFERENT..."
I've been thinking about going for beach-runs and bushwalks with pretty minimalist gear (I know, this has usually meant a 10kg daypack of "needfuls" in the past) but a recyclable shopping-bag just doesn't lend itself to an active lifestyle. This is where a bag like the Snatch Bag come in.
When unfolded, the 36cm (14") by 50cm (20") bag is really very spacious. Made from official Crye Precision LLC, MultiCam® in 500D Cordura material. It has also been given a waterproofing treatment to adds to its already a rugged and resilient construction. The internal seams are taped and triple stitched giving an extremely stable and strong bag for its weight.
The shoulder straps are really good, and multifunctional. Two 2.10m (7') strands of OscarDelta's very fancy SERE Go-Cord 960 (Hybrid Technora), also in Multicam. Even the stitched webbing shoulder straps are Multicam, for all over colour and pattern matching. Great attention to detail..
The nylon eyelets give a very strong, silent and stable feed for the straps to run through, without putting extra bulk, or unduly straining the corners of the pack, as a sewn-in strap might.
No hook-and-loop, no clinking metal. This is a lean, mean storage unit!
Internally, a rip-stop nylon divider panel gives you two separate compartments, without adding extra bulk,and you can see there are three green internal loops, (two in the edge seams, and a bigger on at the back of the lip. Loops like this give you attachment points for dummy-cord, karabiners or Grimlock clips, as well as a means to hang the pack as the need arises.
Here you can see a closeup of the heat sealed GO-Cord, along with the eyelet and the ITW Nexus twin-hole spring-locks which are a really simple, and unusual cord management system. I liked its elegance, and of course, it's metal-free.
The draw string closure of the bag is strong and dependable, having twin cords forming this really helps, and there is a feeling of dependability to it. The drawstring stitching is snug and held tight throughout some vigorous tugging and rough handling, even whilst loaded up.
Here is the load seen in the bag above, a "going for a beach-run for a few hours" pack. Perhaps too much stuff, but I'm notorious for that.
My CAOS admin pack, by Nulu Nylon Gear, Zombie Squad 1L Nalgene, a take-away container of food, my running shorts and shirt, and a Sea-To-Summit microfiber towel.
This probably doesn't represent a well-thought out "bug-out-bag" loadout, but it does represent one of the key elements of "snatch-bag philosophy". This is what I had on hand when I pulled out the bag to take photos, and needed to fill it up -right now-, in a "this, this, this, this and that" fashion. No messing around with intricate pouches and MOLLE pouches, just grab and move.
This bag does exactly what it is designed to, it is simple, stowable, deployable and comfortable to load up and get out there with. The over all construction is tremendous (although I did notice the shoulder-strap webbing edges were unfinished, perhaps this was done on purpose to add to friction, or maybe I was just lucky enough to get a rough-and-ready per-production model (I love those!).
I ran the Tough Mudder again this year, January 19th, which was a lovely sunny, breezy day here in Melbourne.
The event was held at the Phillip Island Raceway again, which lays an hour and a three quarters drive from Melbourne, and backs onto the Bass Strait. I had only recently been given the all clear from the ankle troubles of late last year, and had not had a lot of preparation, baring three or four runs, of 2 - 5km, so I wasn't sure about how I would cope, not only with my ankles, or my general lack of CV fitness as a result of my injury, the prednisone treatment (25mg daily, dropping 5mg each week to wean away).
Regardless, I had booked in, and was raring to go. I had tried to drum up interest from the folks I ran with the previous year, but no takers (although it turns out, a couple did the event as it happens).
For those who don't know what the Tough Mudder is, it is a 20+km endurance challenge, with 25+ military inspired obstacles. The events run world-wide, in all conditions, and feature some signature obstacles, namely, lots, and lots of mud,electrical wire filled corridors, and pools swimming under barriers, ice filled pools and all manner of climbing, crawling, and of course, running. I hate running.
I also swapped out boots, having put my Altama's into retirement and for this event, I wore my Bates Delta-8's which really held up well, and cleaned up tremendously.
Here's one of me having scaled a 2m "Berlin Wall" and torn my number off in the process. Lesson learned, bring my own safety pins or lashing system. Their little pins were ineffective!
This is me and my running-mate, #7819 :) doing the SHINBASHI salute after coming over the Bale Bonds.
She and I knew each other socially, and upon hearing my interest in a running-mate, signed up, regardless of trepidation and obstacle-shyness. Far better a runner than I, we kept a good pace, she kept me going on the straights, and I helped her along on the climbing, jumping and swimming, crawling and squelching.
She started the race with a black headscarf to match her all-black running slicks. I was referring to us as "day-ops" and "night-ops". My gear was already mud-coloured, and my head higher up, so don't think that I was getting away unscathed ...
We did the course in just under 4 hours, I felt that it was actually a lot easier this year, even without all the extensive running I did prior to the previous events. This may be in no small part to mental preparation, and experience. There were no "I haven't done it before" nerves. I made it over every obstacle on my own steam, climbed every wall, made it across the slippery monkey-bars, made it up the Everest half-pipe on my first run. I was rally pleased with not only my pace, but the speed I overcame the obstacles in my path, but also how I was able to help me fellow Mudders.
Here I am, following the event, having stripped off the OAGRE, sporting my celebratory headband, and working up the guts to pull my boots off. Not a blister, or scratch, but a lot of grit and muddy water. It turned out that the time-lapse application I had hoped to run on my iPhone hadn't begun, but the SLXtreme and PRR combination had worked like a dream. The Picatinny rail I had mounted the Contour cam on needed to be at more of a down-angle, I took a lot of 3/4 sky footage, but see below for my links.
I dinged my shin whilst hurdling a log, and gave myself this exciting bruise on the back of my left thigh. Last year I had two of these, one on the back of each thigh. This year I pegged the moment when I got it ... scaling one of the 4m Berlin Walls, lesson learned? major muscle groups do not make good leavers!
A great event, a good challenge, and certainly a good conditioning and preparation experience.
Will I do it again? hells yes. As many, and as often as I can manage.
Following on from this years SHOT show, I saw a link from the guys at Soldier Systems, reporting from the OR (I presume that stands for Outdoor Recreation, or something to that effect) on a really cool hydration system.
The Geigerrig comapny have a rather unique offering, with a pressurized hydration system. This system involves having a bladder with a hand pump (like the kind Dr's use to take your blood pressure on a elbow collar) to pump air into the bladder, squirting it out of the bite-valve.
It
features a 2L (70oz) bladder (although they do offer a 3L bladder as
well) which has fittings for drinking tube and pressurization tube which
are both quick-release valved, and offers a slide-top for easy filling
and cleaning. Skanky hydration bladders are no-ones friend!
Better yet, they have a variety of carriers for these bladders, all designed to contain the pressure, and give you a secure, continuous pressure water-source.
The fabric of the carrier is a light and rugged 500D Cordura, with PALS/MOLLE strips on top and bottom, six D-ring attachment points for lashing it your pack, vest, plate carrier or what-have you, should you decide to forgo the built in (but stowable) pack straps.
Twin compression straps add to the pressure and stability of your water-load, but the real magic here is the hard nylon "guardian plate" which backs the carrier. This was the real magic for me, as it offers something that I've noted was missing, a slick, hard backing to my hydration carrier. I am very happy with my Platatac Bravo but I found that when on Tough Mudder, crawling through pipes and under netting, and barbed wire, that it caught on occasion, as well as getting in and out of vehicles with it, a slick turtle-back would be a great advantage to both toughness, and drag-reduction.
Couple this with the in-line cyrpto and virus filters and you have a very resilient, functional pressurized hydration system. Hydrate, wash wounds, clean goggles all on the bounce, from a secured and armoured platform!
Some recent events have spurred me to thoughts of preparation, self preservation and looking to become a little more self-dependent. The idea of thinking "outside the box" has always been very appealing to me. Doing the same thing, the same way over and over may work, but not having other means is a sure fire path to being caught out when situations change. Alternate strategies, and more than that, alternate thinking is required. This patch is a great reminder of this, from SnakeDr and Last Ditch Kit and is a visual demonstration of how to overcome adversity, from new angles. Not being boxed in by expectations!
Disruptive thinking is another aspect of preparation that is often overlooked in the light of the shiny toys, kit and gear. In the event of disaster, a lot of common curtsey, and everyday thinking suddenly becomes fairly irrelevant. Getting in and out of places, getting away from threats, and facing them directly, these are all occasions where this is a distinct advantage. In my martial arts, one aspect of training is around the idea of concentration, and focus, and how to disrupt your opponents focus, and concentration. the kiai we shout, both acts to focus ourselves, but also to break and disrupt our opponent. The concept of seme of mentally putting pressure on your opponent is also key. Disrupt your enemies. Disrupt any opposition. And always, as this picture indicates ... know your exit strategy.
There is another aspect to all this. This is probably more in keeping with the rest of my blog thus far. Being prepared, being kitted out, and having a good stash of EDC gear, a cache of Bug-In supplies, a Bug-Out-Bag, or whatever, but without the nonce to actually DO something, when the need arises, it wont count for much.
This patch, from my friends at HORNEST bears their motto, Tempori servire meaning "adapt to the situation". One must always be flexible enough take advantage of the situation, to make best use of your skills, equipment and disposition, whilst at the same time
Disrupt your oppositions thinking.
Stay out of the Box.
Adapt to your Situation.
No, there's no great punchline here ... just .... chicken nipples .... or perhaps better to say, "gravity-locking beak-activated water dispenser". Either way, these are some very cool additions to my urban homestead that has dramatically improved the hydration levels, and water quality that my chookens are getting.
The magic of the valve are the twin pins and ball bearing between them.
When screwed into place with the threaded end, the ball bearing and top-pin presses down on the top of the bottom pin, forming a seal. When the bottom pin is jiggled, it moves the ball bearing, breaks the seal, and allows a dribble of water to flow. Once the jiggling ceases, so does the flow of water.
The bottom pin has considerable freedom of movement which means that the chookens can poke and peck at it from whatever angle their little chooken heads come at it.
In fact, within minutes of placing these out for ours to drink from, they had worked it out and have not gone thirsty since installing them.
This layout was my first iteration, which featured a simple clear bucket, without even a lid, but it did allow me to judge how much water was in it, to guage any leakage, as well as how much the chookens were drinking.
One of the things CC Only were quite clear on is ensuring that the connection was secure.
Drilling a hole in the bottom of the bucket was simple enough, and with a dab of pipe-sealant to close any gaps, the system was pretty easy to set up. The real trick is to ensure the hole is the right diameter, there is adequate material for the thread to bite into, and sufficient sealant to prevent dripping.
I have just recently replaced the plastic bucket with a repurposed baby-food tin with a lid, to stem evaporation and also to reduce the weight , as this big bucket got quite heavy to haul when full. Working with a metal base added a little more difficulty in the fitting, as it wasn't as forgiving as the plastic, but is a longer lasting solution.
These were a great addition to my urban homesteading venture, my chookens have had un-fowled water (hyuk-hyuk) and I think they are a little more entertained with having something to peck at for their water.
 As I said in my recent review of the Tactical Whistle, I'm a sucker for a shiny Kickstarter project, and the tPod1, by Tellurex is another such example.


