Monday, March 31, 2014

Review: First Spear - Walt holster

I had a flash of madness a while back, and bought myself something fairly silly, for me. A very specific purpose piece with very little chance of cross-purposing. But so damn cool looking.

This is the Walt torso holster from First Spear. I've been extremely happy with my First Spear OAGRE vest, which I've taken with me on my adventure and obstacle runs. These folks make some good gear, well thought out and put together.

The Walt will apparently fit the 1911, M9, 226, Glock, M&P, XD and other similarly sized pistols, none of which do I own, or have any reasonable expectation to do so any time soon (awww).
That said, its a really nice piece, and I wanted to have it to have an alternative to my Hazard4 RG Harness or the venerable EDC harness before that.

The holster is skinned in a grippy hypalon, which keeps it snug and slip free in position, and is lined with a micro-suede finish. Sewn to accommodate the trigger-guard, but reported not to take any optics or lights, a shock-cord and hypalon tab is set up for weapon retention. I found that the holster took my Strike Industries iPhone 5 SHOX case nicely.

Loops on the top and side of the holster are to affix the ITW G-hooks which give a quick but secure attachment for the baldric which as it happens, is set up with a single row of PALS/MOLLE loops along its length, until the webbing finishes of in an adjustable loop, for fitting. I mounted my awesome little ODDJob knife by SAR GlobalTool to mine, because it was a perfect addition to the rig, for the uses I have been putting it through.

The holster is designed to be worn under the right armpit, giving a left-hand pistol draw, which I thought was a little odd, but that's where I put my phone, anyway, so it worked out nicely for me.
I'd have to put the question out to the serious pistol carriers out there, as to your thoughts on this kind of set-up.

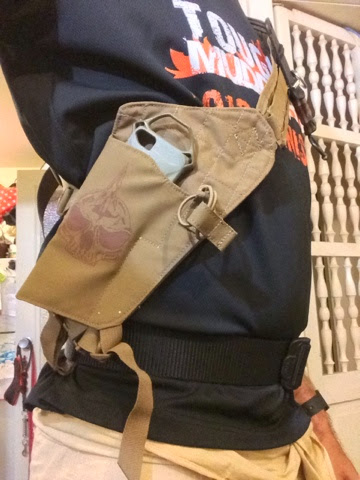
The bottom of the holster was open, to allow for longer barrels, and options for those of you who don't want to disturb your neighbors when shooting geckos and the lowest edge is set up for belt connection with the same kind of Quick Release buckle as seen on the OAGRE chest rig, being a looping hook-and-loop with press-stud to ensure a very secure connection, especially of the belt you are wearing features loop-fields to do just that.

Between the materials, the construction and the form, this is a pretty cool holster, with the gnarly First-Spear logo on the side, and its wrap-around PALS/MOLLE loops makes this a sadly under-utilised addition to my collection, but I like to pull it out from time to time when I can get away with a bandoleer ...


Friday, March 28, 2014

Review: MSM KA-BAR knife

This is an exciting piece, the first collaboration between gear-maker, patch creator and all around barrel of fun MilSpecMonkey and world famous knife makers extraordinaire KA-BAR . The moment I saw it come up, I jumped on the chance to get one, via a fun bunch of people, TacticalShit, and was delighted when it arrived.

This is the KA-BAR / MSM 001 knife.

The first thing I noted was that, not unlike the KA-BAR Zombie Killer line of knives, is the weight. This is a dense, broad blade, weighing in at XXXXX which is surprising given its size, at 9cm (3.5") blade-length, 21cm (8.5") overall and 8cm (2") broad. This is a solid piece of SK5 steel.

Thicker than pretty much every knife in my collection, even the "Famine" tanto, it features some really nice design points. The large crenelated thumb ramp, which gives excellent grip, both in a forwards grasp, and also against the knife edge of the hand, in a reverse grip.

This is a hefty blade made for hard use, and one of the occasions where I wouldn't cringe in using a knife as a pry-bar. SK5 steel is reported to come with a Rockwell hardness of between 52-54, which is nice for a high-carbon steel knife, without getting into the brittle side of things.

Essentially this means this blade can take a beating but still stay sharp. I like the sounds of that. The blade is powder coated with a black bead, for rust-prevention and glare-reduction, much like the Zombie Killer knives

Also included is a polymer sheath, Short Malice clips, mounting hardware along with a Torx tool, and webbing loop for a PALS/MOLLE mounting, although I haven't worked out what to do with this yet.

This view shows off both the thumb ramp and the width of the blade, as well as the second set of crenelations midway along the spine of the blade, beside the false-edge, which MSM suggests would be easy to sharpen after-market, but that they didn't, to avoid local legal issues for users.

I liked the mounting options, the sheath has holes and options for mounting left or right handed, horizontally, vertically, blade-up or blade down, and even diagonally. The thumb-ramp is accessible immediately on the draw, and the foreguard is significantly curved and projects nicely to catch the hand into a good grip on the draw. Twin lanyard holes in the butt-end, which is also textured for gripping on a reverse grip, offer more customization options. Thew paracord wrap adds a great body and a good grip.

With its robust design, keen edge, and well thought out functional production, this is an excellent piece, especially considering the price, and people behind it. If you need a small, rough-use knife, this is an excellent piece.

Thursday, March 27, 2014

Home Front: Influenza vaccination

It is the onset of the Flu Season here, and a fringe benefit of working in Medical Science IT is that I am eligible for free vaccination, as I have been for the last 15 years. I have gotten my flu-vaccination, as well as every other vaccination that had been offered to me, since birth, and considering some of the places I've lived, I'm rather grateful that I have done so.

I actually fell ill with the Swine Flu in 2009, despite vaccination, (more on this later). The key for me is to be as best prepared for a possible widespread, possibly devastating pandemic .

There has been a lot of controversy about vaccination, and perhaps this might go some way to indicate some of the technical advantages and aspects of this vaccination (and others).
My FluVax was the GlaxoSmithKline 0.5mL dose of FLUARIX containing 15ug of each of the three types of influenza virus fragments. •A/California/7/2009 (H1N1)-like virus, •A/Texas/50/2012(H3N2)-like virus, •B/Massachusetts/02/2012-like virus. The H3N2 is a virus antigenically like the cell-propagated prototype virus A/Victoria/361/2011.

Each year the vaccines are designed to meet the predicted strains of interest,  and they work by causing the body to produce its own antibodies against those types of influenza virus, but not against other strains or other flu-like infections.


Protection from these three strains is reported to occur within 2 to 3 weeks of vaccination, and is expected to last for 6-12 months. This protection has been found to be 65-100% effective.

This kind of vaccination is generally injected into the upper arm muscle and is produced in chicken eggs, which the virus has been concentrated and purified by clarification, adsorption and centrifugation.

The purified whole virus is then treated with the detergent sodium deoxycholate and again centrifuged, and the resulting antigen suspension is inactivated with formaldehyde.

As with all medication, there are potential side-effects, and the vaccination process can even illicit illness symptoms, as the body fights off an apparent (but inactive) infection. However, given the debilitating severity of influenza, even with low case fatality rate strains, I think that part of my preparation regime is to be as well vaccinated as I can be and it's well worth those risks. What you can't see CAN kill you ....

Friday, March 21, 2014

Review: ScrewGrabber Kickstarter

I was contacted by Phillip Kaufman, LA based designer and innovator, who was kind enough to send me a couple of his prototypes to test and review. They finally arrived today, and I wanted to get them out there and have a test and a play, before the Kickstarter for them expires. These ingenious little silicone rubber tubes are the Screw Grabbers.

The principle is amazingly simple: a silicone tube, flanged and sliced at one end, that fits over your screwdriver head, and lightly grips the head of the screws you are wanting to put into place.

The tool-end of the tube has a X shaped internal structure to enable it to fit around different thicknesses of drivers, and there are two different sized of Screw Grabber, to accommodate both larger and smaller tools, of 2.5mm-4mm (3/32"-5/32") and 4mm-7mm (5/32"-1/4") sized drivers, regardless of head-type; Phillips, flathead, Torx or hex.


The screw-end of the Grabber features three cuts, and internal ridges to grip the head of the screw, and due to the slide-on nature of the Grabber, you can adjust the depth of field by slipping it higher or shallower on the driver.


Both sizes worked admirably on most of the drivers I tested on, although my smallest of screwdrivers was too skinny to be gripped by the thinner of the two. The larger Grabber worked nicely on my larger drivers, even the flatheads.

Of the prototypes, the clear samples were durometer rated as a Shore 37A, and the blue samples at a Shore of 50. The ScrewGrabber team tell me the finished product will have a higher rating, so it will be interesting to see.
That hardness rating comes into play when both grabbing, holding and driving screws, and I found that the extra stiffness offered by the blue versions did improve the application of these, but made for less impressive photos that the translucent versions.

You can see that the slits open up as you drive the screws, making it relatively easy to finish the job without needed to swap over, remove the Grabber or any other additional manipulation.  I also tried to use the Grabber to remove screws I had undone, but with less success. No big deal really. I was able to collect a screw from a tub of screws though, that was a bonus.

Not having to fumble with screws whilst doing a rapid assembly; shoring up a doorframe, adding additional locks, barricades or the like, saves time and effort.

Not dropping valuable components whilst doing constructions, repairs or the like is another excellent reason to not be loosing your screws. Remember, not all screws are ferromagnetic, so simply having a magnetic tool-tip is not the perfect solution. Especially pertinent for maritime builders, or non-sparking requirements.

These were a simple little addition, and I think I'll be leaving them on my favorite drivers, slipped out of the way, ready to use, no matter what comes.


Wednesday, March 19, 2014

Review: Ti2 - PB9 parabiner pulley

I seem to be fully addicted to both Kickstarter, and awesome titanium pieces. Fortunately, this means I not only have a bunch of cool kit to play with on a semi-regular basis, as well as helping people get their ideas off the ground and into your hands, but also I have things to write about.

This is one such item, which I've been sitting on for a little while,This is another creation of Mike Bond, creator of the Sentinel s4s cache, the Sentinel X and the EDCPen (link coming VERY soon). This is the PB-9 Para-biner

The PB-9 measures 48mm x 111mm x 9.5mm thick (1.875" x 4.375" x 3/8") and weighs 100g (3.5 oz) and almost the whole thing is made from grade 5 titanium. This is the biggest of three variants, and features 9 tool options, being a very versatile tool.

There are two versions of the PB-9, in Imperial (SAE) and Metric, each offering a range of wrench openings:
SAE: 15/16", 3/4" 9/16", (5/8"), 1/2", 7/16", 3/8", 5/16", 1/4" (bit driver) MM: 24mm, 19mm, (16mm), 14mm, 13mm, 12mm, 10mm, 8mm, 1/4". I bracket out the 5/8" and 16mm wrench options because they sit in where the pulley pin and wheel reside, and I don't thing they are really accessible. the pins, split rings fastening them, the pulleys and whole assembly would need to be removed to have this option used. However, the pulley significantly outweighs the wrench need, in my eyes. Both feature a "hidden" 1/4" bit driver, inside the locking gate.

That gate is 12.7mm (1/2") or so wide, and features a hook-and-pin overlock, giving a really secure structural gate. Instead of a regular spring, the PB-9 features a torsion spring, cut from a piece of grade 5 titanium as well, as rustproof as the rest of the piece. Outstanding.

The PB-9 has two pulley options, both made from high strength bearing grade bronze 544 (The prototype pin was stainless steel, the production version is also titanium)

The single pulley option allows for lines up to 1/2" diameter, whilst the twin pulley was specifically for use with paracord. I found that it would take paracord, 3mm plastic coated clothes line, 6mm nylon sheath cord, and even the plastic coated braided steel cable from a laptop lock.


 Using two PB-9s with twin pulleys in a "double tackle" setup allows for a 4 to 1 mechanical advantage when lifting loads.
The tool also features a wedge shaped "Para-Cinch" notch for quick lashing of paracord (or as a bottle opener)

The non-pulley end also features a flathead screw-driver, whch could easily be used as a short pry-par, Mike even suggests as a box-opener. This tool has it all!


One of the things I loved about this Kickstarter was the engineering that went into it, and how that was shared. Watching the test-to-destruction clips of all three Parabiners was amazing. The fact that the prototype PB-9's broke at 1771kg (3,905lbs) is amazing. That's around the weight of a car! Having these tests, and subsequent improvements described along the way was a real eye-opener, and very heart warming.

Seeing the hooked gate go into the design, as well as the living/torsion spring enter the process really gave me a sense of being part of the experience, and has lead to an outstanding tool.All part of the Kickstarter joy.

If I had a gripe about them, it might be that the gate only opens 1/2" or so, which limits what I could clip them to directly. I certainly made do with braided steel cable, and could have used chain, just something I noted.

These are totally going into my bug-out kit, and I look forwards to being the guy with the pulley when it comes time to lift an obstacle.

Saturday, March 15, 2014

Review: GoST Paleo Barefoots Antera Paws

 I was really happy to receive the GoST PaleoBarefoots BAMANOS gloves with Paws grip-spots, and I was really looking to try the ANTERRA versions that Jörg sent along with them. As you might have read previously, where I've talked about how I really loved the ANTERRA and PRONATIV shoes, but noted that as per the PaleoBarefoots recommendations and warnings, they don't react well to polished and artificial surfaces. The steel links just slide, with nothing to find purchase on.

Adding the Paws grip-spots immediately ended this issue, providing immediate regular shoe traction with surprisingly little loss of tactile response.
They added some pressure points on the foot that had not been present in the "bare-sole" version, but this was not unpleasant by a long shot. 
 
The area taken up by the Paws is slightly larger on the links than on the ground contact, and only very slightly permeate into the shoe, essentially imperceptibly. This means that you still have all the flexibility, and articulation of the originals with none of the slip-sliding.

I also found that the extra buffer the Paws provided gave me a little relief from the heat of the Australian summer, when standing still on hot surfaces. It was also interesting to note that the placement of these spots matched very well to the shape and contours of my feet. It's obvious after wearing them that a lot of care and thought had been out into the shape and placement of the grip-spots, and it was more apparent than in the BAMANOS, because of how they traced the contact points of the sole.

This version certainly improves upon an already eye-catching and effective barefoot shoe system, with very little change to the basic function and draw cards of the originals. 

After many kilometers of running and both beachside and urban walking in them throughout the summer, I can confidently say that these are the best yet, and the adjustment period was minutes at most. 

Given that the silicone rubber is melded into the rings directly, I would expect that the Paws will last for many years, wearing down and degrading slowly as I slog through rough terrain and gritty city streets, and will eventually need to be resurfaced. 
However, even then, the stainless steel of the primary shoes will go on working as indefinitely as any of the classic versions. No structural integrity was lost in the adding of the grip-spots, that's for sure.
I very much look forwards to completing my next Tough Mudder in these and with the BAMANOS gloves. 

The combination of the steel and silicone gripping surfaces significantly improve the disaster situation practicality and all-round wearing of this unique kind of footwear.


Friday, March 14, 2014

Home Front: Mass transit


My daily commute takes me about 40 minutes, all up, and sees me at three train stations; my local station, a major junction station and a subway station. I'm ten stations out in the suburbs, so when I am in my way in, or getting home, the crowds have thinned considerably, but in the city, and at the junction station, there can be considerable crowds. Most of the time this isn't an issue, even at peak hour, as the trains are quite frequent and the stations laid out reasonably well.

They are, however, a nexus for people, all moving about, for the most part studiously ignoring everyone and everything. They feed into the choke-points and bottlenecks and I can only assume are unconcerned and oblivious.


When there are delays, usually for technical reasons (not pointing at the rail service provider, or the people stealing copper from signal boxes or anything), but also for environmental reasons (heat buckles the rails on occasion in summer, for example), or even safety reasons (sick passengers, people on the track), these crowds swell tremendously. Nothing new here. Station staff, roaming inspectors, even occasional Protective Services officer teams bolster incidental security, public order and safety.

However, I see this in terms of crowd density, choke points, exit placements and the potential for harm. Growing up in Thatcher-era UK, I am familiar with the specter of domestic terrorism. I see throngs of crowds on underground escalators and waiting at the platform in terms of potential casualty numbers, not to mention disease vectors.

Being stuck on an escalator, or at the bottom of one, waiting my turn on a regular 9-5 day, when everyone is polite and civil is one thing, add panic and strife, another beast entirely. I can usually just get on with my daily commute, without dwelling on it, but other times, I see and triage the risks.

What can we do to mitigate these potential risks? In regular life, we can out trust in the design and emergency response planning that the designers and operators have in place.

We have large, clear-sided waste bins in some train stations, to mitigate them as easy hiding spots for explosive devices, ubiquitous exit signage and fire prevention systems. All good ideas, however, in the event of panic, in a packed station, they may be difficult to operate or ineffective.

Too many people, too many choke points and environmental hazards.
I have similar concerns whilst on board. In regular circumstance, even the mundane issues or patient illness, technical issues, even incidental accidents are all things I have faith in the policy and procedures the operators have in place. It's in the instances of extraordinary events that I am given pause. Catastrophic power loss, or physical infrastructure failure. Major accidents or environmental disaster, or again, communicable disease come to mind. Standing room only, shoulder to shoulder, in a metal plastic and glass tube moving at 80kph. What can I do? What can anyone do?

Situational awareness is a great buzzword. I'm often engrossed in an iDevice, or a book, but I try remember to pause, look around me, watch the movements, postures and demeanours around me. I try to keep my earbuds turned down low, so I can still hear ambient noises and announcements, as well as conversations around me. I maintain control of my pack, full of needfuls and a variety of resources.I ensure my lights are charged, my kits are stocked and my head is in a good space.


[edit-update]
Power has been lost in Melbourne's City Loop, leaving passengers stuck for up to 20 minutes.

Wednesday, March 5, 2014

Review: ITS - Urban SERE kit

I like to increase my skillsets as often as possible, as well as staying on top of my sleek EDC needs so I am always on the lookout for new kit that I can both have on hand, but also try out new techniques and learn new things. The Urban Kit from ITS Tactical is a perfect example of this.

Held in a sliding plastic case 8cm x4cm x1.5cm, it contains a number of very cool SERE elements in a very compact package. The tools include:
  • A folding razor / saw, with inch and mm rulers provides a safety knife and a sturdy saw.
  • A diamond encrusted wire saw/file, great for cutting through chains, filing rough edges
  • Handcuff Shim, the flexible, rounded key for opening cuffs (in the case of unlawful restraint)
  • Quick Stick, the stiff pointed metal key for popping many padlocks open by bypassing the pins, and reaching lock shackle itself.
  • two coin/button sided, polymer Universal Handcuff Keys, (again, for escape from unlawful restraint, with double-locking pin)
  • A ceramic razor blade, because having a small, non-magnetic blade in your SERE kit can have all kinds of uses, and remember, if they can't find it, they can't take it ...
  • 1.8m (6') of 85kg (188 lbs) test yellow Kevlar cordage, for both friction sawing, but also a variety of other purposes, you can only boggle at.
  • 1.8m (6') Stainless-Steel Coated Leader Wire which gives you an even stronger line than the Kevlar cord, but its specific properties can also lend itself to a whole other raft of uses. 
  • Lastly the very cute, Grade AA button compass, what's not to like with having a compass in your EDC? Nothing at all. 
All in all, this is a great little kit. It fits in my pocket with ease, leaving very little indication it is there, and does just as well in my pack. This is a very compact way to not only collect, but also carry some really good tools for many of your urban SERE needs.

Tuesday, March 4, 2014

Review: Vibram Five Fingers

I've covered several sets of the very cool Paleo Barefoots and a variety of other footware, like my Magnum Amazon5's or the Danner Striker II boots before then. Footware is a very important aspect of both day to day life, and planning for those catastrophic events we are all hoping to be prepared for. When I had the opportunity to get a pair of the much vaunted Vibram Five Fingers toe shoes.

I've seen and heard about these for some time now, and thought I might give them a try, because they certainly have some interesting potential.


As well as having worn the Paleos, I have also spent a lot of time in tabi-boots over the years, so the idea of a split-toe shoe is not alien to me, but was an interesting to have a toe for each toe, rather than just one for the thumb as in tabi.

The Vibrams have an abrasion-resistant stretch polyamide fabric for the uppers, with a wrap over Hypalon strap, which feeds through a nylon ring, and secures with hook-and-loop.

The soles are Vibram's own TC-1 performance rubber, which is both a springy and tacky material. I found it quite grippy, even on sandy stone.

The footbed, inside the shoe is of an antimicrobial microfiber, which is great, especially as whilst socks are available, these tend to be a sockless kind of shoe. Having healthy feet is essential, especially if you have to be in your shoes for long periods of time. I'm always in favour of this kind if thing, which is why I also really like my BioDefence spray too .

So the best part of these are the segregated toes, allowing you to splay them independently, giving you very good constant contact with the ground, and the ability to grip with your toes, if you're that way inclined.

Conversly, the same thing can not be said for the main body of the shoe. I found it difficult to mold my feet to curves in the way I have grown accustomed to with my Barefoots, and even the flexible soles of the tabi, this might be due to not having worn them in as much as they need, but they just feel stiff.

They are a light alternative for running, for sure and perhaps it is my slightly wonky little toes which didn't quite sit nicely in these, but overall I didn't find them very comfortable. I will see if this improves with further wearing-in. Well made, and they certainly do everything they are known for, but I think I will stick to boots and Barefoots.
Related Posts Plugin for WordPress, Blogger...