Showing posts with label pocket. Show all posts

Friday, October 4, 2024

Review: EDC Monster Titanium Multi-function Pry Bar

Time for another pry bar! Having just covered the small titanium pry bar I wear in a belt pouch you might be asking why i have yet another one. (on top of the WTF prybar I wear around my neck as EDC). The short answer is Two is one, One is none, and I have two hands and hate being kept out of places. 

This is the EDC Monster Pry-Bar, which was launched via a Kickstarter project. As their sixth successful project ( they make a lot of folding pen-knifes and the like). The thing that caught my eye about this tool however was  its multi-function design. It's packed full of options whilst retaining rugged construction.

Milled from a block of corrosion resistant Gr5 Titanium, the tool features a number of useful features the designers workshopped from common EDC tools.  
First and foremost the pry-bar end of the tool is dual-beveled on the top face and has a bevel on the under side too, finishing up as a 1-2mm flat edge 15mm long rather than a sharp chisel edge. Not sharp by any stretch but plenty pointy enough to cut taped boxes and packages open. 
A good sized bottle opener sits at the belly of the pry end, in front of a finger notch. The double sided beveling allows the tool to be worked-into a gap easier than if it were flat on the underside, which is handy.

 The back spine side of the tool features a swiveling, magnetised cover that turns to reveal two hex bits, a S2 Alloy Steel  Phillip's head and a flat head driver, both held in place with magnets, but easily popped out. both drivers fit the ratcheting driver ring seated in the butt-end of the tool, it ratchets in one direction only, so you flip the tool to change direction of driving.

It's worth noting that the driver bits don't lock into the ratchet driver, and need to be held in place by the user, (placing a thumb on it seemed to work fine, but worth noting) . You could swap out the drivers with others as long as they fit in the recess.

Recessed on the underside of the tool is a magnetically affixed, titanium bodied "everlasting graphite" nibbed pencil. More than just a gimmick, these pencils are very useful for always to hand writing implements, though I have found the nibs to be fragile on occasion, they do write really well and are super handy. Astute readers may have noticed one lanyareded to my other EDC pry-bar

The pencil is short (1.65")  but not unworkable so its a very useful addition and is securely held in its recess, protecting the sometimes brittle nib, when not in use. 

The very butt-end of the tool features a tungsten carbide spike to allow glass breaking and inscribing into hard surfaces. It also features a lanyard hole for fitting you favourite beads or "don't-loose-me" cords. 

As well as the well placed groves milled in for grip, there are four recessed slots (2 on front, and 2 on the back) for fitting tritium vials. But due to shipping restrictions, they were not able to provide the tritium vial, but they did will provide luminous rods as add-on options. I have yet to install these but should be a matter of applyng a dry-clear epoxy glue. The tool has a removable belt clip, but also comes with a snug kydex sheath with a belt clip. All told the tool including its bits and pencil weighs only 85g (3oz) and measures 14.2cm (5.6") x 2cm (0.82") broad. Its a nice compact tool packing a lot of utility into its small frame.

Wednesday, August 28, 2024

Review: titanium pry bar

Time to cover another piece of EDC that has slipped beneath my reporting radar for too long. Its no secret that i'm fond of titanium tools, they're strong, light and non-magnetic. I'm also very fond of pry-bars. Remember kids, your knife is not a pry-bar. Nor is your screw-driver. 

I've always been "the knife guy" in my circle of friends, because I always have at least a pocket pen-knife on my person. More and more these days, environments are less and less permissive when it comes to knives, so I've looked to alternatives. A quick self-audit showed me that I open a lot more boxes than I do cutting food,  and the leading edge of a pry-bar can do a number on most packing tape I've encountered. So I've added more pry-bars to my collection than knives of late. I also find myself making adjustments to equipment and storage units to make things fit more often that I am cutting things. In my search for a more perfect EDC pry-bar, I came across this listing right ebay link for this very functional tool. 

Machined from a solid billet of TC4 titanium alloy it lays 11cm long by 1.6cm wide and 1cm tall. It has a stiffening channel milled down it length on both sides a set of two crenellations at the tip end and three at the butt end as well as a deep scalloping for ergonomic grip. A lanyard hole at the butt end adds a good retention and draw option. The working end of the pry bar comes down to a symmetrical edge with a 2cm slope ending at a flat 1cm wide,  2mm final bevel. 

Its not a chisel, its a pry bar and that final edge is strong whilst being fine enough to slip in to most locations I've needed to pry up. That said, some jobs have required a little persuasion either lifting, wedging or just tapping the tool in to get that wedge started. Once started though, the tool performs nicely, lifting with the sturdy and ergonomic body. After a long period of it living in my pocket along with other elements of my EDC I whipped up a small leather belt pouch from some scraps, where it has been a handy tool for all my prying, tape cutting and even occasional flat-head screw driving need. All in a mere 45g item.

This is a lovely tool that I've enjoyed using and just nice in the hand as a fidget toy.


Saturday, July 20, 2024

Review Oceanus Brass - Cablelaid cordage cutter

Here's another solid brass tool to add to my loadout of adaptive hardware. I'm always looking out for tools that can help me adapt to my environment or supplement my resources, especially if normal resources are unavailable or scarce. This particular tool turns plastic drinking bottles into cordage!

You'd be pressed pretty hard to wander too far anywhere and not find modern trash. Plastic drinking bottles get thrown out of cars along roadways, get blown or dumped into waterways and turn up all over the place. The trick is to turn this abundant waste into useful product! Thats where a tool like the Cablelaid by Oceanus Brass comes in. Machined from solid brass bar stock, the tool is based around a simple principle; a razorblade, held in place behind a channel to feed the leading edge of the plastic through and cordage out the other side. 

The top plate of the tool is held in place by three inset Alan key screws, to facilitate swapping out of the simple razor blade in the event it dulls, though flipping it would double your cutting mileage, before replacement or sharpening is required. 

The tool has three channels built into the side that both guide the bottle in to the razor edge but also set the width of the cord produced. Notches set at 8mm, 6mm and 4mm to the blade with a 2mm guide slot along the top of the tool. The tool works by cutting the end of a plastic bottle off, then feeding the edge into the desired notch and the razor begins to cut the bottle into cordage. the notch then feeds the bottle in measured width to the razors edge and cordage exits out the back of the tool. 

In order to maintain a constant pressure on the cutting edge and even bind-free cutting, it is beneficial to mount the bottle to the tool, such that it spools.


To facilitate this, the tool has a hole bored through it, that fits a pen, pencil or the purpose made telescoping feed rod, its also helpful to anchor the tool in place, and a couple of nails serve the purpose well. Thus braced, its a matter of cutting an even strand, which takes a little finesse, and more than a few false starts. The more even the initial cut of the bottle is the better the start will be. as notched cord is weak and often snaps as it is drawn off the bottle. 

I found that gripping the end of the cord in some pliers made for a good method, allowing me to focus on keeping an even tension on the cord, such that an even cutting would take place, free from pinching and mis-angled cuts. 


From a standard 1.25L soft drink bottle, with a good clean start and careful processing i've been able to reliably cut 10-12m (32-40') of 8mm wide cord.

I've found that removing the label and washing out any sticky residue helps keep the cutting smooth and steady, but the first, initial cut to remove the base of the bottle seems most important. I also found that cutting from bottom to top is most successful.


The tool is pocket sized, at 114mm (~4 1/2") long,  23mm~15/16") wide and  11mm(~7/16") tall weighing a solid 184g (~6.5oz) but it'r rock solid and comfortable in the hand the way that solid brass is.

It can take either standard razor blades or alternatively box cutter blades, which fit into machined spots inside the tool. 

The tail end of the tool features a lanyard hole, and comes fitted with a brass Bow-Shackle that is the signature of Oceanus Brass products. Versatile and useful on its own. A final nice touch is that the tool came with replacement blades, spare screws and Alan key as well as the telescopic rod in an all-included package.

Though the art of bottle-cordage conversion requires a certain finesse and practice, it's well worth attempting as an alternative to bought cord and thus far I've found a number of uses around the house and in the garden. More to follow.


Tuesday, January 9, 2024

Review: Rose Kuli hammer multitool

Multitools have a special place in the heart of all preppers. They make for a resource rich bundle that can provide a lot pf utility in a small package. whilst the ubiquitous Swiss Army Knife is probably the first multi-tool for many ( it certainly was for me), the Leatherman or Gerber belt tool has taken the place in the eyes and EDC of many and whilst these paragons of utility assuredly have their place, they don't do everything. That's were something like  the Rose Kuli hammer tool comes in. 

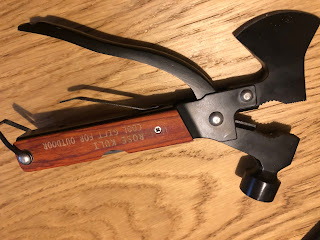
Prominently featuring a split hatchet head and a hammer head, the jaws opening up to expose pliers and cutters, with a spring assist for the plier arm. The Rose Kuli tool features red wood scaled handles, screws recessed in at the high end and riveted at the bottom end, the plyer-arm retaining loop seats into a notch in the bottom of the plyer arm, preventing the plyer head from opening up unexpectedly. 

The hammer-head sits directly in line behind the hatchet head to maximize impact efficiency for both tools. I found that the small hatchet head being only 4cm (1 1/4") broad but was plenty enough tool to carve a notch in some logs i have seasoning at the back door. You wont be felling any mast logs with it, but it'll work nicely delimbing small logs, and even baton splitting, the hammer head providing a good strike face. I worried that the hatchet head appeared riveted in place and would come loose but it turns out that top rivet only holds the sides in place and the hammer/hatchet pieces were secured by the pivot rivet and marry up tightly when the plyer arm is closed. 

The plyer jaws have both a fine toothed and a broad toothed section, for both fine and coarse tasks as well as a 1cm (2/5") cutting jaw, for wire or nail cuttings. 

The hammer itself drives nails quite well, for such a light tool at 400g (14oz), and I could tap one into my new treated-pine fence-posts with ease. The wood scales and plyer arm make for a comfortable grip on the palm and fingers. the hammer-side handle-face holds a surprise in the form of a selection of folded tools.There are 5 fold-out "blades" to further supplement the tools over-all utility.  From left to right there is a simple leaf-point single edge blade, a Phillips head screw-driver, a wood-saw with fish-hook disgorger tip, a 4-size hex nut wrench (5,6,7,10mm) with bottle-opener and pry head, and a serrated blade  with a file and flat-head driver tip. I would have liked a can-opener, and none of the tools lock, but each are functional.

As Corb Lund would sing "Well it's a vise grips for pliers, and pliers for a wrench
A wrench for a hammer, hammers everything else
"

It came in a flimsy nylon sheath with a hook and loop flap that barely covers the heads, leaving the edge of the hatchet somewhat exposed. 


For a light-weight tool, it certainly bridges the gap between belt-multitool and camp-hatchet.


Thursday, March 23, 2023

Review: Scotch eyed auger


I started seeing ads for these a while ago and got one a couple of years ago for bushcrafting adventure and general utility. Having manual tools on hand is good, both for emergency power-down use but also off-grid crafting. Hand saws, hammers and hand-drills are all reliable, if sometimes arduous tools to make use of.

A scotch eyed auger bit is a type of tool you can use to create holes either dry or wet woodworking applications. The “scotch eye” is the hole at the end of the auger and its purpose is to enable easy handling and additional leverage. 

This particular one has a 20mm auger bit (8/10th") with a single flute that runs for 9cm (3.5") for  a total shaft length of 15 cm (6") and terminating at a round pipe eye of 18mm (7/10th"). It appears to have been made from a 20mm hex ended drill bit welded onto the eye segment. 

The cutting tip of the tool starts of with a self-tapping screw-head that ensures good purchase and correct placement of the auger for optimum boring. 

The cutting face of the auger is set back from the leading edge of the flute, which has the effect of being a scoring/ cutting edge, around the circumference of the bore being cut, this ensures a clean cut and smooth finish.

The eye is set perpendicular to the auger shaft, such that a branch can be fitted through it  in order to make a handle to easily turn the auger and bore into even hard, seasoned timber. Once the tip has bitten, and the cutting face engages, the long flutes will guide the auger on a straight path through the wood, so be sure to get the initial line straight. 


The eye is also a means for producing peg ends that will fit into the hole bored by the auger. These can be  whittled manually and test-fitted in the eye or hammered through the eye to shave/ scrape the pegs down to size. The remaining hex of the original drill  haft is lined up to nicely  be hammered upon, which was also a nice touch. 
The eye is sightly narrower than the auger bit, which means that pegs cut with it will be -slightly- loose, which can be a good thing depending on the situation, but a long as you take it into account you  would be fine. If I were making a pole and branch ladder, i'd be lashing the rungs in, regardless. The length of the tool allows for quite deep (6") cuts to be made. This is plenty deep enough to make a rocket fire from a log like a Swedish Fire torch. Deep enough that you could probably pin log cabin logs together, though that would be a lot of hand cranking. pegs used in this fashion are called treenails or trennals and have been documented back as far as 7000 years.

I've seen some Scotch eyed augers with one face of the eye being sharpened to bite into the peg-wood, whilst the rear face is hammered and mine lacks this. I'm not certain it would be necessary and have done just fine without, but if you were intending to make a lot of pegs out of cut lumber it might be advantageous. I whittled down this segment of green branch the power company lopped from one of our cub-side trees, and its made a very good handle in less than a minute. I did this when my previous branch/peg handle snapped whilst mid way through boring a hole through a particularly seasoned piece of recycled timber. A minor setback, quickly addressed with a field expedient replacement and I got the job done. 
One thing that hadn't occurred to me until I was well into my boring task was that the swerf material (wood chips) I was boring out would make excellent kindling, even in wet conditions ,the inside of most wood stays dry.  This would be even more true with more resinous woods. I've used the auger on branches and logs I've found trail-side as well as dressed timber both fresh and reclaimed. 
One word of advice, ensure your leverage stick is a good fit and smooth or you'll hurt your hand whilst boring. Wear gloves. Be sure your angle is correct when starting off and check for drift. All in all its a very simple and elegant tool and at only 175g (6.3 oz) its an easy add to your bushcrafting carry. 
I made a simple leather pouch for it with belt loops, so I can take it with me along with my belt knife and trail hatchet. I imagine myself making tripod stools and even legged benches with this tool, as well as through-holes for future furniture projects. 


Wednesday, March 8, 2023

Review: Go! Outfitters - Landing Pad

A well made tarp is a crucial bit of kit that every outdoors expedition could benefit from, be it rain or wind shelter, shade or just a dry and prickle free place o picnic upon. Though at times a 9  x 12 tarp may be a bit too much, especially if you're just planning for a bit of a trail hike. Then there is your gear, be it packs, cook gear, bedding or even boots at the end of a long day. If like me you prefer a slung hammock to a ground tent there is the question of what to do with your gear, if whatever fly system you have doesn't cover it. The clever people at GO! Outfitters came up with something to fit that niche, the Landing Pad.   

It’s made from durable 70D polyester, with a 1000mm waterproof polyurethane coating on the bottom and a silicone coating on the top for extra protection and easy clean up. This makes the Landing Pad extremely waterproof. 

 The Landing Pad is 137cm (54") in diameter and has eight stake loops and four sets of drawstrings with cord locks around its outer edge. It comes with a set of steel hook-style tent stakes in a draw string bag to stake it down as needed. At 137cm in diameter, the circle is big enough that 4 people could sit on it back to back or three facing inwards, if legs can be managed. Certainly big enough for a trail-side picnic or to drop bags and boots on whilst hopping into your hammock. Stake it down under your hammock for a soft place to step onto once you swing your legs over but before you put your boots on. 


The four drawstrings around the edge of the Landing Pad allow for the lips to be drawn up into a low bathtub to keep damp ground run-off out. It also allows for the whole circle be drawn up like a purse to wrap your gear in a highly water proof bag. Obviously the opening isn't covered, so don't be throwing it in a pool or leaving it under a waterfall. By pulling two opposing drawstrings the landing Pad converts into a gear hammock,  stretching 2.4m (7'10") overall with a 1m (3') hammock space. Though it can be drawn tighter doing so reduces the capacity. I would use it as an along-side sling, rather than bunk-style to keep things in reaching distance and act as a buffer.

 This drawstring rim also enables the Landing Pad to be fitted over a backpack to shelter it from the weather and could supplement a poncho to keep both you AND your gear dry.  I found it big enough to be able to wear it like a turtle-back poncho, covering my back, butt arms and back. Its even big enough that I could shelter under it like an umbrella when couched, staying totally covered. 

I found that the tan/brown material made for quite the unobtrusive "hide" when crouched down under it when just off-trail. It occurs to me that with an expanded hiking stick or appropriately padded branch you could make a small single pole shelter with the Landing  Pad, properly staked out.The Landing Pad, with stakes and stuff-sack weighs 285g (10oz) and by itself 15g (5.3oz) and packs down to a pocket sized 4cm X 13cm X 18cm (1.5" X 5" X 7").

More than compact enough to stuff in a pocket or day-pack when going for a hike to provide a clean dry spot to break on. I have two  ( one brown one charcoal grey) and they make for an easy addition to any adventure without adding excessive gear load.

Tuesday, September 6, 2022

Review: Streamlight - Wedge flashlight

Sharpie for Scale
I'd been without an EDC flashlight since loaning mine to Tactical Baby for school camp, never to be heard of again. (the light, not the TB, she had a blast). I made do with a petrol-station bargain bin LED light that was usually functional but not especially bright or reliable. So when an opportunity came up to  try out another I jumped at it. I had never heard of Streamlight or their Wedge light but as soon as I looked it up I knew it was the next light or me.
 
I liked the look of its sleek but robust design, bulkier than a pen-light and that it looked like it was designed for both pocket and PALS/MOLLE carriage. I have a Fellhoelter bolt-action pen light on my Hazard 4 chest harness (which is pretty much my principle EDC go-to), but its not much more than a "dropped my keys" or pupil-dilation checking tool. 

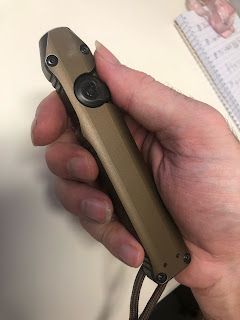
The Wedge has a pleasant solid heft to it at 4oz (113.4g) and it fits the hand nicely, with the finger groves fall naturally into index and pointer fingers, placing the wheel button squarely under the thumb. The heel of the palm seats the butt-end of the light, tucked in securely by the pinkie finger. It measures 5 4/5"X 2/5"X ~1" (13.87 x 1.52 x 2.54 cm) overall, ( not counting the subtle pen clip ( which is reversible for lefties or righties). I tend to wear it in my front right pants pocket with the short paracord loop easily hookable for easy access. A month of daily carry has worn the anodizing of the tip, to zero functional effect.

candle Mode 
The light is activated by rolling the wheel button forward to the stable mid point, producing a bright, clear white light rated at  300 Lumen. This is the Constant-On Mode, which has a 3 hour runtime. When engaged, a small green LED behind the wheel is illuminated. This seems redundant as the main emitter LED is very clear. My own testing has the battery life lasting over 4 hours but 3 hours is a safe benchmark.  The green LED shifts to red when battery life is low, which is a nice feature. Even after my 4 hour test it wasn't especially hot either which was nice, the heat-sink of the all metal body works well. 


Standard mode activate

The built-in Lithium Polymer batteries are charged via a recessed, waterproofed USB-C port in the butt of the Wedge. When charging, the behind-the-wheel LED is red until full charge at which point the indicator light goes green.

But this is where the extra distance on the wheel button comes in. If you push the wheel beyond the constant-on mid-point, you activate the THRO, (Temporarily Heightened Regulated Output) mode. This kicks the constant-on 300 Lumen up to a dazzling 1000 Lumen output. Light throw is rated at 225' (69m) at constant-on and 360' (110m) in THRO mode. One thing that impressed me was the wide cone of light, with the main cone being around 120 degrees wide, with a secondary cone at around 160 degrees. This extra wide beam provides for an almost full room coverage from a doorway, which is very handy for those "bump in the night" investigations or "where did that battery roll under the bed" searches.

The constant-on setting is standard, with the THRO mode requiring constant forwards pressure to maintain it, such that an initial push forwards may move directly to THRO-mode then back to constant-on. This isn't too much of an issue, but I did find that some finesse was required to switch it on without moving to THRO-mode, or flickering ON/OFF. That can be a little annoying, specifically because when I want light, I want constant, stable light NOW. 


THRO mode active: wider, brighter, longer
Another thing I like about this light is its slim but not skinny-size making it convenient to deploy in a pocket, on a belt or even in the channels of PALS/MOLLE. Perfect for placement on a chest-rig or on a pouch. It's a snug fit, especially on a rigid surface, but that adds to the security of it's carry. The para-cord fob allows for easy draw, and just like that you have the utility of a bright sharp white light at the slide of a thumb.

The base of the light, even with its recessed USB-C charging port and pen clip sits flat nicely allowing the Wedge to be stood up in "candle mode" and given it's wide arc, it will illuminate a whole tent, room or goodly sized cave. 

MOLLE carry
The lens glass is slightly inset from the rim of the frame, offering it some measure of protection against  scratches and impacts. Whilst I wouldn't recommend using it as such  I suppose one could grip it like a kubaton for self defense purposes. Every tool is a weapon if your imagination can stretch far enough. It's not going to do you as a set of brass knuckles, but if you ice-pick your grip you'll make a bit of a impact focus point, even if you have to drive the switch with your pinky. Good for temple-indexing, OK for cool. 


ergonomics
I really like how the light indexes in my hand, how easy it is to activate and the sheer volume of the light it emits. It is certainly one of the most powerful lights (especially for its size) that I've had. Its sleek form factor makes it unobtrusive and easy carry and quick to deploy. My only complaint would be that the thumb switch slips back from ON to OFF too easily, if its not seated quite right. This may "wear-in" over time, and hopefully in the right direction, but isn't enough to put me off this light. I've subsequently found that flicking it to "ON" then getting my thumb of the dial reduces this stutter effect, so i'm willing to concede some user error may be in play here

One last thing, if you ever felt the need to illuminate your brain, the emitter end will fit up the standard adult nostril and will light your honker up like Rudolph. Tastes like Crayons too.

Tuesday, May 31, 2022

Review: Sailors Compass - Oceanus Brass

I've covered compasses before, mostly as a generic " have a compass, navigation is important" tool and as part of a variety of multi-tool items or kits that include a compass but this one is a little different. I backed a kickstarter for a boutique compass with maritime style. Oceanus Brass specialize in nautically inspired items milled in brass. This is the Oceanus Brass - Sailors compass. Which I backed on Kickstarter. They're in full production now, so you can pick one up, or anything else in their range. Their latest Kickstarter is for a plastic bottle cord maker and looks great too
Brass is an excellent material for traditional nautical kit for several reasons: It is hard wearing to withstand long periods between resupply or repair options. Corrosion resistant to resist saltwater exposure. Non-sparking to keep powder and timbers safe and non ferro-magnetic so as not to throw off your compass needle. It also has a pleasing heft and a bright luster. 
The sailors compass comes as an un-embellished and unadorned puck, with a seam line running its circumference at the 2/3 of its height. The seam line is narrow when the lid is secured and both top and bottom edge of the puck are evenly beveled and smooth. The "lid" unscrews for two full rotations  along finely machined threads, with just index and fore finger and thumb vs palm needed to open it.
Inside the compass is a liquid filled needle chamber, with a well defined needle including a nicely pointed "head" featuring a glow in the dark "dot" for night-time navigation. The tail end flight is subtle and balances the needle both physically and aesthetically.
 
The bezel is gently notched for easy grip and rotates smoothly and features degree markings, in 20 degree major spacings, with minor marks for 10 degrees and 2 degrees. It's firm enough that it won't slide of its own accord but smooth enough that it will turn with a finger-tip's pressure. The backing of the bezel is a ring of glow in the dark material to provide a readable back lit bearing in the dark. A fixed red line serves as the index mark and a pair of embedded glow-dots in the base of the bezel chamber lines up with the North indicator. A central dot completes the after-dark navigation picture. 

The compass is moderately large for an EDC pocket compass, at 2" (55mm) in diameter, 5/8" (17mm) in height and 6.8 oz (194g) in weight, but its smooth and solid design makes it an easy carry. Whilst it would not take the place of a good lensatic compass for navigation. It certainly does the job for simple wayfinding navigation. 


 Solid brass construction provides sea-worthy durability. The Sailor's Compass can be dropped, frozen, banged, forgotten until it isn't. If i had to pick something I didn't like about the compass it would be that it's too smooth. The unadorned surface might lead to slick, fumbly fingers to drop a vital piece of kit and some knurling or a dummy-cord knob or thread-hole might go a long way to securing it. All told though, it makes for a very pleasant EDC pocket addition. 

Sunday, July 21, 2019

Review: Danforce G1 Pro Modular flashlight

My love of flashlights is well documented and nothing new. I do however keep losing or breaking them, so I keep an eye out whenever I can for new exciting models. One such light was Kickstarted a while back by redoubtable gearsmiths Dan Force who offered the modular DanForce G1 Pro Flashlight. 
One big draw-card for me is the modularity and the accessories offered in this kit. These include:
  • Weapons Rail Mount(not included in my pledge)
  • Pressure Switch (not included in my pledge)
  • Emergency Power Bank
  • Tactical Pouch (not included in my pledge)
  • Lantern Attachment
  • Red & Green Light Filters
  • Compass
  • Bike Mount
  • Protective Carrying Case
  • 3200 mAh High-Power Rechargeable Battery
  • Fast Charger
  • USB Cable
  • Hand Strap
  • Neck Strap
It's a lot of loot in one kit, that's for sure. So, the flashlight itself is milled from 6061 aluminium and in its "short" configuration weighs 220g and 275g in the "long" configuration.
The body of the light is  1 1/16" (27mm) wide, 1 3/4" (44mm) at the bezel and 10 3/4" (27cm)tall in the long and  7 1/2" (19cm) in the short. 


The difference between the two is the addition of a second battery segment, which is a conversion of the "Emergency Power Bank" component,  and attaching it to the light. The lens head unscrews from the primary battery component, as does the push button end cap. I'm not sure why  the head unscrews as it seems irrelevant as its threading only fits the primary battery segment, and is incompatible with the other parts.  The head houses a mighty CREE L2 LED panel behind an adjustable lens. The lens has a ratcheting twist action, with a loud click, and spreads the light out from a corridor filling long distance spot to a room filling or road illuminating lantern. The light is fitted with a broadly crenelated bezel, which is also replaceable (and accompanied by a spare)

 The Cree L2 emitter has a listed output of570+ lumens in the short configuration, and 1080 in the long, thanks to the combined charge of the  3200mAh 3.7v 18650 batteries, which in turn will power the light in high for 7-8 hours in single and 10-12 hours in double.

 A rotating ring behind the bezel unscrews to reveal a Micro-USB port that can be utilized to charge the battery. It features a blinking green and red LED indicator, green to indicate charging and red seems to indicate charge full. The light flashes once when hooked up to a power source.

Its possible to recharge the "Short" segment  from the extension segment by using its Power Bank end cap. The Power Bank end cap has a micro USB charging input and a red charging indicator as well as a standard USB-a output.The silicone dust over keeps your ports clear of crud.

As well as being able to charge the flashlights battery in its short configuration but can also be use to charge up other devices such as GPS units or phones. Being a separate unit means I can charge one battery as the other is in use which is handy. Especially as I like to keep multiple power generation sources available.

The G1 PRO is all about putting you in control, giving you six separate modes of operation, Featuring high, medium, low, SOS and strobe modes, as well as an eco-mode for when you need extended battery life in challenging situations. Each mode is accessed by clicking the power button on and off in succession to cycle through the modes.


One of the neat accessories is the lantern dome, an opaque cap that fits snugly over the bezel end turns the flashlight into a room illuminating lantern, perfect for power outages at home, in a tent or even just to scope out a dark car boot.

Unscrewing the bezel allows the fitting either of the two included colored plastic filters to project red or green light as needs be. The addition of a compass to the end-cap of the 

The rubber o-rings at each of the seams and the precision manufacture ar what rate the G1 its IPX04 rating (IPX4 – Protects from splashing water, no matter the direction). The bike mount allows clamping the G1 to handlebars to act as a very effective headlight.
The G1 light is bright and robust and the utility of the lens as well as the modular Power Bank components makes for a truly memorable unit

High power mode on wide lens setting.
Unlit testing conditions, suburban street


High power mode, lens in tight focus
High power mode, lens in tight focus, square emission clear


Related Posts Plugin for WordPress, Blogger...