Showing posts with label steel. Show all posts

Tuesday, December 17, 2024

Review: Survival Storehouse Tactical Tin

Survival Storehouse kindly sent me one of their Tactical Tins recently and i'm pleased to present you with my review of it now. 

The tin itself is a standard 200 rnd .30 cal / 7.62 ammunition can, brand new and stickered with the BDH manufacturers ingredients and nutritional facts details. I love ammo cans; robust, resilient and ergonomic, lending themselves to stacking and packing. They also feature a rubber gasket on the removable, latch locking lid for an air and watertight seal. This means from the get-go you have a  sealed, crush-proof and portable storage for your food. The added weight of a steel can is mitigated by its utility and reliability. 

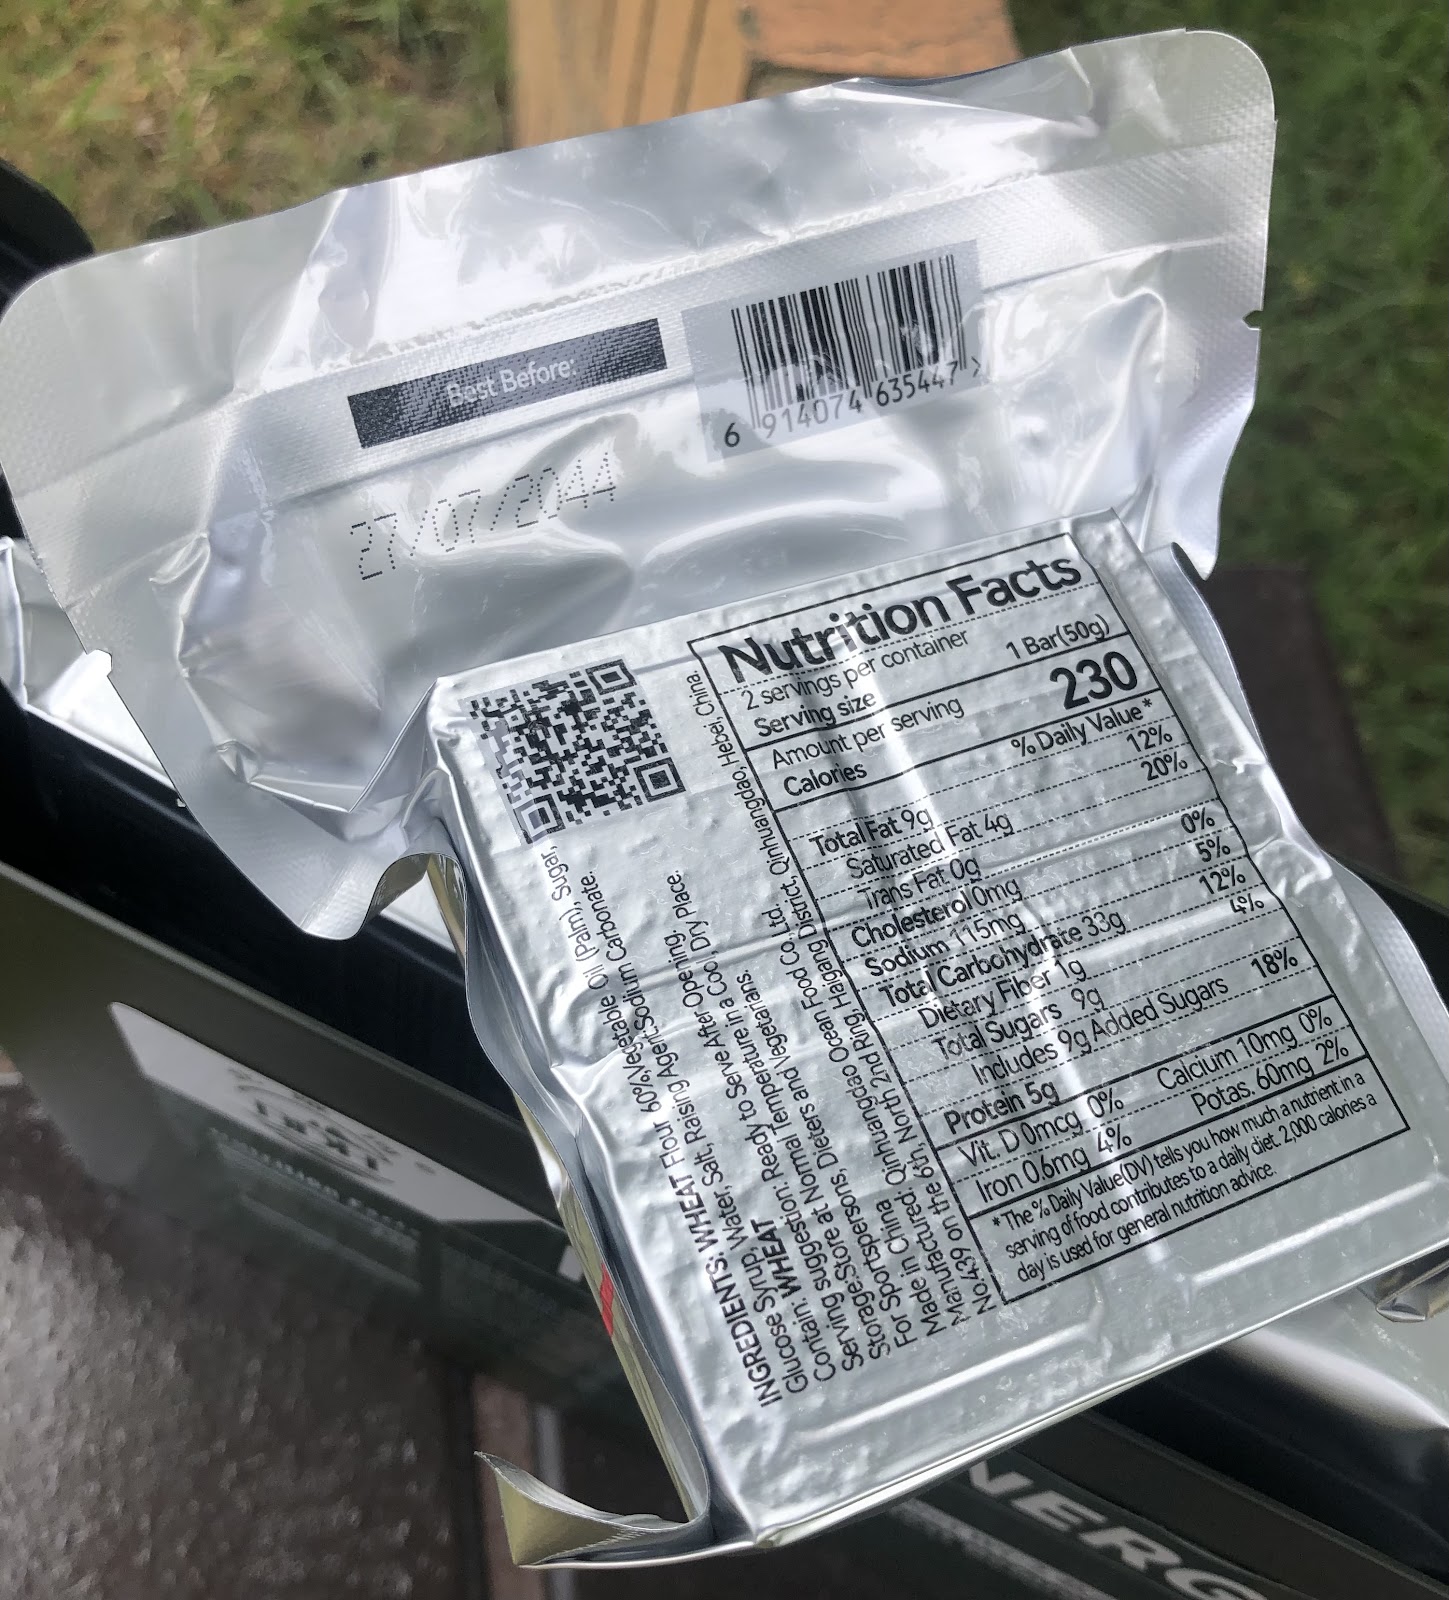
Inside the can are 12 individually packaged high density food bars. I've covered these before here and the ones included in the Tactical Tin are identical, produced by the same manufacturer in China, but the ones included in this Tin were manufactured in August 2024, with a 20 year expiry, good out till 2044! 


The vacuum sealed Mylar sachets each contain 4 individually plastic wrapped biscuits, each block of four weighs 200g (7 oz)  and each 100 g ( two bars) contains 2000 Kilojoules or approx 300 calories. (2000 calories / day is USFDA recommended)

Ingredients: wheat flour, palm oil, sugar, glucose syrup, water, salt, food additives, baking soda, edible essence. This is the standard flavor, but they also come in chocolate or peanut butter varieties. Which I haven't yet had a chance to try. 

I find them very tasty and keep a couple in my car, in my day to day get-home bag and even at my desk at work. Great for a pick me up snack or a "forgot breakfast". 

With up to 20 year shelf life from manufacture date if stored in a dry cool place. These are a reliable and long term food supply, packed with energy and vitamin enriched. Shipped from Survival Storehouse's warehouse in Australia. The combination of the bomb-proof ammo-tin and the super dense food bars makes the Tactical Tin an ideal first stop in any prepping adventure. Perfect for back of the closet, car trunk or bunker load-out!

Friday, June 9, 2023

Review: Gardening shovel

Another hand tool post. I really like hand tools, not only because of their simple utility and ease of use but also on the freedom from reliance on power, for both off-grid use and grid-gone use.

Digging holes is one of those truly universal skills that all peoples; Inuit to Bedouin, Pict to Massai participate in. There is something very primal about digging. Whether is be digging up roots and tubers, clam or crabs for food, digging a fire-pit like a Dakota fire-hole ,digging for fresh water, for shelter or to bury a cache of booty. 

This most recent tool i've added to my arsenal is this very simple gardening trowel I saw online

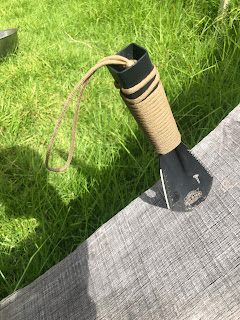
This tool is simplicity itself. An overall length of 32cm (12 1/2"), half of which is "blade" the other half is handle. Made from a single piece of 16Ga stainless steel 2.2cm (7/8th") tubing, the blade has been punched out and folded outwards to a nominal width of 5cm (2")) The resulting edge is unsharpened, but finishes in a respectable point. 

The tip is slightly canted inwards almost to the centre of the handles cross-section, for scooping and balance.

The whole tool has been dip-coated in a tough black paint, which has barely worn on the edges from my digging in sandy soil and repeated throwing into turf and fence posts. 

The butt-end of the pipe handle is filled with a hard plastic plug that I managed to pry off, drill a hole into and add a cord loop for ease of removal and grabbing.

A quick dirt test resulted in a slightly lower yield  than the ChinLin spade but what it misses in surface area it makes up for in depth and low-drag design, which results in a quick digging tool. 

Silent and efficient this tool allows you to dig deep, even through tough turf, perfect for planting bulbs or seedlings. The most exciting part of this tool is that the hollow pipe handle doubles as an eye for mounting a shaft which can either add reach for digging or weeding without tedious bending. 

It is completely and totally coincidental that fitting it to a standard broom handle converts it into a fairly serviceable spear. Much like the humble axe, a spear is a force multiplier and unmatched in melee combat, even in the hands of relatively unskilled operators. 

Weighing in at a mere 120 gm (4 1/4 oz), this tool is easy on the hand and deft in the garden. The only drawbacks are the open end on the blade/ handle interface allowing dirt to enter, but not a  significant issue, a quick shake or bang will loosen that. In a pinch you could scoop up water and carry it in the upturned handle. 

Thursday, March 23, 2023

Review: Scotch eyed auger


I started seeing ads for these a while ago and got one a couple of years ago for bushcrafting adventure and general utility. Having manual tools on hand is good, both for emergency power-down use but also off-grid crafting. Hand saws, hammers and hand-drills are all reliable, if sometimes arduous tools to make use of.

A scotch eyed auger bit is a type of tool you can use to create holes either dry or wet woodworking applications. The “scotch eye” is the hole at the end of the auger and its purpose is to enable easy handling and additional leverage. 

This particular one has a 20mm auger bit (8/10th") with a single flute that runs for 9cm (3.5") for  a total shaft length of 15 cm (6") and terminating at a round pipe eye of 18mm (7/10th"). It appears to have been made from a 20mm hex ended drill bit welded onto the eye segment. 

The cutting tip of the tool starts of with a self-tapping screw-head that ensures good purchase and correct placement of the auger for optimum boring. 

The cutting face of the auger is set back from the leading edge of the flute, which has the effect of being a scoring/ cutting edge, around the circumference of the bore being cut, this ensures a clean cut and smooth finish.

The eye is set perpendicular to the auger shaft, such that a branch can be fitted through it  in order to make a handle to easily turn the auger and bore into even hard, seasoned timber. Once the tip has bitten, and the cutting face engages, the long flutes will guide the auger on a straight path through the wood, so be sure to get the initial line straight. 


The eye is also a means for producing peg ends that will fit into the hole bored by the auger. These can be  whittled manually and test-fitted in the eye or hammered through the eye to shave/ scrape the pegs down to size. The remaining hex of the original drill  haft is lined up to nicely  be hammered upon, which was also a nice touch. 
The eye is sightly narrower than the auger bit, which means that pegs cut with it will be -slightly- loose, which can be a good thing depending on the situation, but a long as you take it into account you  would be fine. If I were making a pole and branch ladder, i'd be lashing the rungs in, regardless. The length of the tool allows for quite deep (6") cuts to be made. This is plenty deep enough to make a rocket fire from a log like a Swedish Fire torch. Deep enough that you could probably pin log cabin logs together, though that would be a lot of hand cranking. pegs used in this fashion are called treenails or trennals and have been documented back as far as 7000 years.

I've seen some Scotch eyed augers with one face of the eye being sharpened to bite into the peg-wood, whilst the rear face is hammered and mine lacks this. I'm not certain it would be necessary and have done just fine without, but if you were intending to make a lot of pegs out of cut lumber it might be advantageous. I whittled down this segment of green branch the power company lopped from one of our cub-side trees, and its made a very good handle in less than a minute. I did this when my previous branch/peg handle snapped whilst mid way through boring a hole through a particularly seasoned piece of recycled timber. A minor setback, quickly addressed with a field expedient replacement and I got the job done. 
One thing that hadn't occurred to me until I was well into my boring task was that the swerf material (wood chips) I was boring out would make excellent kindling, even in wet conditions ,the inside of most wood stays dry.  This would be even more true with more resinous woods. I've used the auger on branches and logs I've found trail-side as well as dressed timber both fresh and reclaimed. 
One word of advice, ensure your leverage stick is a good fit and smooth or you'll hurt your hand whilst boring. Wear gloves. Be sure your angle is correct when starting off and check for drift. All in all its a very simple and elegant tool and at only 175g (6.3 oz) its an easy add to your bushcrafting carry. 
I made a simple leather pouch for it with belt loops, so I can take it with me along with my belt knife and trail hatchet. I imagine myself making tripod stools and even legged benches with this tool, as well as through-holes for future furniture projects. 


Thursday, February 16, 2023

Review: ChinLin spade trowel

Whether it's putting in crops, digging up a secret-squirrel cache, taking care of some business in a back-woods latrine or just some old fashioned fox-hole digging, having  a good digging tool comes in very handy and saves the old fingernails. I have a couple of folding entrenching tools in my camping/bug out kits, but even compact as they are, they can add a bit of bulk and weight. Sometimes they're even a bit too much tool for the job. A full-sized e-tool will make a big Dakota-fire hole, where a trowel sized tool would be more economical. I love multi-function tools, especially when they don't add function at the expense of the primary function. 

This little beauty is the ChinLin HW-901 spade and I originally picked a couple up on Wish.com but it looks like they are no longer sold there. I did find them on this Indonesian clone ( buyer beware). What it is is a 26.3cm ( 10 1/3") trowel with a para-cord wrapped box handle. Made from a  single piece of 420 Stainless steel, the handle has been welded along the middle of the upper face, obscured by the cord wrap. The trowel has a sharpened edge around 3/4 of its edge, with the final quarter being a serrated saw-edge. The spoon face of the tool has a nail puller cut in as well as a set of four hex-head wrench cut-outs. 

The edges aren't super-sharp but they're sturdy enough to chop with, which will be good for clearing brush, weeds or stubborn roots whilst digging. Weighing in at only 80g (2.8oz) it's not going to cut it as an axe, but it makes for a lively and light digging tool. The sharp edges and serrations do make digging through turf easy, and the tool-cut-outs don't effect digging and scooping output significantly.

There is a 7cm ruler printed on the inside of the spoon which is  a nice addition. The pressed steel has a spine ridge pressed in for stability and the tool is very stiff, which makes it very good when sawing or prying (splitting cracked wood or perhaps stone), especially handy when pulling nails with the nail puller or applying torque with the hex wrench holes. 

The cord-wrap is made of 290cm (9'6") of paracord, secured to the handle through four sets of holes drilled into the sides of the handle, and terminating in a lanyard loop at the bottom end. The handle has a slight taper which keeps the cord from sliding off either ends. 

Those side lashing holes and the hole in the spine of the spoon near the handle of the tool can also act as attachment points to fix a pole fitted into the hollow handle, either acting as a extension to the handle, or to turn the tool into a spear. 

The tool comes in a hand if pretty flimsy nylon pouch with a belt loop. I've found it very useful to have on hand when picnicking or hiking. The pouch keeps the sharp edges secure. 

I bought one for myself as a tactical hand shovel, and another for my veggie-garden planting partner. We've both put it to  good use and they've never failed us. 


Panjang Handle: 10.4 cm


Sunday, March 15, 2020

HomeFront: Ordning hobostove hack


I like fire, almost as much as I like blades and lights.. but I do not like being on fire. Which is why I like fireplaces and stoves. Whilst it is easy enough to dig a hole or set up a ring of rocks, sometimes a purpose built tool suits the purpose even better. there are times when the full-blown  BBQ is overkill, especially if I hiking and camping.

Systems like the Fire- Box are purpose built and designed expressly to suit this need but as it turns out it is possible to quite easily make your own. I decided to make my own using an IKEA Ordning cutlery rack I had seen on line. The Ordning rack is a 12cm diameter,  18cm tall  stainless steel cylinder 180g with an inwardly rolled lip. The sides are perforated by six sets of 1 cm holes in a 3 x 6 grid. The base also has holes. These holes arced these holes act as the vents  for the fire. In order to improve air flow, I decided to put feet on mine, so I fitted it with quarter inch hex bolts I have fixed with a nut and a washer at the four corners and in the center for stability.

I then used a Dremel with a cutting wheel to cut a door into the side, using the holes as a guide. I cut a 3 x 4 hole hole and folded it inwards from the bottom. This hole became the feed hole, to feed the fire whilst a pot or pan was on top of the fire. Folding the lip inwards provides a platform for the fuel and stability when feeding larger fuel items. I also cut 8 notches in the lip of the cylinder in three pairs in one direction and one set perpendicular to those. These notches are for steel support wires I cut to size to act as a grill and pot support. I used welding rod for these wires as I had plenty.

Lighting the fire was a simple matter of filling the stove with tinder and woodchips and lighting it which I did both through the feed hole and also through the air holes. With just twigs and woodwork off-cuts, I got a nice little fire very quickly and noticed the feet kept the fire off the wet ground which helped it burn. Once it got burning I noticed the smoke coming out of the holes was igniting giving a more complete burn and rendering it almost smokeless. I suspect the metal walls were igniting the flammable wood gas. This increased the efficiency of the stove and reduced tell-tale smoke trail effects.

Putting the grill wires on a provided a stable platform on which to boil water for tea in my enamel mug, but a billy or pot or kettle could have fit just as well. The stove put off some nice radiant heat from just sticks and off cuts, burned very clean and down to basically ash. Once it burnt down I flipped the grill wires off and upended the stove to knock the last of ashes out. Popping the wires in the stove it was cool enough to pick up and pack in minutes.

Its a very lightweight system and requires attention to feed it as it only has a small fuel capacity but it was really easy to use and make. I will think about some kind of cloth bag to put it in to keep the soot off things and keep the wires in place. I look forward to experimenting with cooking on it and seeing how little fuel I can get away with to make a whole meal. 
One of the things I like about this design was the lack of sparks. Even with a quite a strong cross breeze, the stove let few to no sparks escape, the network of holes leading to quite complete combustion as previously noted which in turn reduces fire-risk. I like this because it means reduced risk of fire spreading and less effort being required in setting up fire -breaks, reducing environmental impacts and set up time. Feeding a tent peg through the holes in the base could lend additional stability and with its feet, the stove could be set in a depression or hole to further reduce its impact and also exposure without smothering the fire.

Monday, July 30, 2018

Review: Firebox stove


I'm a notoriously difficult present recipient, mostly because I like eclectic and specialized kit and often get my own. When my birthday rolled around this year I was in the fortunate position to have made a list of cool things that I had not yet acquired. One such item was the flat packing and portable fire place system called a Fire Box Stove. This is the Gen2 5" Folding Firebox Campfire Stove which is a multi-purpose super tool for fire.Thanks Basse and Barry!

It's a multi-fuel cook stove designed to be able to utilize wood and other fuels found in nature, solid fuel tablets, alcohol burners, iso-butane gas burners, gel fuels (such as Sterno), wood pellets or charcoal briquettes. I haven't yet tried it but i'd think pine cones would work nicely in it, as would shredded or twisted cardboard.


The folding Firebox's large size and its sturdy construction makes it reportedly stable enough for a large dutch oven yet it can be used with cookware as small as a camping cup. BE sure to set it up on stable flat ground to avoid spilling your pot of 'pocalypse stew ... The Folding Firebox Stove is also easy to set up. It's four hinged sides effortlessly opens into position, the internal fire base folds down to lock it into its approximate box shape and the accessory fire sticks and ash-tray slot into place as desired. When it's time to go it folds flat, clips together and slips into its own handy leather case ready to slide into your pack, cleanly and easily.

Constructed of Stainless Steel, it stands 19cm(7.5") tall, 12.7cm(5.0") across when set up and all told weighs 907g 92 lbs). Folded it lays a mere 0.95cm (0.375") thick. The hinges are well enclosed longways loops of rolled steel and steel pins. I found the hinges to be smooth and whilst not stiff, to be firm enough that the walls did not flop around when setting it up.
When the internal base is deployed , it braces the walls and fits it securely. Even after use, the hinges moves smoothly. The ash tray was a bit fiddly to fit but it has a right way and a wrong way, as its not square and neither is the stove. (It's a trapezoid.) The fire sticks either slots through the walls of the stove to offer coal support or into notches in the top to provide stable cook surface.
A perforated grill plate can also be fitted into the top of the stove in place of the fire sticks. This allows food to be directly cooked on the fire, without need of pot or pan but also makes good cooking platform for a pot or pan.

As well as the perforated sides which give good aeration and wind shielding a fold down lip at the top of one side gives when more heat and burn control. Fuel can be fed in through this gap or through the larger holes in the base of the walls. Short sticks, twigs even straw can be fed in though these side slots without having to remove cooking items from the heat. The relativity small size of the stove means that only a small volume of fuel can be loaded in at any one time so no big logs for long slow nighttime burns and it will require constant feeding. The Firestick posts made good fire tending tools and allowed me to lift and shift components such as flaps and the grill plate without burning myself.

The modular design of the FireBox means that a variety of fuel can be used, in a variety of amounts and applied to a variety of cooking methods. My only complaints with the design are that some of the tolerances are very tight, such as the holding pegs of the grill plate which can be; fiddly to seat and popped loose under heat.

A fire chimney isn't new to my firemaking kit. Astute readers may recall the CampMaid charcoal chimney fire starting system I covered. In principle the two are every similar but the Firebox is purpose built as a stove, whereas the CampMaid chimney is designed as a BBQ starter.

With its multiple cooking configurations, useful accessories and collapsible design, the Firebox leverages its lightweight design and sturdy materials it can use virtually any size cookware and make use of some pretty marginal fuel sources to not only cook food, boil water to make safe but it also functions as a portable campfire.

It's small, not for for burning logs but it certainly beats trying to clear a dry spot for a fire after a rain, and preparing a fire pit, or leaving one improperly quenched. The Fire box, being so well vented, burns very completely leaving only fine ash if left to burn out.

As a backyard stove, it was excellent, and meant I could set up a small fire in a controlled way to burn off scraps and have some fun with my little one Tactical Baby, and teach her good fire behavior in a controlled space. In a wilderness setting it might be wise to set it up with some wind shelter, as the perforated sides and base let embers fall through and it would be irresponsible to spread fire, also it shelters the fire and ensures an even burn essential for cooking.


I used my EverFire brick firestarters to both get it going and to do some initial cooking and it worked really well with those. The Firesticks allowed me to tailor the burn height and positioning. With these to maximize their effectiveness.

I noted a little warping of the grill plate after its first use, and some thermal discoloration of the steel from where the stainless steel reached sufficient temperatures. Not that this was a surprise or is a problem but good to remember.

Its a little too big to fit in a cargo pocket,  but small enough to fit in the front pouch of almost any daypack i'd want to take on the trail with me.

I look forwards to collecting the accessories and trying out my lightweight camp cooking skills.


with an Everfire brick as fuel. supported by Firesticks

Off cuts and woodwork scraps kindled by the EverFire brick

time for a nice mug of tea!


Baby wieners toasted and consumed! Vacation fun!


Non-sqaure base plate folds to holds it rigid
A single methylated spirit charged EverFire brick gets it red hot


Heat your tea, cook your dinner, warm your hands!


Wednesday, February 7, 2018

Review: Jimmy and Chappie


Sometimes, you really just need the right tool for the job, especially if that job involves bashing things or breaking things. Sometimes it's a pesky padlock you lost the combination for and can't manage to shim open. Sometimes it s a pallet of wood you're recycling and need to cut the rusted nails out of. There are lots of different reasons having a set of bolt-cutters or a small crow-bar for. I'll leave the glorious details up to your imagination. Importantly, sometimes these jobs are called for away from your workshop or bunker. Which is when smaller, portable versions are called for. that's when tools like my "Jimmy" and "Chappy" come into play. I have a full-sized set of bolt-cutters (seen sheathed in my SORD 870 Back Scabbard here) and a collection of pry bars big and small all the way up to a whopping huge 1650mm Cyclone fencing post Eagle bar.

So the addition of a short, 18" Plumb wrecking bar which I've nicknamed "Jimmy" after one of the traditional names for a crow-bar, to go along with the seriously beat up and battle-worn "Chappie" bolt cutter. Both tools I rescued from a nana-garage sale a while back. Why "Chappie" you may ask? Because "Chappie can no do crimes".

 Jimmy is a 18" Wrecking Bar made by Plum, and features a goose-neck at one end and an angled chisel end at the other end. This allows you to pull, pry and straighten, with the angled chisel end good for prying and lifting, the goose-neck end is slotted for pulling nails. The length of the bar is hexagonal in cross-section, making it possible to attach a shifter or a wrench to it to for extra torque, should you really need to pop something open. Constructed from forged high carbon steel, Jimmy and bars like Jimmy can and have taken a beating. Hammered between planks of a pallet ,and stomped on to pop a plank up, even used as an impromptu hammer utilizing the flat face of one of those hexed-sides to drive home tacks or loose nails. I've found the 18" Jimmy offers more than adequate leverage for the tasks I've put it to.


Jimmy has a very hefty weight to it, thanks to its forged carbon-steel construction, which is a boon, but not too much of a burden to carry around in a pack or in the back of a vehicle. I've experimented with carriage options on both my battle-belt and LBE vests too, but am not yet satisfied with both secure, quiet and accessible options. Ideally I'd like to be able to reach back and whip it out to pry a door or pop a zombie in the head, one handed, but if it's in bag or on my back, I'd have to get a buddy to help me out. Not getting hung up on things is also important, especially in a search and rescue or salvage situation and I will end up with a "Medium speed, acceptable drag" option in the end.

Chappie has had a much harder life and bears the scars of years of neglect and abuse. His cutting hammers are dinged and chipped from ill-use, there is rust and crud worked into his recesses and workings. The rubber of his handles is cracked and broken of in many spots, bare metal showing through, and there is a post-fulcrum adjustable nut and post that act to limit over-bite on the cutting hammers. The nut needed a little WD40 and a wrench to loosen but once loose, It was possible to adjust the limiter to allow a better cutting action from Chappie with his compound hinges. The damaged hammers are hardened so are really difficult to repair, resistant to filing as they are. I have been able to do few minor cuts with Chappie, clipping exposed nails in salvaged timber and cutting chain links for home maintenance jobs, but the damage is inconvenient.


Bolt Cutters typically have long handles and short blades, with compound hinges to maximize leverage and cutting force. They can yield upwards of 20 kilonewtons (4,500 lbf) of cutting force for a 250 newtons (56 lbf) force on the handles. Given this, I feel I'm missing out on prime cutting power with the chips and dings in Chappie's teeth. An upgrade to a first-hand cutter may be in order. That said, by adjusting the post-fulcrum nut and having a go at the worst of the deformations to make it workable, but I suspect it would require power tools and re-tempering to get it back to prime condition.

As with Jimmy, Chappie's small size makes it very portable and easily stowed in a pack, back pocket or in a suitable pouch. Being able to quickly and quietly cut chain, cut chain link fences or locks could be very useful in a disaster situation, where search and rescue or salvage might be hampered by bigger, heavier tools.


Again, don't be doing Crimes!

But. Have the right tools available to you you to do what needs to be done. Practice and get to know the limitations and abilities of your tools, and practice caring them to get a good setup in place.
Related Posts Plugin for WordPress, Blogger...