Showing posts with label FUBAR. Show all posts

Thursday, June 13, 2013

Review: Get Home Bag - Bug Out Bag

Some friends of mine asked me recently for recommendations for Bug-Out-Bags, after watching the NatGeo "Doomsday Preppers" show, and The Colony.

I don't have a "Bug-Out-Bag", per se,  but I do have two "Get Home Bags". One in my car, and one is my every-day pack. 


I've covered both before, as Items, and shown off what I keep in them from time to time, but as a unit, I thought it might be worthwhile laying it all out.

My primary, EDC and "get home bag" is the Platatac Bullock Echo, to which I've added a couple of extra pouches and loaded up a fair bit. This is the bag I have with me everywhere I go, and I still manage to carry my iPad, days food and whatever else I need day by day in it. Great pack. It's a reasonable load that I carry, as you'll see, but I can run, climb, crawl, jump and probably swim with this all on me. I get some funny looks sometimes, but I'm used to that. 


1) waterproof poncho, OD / first aid kit
2) set of metric Alan keys on a split ring
7) cord
12) ZuluNulonGear CAOS admin pouch with small adjustable wrench, LED plyer multitool, Buck Tools Multitool, dexim BluePack 1200mAh ( 5V-500mAh) USB iPhone battery, UV laser pointer, kumquat carbon fiber credit card bottle opener, sharpie.
14) microfiber towel
16) Platatac Half Med pack with elastic bandage, forceps, non-latex gloves, cylume sticks, band-aids, bandages
18) Sea To Summit Alpha cutlery and chopsticks
20) Platatac HeadOver head sock 
23) alcohol based hand sanitizer
26) cable ties
27) toiletries bag with toothpaste, soap, safety razor, floss
28) essential oil deodorant bag
29) Spare glasses in hard case
30) nut and honey snacks
32) whistle

I also keep this, in the car. I consider this my "broken down in the side of the road" kit, but also doubles as my camping/kicking adventure bag. I have a full first aid bag in the car, and a fairly complete tool bag as well.

As I've covered before,  the Kathmandu Hip Bag is a very dependable, and feature rich, wearable pack.

With my FUBAR and CRKT Stiff Kiss it is quite the formidable survival pack.

Here's what I keep in it....

33) heavy waterproof poncho, Woodland camo
34) gaffer tape
35) camping propane gas
37) enamel mug
38) bug spray
39) sweetened condensed milk in a tube
42) high-test marlin-fishing line
43) Petzl "figure 8" device
44) Kong locking carabiners
45) 5mm dynamic rope

46) matches
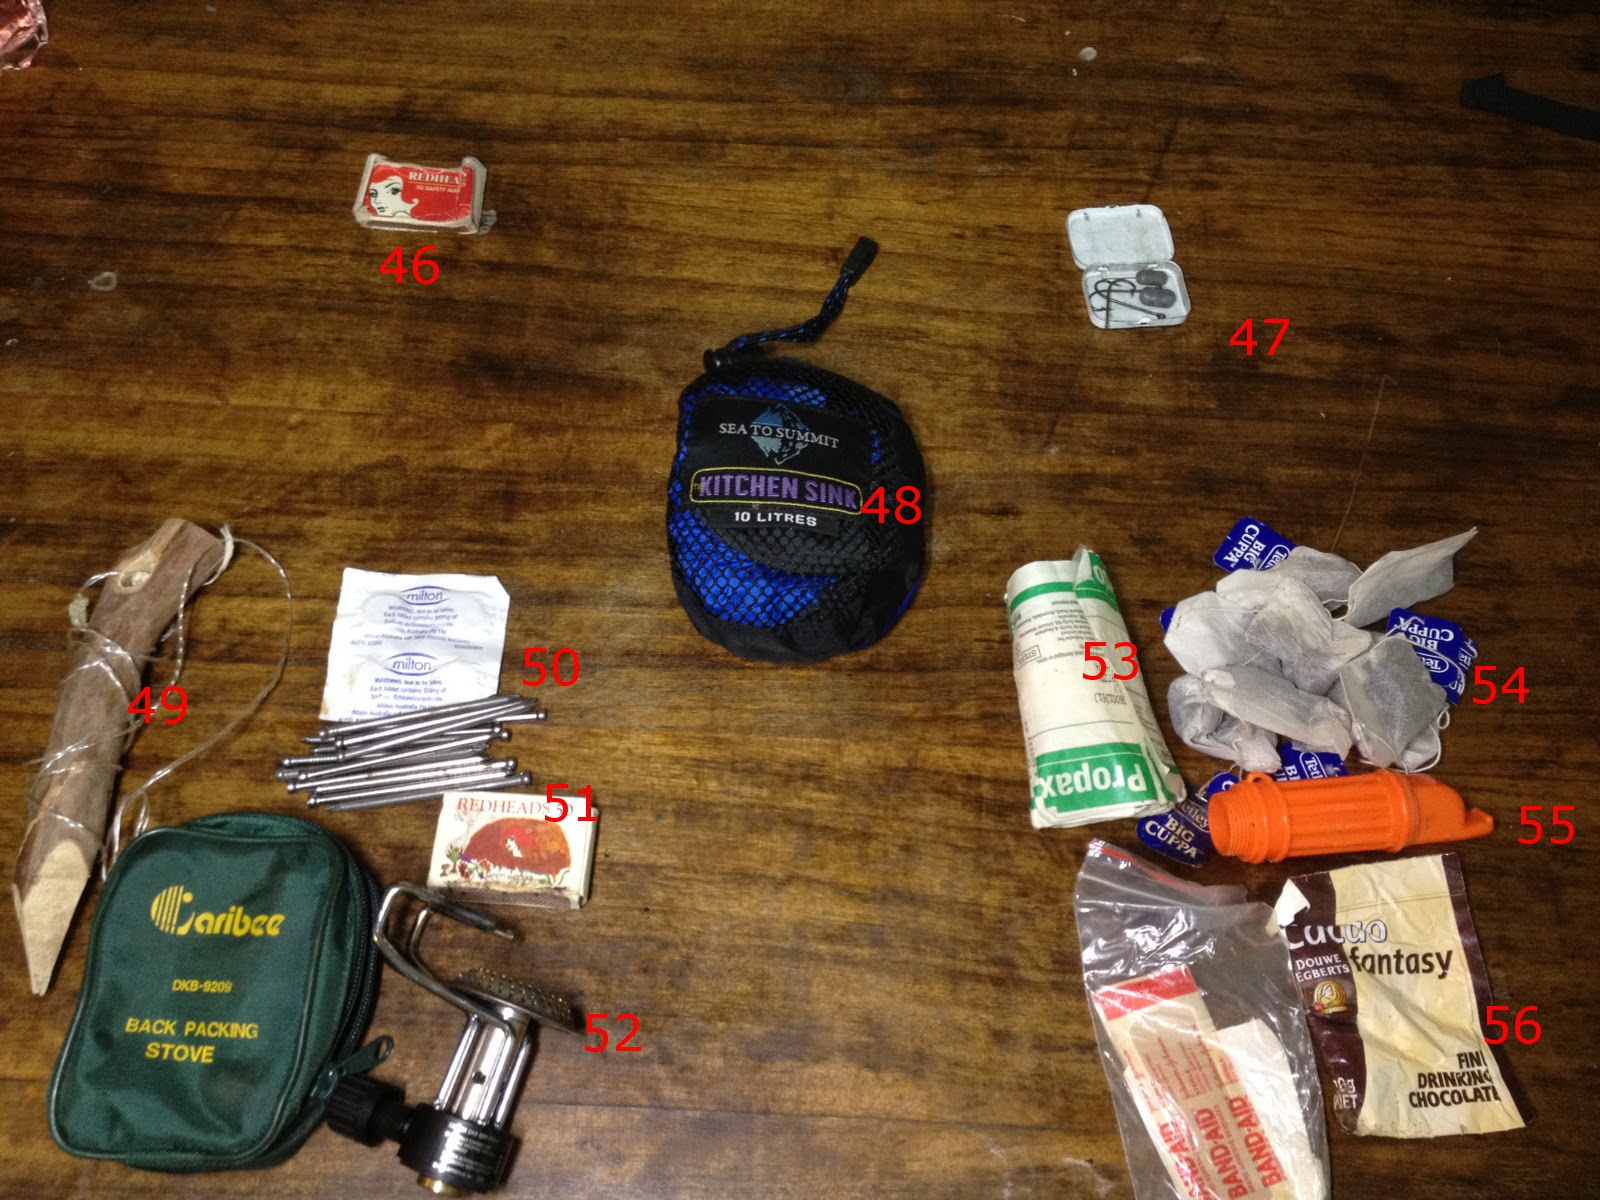
47) fishing hooks and sinkers in-a-tin
49) hand carved snare with braided line
50) Miltons water purifier tablets
51) nails
53) bandages
54) tea bags
55) whistle and flint
56) powdered chocolate.


I can wear both the Bullock Echo and the Kathmandu bum-bag at the same time, between the two I have a lot of survival kit in fairly small, wearable packages. Given that I don't spend a lot of time in the distant wilderness, but more urban sprawl, and country roadsides I think that in the event of a disaster in my region, I would be able to manage with this loadout for quite enough time to get home, or away, and overcome most any obstacle that I might come across.

For me the idea of a "bug-out-bag" is more of a "never coming back" bag, which would be a little more substantial, and aggressive, where these two are more a "get out of trouble" set. I can help myself, and others push through rough times with what I carry at all times, and have with me in my car...

After the Black Saturday fires of 2009 and the semi-regular flooding we are getting, I want to be ready, Equipped!


[edit] I've been asked if i would make Bug-Out-Bags for sale ... anyone interested?

Saturday, July 28, 2012

Video Review: FUBAR & Annihilator vs meat

Following on from my previous post where I demonstrated the kinds of effects the KA-BAR Zombie Killer knives have on a selection of beef and pig parts, today I compare and contrast The Dead-On Annihilator SuperHammer with the Stanley FUBAR.

For the two hammers, I did static tests with the the beef sides, leg bone and pig head on stacked logs. This was my first attempt at target cutting on meat, but was a very rewarding experience.

Again, I tried to limit myself to the, strikes and thrusts that I would use in a fighting situation, rather than what I might use in a demolition or handy-man type situation, in that I wanted to avoid over extension, and sufficient commitment to each strike to complete it satisfactorily whilst being in a follow-up position as well.

As I mentioned in the original post, and in the clips, all the meat was retrieved and used to make some really delightful stocks, the fat rendered for lard and the remnants fed to my chickens to supplement their pellet, grain and vegetable scrap diet.

So, on to the mayhem...


1 Dead-On Annihilator & Stanley FUBAR test vs prone sides of beef


1 Dead-On Annihilator & Stanley FUBAR vs beef leg-bone


Whilst being (presumably) off-purpose for these tools it was a very valuable set of tests for me personally, in that they demonstrated what kinds of effects these tools would have in the event of their being used in combat. Namely; messy and very unpleasant. I've had ribs and fingers broken from blunt-force trauma from weapons (accidentally during the course of kendo training) so can attest to how debilitating it can be, even with something as innocuous as the wooden bokken let alone a hammer. War-hammers were employed for centuries with devastating effect

Tuesday, March 6, 2012

Review: Utilikilt


I've covered a pocket-covered vest before, but also wanted to give some time to one of my favorite pieces of clothing. I've worn kilts since i was about 7 and my folks had one made for me when we lived in the UK, in our family tartan. When I "came of age" and they said I should get a formal suit made up, I instead chose to get my dad's kilt, and Prince Charlie vest and tail-coat made. Years passed, and I came across the wonder of the Utilikilt, and was in love! These hardy and ready to rumble kilts are made in Seattle and what they lack in traditional styling, they make up for in spades with utility! Five or six years ago for my birthday I was gifted one of their most option-laden models, so here it is, the Survival Utilikilt .
What is consists of is a heavy duty press-stud closure kilt, made of a pretty hefty 9 oz 100% cotton twill. The press-studs affix the two ends in a very secure 'V' in the front, giving ample security to the front, and even takes into account belt loops, which are doubled at the closure point, a great feature. Twin deep internal slanting pockets give a "pants-like" place to stuff your hands and gear. A pair of elastic-gusseted side-saddle cargo pockets. There are in fact two pockets, one shallow, the other deeper, (these are also detachable, and each comes with its own closure flap and belt loops.) The back of the kilt features two standard sew-on pockets, but are just as awesome. Pockets on a kilt, brilliant! A key clasp on the front gives an attachment point for keys and lanyards, which I use to sling a lanyard from my multitool .


One feature that really stands out and puts this back in the realm of survival-wear is the addition of a "modesty" closure system. A simple toggle and loop setup affixes the two front flaps at the middle, and keeps the two fold from opening under any weather circumstance. No risk of wind lifting up one side to flash the civilians. There is even a button hole on the back side of the kilt, so that in a pinch you can bind the front and back together to give a loose-shorts effect for those times you -really- don't want your undercarriage exposed, like assaulting a barricade, climbing over burnt-out cars or vaulting fences.


Utilikilts have several other awesome models, and the orange one above is one of them, this is the Workmans Utilikilt which is made from a beefier 12 oz. 100% cotton Duck cloth. This kilt was designed with construction workers in mind and as such features places for tape-measures to clip,and two riveted-on multi-chamber saddle pockets with pouches for kids of items. “The Grip” adjustable side hammer loop, which fixes with internal press-studs and provides a really good attachment point for hammers, tools, holsters and the like. My FUBAR fits really nicely on it. Again, this kilt features twin pockets at the back and also comes with a "modesty" closure system of a couple of internal press-studs to close up the pleats and make a set of quasi-shorts when the need arises.

Both these kilts are rough and ready, rugged and hard-wearing. The black Survival has faded slightly, but gets a lot of wear. The orange Workman is quite stiff, but that comes from being such a heavy fabric. I feel I can depend on them to take whatever I dish out to them, have worn them whilst camping and adventuring, and will wear one of them to the Tough Mudder at the end of this month.

Here's one last pic of me in my -other- Utilikilt, a more refined office-wear version, the  Mocker Utilikilt in olive green,after a week in the office, going to see the Sisters of Mercy play, sporting my Zombie-Tools t-shirt.

Wednesday, January 25, 2012

Review: Kathmandu Hip bag

Here is a piece of essential kit that I received for Giftmas a number of years ago, which I have taken with me hiking all around Australia and New Zealand. It now makes up my bug-out-bag, and lives in the wheel well of my car, under Tactical Baby's car-seat. Being a sizable pack I've been able to use it as my sole day-pack when hiking up and around a number of mountains without being encumbered and more importantly keeping my hands and shoulders free. I've chopped and changed the contents a number of times, to suit my needs of the day.  It's also where my CRKT Stiff KISS and FUBAR live. I haven't been able to find what it is called, it seems to be out of stock, but here is what I can tell you about it.

There are three external pockets, one of which is a draw-string tightening bottle pouch, and two zippered pockets, each topped with a strip of SOLAS tape. The main body of the pouch holds an expansive chamber, probably at least 5L in capacity. Both the side pockets and main chamber are zippered, with toggles fitted for ease of opening, and are covered by well fitted lips to keep rain out. The whole pack is made of a hardy Cordura nylon throughout. Two sets of Fastex buckles on webbing straps are fitted to tighten the pack down, and there are three daisy-chain loops of webbing sewn onto the middle, perfect for fitting Cyalume sticks, I have three, red, blue and white, currently. The back pad is fitted with a wide band of closed-cell foam for padding, and also has a space between the pack and padding for fitting either a belt or perhaps documents. The side straps include some padding bands, both of which include a small, zippered utility pocket and come together in a wide banded Fastex clip. Two D-rings fitted to the top of the pack allow for shoulder straps to be fitted, to assist with load-bearing, or offering  alternate attachment points. A webbing handle finishes off the carry options nicely
Here's what I currently load out with: In the main chamber I have a tightly rolled woodland-cam waterproof poncho,  a linear induction flashlight (I taped over the emitter end, to cut down on light leakage). Two rolls of tape, an enameled mug, a roll of SES tape, a tube of sweetened condensed milk, 4 metal espresso cups, a bottle of bug-spray, a long length of high strength fishing line, a propane cylinder, the Bear Grylls  Ultimate Survival kit I've reviewed previously, and 50m of 5mm dynamic, along with two 2200kg carabiners and a Figure 8 Rappel Device.

In the outside zippered pockets,  I keep a snare kit, a Caribee camp stove, matches, Milton water  purification tablets, nails. In the other pocket, a set of bandages, BandAids, a survival whistle with a flint, tea-bags and instant chocolate. A Sea-To-Summit 10L Kitchen Sink lives in the bottle-holder, and in the side-strap pockets are another box of matches and a pill-tin with fishing hooks and sinkers.


By no means an exhaustive survival kit, but I like to think that with this in the car, I am able to be a whole lot more prepared for a road-side delay if I am out adventuring, or if the need arises, and we bug-out, an advantage over the elements.

Monday, January 23, 2012

Review: Stanley FatMax FUBAR


A couple of years ago I received a catalog in the mailbox from a local hardware store, and whilst flipping through it, came across something that immediately stopped me in my tracks. I've had a few hammers over the years, from ones I inherited from my father, to the bastard leftovers of shared-house shed tool boxes but I'd never before bought my own. I've even reviewed a multi-tool hammer I bought as a gift last Giftmas, but this is something different. This is the Stanley FatMax range FUBAR and it is a real beast. At 1.13kg it's a pretty heft piece if steel to be swinging, but this is no tack-driver. This is a breaker.
Made from a single piece of forged steel, with no fitting joins to weaken the tool, just a rubberised and textured grip covering the middle of the bar, this is a piece designed for some serious durability. It's design incorporates 4 tools in one, which as I've previously mentioned is always a draw-card for me. I appreciate extra functionality that doesn't compromise the efficacy of the tool. The head-end features a large striking face, positioned and balanced fairly well for rough work; pounding big nails, and bashing things into shape. As I said, it's not a tool for delicate fittings.

The back of the head features my favorite part, the toothed jaws are designed to fit and grab common lumber sizes (2x4 and decking boards). This is great, and I've demolished a packing crate in less than a minute with this, salvaging almost every piece for handy-work, where a regular hammer would have taken a lot more effort, time and risk of injury. Right tool, right job. I've also made bricks go away with it, not only popping one brick out of a wall, but also shattering them into gravel when the need arose.

The tail end is made up an angled pry-bar, with a nice broad chisel edge for getting a good "bite" into whatever you have slated for forceful opening, without being a snapable knife-edge. It also features a nail slot, beveled into the body of the tail, so as not to reduce the structural integrity of the edge. I've also used it as a lanyard loop. As you can see, the tool is coated in a protective coating, but has flaked off revealing the tempered steel underneath on the areas of hard wear. The hardened steel has taken pretty much all the beating I have dished out with only some light scratching, and I am fully satisfied with this as a demolition tool.

There has been some debate I've read about this as a post-Apocalyptic hand-weapon, and whilst heafty, and oddly shaped, I'd suggest that with practice, it would be a valuable addition to your arsenal. By practice, I mean using it as intended without mangling yourself or those around you. Whether tearing down improvised barricades, or putting them up, I'm glad to know I have a FUBAR in my car, to FUBAR anything that blocks my path. Just like Stanley the Honey Badger would. FTW.

Video demonstration anyone? 

Related Posts Plugin for WordPress, Blogger...