Showing posts with label salvage. Show all posts

Thursday, April 27, 2023

Review: restored Folding entrenching tool

 A couple of years ago, between lockdowns, I went for a bushwalk with the family, in the Churchill National Park just near my parents place, and on the way back we passed a couple of items, sitting rusting beside a tree. I'm a firm believer in the old Marine adage of "Gear adrift is gear a gift", and as it had obviously been left in the elements for some time, snapped them up. A good sized Dutch oven, and a wooden handled cast iron pot with lid, and beside them: a rusty entrenching tool. After some soaking, scrubbing, heat-cleaning and re-seasoning the pots have become a welcome addition to my outdoor cookware collection.

The entrenching tool appears to be a Bushtracks folding entrenching tool with Pick' which had seen better days. The screw-down locking bracket had partially seized but with a little elbow grease and liberal WD-40, I got it worked loose enough to unfold the shovel-head and the pick head, with a little extra work I cleared the screw threads of grit and get it working smoothly. 

The next step was to wash and scrub the rusted  shovel face and pick. Luckily the hinge and locking bracket were not especially rusted. Once the loose crud and dust was removed, I heated the shovel head over the gas range hood to drive off any remaining moisture and coated it liberally with linseed oil as a seasoning mechanism. I did this outside as the hot steel vaporized the oil into old-timey smelling white clouds.

The scrubbing and seasoning paid off  and the surface has remained rust-free despite quite a lot of digging, both in the garden and trips to the beach where I use it to fill ballast sand-bags for our sun shelter. I have previously reported on my black tri-fold e-tool and the much smaller tactical-dump trowel but i'll be comparing the two e-tools, as they're in the weight-class.

I'll start by breaking the tool down into its major elements: the shovel, the pick and the haft. 

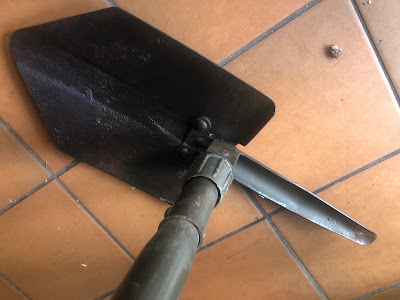
The working end of the shovel is a triangular tipped square side shovel, with  a gentle scoop. The tip is rounded and the edges are quite wide for durability, unlike the tri-fold which has a decidedly sharpened edge. One of the square sides has a sawtooth edge cut into it. The shovel face is riveted onto the hinge piece with three hefty rivets. The shovel has three positions, folded flat, 90 degree "Pick mode" and full extension. when folded flat the "head" of the shovel between the rivets makes a half decent hammer face, perfectly suitable for driving tent stakes in, not so much for fine carpentry. 

The screw-down locking bracket features  a big washer to aid in keeping  a tight fit when tightened which has stood up to some enthusiastic hammering and digging.

When folded out in "Shovel mode" the tool stretches to a fairly decent 62 cm (24 2/5") length, slightly longer than the delta-handled tri-fold. Length is leverage and leverage is force, both have utility when digging, and the extra length has little impact on its pack-ability  at 42cm (16 1/2") fully folded.


The shovel face itself a little smaller than that of the tri-fold,, but the tri-fold has an inch or so "behind the shaft" so the usable length is all but the same. it certainly digs well and scoops tailings out of the way smartly.  It lacks as pronounced  a rolled-over back-edge to support a diggers boot-assist, and if you really wanted or needed to you could use the pick, folded down.  

At 860g (lbs 14oz) its a reasonable tool to carry around, especially if you know you'll need to dig more than a trowels amount (be it a fire-pit, latrine pit-trap or fighting position.) The wide edge does not lend itself to axe-like chopping in the way the tri-folds per-sharpened edges do ,though they could take an edge without too much effort (either hand file or powered grinding tool). The saw teeth could be sharpened up without degrading the robustness of the tool, but that's a project for another day. I have been primarily using this in the vegetable garden, tilling soil, digging up potatoes and shifting delivered soil into our raised beds.

The Pick tool folds and locks in place the same way as the shovel does. The most useful position being at 90 degrees to the haft. The spike itself is curved along the whole length of the pick for strength and extends out  21 cm (8 1/4") from the haft. 

It is possible to operate the tool with both shovel and pick extended, but its a bit cumbersome. Easier to use one tool and swap between the two.  The pick isn't sharp-tipped, featuring the same robust edge as the shovel, but its not expected to be a mining tool. 

The pick, when folded flat against the haft, can also serve as a hammer, though the rounded back face of the pick makes for a tricky strike surface, but possible.

The pick can also be folded "upwards" into a "spear" configuration, extending the tool into a length of 58cm. Good for getting to the bottom of a hole, reaching the top shelf or possibly ventilating an unwanted visitor to your trench.

Lastly, this tool can, when set into soft enough soil, make for a halfway decent stool, with some balance and practice. better than sitting in the dirt or mud, not as good as a proper chair. 

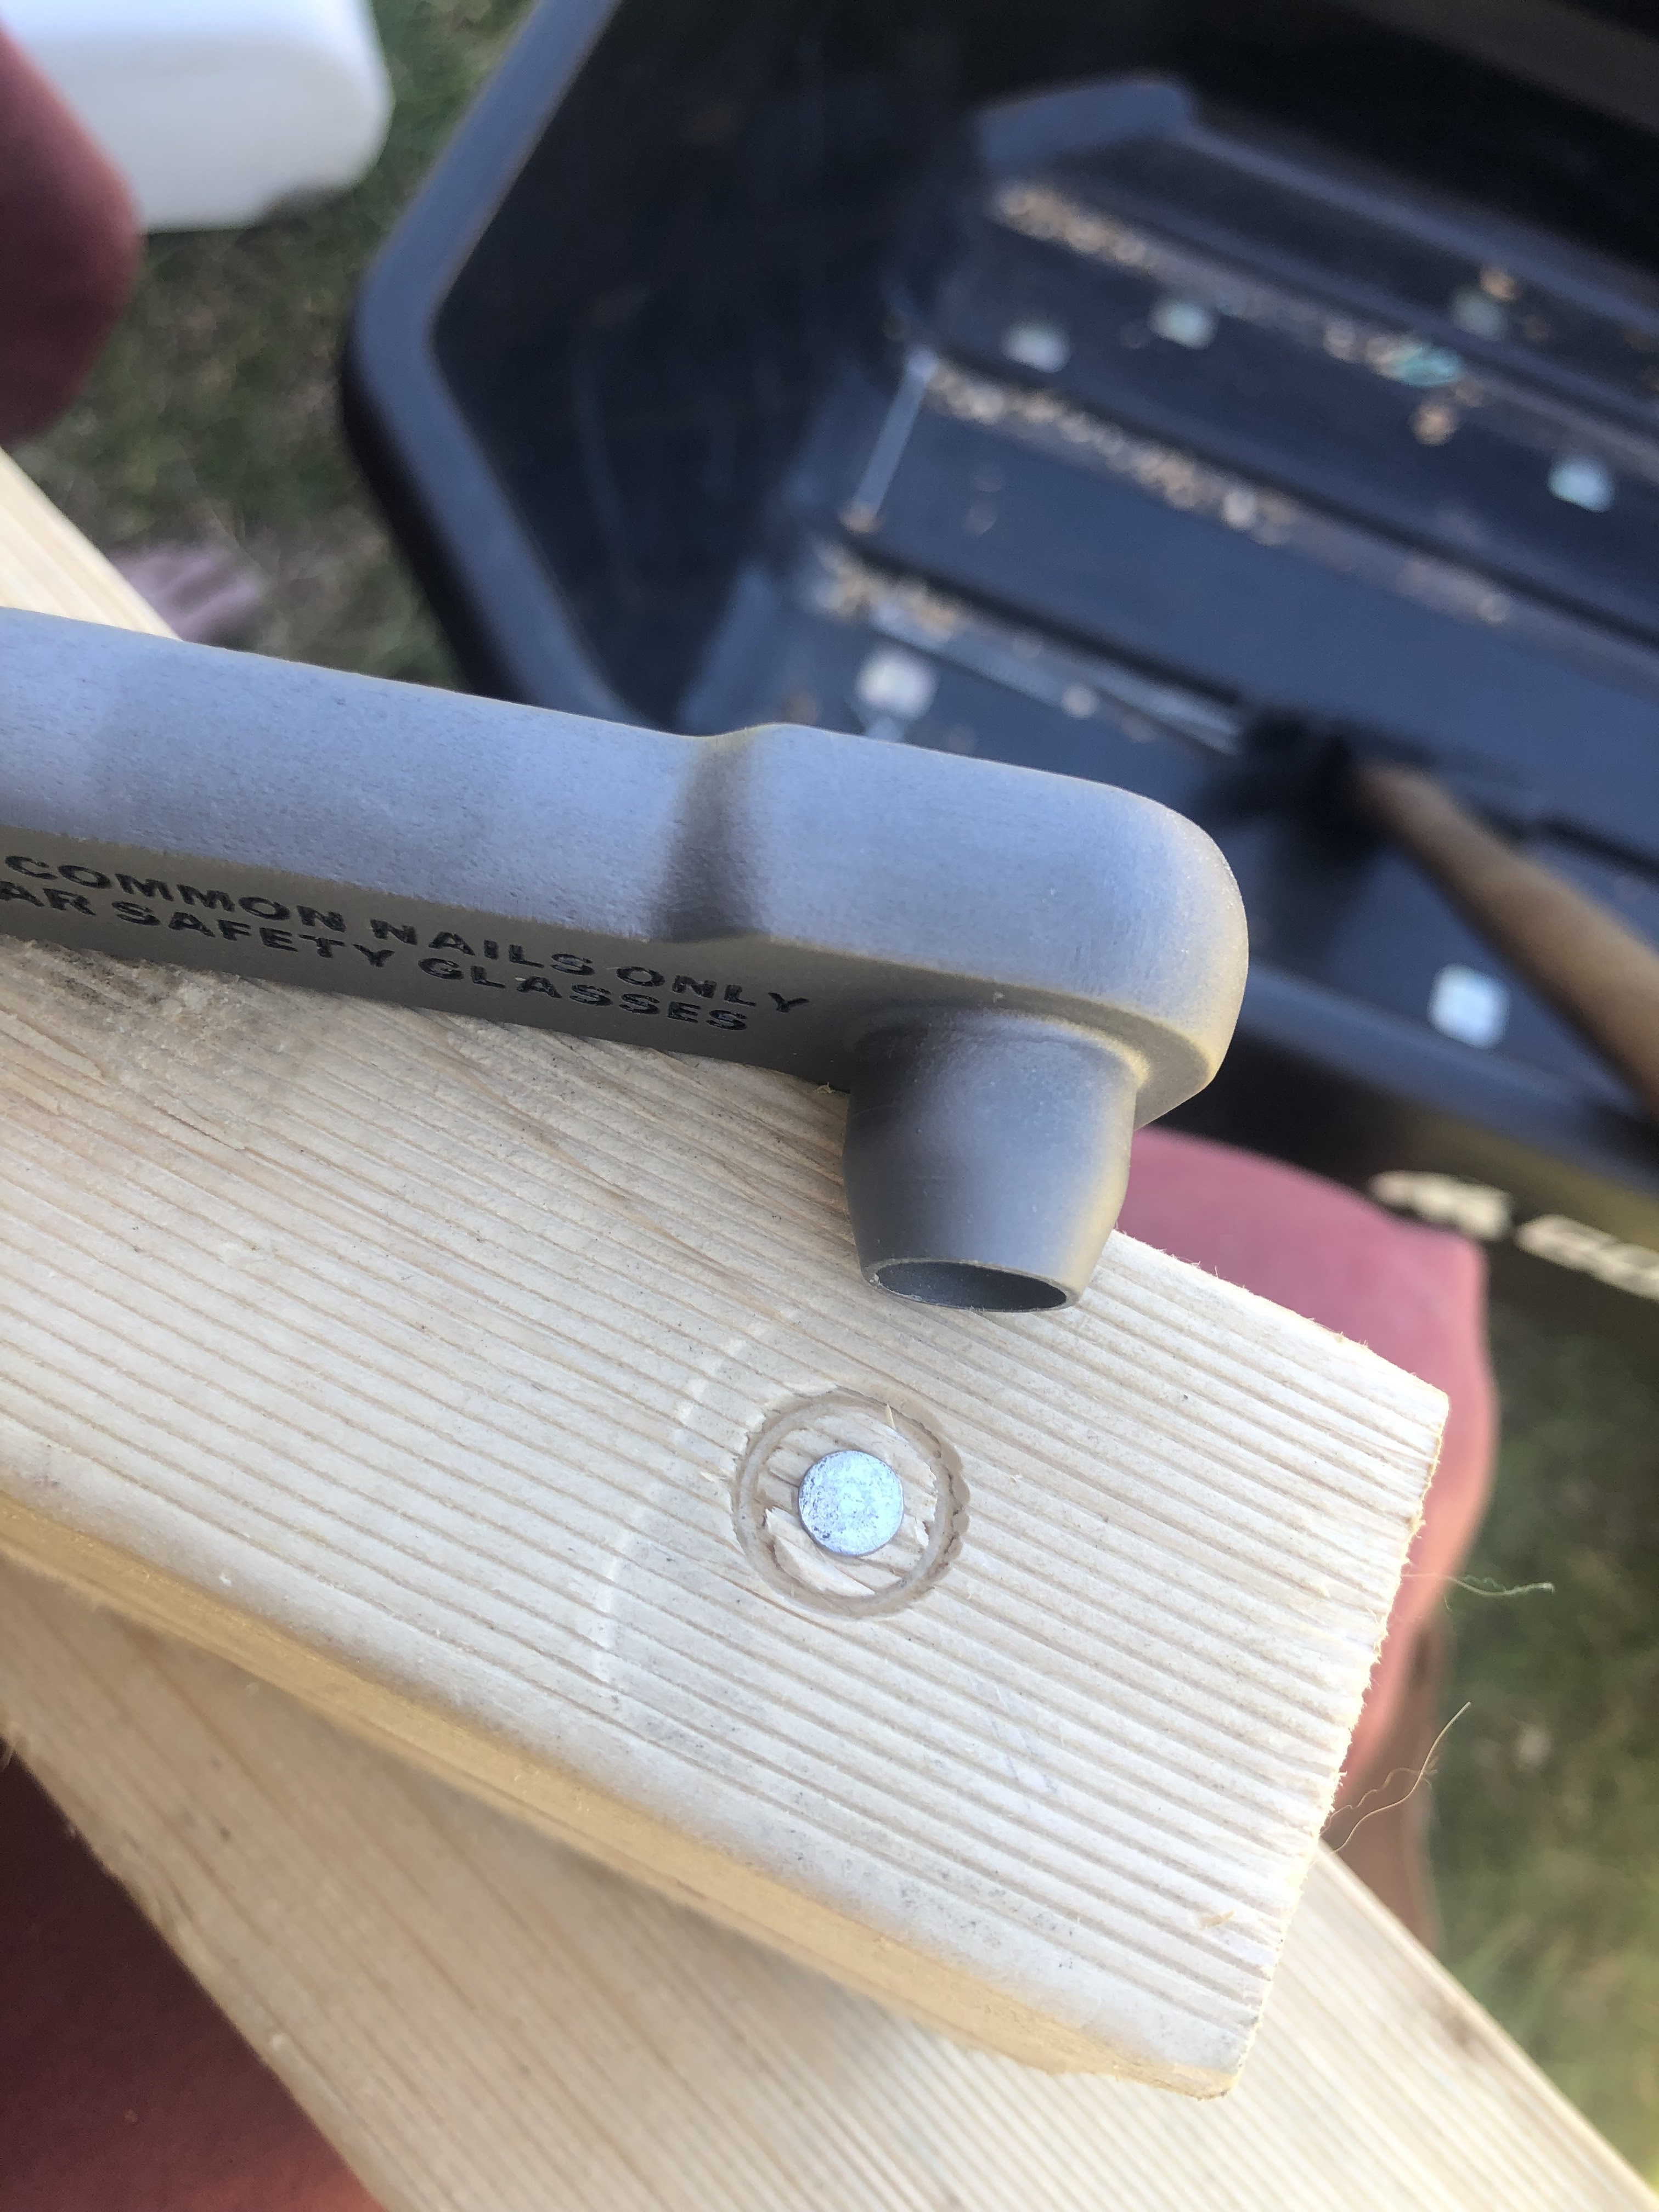
The original haft was held in place by a rivet through the throat of the locking bracket, and whilst giving the tool a good bash test, trench-club style, I managed to snap it off at the bracket. After sitting unloved in a pile of scraps for half a year, including a house move, I dug it out, ground down the rivet head with an angle grinder, whittled a new head to the shaft, fitted it after a little char-hardening and set it with a clinch-nail. This cost me 2-3 inches of over-all length, but with my longer than average wingspan, it's none the worse. 

Though it doesn't fold down as small as the tri-fold, nor stow away in its own belt pouch (though military surplus canvas pouches exist), this is a solid tool rich with utility and with years more life in it, both in the garden and on the trail.

At some stage I may throw a sharp edge on the shovel for root/brush chopping and i'm certainly going to try my hand at sharpening the saw edge, but all in all I'm very happy with this restoration and salvage of a "lost" tool.

For the God-Emperor! For Krieg!


Tuesday, February 7, 2023

Review: Stilletto titanium nail puller

I do love a  good salvage. Whether it be road-side junk-swap, flea market bargain or dump-harvest the idea of junk salvage strikes a deep chord in me from both a 

post-apocalypse survivor point of view  and 80's kids sci-fi. That said, sometimes having the right tool for the job, especially if you're working with aged or non standard materials. I do like to recycle timber, for garden-beds and storage shelf construction, and getting the nails out can sometimes be a real pain, especially in well seasoned hardwood pallets.  

Previously I have made do with my pair of  demolition hammers (the Dead-On Annihilator and the Stanley Fat-MAX FUBAR) which are brute force tools, even when paired with pry tools such as Jimmy and the ever rugged Breacher bar. I've had a lot of success with this combination of tools but they're inelegant. I'm also a sucker for titanium. I know its not a miracle metal, neither mithril nor vibranium/ adamantium but its pretty rad.

Now on to the tool!

This is the original Stiletto Titanium framing nail puller with the Patented nail removal feature! In essence it is a 30.48cm ( 11.5") pry bar, made of one piece of titanium. It has an open-truss design to cut weight but retain rigidity, weighing in at 300g (8.5 Oz)


One end features a standard cloven hoof pry edge, which is quite pointy, for aggressive purchase finding, and the other end its a cat's paw, 90 degree pry bar, with a similarly pointy tined  cloven end, and a smooth, rounded fulcrum for mark-free nail-pulling. The key feature of the cats-paw end is the perpendicular dimpler. This open-ended conical protrusion is used to punch a circular indentation into the wood,below the level of the head of the nail, in order to allow either of the pry ends to find purchase and pull them out. This is achieved by centering the open end of the dimpler around the had of the nail and striking the back face with a hammer, hard enough to drive a dimple into the wood around the nail-head. 

The dimpler has an internal diameter of 1cm (0.4") which should be plenty big enough for common nails found in timber. Stiletto specifically state it be used for "common nails" only


The divot allows the tines of the nail pullers to be worked under the nail-head without gouging the wood too much ( divot aside). I found that for especially stubborn or embedded nails ( or punched down, or otherwise deep) that the tines can be driven in by hammering in the tool from the other end. It should be worth noting that Stilleto claim the titanium strike faces outlast steel bars 3X longer - doesn't spall, crack & mushroom like steel bars. I also use the back face of the cats-paw to drive some nails, and though it took some transfer marks, the satin matte finish was un-marred. It's a bit light to act as a hammer effectively but in a pinch, just fine. 


The open truss body is clean edged and smooth to the hand, allowing a strong grip be taken without roughing up your hand.
The shaft of the tool is slim enough to be threaded through PALS/MOLLE channels, for belt, pack or carrier  carry, but I wnt through my leather scraps bag and whipped up a quick holster with a belt loop for my use. I look forward to easy break-down of pallets and furniture for firewood or lumber needs.

Its a great tool, multi-functional, rugged and fit for purpose. 


Tuesday, September 20, 2016

Reblogging: Improvised Tanks for Tank Week

Here's a piece I wrote for Breach Bang & Clear

“Every normal man must be tempted, at times, to spit on his hands, hoist the black flag, and begin slitting throats.” ― H.L. Mencken, Prejudices: First Series

... and at times you want more than just a mean look and the occasional sandbag to be between you and harms way. Sometimes you want to call on the thunder of armour. However, you might not have the power of the military-industrial complex behind you. You might only have the local scrapyard, oxy-torches, sheet metal, and an innovative spirit.

Currently the world's undersupplied warfighters are inventing all kinds of home-brew armour options, and we've been lucky enough to catch a glimpse of them over the last few years. And I must say, we're lucky to have only been catching glimpses and not rolling into battle in them. Let's check a few out.


This is the SHAM II, a proudly "100 percent made in Syria" improvised armored vehicle. Put together by Syrian rebels of the Al-Ansar brigade, in Bishqatin, four kms west of Aleppo, it came to the world's attention on December 8, 2012.


Built on an old car chassis and covered in 25mm thick steel walls, it was reportedly able to resist up to 23mm cannon fire. At only 2m wide and 4m long, this is no Abrams. It is, however, fitted with a remote-operated (by a hotwired Playstation remote of all things) 7.62mm machine gun on top. It also has five cameras that give the humans inside a view from all angles.

In one of the original interviews, its primary operator said ‘This is my brother, a trained engineer, who got the idea, we got a car, left its diesel motor on the chassis and built the engine. Not including from the gun, the vehicle costs about £6,200($10,000)." This gives you an understanding of what these folks are doing with their spare time.

Read the rest here at Breach Bang & Clear:

Wednesday, June 29, 2016

Review: Kathmandu Wide Mouthed drink bottle

Every now and then a piece of gear comes my way through .... unconventional means.

One time an IR strobe mysteriously appeared in the post, another time the same thing happened with a set of lockpicks. Other times I have found gear discarded and added it to my collection (some would say hoard).

This time it truly was a case of "gear adrift is gear a gift", in that in the flotsam and jestam of my local beach, I spotted a water-filled bottle, and fished it out.

It turned out to be a very serviceable Kathmandu wide-mouth drink bottle.

It was full of fresh water, and had obviously snapped loose, fallen overboard or been washed away, as the lid-to-bottle retention strap had been snapped away, and only a stub remained on the lid.

I am all for reusable drink bottles, and the clear-plastic, wide mouthed Nalgene's that I have been using for years have served me well.


That link is for a slightly different design, as the one that washed up appears to be no longer available but here is the Dead link anyway.

Apart from the obvious aspect of having a reusable and sealable water bottle, that holds a liter of water for hydration purposes, this kind of bottle also has the capacity for storage for any number of small needfuls to set it up as a survival cache or just as a waterproof storage system for those of you with phones or still use paper money still ...

As a reusable drink bottle, it is only 155g (5.5oz) Eastman Tritan co-polyester, which makes it both odour and shatter resistant,  freezer safe as well as withstand temperatures up to 100 degrees for washing in a dishwasher. They aren't recommend for hot beverages as the plastic will become too hot to touch but make for a great hot-water bottle if you wrap a t-shirt around it once it's sealed up tight.
Even after being lost at sea, and losing its retention strap, and being sandblasted rather thoroughly, its held up really well. The volume increments are still visible, which is good for measuring cordial or tracking how much I've drunk and how quickly, but that's not nearly as useful as the addition of moulded finger grip points on both sides of the bottle.

When you've just filled the bottle, or washed it, or worse, filled it AND washed it they get slippery. so having a textured gripping surface really adds value to the bottle.
I dummy-corded a new retention string to my bottle, so I don't loose my lid, and have something to tie MY bottle down with, so I don't loose it overboard.

Certainly a good addition to my bottle collection, and the price was right, that's for sure.

Always be on the lookout for gear adrift, it's gear a gift. I'm still enjoying a number of items I salvaged off the Tough Mudder courses I've run.


Wednesday, June 8, 2016

Home Front: making braided rope


I wanted to have a go at making rope from plastic bags, a project I had seen online from a few sources, like MAKE magazine which I had a subscription to for some time (thanks Wombles) and Instructables, both excellent sites for finding crafts to engage in, especially to check out a range of ways to do similar things. There are certainly projects that would suit a range of needs, check them both out.

I started collecting plastic shopping bags when we went shopping, bags I would have ordinarily recycled either when we did our fortnightly recycling bin, or back to the supermarket to the dedicated bag-recycling point. I also had a friend bring a butt-load of them as well.

The primary construction of a strand of bags rope is to cut the bag from the bottom of the handle loops, on both sides, down to the bottom sealed hem. this gives you a double loop of plastic fabric, that is very sturdy in the up-down axis.

It's possible to then loop one bag into another with the working bag looping through the exposed loop of the standing bag, and then through itself, and when the knot is sured up, a very solid join is made.

Repeating this process, with a fresh bag being looped into the end of the standing end, the chain is continued for as long as you want. I wanted to braid my strands, so I created three fifty-bag chains, and lined them up. This was a mistake.

I found that having the full lengths meant that when I was braiding the lengths were constantly getting tangled with each other.

My solution was to bundle up the three lengths into some of the heavier bags I had left over. These gave me a far more manageable bundle to braid with, but were still bulky.

A far better idea would have been to make short lengths of 6-7 bags long and added more as the braid progressed.

One trick is to ensure that the three chains are off-set such that the knots don't bunch up in the braid, and this gives the rope something that ALL "primitive" non-monofilament ropes benefit from. Weakness in individual strands are overcome by the braiding (or twisting in twisted ropes) and whilst there may be individual components of the cords that have damage, or weak points, the overall effect balance that out, and supports itself.

One thing I found during the braiding process, I encountered many of the sides of the cut edges hanging outside the braid, and these tags of plastic can be woven back into the rope fairly easily. Where I could, I knotted them and ensured they would not spring loose. I could have twisted the chains in order to capture the tags, but that would have increased the effort needed to make the rope considerably. All in all, once I had my three strands of chained bag-loops, the weaving process took around an hour, and was a reasonably simple process. Keeping a uniform braid is the key aspect for this, and those first few meters were the hardest to keep even, mostly because of the super-long chains I started with.

Making the chains was another time consuming but simple process, light work made quick by my Big Wet cyberpunk pals one evening as we watched John Wick (epic, awesome movie!) one evening. Ensuring the side-seam cut was correctly made, and didn't cut too far to either side, leading to failure of the loop, was one problem, and lead to some wastage. Generally, the plastic gags were remarkably robust, and the chains themselves were quite sturdy, especially if given a slight twist to gather them up.

Once braided, the resulting rope was really quite sturdy. I was able to loop it over a post and pull on both ends with all my strengths without any problem, and lean back with all my weight on it. I had hoped to get some better way to test it, but I'd say that for a static load, they are quite stable. I suspect they could be used for any number of lashing, binding or dragging tasks, but I wouldn't want to use them for any life-sustaining tasks unless there were no alternative.

So, from approximately 150 bags, I made a 10m length of braided, 3-strand chain rope, purely from salvaged shopping bags. None too shabby.


Wednesday, April 6, 2016

Review: SAR GlobalTools - kiridashi


The traditional kiridashi knife is small and very portable blade from Japan, with a chisel grind and a sharp point, used as a general-purpose utility knife. These knives are carving/utility knives have their roots in woodworking. The name, kiridashi literally translates to “carve out” which would seem to support this origin. Regardless, they are found in many facets of traditional and contemporary Japanese culture being used in a variety of activities from everyday tasks like sharpening pencils to gardening.


They are often made with a handle wrap and sometimes scales and a scabbard, but are just as likely to be a single piece of steel.

This take on the classic is from my mate Spencer Alan Reiter of SAR Global Tools who works his metalworking magic from a shed in Louisiana and has brought forth such wonderful items as the Moonglow necklace signaling tool I wear 24/7, the SESS signalling dogtag I keep lashed to all my packs, and my favourite neck-knife, the OddJob.

The SAR kiridashi's are all one-offs, that Spencer builds from reclaimed stock left over from his other projects. Waste not, want not, and perfect philosophy for the creation of a kiridashi. The riddle of steel  rings in his ears.

Crafted from an offcut of CPM3V and is heat treated to a hardness of "dead nuts" 60HRC according to Spencer.
It's also sharpened to a razor blade edge along both its main cutting edge and to a very sturdy and substantial point. The geometry of the SAR kiridashi is is very similar to a scalpel and being one piece CPM3V its 165mm length it weighs only 30g, very dense and very good in the hand. With two holes drilled in the head of the blade for a mass reducing effect and three grip-enhancing drilled notched behind the head, and another in the tail end as a lanyard hole.


Worked over in the SAR workshop, you can easily use it knowing that you are using a high quality product.  You'd never know it was a one off recovered from workshop scrap. In keeping with the kiridashi's main purpose originally to be used as a craft knife, I wanted to show off it's practical application and the single, flat ground chisel edge which just works a treat as a wood whittling tool.

The blade can put it to many different uses. Here are some practical examples: general cutting, gardening, cutting zip ties, deburring and drilling holes, self defense, survival tool, the uses are almost innumerable. Anything you could want from a heavily over-engineered craft-knife. 

The SAR kiridashi's are set with a cord-wrap on the handle for enhanced grip on the thin metal spine, and come with a kydex scabbard along with a bead-chain necklace for neck-knife wear. 

Bear in mind that these are all hand-crafted, heat treated and sharpened in what is essentially a one-man shop, along with Spencer's philanthropic work in conjunction with the Run Rangers Run charity, in creating his Inglorious Bastards knives, re-purposed from antique files, so his time is hard to come by and the runs are small. Keep an eye out and be on the lookout for new knives such as the Kingfisher's that are coming out...

Wednesday, October 21, 2015

Review: Fenix HL35 headlamp

First seen on Breach Bang&Clear here ...

My pal Sean from G8 sent me a pre-release Fenix HL35 LED headlamp to review, which was awesome to have happen, and very timely for us here.
I've covered a number of Fenix lights previously, from the unusually designed TK51, to the mighty LD60 and the very handy E99Ti keychain light to the very practical domed CL20 camp lantern. The HL35 is the next iteration of the existing Fenix headlamp range, and whist some of the stats are still unpublished, here's what I can tell you.


It is an aluminium housed, high performance headlamp boasting three levels of light from the main LED (assuming similar stats to the HL25 a maximum of 4/50/280 lumens while in burst mode, and a 223ft beam distance). A second, red LED is built in as well, and the selection button on the side of the housing cylinder next to the power button. You cycle through the four modes once the light is on with this. 1) steady white light (cycle through power setting with power button), 2) steady red light, 3) slow flashing white light 4) fast flashing red light. The main light is cycled through its three settings by pressing the power button, once lit and both LED's are shut off by holding the power button down. Holding the Mode button down will cause the light to come up on its maximum setting, before allowing you to cycle through the modes. The lamp is fitted in a bezel and is rotatable 60 degrees in the front, with a nice sturdy ratchet action, and well crenelated ends to facilitate the turn.

Built to resist the elements, the HL35 is waterproof to 2m, impact resistant at 1m and incursion protected to an IPX-8 rating. The HL35 is powered by 2 AA batteries.

The HL35 measures 66mm (3.2") wide, 45mm (1.8") "deep", and weighs about 90g (3.2oz) so it's remarkably dense, but not too weighty. the around the head and over the crown elastic headbands. These are usually the part of headlamps that I like the least; that the lamp part either flops around or the band is awkward. The HL35 is very stable, with a thin closed cell foam pad holding it in place and adding some comforting padding and the elastic is adjustable both in circumference and over the top.


One thing about the lamp, the two buttons are a little differentiate, especially with gloves on. I was rummaging in a dark nasty place this week, and needed to not bring too much attention to myself (don't ask, but I have a strong stomach), and it was tricky to select the right option with the gloves I had on. Working out which button was the power, and would let me alternate the three light levels, and which was the mode button, and inadvertently set me to strobing, was a problem.  I feel that even with the mode button being stippled, and a bit larger, the fact that they are both side-by side makes that tricky, especially when gloved.

That said, it's the first headlamp I've had where I didn't cringe at having to put on and use, the light was crisp and well cast, and it was comfortable to wear. If you're in the market, it would be well worth a look in.

Monday, September 7, 2015

Review: maybe 5.11 Tarani x14 karambit


We have friends who heard that I have a thing for knives, and fixing broken things, and they send a mashed karambit they were very proud of my way. It looked like it had been stood on, popped the main blade fixing screw, and some of the torsion spring and locking mechanisms had bent and warped. The belt clip had two missing screws, but the blade was in good shape, if a little blunt. I got out my TORX screwdrivers and set to work.

Once I found a spare main fixing screw I had in my parts-bucket, and bending and hammering the frame lock spring back into shape I was pretty satisfied that I'd rejuvenated the blade back into a functional state. The thing was, even fully screwed together, it seemed ... wobbly. I held it in my hand and looked at the 5.11 logo and Tarani branding and thought to myself "is this something that Tom Davin would have released?" I had some serious doubts.

I did a web-search on the listed data "5.11 Tarani X14 karambit" and all I came up with were Russian language YouTube reviews, and an Ali Express listing for a 5.11 Tarani x14 karambit.

I asked Omega for the 5.11 CUB Tarani Karambit that I got fer her a couple of years ago and held them side by side, the difference was immediately obvious. Even if the "x14" was an entry level, budget version of the "CUB", it just seemed too different, with a torsion spring rather than a linear liner lock. The molding of the scales was also a little bit off, not sharp enough or well finished enough to be a match to the 5.11 logo.  The scales and the frame were also not fully flush.

That might have been because of the damage it had sustained, but it seemed more likely, due to poor construction in the first place.

At full length it makes a 16 cm (6.3") arc, with the blade making up 7 cm (2.7"). At it's widest, the blade is 2.8 mm thick, and made out of 440 steel, half serrated for extra bitey cutting needs, and is apparently hardened to a 55 HRC rating. The surface is oxidation coated, for rust prevention, and marked with a very convincing 5.11 logo on one side, and the Tarani logo on the other. Weighing in at 120 g (4.25oz, it's quite light and lithe in the hand, the ring-loop fitted me well, although the gaps within the frame meant that if I gripped tightly, they could have dug in.

Its a nice enough knife if you're not looking for reliability, or quality and want to look badassed with your karambit. I will happily address my thoughts if 5.11 get back ti me, but overall, my impression was that this was a poorly put together piece.

Sunday, December 28, 2014

Review: Weed Forager's Handbook

I was very lucky that for my birthday, a most lovely lady friend of mine gifted me with a most marvelous book.

She knows of my proclivity for self-sufficiency and likewise has an eye for it herself. She had been on a series of Edible Weed walks and workshops, run here in urban Melbourne, and thought to buy me the accompanying book:
The Weed Forager's Handbook:
"A Guide to Edible and Medicinal Weeds in Australia"

Full of full colour photos and classically rendered botanical illustrations, this 166 page manual contains detailed edibility and medicinal notes on 20 common weeds, that can be found in my local area, and in most regards, Western urban environments. the book itself is small enough to fit easily in a cargo-pants pocket, and even a back-pocket. Great for those foraging trips around the neighborhood. 

I've made several meals containing greens I have sourced from on or around my home, in the laneway and up and down the nature strip of my quiet suburban street.

As well as the main 20, there are  another 14 short profiles of useful plants. Each of the listings comes with tales from history and folklore regarding the plants, as well as a good introduction to known poisonous plants hat should NOT be harvested.

I knew nettles were edible, but didn't know how to harvest and prepare them, and they are delightful!
Likewise, dandelions and wild lettuce grow around my house, and they have also made it onto the table, in soups and stews, and even as a boost to salads.

This book by Adam Grubb and Annie Raser-Rowland has added to my spread of knowledge with regards putting good food on the table, and even though I might have had to sneak it past the finicky teenager, I like to think that I am adding to the nutritional bounty of our otherwise distant farm and supermarket sourced food.

It also never hurts to know what will make a needful addition to the pot, should the shops be bare and the roads closed!

Thursday, December 18, 2014

Home Front: summer garden 2014

As with previous years, I planted a vegetable garden over the winter-spring cusp, in order to have a good summer crop of greens.

Using wood I reclaimed from pallets that had been left on the road-side by a neighbor who was having some renovations done, I built this box in an afternoon, dug post holes, dropped it in place and left it lay-fallow with weed-suppressing cardboard boxes lining the base. I then filled the box 3/4 the way up with a mulch/soil mix that I had purchased (and got a water-saving rebate for), and hit our local garden/hardware store for seedlings.

In previous years I have planted in our low-sided veggie patches, but this year, as a result of my lovely partner Omega's request for a raised bed, to give better access to our crops without the need for bending and kneeling, which is one reason I built a hip-high box.

These little guys are the other reason. We now have four Flemish Giant rabbits. They started off palm sized, and will eventually get to be 10 kg (22 lb) each. I have now made two wired-off enclosures for them to run in, but we found they could both climb, and hop into the raised bed. Hence the "over the top" chicken wire over the bed, and the over-hanging lip to make a more effective perimeter fence.

A lucky finding was that the rabbits didn't like the artichoke plant that we had regrow this year from last years failed attempt. We've managed several meals worth of artichokes and Tactical Baby enjoys selecting which "dinosaur flowers" we are going to have. There are also several onion plants in there, also segregated from the bunnies, and it looks like we might have some invincible potato plants coming up as well.

I lined the side of the raised bed with a strip of copper tape, which has proven to be an effective slug and snail deterrent. We did have a cabbage moth caterpillar problem, which was attacking the broccoli, cauliflower and cabbage plants we planted, but the invading bunnies ate all the buds from them anyway, so we lost those crops.

What we do have going however is two kinds of kale, spinach,  Vietnamese mint and coriander, tomato and spring onions. We also have several eggplants on the go in there.

Its a very high density plot, and it takes some rummaging to get from one plant to another, but being hip-high has been a great improvement.

My other partner Lorin has been admonishing me for planting the tomatoes in there, and not separately, because of how big they've gotten, but I'm a sucker for high density, bountiful and bodacious harvests, and that covers my gardening too!

We might even give the vertical garden another go, although we've left it a bit late in the season. Between the two extra rain barrels we put in, and the unfortunate reduction in our number of chookens (lost 7 overnight, some kind of illness, down to one, the unkillable Princess Layer, veteran of four previous calamities) we might even make more use of the back yard this summer. 


Wednesday, September 17, 2014

Home Front: log, it's log!


A couple of weeks ago I came home to this rather large pile of timber in my front yard. Apparently the local arborists know that I have a wood fire and after propositioning them to take the least tree they cut down, they've taken it on themselves to not have to mulch any logs they fell, and after asking my eldest who was getting home from school, they tossed a tree into my front yard.
At least this time I didn't have a veggie patch for them to crush.

Welcome Mt Birchmore, altitude 1.2m.
I'm pretty sure it was birch, although there was no foliage for me to confirm with.
One thing I know, there was a whole tree's worth.

Obviously this would need to be seasoned before burning it, but as we've just come into spring here, and summer brings "total fire bans" for weeks at a time, I will be able to comfortably sit through the six months of drying time that is recommended for green wood. Given Melbourne's zany weather, probably just for the best, anyway.

I was lucky that the arborist crew chainsawed most of the logs into pretty uniform lengths, and even the larger blocks of wood into manageable chunks.
I spent a number of hours hauling all this around to the back of our house and stacking it up.
Before stacking my new haul, however, I needed to clear out my vine, leaf litter and as it turns out, bush rat nest filled old log pile.
This pile of mixed logs, including redgum and a variety of other woods that I have salvaged from around my neighbourhood and on my drives to and from Triceratops Girl on the weekends. It's become part of out urban-scavenging mindset to always be on the lookout for logs piled up out the front of houses. When we can, we stop and load up the back of the RAV4 and restock our supply.
After cleaning out my log store spot, a paved area beside the trampoline and fenced off chicken run in what used to be a bare patch of grass, I stacked up my timber booty in three layers, on one side, and a single stack behind the wall my smoker sits on, with a good mix of large logs and thinner ones so that I have a selection when it comes time to burn it. I covered the main body of the stack to attempt to keep the spring rains from setting it to rot. Triceratops Girl was even keen to get involved with the hauling and stacking she has a slow-combustion stove at her mothers place, so knows all about having nice wood fires.

Wood fires may not be the most ecologically friendly, often producing a lot of particulate waste, especially in open fires, or when using green wood, but when it comes to survival and self-reliance, having a supply of firewood, and the means to both cook and heat with it can make the difference between comfort and squalor. In snow-bound areas, it can mean the difference to life itself.
Related Posts Plugin for WordPress, Blogger...