Showing posts with label camp. Show all posts

Thursday, August 8, 2024

Home Front: Dried food stew

 Pushing on with a food and meals theme, I thought i'd make a start with this simple meal. I started out by collecting my ingredients. I'm a big fan of dehydrating food and I wanted to try my home-dehydrated items out. I had bought and dehydrated bags of frozen peas, corn and diced onion. ( hint for the novice, do these all separately to avoid mixing when they fall through the grills when shrunk by dehydration).1kg  frozen peas yielded 252g and 1kg frozen corn yielded 223g corn kernels. Pictured here was 1 cup of each, a half cup of dehydrated onion, 1 cup of  "soup mix" (beans, split peas, lentils,  I also used a handful of  hard jerky I had made, cut into 1" squares, a tablespoon of seedy mustard, and a half teaspoon each of granulated garlic and fennel seeds. So the only wet ingredient was the mustard. The rest could be stored in a sack and if in a decent jar, would last pretty much indefinitely.  


It was light on seasoning, but I wanted to make as minimalist a meal as possible, to see what little you could get away with and still have a palatable meal. 

I wanted to push the rustic angle so 
I opted to prepare this in a piece of stoneware I had acquired at an op-shop. This  Stoneware Tureen had a close fitting lid and wing-handles and similar items can be found elsewhere too. I put all the ingredients into the tureen and added 6 cups of water, put the lid on and put it in the oven on low for a number of hours. 

With plenty of water and a long and slow cook everything re-hydrated nicely and with a couple of stirs to blend flavours, it came together nicely. The jerky softened up and the peppery marinade I had made it with blended into the stew just a little, but pleasantly so.

The peas, soup mix and onions all softened up and thickened the soup into a hearty stew. The corn re-hydrated about 70%, enough to be tender, but not juicy. 

I tested it after a couple of hours, stirred it and  added a little more water then left it to bake some more. The beef softened up but was still a bit tough. smaller chunks or perhaps some beating to soften the fibres might help next time. 

I cooked it down till there wasn't any standing liquid, which might have been a mistake, but it was soft, not soggy when I decided it was "ready" and ladled myself out a serve. It smelt great whilst slow cooking and whilst not exciting to look at, was both surprisingly tasty and filling, with a couple of good ladle fulls making a solid meal and this made several servings worth. 

If and when i make this again, I think id use beer or stock for the liquid base, and add some form of fat or oil just to bolster it and add richness. Perhaps bacon or spec in chunks?

Some additional seasoning wouldn't go astray, perhaps even just a bay leaf or two. 

It was certainly a good way to make use of my dehydrated ingredients and made a very satisfying set of meals for what would be a very light  batch of ingredients (I forgot to measure, bad scientist).

This kind of meal is called a pulse. It is very ancient and exceedingly simple to make. Next time with more rigorous record keeping. 
What else should I add? Might try dehydrating frozen carrot next. 

This is certainly a meal one cold make in the coals of a campfire, even semi-buried in ashes and returned too after ranging for a solid evening meal. Well worth trying, even with the risk of burning. 

dehydrated MRE style meal


Saturday, May 11, 2024

Review: King's Adventure Stove

 During the opening rounds of Covid lockdowns in the summer months of 2020 it occurred to me that disruptions might linger on till at least winter. Though I live in a temperate city, which rarely dips below freezing, I wanted to ensure I had a source of heating for both warmth and cooking that was off-grid. I have a variety of BBQ's both charcoal and LPG (I also acquired spare LPG cylinders). At the time
I even had a cast iron wood-stove I was restoring. I had seen portable wood stoves for ages and even camped near some on occasion and thought they would suit my projected need quite nicely. Bigger than a backpack pot-stove but not as big as one of my kettle BBQ's or the cast iron one. I wanted something I could use to burn household and reclaimed timber if needs be, more so than logs and branches that an open-fire pit might be used for. Portability was also an important consideration.  

The ads I'd been seeing pointed me towards https://www.4wdsupacentre.com.au/ which seemed to be a reliable source for robust camping kit. Kings Premium Camp Oven Stove | Wood-Fired BBQ | Enclosed Firepit | Steel Construction | For Camping or Backyard Use - 4WD Supacentre

It seems the particular model I chose is out of production and the current models are square sided, rather than rounded, but this plays very little part in its utility as a camp-stove. 
The curved sides of the stove feature a welded bar on one side, acting as a hanger for tea-towels, tongs of what have-you, for drying and keeping out of the dirt and off the stove itself. It also acts as a barrir to stop things touching the hot sides of the stove. 
 
Stove pipe sections all fit inside the stove for transport and storage. 
On the other side of the stove a similar bar forms a hinged handle for carryig the stove, briefcase style (before setting up). It could also be used for hanging things, but more care needs to bwe taken as its stand-off distance from the belly of the tove is far less than the fixed bar on the other side.  

The three legs of the stove are hinged and fold flush to the belly when in transit, held in place with pins, each with their own retaining chain. The legs each have a round foot, each with a couple of holes drilled through for tent pegs to secure the stove in place. 

The legs, once unfolded, are held in place by those same retaining pins as used for storage. The rigid stove-pipe sections are easily fitted to the stove-body, which features a small section proud of the cook-top for ease of mounting. Its worth noting that one section of pipe features a flue control valve, just a simple spinning disk on a rod that can be angled to choke down the fire as needed.  The five stove-pipe sections do not feature a spark arrestor, or an end-cap, but it has been easy enough to make one with a re-purposed soup-can and a couple of tent pegs. With all five pipes connected the whole stove tops out at 2.45m (~8'), which puts smoke well out of the way, but well worth staking the feet to avoid any tippage. The stove top measures  45 x 24 cm (1'5" x 9 3/4") and has a trio of divots pressed in for rigidity, as well as a 15 cm (3") diameter removable burner lid, with retaining notches and a recess for a hook to pull it off the fire. 

The door is a simple circle, hinged on one side, with a notched latch to secure the fire closed, or cracked open for air-flow. 

The door is also 15 cm (3") diameter, which along with the internal length of the stove at 43cm (17") or so, limits the sice of the wood it is loaded with, but not unreasonably so. A small curved ash-lip is also provided, and slots in under the door to catch and embers that spill whilst filling or stoking the fire. It also provides a nice rest for roasting foods on a stick, in the stove. 

With the burner lid off you can get quite a a roarimg fire going, especially good once the fuel has all caught and the flue is drawing any smoke through. This lets you build a good bed of coals to cook with. You - could- cook directly on the stove top as the bare metal gets quite hot, but I prefer to put a pan or pot on, to assist with cleaning. I've found that the surface does rust if left in the open so have taken to oiling it, as I would to season a cast iron pan which has helped protect it. Obviously this can lead to a bit of smoke as it burns on, but well worth it to keep the stove in good condition and leaves a great finish.


A piece of good fortune came in the form of the thick walled cast iron pot that I salvaged and restored fits perfectly into the burner lid opening, which both speeds the hating process but eliminates any smoke escaping. Its important to keep an eye on the cooking progress as with any wood fired stove, it can develop hot spots. 

Whilst obviously not a hiking stove, all together in its canvas carry bag the stove is quite portable, with space inside to carry the stove sections as well as a couple of fire poker tools. 

I dont have a hot-tent, nor much desire to do much cold -weather camping, but if I did, i'm certain this stove would make a fine addition to camp. My famly certainly enjoy the occasional fire-side, back-yard gather, without the concerns of smoke in the face or embers blowing that an open fire would bring. 

Whether its kranskies on-a-stick, a pot of beans, that old classic marshmallows, or a simple pot of tea, there is somehing magical about having your own fire. 

Easy enough for littlest-coyote to set up on their own, compact enough to throw in the back of the bug-out vehicle. 


Friday, February 16, 2024

Review: Back Country cusine Beef Terriyaki


Time for a food post. When on the trail, camping, bugging out or even bugging in, it is advantageous to have tasty, easy to prepare and storage stable meals. I've covered Back Country Cuisine meals before as well as the similar Outdoor Gourmet Company meals Even compared to the main meal components of MRE ration packs they compare well. One thing I really like about this kind of dehydrated meal (which I fondly recall from way back in my Houston childhood,) is the NASA like retort the meals come in.  The main meal  I selected was the beef Teriyaki, which weighed in at 175g dry, and called for 438 ml (1¾ cups or K2 fill line) of boiling water be added to meal pouch. Stir and stand for 10-15 minutes. Serving size 613g (once prepared). The pouch has an internal ziplock to seal in the meal and heat during the re-hydration process. The retort bottom blouses out at the bottom to allow it to stand on its own. 
The meal itself  consists of freeze dried beef, rice and vegetables in a soy flavoured sauce. The meal is both Gluten free and had no added dairy, both good to know for those with dietary requirements like Coeliac's such as I have in my family. One thing I neglected to pay attention to was the full ingredient list and one of the vegitable components was dehydrated capsicum to which i'm allergic. Thankfully I was able to pick out even after re-hydration, with no ill effects. The squares of dehydrated beef reconstituted nicely as did the rice. The dish, once water is added, and left to stand for 10-15 minutes, and given a good stir ( right down to the corners of the retort), the meal thickened up into a very satisfying consistency. Easily spoonable without being sloppy, it was easy shared out.  
I shared this meal in order to help vette it for future stock-ups  (a very good policy, taste-test your food preps). 
As well as  being a hot, fast and tasty meal, nutritionally they offer quite a lot. A single serve meal provides Energy 3180kJ (759Cal), Protein 34.1g, Fat 22.7g, Fat - saturated 9.3g, Carbohydrate - total 103g, Carbohydrate - sugars 27.1g, Sodium 1990mg. Probably not what you'd want to eat every day, but certainly suitable to have on adventures or whilst in the midst of crisis. The flavour was mild and inoffensive and as an all-in-one meal it certainly works. 

I've made mystery-can meals before, but having a balanced and blended meal was an excellent step up in preparedness and certainly a vast improvement in palatability over compressed rations biscuits. Family approved!


Hal


Thursday, January 4, 2024

Review: Campmaster single burner stove

Carrying on in the series of camp cooking posts, let me bring to your attention the utilitarian Campmaster Single Butane Stove. This simple and straightforward single burner stove only weighs 1700g (3 3/4 lbs), without a fuel canister, and  folds down into a very portable 343mm(13 1/2") x 280mm(11") x 118mm (4 2/3"). I've seen similar burners set up in Korean BBQ joints for at-the-table cooking. I've often used it for exactly that purpose, inside at the dining table and on innumerate picnic tables. The blue enameled steel frame is both sturdy and easy to clean. 

The stove takes standardized 220g Campmaster CRV Butane Gas Cartridges 4 Pack (Countersink release vent) safety cans which are explosion proof and they fit into a compartment on the side of the strove. The cartridge locks into place with a latch in the lip of the bottle and a lever beside the adjustable flame control needs to be engaged in order to connect the cartridge to the stove. The compartment closes when the stove is in operation to protect it and the user. it is well vented in case of leakages. 


The stove has a peizo-electric sparker, triggered by the Flame control dial which is handy. The stove has strong heating power: (Gas Consumption: 160g/h (7.9Mj/hr)) at maximum setting, which is plenty for a number of serves of a meal, or several rounds of quick cooking meals. 

The hob itself is cast aluminium, and the stove-top comes out and when flipped provides a trivet for resting pots and pans on, small enough to hold up an enamel mug for singular brews, perfect for cold mornings in a tent vestibule. The hob head is recessed in the stove-top to shield it from winds Though it should be noted there is a manufactures not not for use below 0oC freezing, presumably because the butane freezes up in the canister or in the tubes.

The stove is lightweight enough that its easily hikeable, especially important if you're going to a fire-free area and want to cook, without hauling a whole BBQ and gas bottle. I have to admit I stocked up on the canisters during the Covid lockdowns, in case there were mains-gas shortages or disruptions as part of my  bug-in / bug-out preparations, thankfully un-necessary. We did have several pleasant summer night al-fresco dinner cookouts, and I've even used it for at-the-table teppanyaki  and hibachi type meals. ( Be sure to ensure it is used in well ventilated spaces and that the stove is set up on a heat-proof location as radiant heat can scorch surfaces. ) The canisters are self-sealing and can be stored for lengthy periods between uses.

Thursday, September 7, 2023

Review: Snugpak Stratosphere bivvy

I typically prefer off-ground camping in hammocks or on cots, but there is  a time and place for a low-profile, low laying tent, and sometimes even the ubiquitous dome tent is too much. Whether it be due to weather (high winds are not attractive to hammock users), location ( no trees or structures to sling between) or for a more clandestine profile, sometimes a bivvy is the way to go. I've used improvised bivvies before, with a tarp, poncho or just a poncho liner, but I saw this and wanted to add it to my collection, so as a birthday treat to myself I bought it as part of the Platatac End of Financial year sales.

This is the Snugpak® Stratosphere and it is the picture of functional, elegant simplicity. That's saying a lot, right off the bat, but it really impressed me. It is, essentially a waterproof over-bag for a sleeping bag, with a supported canopy to provide space around your head and shoulders.

The whole package is enclosed in a roll-and clip-top dry-bag type stuff-sack, with two additional webbing straps and buckles to cinch it in tight, it packs down to a mere 31cm x 14cm  (12" x 6") and all told weighs only 1.13kg  (2.49lbs).


The bundle contains two drawstring bags, one for the 7 aluminium alloy Y-stakes, and one for the two collapsible 8.5mm aluminium poles. as well as the uni-body bivvy itself. 

The bivvy upper is constructed of a 50D 190T 100% nylon ripstop cordura with (5000mm HH) waterproof polyurethane coating. All seams being fully waterproofed and taped, the upper meets the bathtub style  210T 100% Cordura nylon with (8000mm HH) waterproof polyurethane coating. This combination makes for a very dry sleep, even in very exposed locations.

Two sleeves at the head-end take the curved poles to pop out the hood section, seating in eyelets in tabs in the base to stretch out the head and shoulders area nicely. A flap at the back edge can be staked out to to pull it extra taut and increase the internal cavity even further.

Pegging the bivvy out at each toe end corner, shoulder and head end flaps, as well as the back flap makes for a very secure and stable structure. It sits very low to the ground, offering a very slight weather silhouette. 

When fully staked out the bivvy has a footprint of 220cm (87") length x shoulder width of 70cm (28") x feet-end width of 60cm (24") x and is 48cm (19") tall at the hood.

The bivvy has  a 3/4 length zipper, which extends all the way up and over the lip of the hood to seal the whole unit off from weather or bugs. As well as the storm flapped zipper, it also has 5 hook and loop strips for rapid egress in case of emergency or contact. You obviously compromise the water-proofing of the bivvy by not zipping it up but it's a trade-off you can choose to make. 

The hood canopy is stand alone stable and provides a shady nook to rest ones eyes in without the need to zip up at all. The fabric of the bivvy is soft and not very crinkly, making it comfortable to lay in without a lot of distracting noise. The back side of the hood features a No-See-Um Mesh Mosquito Net window, under the flap, which provides sheltered venting to reduce breath condensation from building up. In good weather the flap can be rolled up and stowed with toggle loops. 

The front of the hood can be zipped up all the way to the left corner for complete enclosure or left open to the elements. If left zipped up there is a hidden feature, a backwards zippable mesh face window, for added ventilation or visibility without creeping intruders. It rolls up out of the way when not in use. 
face window opened
rear window open, flap rolled up

Inside the hood there is a surprising amount of room, plenty enough to sit up on your elbows to read or even wrestle yourself in and out of sleeping bag or change clothes. The roof of the hood has a mesh pocket built into it, plenty big enough to slip a tablet, phone glasses or even a small light. 

Getting in and out of the bivvy is easy, once you get past the hood lip zipper, which can be a little awkward to get around the corner. It is super quick to put up, pegging the feet out, feeding the poles and pegging out the back takes just minutes. The end result is a sleep system that is elegant, robust and reliable. 

After a couple of trial set-ups, Tactical-Baby said they wanted to try it out overnight, so with just a yoga mat ,a sleeping bag and a couple of fleece blankies. Despite an overnight of 15C (60F) and spotty raining throughout the night (enough to leave pools on the upper surface they were remarkably comfortable and slept well past dawn. 

Given its small packed-size and light weight I wouldn't hesitate in either recommending it or strapping it to my own pack if there was even the possibility of needing to overnight trail-side. With its low profile and unobtrusive olive drab I bet you could pitch it in trailside bracken and smell passing hiker without being seen.

Tuesday, May 30, 2023

Review: CRKT Freyr hatchet

Its no secret that I am a fan of axes, or cutting tools in general

I never go camping without packing at least my Fiskars log splitter and even a long hike will see my Boker Tomahook in my belt because their general utility and suitability to the tasks commonly at hand  camp-side or on the trail. But a log splitter is big broad and heavy and the tomahook is light, narrow  and short. Not all tools do all jobs well, which is why when I saw the CRKT Freyr hatchet I was impressed enough to add it to my collection. 

The broad head of the Freyr is made from the robust 1055 high carbon steel, with a textured black finish all the way to the beveled edge. It features a hammer poll on the reverse face, which I prefer over a spike end for the utility of having a hammer on hand. I rarely have to puncture breastplates, oil drums or car tyres. I do, however often have to reset nails, screws, tent pegs and the occasional fence-post.

Another thing I liked was the significant beard which enabled me to fit most my fist behind the blade for good control and protection when using the blade for shaving or planing. 

This makes it very handy for camp-craft, making kindling for fire-starting and coincidentally, the top corners of the head make good striking surfaces for ferrocium rods.

The usable blade bit length is 12cm (4 3/4"), with a slight toe rising above the top edge of the hatchet, giving decent bite when embedding head-on, which i like to do when pausing in chopping or as a carry-aid when processing logs. 

The haft is stained Hickory, with a very nice grain and a smooth finish, a 42cm (16 1/2") overall length, with a slightly flared end knob for good hand indexing and retention when chopping. The head has been wedged in the eye and has two steel rings holding it all in place and stable. As the Pale Rider would say, "that's a nice piece of hickory".

Unlike the Tomahook, with its full-length tang, the Freyr maintains almost the full weight at the axe-head end, lending itself to solid chops regardless of how you hold it. The traditional bit and eye design broadens the tool for extra log splitting power, without adding significant extra mass or bulk. Topping out at 814g (1lb 12oz) its certainly a handy tool around camp on on the belt when adventuring. 

I have made a leather mask for it, to protect myself and the edge, which I secure with the leather strip when on, 


The balance point is just behind the tip of the beard, adding to its nimbleness in the hand. Overall i'm exceedingly pleased with this hatchet, it is simple, elegant and functional. It holds a good edge, the black finish keeps it rust and resin free. 

 I wouldn't say it has replaced my Fiskars logsplitter for its power and reach or the Tomahook for its versatility and tacticool appeal. 


Thursday, April 27, 2023

Review: restored Folding entrenching tool

 A couple of years ago, between lockdowns, I went for a bushwalk with the family, in the Churchill National Park just near my parents place, and on the way back we passed a couple of items, sitting rusting beside a tree. I'm a firm believer in the old Marine adage of "Gear adrift is gear a gift", and as it had obviously been left in the elements for some time, snapped them up. A good sized Dutch oven, and a wooden handled cast iron pot with lid, and beside them: a rusty entrenching tool. After some soaking, scrubbing, heat-cleaning and re-seasoning the pots have become a welcome addition to my outdoor cookware collection.

The entrenching tool appears to be a Bushtracks folding entrenching tool with Pick' which had seen better days. The screw-down locking bracket had partially seized but with a little elbow grease and liberal WD-40, I got it worked loose enough to unfold the shovel-head and the pick head, with a little extra work I cleared the screw threads of grit and get it working smoothly. 

The next step was to wash and scrub the rusted  shovel face and pick. Luckily the hinge and locking bracket were not especially rusted. Once the loose crud and dust was removed, I heated the shovel head over the gas range hood to drive off any remaining moisture and coated it liberally with linseed oil as a seasoning mechanism. I did this outside as the hot steel vaporized the oil into old-timey smelling white clouds.

The scrubbing and seasoning paid off  and the surface has remained rust-free despite quite a lot of digging, both in the garden and trips to the beach where I use it to fill ballast sand-bags for our sun shelter. I have previously reported on my black tri-fold e-tool and the much smaller tactical-dump trowel but i'll be comparing the two e-tools, as they're in the weight-class.

I'll start by breaking the tool down into its major elements: the shovel, the pick and the haft. 
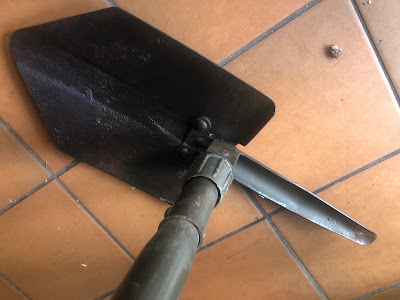
The working end of the shovel is a triangular tipped square side shovel, with  a gentle scoop. The tip is rounded and the edges are quite wide for durability, unlike the tri-fold which has a decidedly sharpened edge. One of the square sides has a sawtooth edge cut into it. The shovel face is riveted onto the hinge piece with three hefty rivets. The shovel has three positions, folded flat, 90 degree "Pick mode" and full extension. when folded flat the "head" of the shovel between the rivets makes a half decent hammer face, perfectly suitable for driving tent stakes in, not so much for fine carpentry. 

The screw-down locking bracket features  a big washer to aid in keeping  a tight fit when tightened which has stood up to some enthusiastic hammering and digging.

When folded out in "Shovel mode" the tool stretches to a fairly decent 62 cm (24 2/5") length, slightly longer than the delta-handled tri-fold. Length is leverage and leverage is force, both have utility when digging, and the extra length has little impact on its pack-ability  at 42cm (16 1/2") fully folded.


The shovel face itself a little smaller than that of the tri-fold,, but the tri-fold has an inch or so "behind the shaft" so the usable length is all but the same. it certainly digs well and scoops tailings out of the way smartly.  It lacks as pronounced  a rolled-over back-edge to support a diggers boot-assist, and if you really wanted or needed to you could use the pick, folded down.  

At 860g (lbs 14oz) its a reasonable tool to carry around, especially if you know you'll need to dig more than a trowels amount (be it a fire-pit, latrine pit-trap or fighting position.) The wide edge does not lend itself to axe-like chopping in the way the tri-folds per-sharpened edges do ,though they could take an edge without too much effort (either hand file or powered grinding tool). The saw teeth could be sharpened up without degrading the robustness of the tool, but that's a project for another day. I have been primarily using this in the vegetable garden, tilling soil, digging up potatoes and shifting delivered soil into our raised beds.

The Pick tool folds and locks in place the same way as the shovel does. The most useful position being at 90 degrees to the haft. The spike itself is curved along the whole length of the pick for strength and extends out  21 cm (8 1/4") from the haft. 

It is possible to operate the tool with both shovel and pick extended, but its a bit cumbersome. Easier to use one tool and swap between the two.  The pick isn't sharp-tipped, featuring the same robust edge as the shovel, but its not expected to be a mining tool. 

The pick, when folded flat against the haft, can also serve as a hammer, though the rounded back face of the pick makes for a tricky strike surface, but possible.

The pick can also be folded "upwards" into a "spear" configuration, extending the tool into a length of 58cm. Good for getting to the bottom of a hole, reaching the top shelf or possibly ventilating an unwanted visitor to your trench.

Lastly, this tool can, when set into soft enough soil, make for a halfway decent stool, with some balance and practice. better than sitting in the dirt or mud, not as good as a proper chair. 

The original haft was held in place by a rivet through the throat of the locking bracket, and whilst giving the tool a good bash test, trench-club style, I managed to snap it off at the bracket. After sitting unloved in a pile of scraps for half a year, including a house move, I dug it out, ground down the rivet head with an angle grinder, whittled a new head to the shaft, fitted it after a little char-hardening and set it with a clinch-nail. This cost me 2-3 inches of over-all length, but with my longer than average wingspan, it's none the worse. 

Though it doesn't fold down as small as the tri-fold, nor stow away in its own belt pouch (though military surplus canvas pouches exist), this is a solid tool rich with utility and with years more life in it, both in the garden and on the trail.

At some stage I may throw a sharp edge on the shovel for root/brush chopping and i'm certainly going to try my hand at sharpening the saw edge, but all in all I'm very happy with this restoration and salvage of a "lost" tool.

For the God-Emperor! For Krieg!


Thursday, April 20, 2023

Review: portable Campmaster dual-range stove

 Having a campfire cookout is a glorious thing: open flames, glowing coals, smokey flavors, but some times you want the surety and stability of a gas range, especially if feeding a family or in adverse conditions, something like this can really make a potentially miserable situation cheery again. 

The Campmaster Double Burner range is a collapsible unit that folds up into a 11cm (4 1/3" H) x 26cm (10 1/4" W) x 21cm (8 1/4"D) box weighing 3.1kg ( 4lbs 10 oz).It unfolds, with silver retention band folding underneath it to form legs. The adjustment knobs sit outside the frame, so you'll need to be careful of that when packing and transporting. 

When unfolded, the "lid" forms the splash-back and two wings fold up and "tab A into slot B" to secure the lid and form a windshield. The unit comes equipped with a detachable hose with a recessed port on the right hand side. the cylinder end of the hose fits 3/8" LHT gas cylinders, without requiring a regulator.


Unfolded and hooked up to a gas cylinder, the range has two burners each with independent control knobs, which throttle the fire from roaring fast-boil to gentle simmering. The burners are guarded by stainless steel wire grills much like  the retention bands/ legs. The base of the unit has a cut-out which serves as a drain spot for spills when in use, or as a handle to carry it when folded up. These are hefty enough to bear up under my biggest cast iron pots, though the wings and splash-back need to be folded back to make room, but certainly enough room for a good size skillet and a pot for full meal cooking.

 The unit can be used with Universal LPG from cylinders complying with AS2030.1 (or equivalent), which means it is compatible with Swap and Go cylinders

The stove doesn't feature a pizo-electric starter, so to ignite it you'd need a match, lighter or ferro-rod type system, that's not an issue for me as I carry multiple fire-starting options as part of my EDC. 

The wings and back form an effective wind-shield keeping the burners from blowing out and heat staying where you need, the blue enamel finish makes wiping down any cooking splatters or trail dust an easy task. Needing an LPG tank for fuel sort of restricts it to back-yard or tail-gate type events, unless you fancy hauling a cylinder about, but its reliable, powerful and super simple to use.

My parents gifted me this one, as they used it to cook on whilst having their kitchen renovated and are not big campers.

One final thing, the standard BBQ cylinders available to me don't have a 3/8ths" fitting,  so an after market adapter is required but these are easy to come by. 

I keep mine on the top shelf of my tucker-box /  chuck box which we built around this unit, where it not only stows nicely but can cook on, right in place. 


Wednesday, March 8, 2023

Review: Go! Outfitters - Landing Pad

A well made tarp is a crucial bit of kit that every outdoors expedition could benefit from, be it rain or wind shelter, shade or just a dry and prickle free place o picnic upon. Though at times a 9  x 12 tarp may be a bit too much, especially if you're just planning for a bit of a trail hike. Then there is your gear, be it packs, cook gear, bedding or even boots at the end of a long day. If like me you prefer a slung hammock to a ground tent there is the question of what to do with your gear, if whatever fly system you have doesn't cover it. The clever people at GO! Outfitters came up with something to fit that niche, the Landing Pad.   

It’s made from durable 70D polyester, with a 1000mm waterproof polyurethane coating on the bottom and a silicone coating on the top for extra protection and easy clean up. This makes the Landing Pad extremely waterproof. 

 The Landing Pad is 137cm (54") in diameter and has eight stake loops and four sets of drawstrings with cord locks around its outer edge. It comes with a set of steel hook-style tent stakes in a draw string bag to stake it down as needed. At 137cm in diameter, the circle is big enough that 4 people could sit on it back to back or three facing inwards, if legs can be managed. Certainly big enough for a trail-side picnic or to drop bags and boots on whilst hopping into your hammock. Stake it down under your hammock for a soft place to step onto once you swing your legs over but before you put your boots on. 


The four drawstrings around the edge of the Landing Pad allow for the lips to be drawn up into a low bathtub to keep damp ground run-off out. It also allows for the whole circle be drawn up like a purse to wrap your gear in a highly water proof bag. Obviously the opening isn't covered, so don't be throwing it in a pool or leaving it under a waterfall. By pulling two opposing drawstrings the landing Pad converts into a gear hammock,  stretching 2.4m (7'10") overall with a 1m (3') hammock space. Though it can be drawn tighter doing so reduces the capacity. I would use it as an along-side sling, rather than bunk-style to keep things in reaching distance and act as a buffer.

 This drawstring rim also enables the Landing Pad to be fitted over a backpack to shelter it from the weather and could supplement a poncho to keep both you AND your gear dry.  I found it big enough to be able to wear it like a turtle-back poncho, covering my back, butt arms and back. Its even big enough that I could shelter under it like an umbrella when couched, staying totally covered. 

I found that the tan/brown material made for quite the unobtrusive "hide" when crouched down under it when just off-trail. It occurs to me that with an expanded hiking stick or appropriately padded branch you could make a small single pole shelter with the Landing  Pad, properly staked out.The Landing Pad, with stakes and stuff-sack weighs 285g (10oz) and by itself 15g (5.3oz) and packs down to a pocket sized 4cm X 13cm X 18cm (1.5" X 5" X 7").

More than compact enough to stuff in a pocket or day-pack when going for a hike to provide a clean dry spot to break on. I have two  ( one brown one charcoal grey) and they make for an easy addition to any adventure without adding excessive gear load.

Friday, February 24, 2023

Review: Great Outdoors Silver Grande 9L tent

Having an ultralight bivy tent is all good and well for a bit of  a solo over-nighter off the trail when ounces mean pounds, but there is also a time and a place for a big tent that will fit the whole family, and gear. Sometimes you need to go big, and one such biggness is the Great Outdoors Silver Grande 9L a four room, 9 person tent.We jokingly refer to this beast as the Tent Mahal. All told this huge tent weighs 29.7Kg (65.5 lbs) so its definitely more suited to back yard or drive-in camp sites, though i have carted it in to a couple of sites in a trolley and/or hand wagon. 

This rather palatial tent with measures 6.4m (21') in overall length (2.1 x 2.2 x 2.1) and 3m (10') wide in the middle, 2.15m at the end rooms. The front room adds another 2.1m to the width to a total of 4.3m (14'). The side rooms are a little bit shorter than the main central room, which tops out at a very respectable 2m15m (7') tall enough for me to stand and stretch in nay room, quite a luxury. Each room has a door out wide zippering allows for good clearance around the bathtub bottom of the tent. The three off-rooms all open onto the central room with a low-trip edge of similar width as the external doors for ease of access. 

The internal doors are made of the same lightweight and breathable fabric as the inner walls of the tent, and self-stow in fabric pockets beside each door.  Each outside door features a flyscreen outer, with the opaque option as an in-set. these all wrap up with their self-storing toggle and loop attachments. The interior is really very spacious and airy. The walls are at a high angle, so you maximize the available space, which is often lost in lower dome tents. The internal walls are all a very light, breathable material, and well fitted. 
Each of the off-rooms have window panels on the sides which can be rolled up to add airflow and views. Structure is provided by two sets of colour coded fiber-glass poles, and each is designed to slot into sleeves built into the inner shell, and mount on captive pegs attached to split rings, attached to the base, in the corners of the main room. These also have clip-on stays to keep the inner walls taut. The off-rooms each have a similar system, forming an arch over the external doorway. Plenty of peg-loops around the edges provides for a well pegged-down base. 

Each room features clips in the corners to suspend a light or string a clothes line to air out what have you. The main room has two "window" panels in the roof and the fly has two clear PVC panels corresponding for light and ventilation. The windows throughout make for a very well lit and comfortable home away from home. 
The main room has two zippered ports in the bathtub floor wall to feed power or other cables in without exposing yourself to too many bugs and critters. Perfect if you have a powered site, a generator or the like. You might even feed an LPG hose to a cooker if in-tent cooking was your thing, though I wouldn't recommend it myself. There are also two sets of four mesh pocket sewn into the main room walls for all manner of small items; phones, sunglasses, tissues, spare socks, gloves, caps. This little touch helps organize personal effects that might otherwise vanish until pack-up time. (I once "lost" a wallet, went as far as cancelling all my cards only to find it under the tent when we packed up). The fly is silvered on the inside which adds significant protection from the sun, and radiant heat, and as previously mentioned has clear PVC panels matching the windows on the sides and top of the inner layer. 
The zippers are set under a lip for rain shedding and have a reflective cord loop for easy pulling at night. Numerous guy-lines are built in to strategic locations and the ground- reaching corners feature a heavy-duty shock-cord loops for pegging it down. The "front door" has a door-matt built in, perfect for keeping muddy feet out of your nice clean tent. The fly features a pop-out pavilion with two poles to form an annex that is billed as being able to join up with the back-cabin of a truck or van, for even more enclosed space, though i haven't had the ability to try that out. I have managed to set the whole thing up on my own, under good conditions, but it's easier with help. I have set the fly up the wrong way around several times, prompting me to write on the corners of the fly and tent ("tab A, slot B" type notes for next time I set it up. The tent nominally fits in a light nylon carry bag, with carry and drag straps, and a wheeled base, but I have had great trouble re-packing it every time. 
After use, I like to lay the fly out to dry, ( and the inner, too,inverted if possible) if space and time allows to have it dry for pack-down. In summary this is a great tent, spacious, roomy and airy, but its very large and heavy. With all the pegs in place, and well guy-lined down, the chain-of-domes structure is very stable in even quite high winds, and in the light rains I've had it up in we've had no leakage or seepage problems. Given its capacity, it could even do as a short to medium term bug-out home, once a suitable location has been scouted, whilst more permanent habitations are established. This was a second hand gift from a festival going friend of ours, and i probably wouldn't have bought one as large on my own. Looks like its no longer on the market, but if you have the need for a big tent, something like this would suit you well.

Related Posts Plugin for WordPress, Blogger...