Saturday, March 15, 2014

Review: GoST Paleo Barefoots Antera Paws

 I was really happy to receive the GoST PaleoBarefoots BAMANOS gloves with Paws grip-spots, and I was really looking to try the ANTERRA versions that Jörg sent along with them. As you might have read previously, where I've talked about how I really loved the ANTERRA and PRONATIV shoes, but noted that as per the PaleoBarefoots recommendations and warnings, they don't react well to polished and artificial surfaces. The steel links just slide, with nothing to find purchase on.

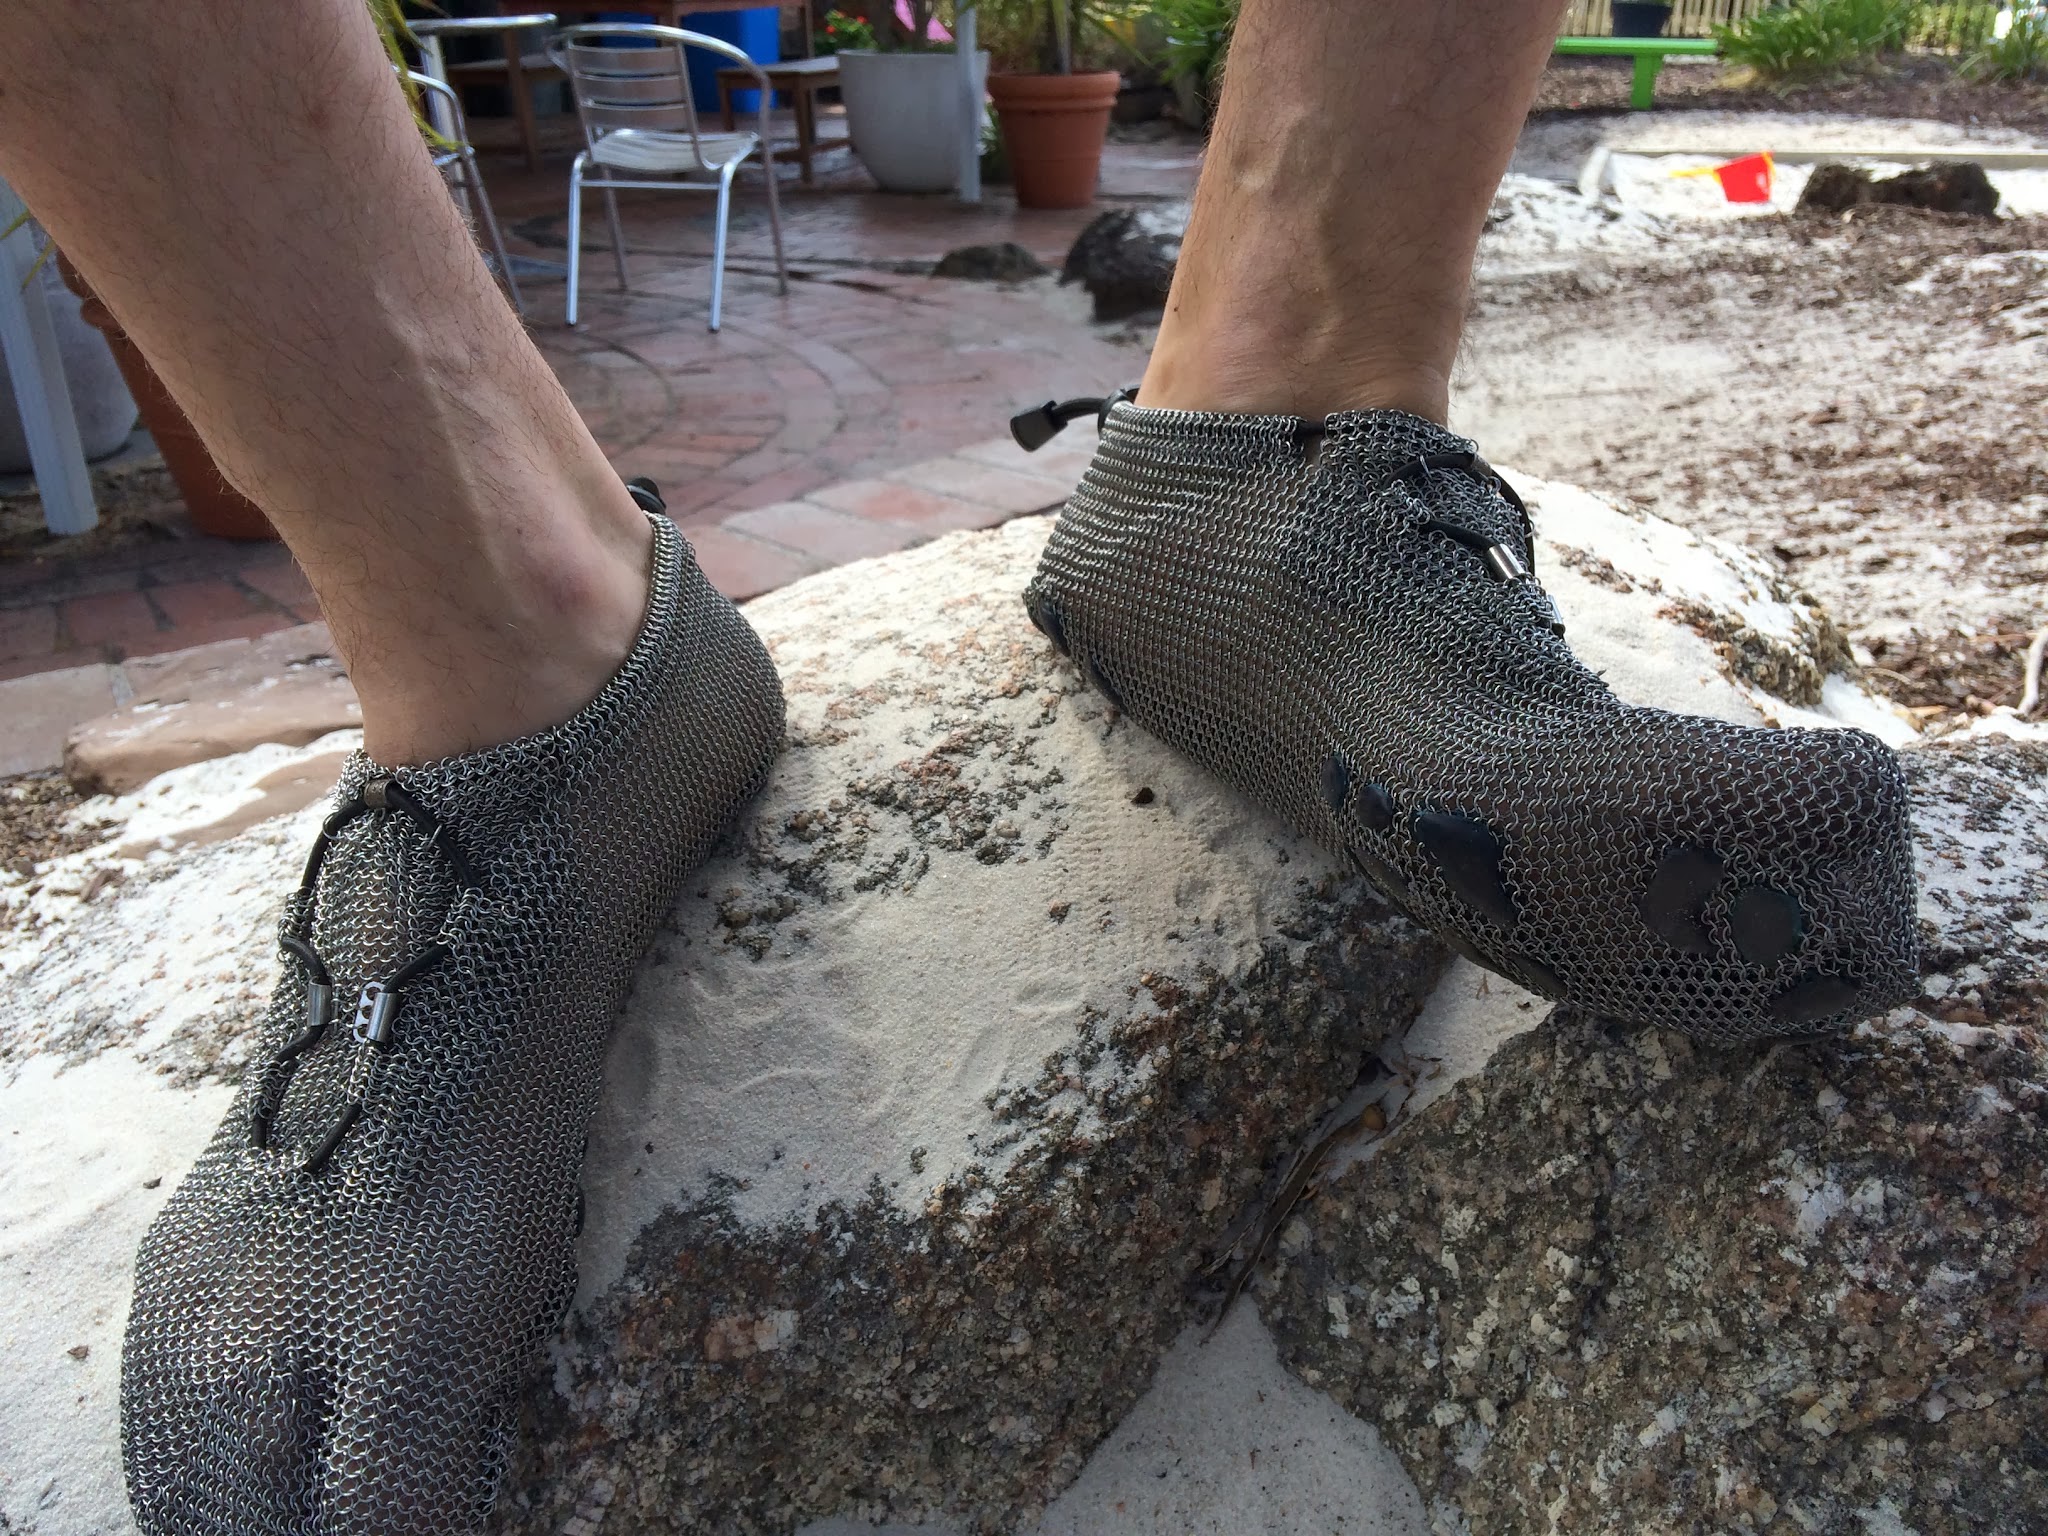
Adding the Paws grip-spots immediately ended this issue, providing immediate regular shoe traction with surprisingly little loss of tactile response.
They added some pressure points on the foot that had not been present in the "bare-sole" version, but this was not unpleasant by a long shot. 
 
The area taken up by the Paws is slightly larger on the links than on the ground contact, and only very slightly permeate into the shoe, essentially imperceptibly. This means that you still have all the flexibility, and articulation of the originals with none of the slip-sliding.

I also found that the extra buffer the Paws provided gave me a little relief from the heat of the Australian summer, when standing still on hot surfaces. It was also interesting to note that the placement of these spots matched very well to the shape and contours of my feet. It's obvious after wearing them that a lot of care and thought had been out into the shape and placement of the grip-spots, and it was more apparent than in the BAMANOS, because of how they traced the contact points of the sole.

This version certainly improves upon an already eye-catching and effective barefoot shoe system, with very little change to the basic function and draw cards of the originals. 

After many kilometers of running and both beachside and urban walking in them throughout the summer, I can confidently say that these are the best yet, and the adjustment period was minutes at most. 

Given that the silicone rubber is melded into the rings directly, I would expect that the Paws will last for many years, wearing down and degrading slowly as I slog through rough terrain and gritty city streets, and will eventually need to be resurfaced. 
However, even then, the stainless steel of the primary shoes will go on working as indefinitely as any of the classic versions. No structural integrity was lost in the adding of the grip-spots, that's for sure.
I very much look forwards to completing my next Tough Mudder in these and with the BAMANOS gloves. 

The combination of the steel and silicone gripping surfaces significantly improve the disaster situation practicality and all-round wearing of this unique kind of footwear.


Friday, March 14, 2014

Home Front: Mass transit


My daily commute takes me about 40 minutes, all up, and sees me at three train stations; my local station, a major junction station and a subway station. I'm ten stations out in the suburbs, so when I am in my way in, or getting home, the crowds have thinned considerably, but in the city, and at the junction station, there can be considerable crowds. Most of the time this isn't an issue, even at peak hour, as the trains are quite frequent and the stations laid out reasonably well.

They are, however, a nexus for people, all moving about, for the most part studiously ignoring everyone and everything. They feed into the choke-points and bottlenecks and I can only assume are unconcerned and oblivious.


When there are delays, usually for technical reasons (not pointing at the rail service provider, or the people stealing copper from signal boxes or anything), but also for environmental reasons (heat buckles the rails on occasion in summer, for example), or even safety reasons (sick passengers, people on the track), these crowds swell tremendously. Nothing new here. Station staff, roaming inspectors, even occasional Protective Services officer teams bolster incidental security, public order and safety.

However, I see this in terms of crowd density, choke points, exit placements and the potential for harm. Growing up in Thatcher-era UK, I am familiar with the specter of domestic terrorism. I see throngs of crowds on underground escalators and waiting at the platform in terms of potential casualty numbers, not to mention disease vectors.

Being stuck on an escalator, or at the bottom of one, waiting my turn on a regular 9-5 day, when everyone is polite and civil is one thing, add panic and strife, another beast entirely. I can usually just get on with my daily commute, without dwelling on it, but other times, I see and triage the risks.

What can we do to mitigate these potential risks? In regular life, we can out trust in the design and emergency response planning that the designers and operators have in place.

We have large, clear-sided waste bins in some train stations, to mitigate them as easy hiding spots for explosive devices, ubiquitous exit signage and fire prevention systems. All good ideas, however, in the event of panic, in a packed station, they may be difficult to operate or ineffective.

Too many people, too many choke points and environmental hazards.
I have similar concerns whilst on board. In regular circumstance, even the mundane issues or patient illness, technical issues, even incidental accidents are all things I have faith in the policy and procedures the operators have in place. It's in the instances of extraordinary events that I am given pause. Catastrophic power loss, or physical infrastructure failure. Major accidents or environmental disaster, or again, communicable disease come to mind. Standing room only, shoulder to shoulder, in a metal plastic and glass tube moving at 80kph. What can I do? What can anyone do?

Situational awareness is a great buzzword. I'm often engrossed in an iDevice, or a book, but I try remember to pause, look around me, watch the movements, postures and demeanours around me. I try to keep my earbuds turned down low, so I can still hear ambient noises and announcements, as well as conversations around me. I maintain control of my pack, full of needfuls and a variety of resources.I ensure my lights are charged, my kits are stocked and my head is in a good space.


[edit-update]
Power has been lost in Melbourne's City Loop, leaving passengers stuck for up to 20 minutes.

Wednesday, March 5, 2014

Review: ITS - Urban SERE kit

I like to increase my skillsets as often as possible, as well as staying on top of my sleek EDC needs so I am always on the lookout for new kit that I can both have on hand, but also try out new techniques and learn new things. The Urban Kit from ITS Tactical is a perfect example of this.

Held in a sliding plastic case 8cm x4cm x1.5cm, it contains a number of very cool SERE elements in a very compact package. The tools include:
  • A folding razor / saw, with inch and mm rulers provides a safety knife and a sturdy saw.
  • A diamond encrusted wire saw/file, great for cutting through chains, filing rough edges
  • Handcuff Shim, the flexible, rounded key for opening cuffs (in the case of unlawful restraint)
  • Quick Stick, the stiff pointed metal key for popping many padlocks open by bypassing the pins, and reaching lock shackle itself.
  • two coin/button sided, polymer Universal Handcuff Keys, (again, for escape from unlawful restraint, with double-locking pin)
  • A ceramic razor blade, because having a small, non-magnetic blade in your SERE kit can have all kinds of uses, and remember, if they can't find it, they can't take it ...
  • 1.8m (6') of 85kg (188 lbs) test yellow Kevlar cordage, for both friction sawing, but also a variety of other purposes, you can only boggle at.
  • 1.8m (6') Stainless-Steel Coated Leader Wire which gives you an even stronger line than the Kevlar cord, but its specific properties can also lend itself to a whole other raft of uses. 
  • Lastly the very cute, Grade AA button compass, what's not to like with having a compass in your EDC? Nothing at all. 
All in all, this is a great little kit. It fits in my pocket with ease, leaving very little indication it is there, and does just as well in my pack. This is a very compact way to not only collect, but also carry some really good tools for many of your urban SERE needs.

Tuesday, March 4, 2014

Review: Vibram Five Fingers

I've covered several sets of the very cool Paleo Barefoots and a variety of other footware, like my Magnum Amazon5's or the Danner Striker II boots before then. Footware is a very important aspect of both day to day life, and planning for those catastrophic events we are all hoping to be prepared for. When I had the opportunity to get a pair of the much vaunted Vibram Five Fingers toe shoes.

I've seen and heard about these for some time now, and thought I might give them a try, because they certainly have some interesting potential.


As well as having worn the Paleos, I have also spent a lot of time in tabi-boots over the years, so the idea of a split-toe shoe is not alien to me, but was an interesting to have a toe for each toe, rather than just one for the thumb as in tabi.

The Vibrams have an abrasion-resistant stretch polyamide fabric for the uppers, with a wrap over Hypalon strap, which feeds through a nylon ring, and secures with hook-and-loop.

The soles are Vibram's own TC-1 performance rubber, which is both a springy and tacky material. I found it quite grippy, even on sandy stone.

The footbed, inside the shoe is of an antimicrobial microfiber, which is great, especially as whilst socks are available, these tend to be a sockless kind of shoe. Having healthy feet is essential, especially if you have to be in your shoes for long periods of time. I'm always in favour of this kind if thing, which is why I also really like my BioDefence spray too .

So the best part of these are the segregated toes, allowing you to splay them independently, giving you very good constant contact with the ground, and the ability to grip with your toes, if you're that way inclined.

Conversly, the same thing can not be said for the main body of the shoe. I found it difficult to mold my feet to curves in the way I have grown accustomed to with my Barefoots, and even the flexible soles of the tabi, this might be due to not having worn them in as much as they need, but they just feel stiff.

They are a light alternative for running, for sure and perhaps it is my slightly wonky little toes which didn't quite sit nicely in these, but overall I didn't find them very comfortable. I will see if this improves with further wearing-in. Well made, and they certainly do everything they are known for, but I think I will stick to boots and Barefoots.

Thursday, February 27, 2014

Home Front: Alternate dwellings

I have always fantasied  about building or repurposing my own bunker. So much so that we have "you're allowed in the bunker" conversations with guests.

Obviously we don't have any ex-missile silos to convert into a SiloHome or the like, which would be most awesome; secure, rugged, self contained to a large extent and usually significantly removed from built up areas.  Perhaps still listed as a strike-site, so that's a drawback...

Then there is the thought about what kind of every-day structures would actually provide protection from a radiological/nuclear  attack as postulated on Gizmodo in their Where to hide in case of nuclear attack article, which is the kind of thing I am always interested in reading.   I can't think of a single house I've lived in, or visited that has a cellar in Australia. They just don't do that here, which is silly, considering the heat in summer ...

Then there is the concept of living inside the box which I've been keen on for decades, having seen shipping containers being both discarded and re-purposed.  I think it would be most excellent to build a home from these. Research has suggested however that they don't bury well. Which leads me to think of a complex castle like arrangement of many stacked and interconnected units. There are even online resources for floorplan suggestions.  

Dreams and hand-waving plans only, at this stage. I'm a long way off being able to do anything like this, but its a fun mental exercise.


Wednesday, February 26, 2014

Review: SORD - 870 Back

The good folks at SORD, who hooked me up with one of their very cool hoodies, were also kind enough to send me one of the items I saw on their website but have never seen the like of in person. As you are probably aware, I am big on being prepared, so it probably strikes you as unsurprising that I have a set of bolt-cutters. These were a hold-over from my University Scavenger Hunt days (I was head/on several Black-Ops teams, and later a Judge) but the knack of getting into, onto and around obstacles, and coming away, unscathed, with tools, with the prize has always been dear.
This is where something like the SORD 870 Back pouch would have come in very handy.

Explicitly designed to house the Remington 870 models of shotguns, as well as other breaching tools such as sledge hammers, bolt cutters and breaching bars. I was thrilled at the chance to get my hands on one and see what I could make use of it for.

Fitted with two twin sets of PALS/MOLLE attachment tabs (with integral hook-and-loop) and a Fastex style clip with a long webbing strap, this was exactly what I'd envisaged.  Constructed from what I believe is 1000d Cordura.

Internally the pouch has two main compartments, the larger, external one, and a smaller, tucked-away one. I hadn't noticed the smaller one until I had been loading it up, and I opened it up. Not owning a shotgun, I havent been able to test it out with its name-sake, but I certainly tried out a variety of my own stabby, cutty, smashy tools, and was very pleased with the results. The main pocket was a perfect fit for my off-the-shelf bolt cutters, holding them very securely for such a head-heavy tool.

The thinner back pocket seemed to be a perfect for for my stand-by tree-chopper, the Ontario BlackWind. I really wanted to fit it out with my Zombie Tool Deuce, but the Deuce was just too much sword for that pocket.

With the retaining strap holding it in place, I mounted the pouch to the side of my Platatac Light Field Pack and took it out for a trial. I barely noticed it. No sway, no rattle, not jiggle. In fact, with those top and bottom PALS/MOLLE fasteners in place, I barely even felt the pack shift from the extra weight. The low profile and rounded sides meant I had no snagging and better yet, I could even manage the fabled over-shoulder draw much loved by Hollywood, (as long as a buddy unclips the Fastex clips for me) However, this has allowed me to carry, comfortably and securely, two of my favourite tools of localised destruction.


Great piece. Well made and exceptionally well suited to the role it was designed for.

Tuesday, February 25, 2014

Review: GoST Barefoots - BAMANOS Paws

Here's an interesting twist on regular gloves, and the astute amongst you might recognize the lineage of these, to that of the PaleoBarefoots PRONATIV and ANTERRA that I have covered previously. You would be right, and these are indeed the glove versions of those barefoot running shoes.  These are the BAMANOS from GoST. I had been lusting after these for some time, as I am forever dinging, cutting and scratching myself when gardening, adventuring and clambering, especially in wet environments and regular gloves sometimes wont cut it. 
Even my tried and tested Ironclad Landscaper gloves which I've worn lazertagging and in Mud Runs   but also with the Condor Combat Nomex gloves  there have been troubles with waterlogging and becoming wrecked with wear. That's where the durable chainmail links made of 0.55 mm gauge (1.4404") stainless steel  with a 4mm external diameter chain and an internal diameter of 2.9 mm, same as in the shoes. The most exciting innovation, is the cuff links, with two sets of  steel clips with hooks that feed into a slightly larger set of rings, one from under, then another wrapping over and hooking down, giving a really secure fitting. Being fingerless gloves, the armour only protects the hand, and a little past the first knuckle and down to the beginning of the wrist. That protection however, is tremendous. I had no trouble gripping tools, and manipulating debris in them, although, being fingerless, you still need to be mindful of that, but for gripping wear, you're covered. The addition of the new PAWS grip-spots means that the otherwise slick steel of the rings has even better traction on smooth or polished surfaces. One thing I found, wearing rings under them was uncomfortable ... Jewelry off when you are battling the hordes!

I look forwards to trying these out on the upcoming Tough Mudder, and we'll see how well they perform in some really adverse conditions. Conditions that so many other gloves have failed under. 


Monday, February 24, 2014

Review: Cold Steel - Gladius

At the same time I picked up my United Cutlery M48 walking-axe I also managed to scoop up my second Cold Steel piece, via the folks at Global Gear. I have had the Cold Steel Boar Spear for years, and have purchased several of their knives for people in the past, but have now added their Gladius to my collection.

I've known the Cold Steel products to be no nonsense pieces, and this is no exception. Styled after the Pompeii style standard sword of Roman Legionaries the Cold Steel version is referred to as a machete, and it certainly functions in this role.

The piece is double edged, and features a 48cm (19") blade, being 68cm (27") overall, and I thought the waisted head of the blade was was a nice touch, giving it an elegant line. Made of 2.8mm thick 1055 carbon steel with a baked on rust-protecting matte black finish, it is both light in the hand, at 510g (18oz), and with the large polypropylene handle, it is a well balanced piece.

When I un-boxed it, I found (as several other reviewers have noted) that the edge was a little rough, some burrs from the grinding process still apparent, which was a bit disappointing.  With a few passes with my DMT sharpeners, these cleared nicely. I have used it for clearing brush, and some test cutting, and found it to have good resistance to shock, and the finger groves to offer good purchase for the hand.  Here it is lined up against my wall-hanger gladius, which is much closer to the 1.5kg of the ancient pieces, but not the utility.

The pommel is drilled, to accept a lanyard, should that he desirable, which I think might be, as I felt the polypropylene finish to be a bit slick. Stippling could also help solve this.

I also wanted to compare this visually, up against the Ontario BlackWind, which is almost 400g heavier, and two-handed, but I was surprised to feel how much livelier the Gladius was. Interesting. Being thinner, it slices nicely, but I wonder about its resilience to stiffer abuse.


The sheath is made of Cor-Ex, which is to say some kind of nylon, with a hard plastic liner to protect it from the edges and stabbing point of the blade. With a simple belt loop, it wouldn't be a problem to wear this in Legionnaire style, but I'd also like to have some other means of strapping it to me. That said, for all my jungle-clearing action I think a belt-carry for this would be just fine.

I've also included a clip of me waving it about in a manly yet practical fashion, to give you an idea how it handles, and how it cuts.

Given its relative low cost, and solid construction I'd say this was a very good option for those who want more than just a simple a chopper in their machete collection. 


Friday, February 21, 2014

Wish-Lust : Survive2Thrive - 40 Days and Nights food

I had two different friends point these out to me, and thought it would be well worth sharing.
I've covered the Mainstay ration packs
in the past, and whilst they are great high-density survival food, they really aren't intended to be hold-out food, rather than room-filling stocks of long term supplies. That's where a product like these come in.

This is the Survive2Thrive - 40 Days and Nights
preparedness pail, which is packed full of staples. Full of 15.8kg (35 lbs) worth of staples to be precise. This 33cm x 33cm x 40cm (13" x 13" x 16") tub is designed to stack securely, meaning you can stockpile and store them effectively.
 
The kit is filled with individually vacuum sealed in 6 & 7 mil. food-grade bags, purported to give their contents a 10-15 year shelf life, 

  • Rolled Oats: 5 lbs 
  • Brown Rice: 4 lbs 
  • Millet: 4 lbs 
  • Garbanzo Beans: 3 lbs 
  • Green Lentils: 3 lbs 
  • Black Beans: 2 lbs 
  • Pinto Beans: 2 lbs 
  • Quinoa: 2 lbs 
  • Sprouted Buckwheat: 1 lb 
  • Sprout Blend: 1 lb 
  • Gluten Free Pancake Mix: 1 lb 
  • EnerFood Green Superfood Powder: 7/8 lb 
  • Chia Seeds: 1/2 lb 
  • Fermented Miso Powder: 1/4 lb
  • Cajun Spice Mix: 1/16 lb
Everything in the bucket is purported to be raw, uncooked, certified organic, non-GMO, and even vegan. The supplies are not dehydrated, freeze dried, nor have any added preservatives. There's only the small packet of seasoning, though, and all the contents require extensive cooking, so it's certainly not eat-on-the-run food. But if you were hunkered down in your bunker, it would keep you fed and healthy, that's for sure.

The shopping list of items would be pretty easy to replicate at any whole-foods supplier, and both vacuum sealers and buckets are also available. It wpould be possible to whip up something to this effect, and avoiding the massive shipping costs to Australia, but if you're on the Continental US, well worth adding to your survival cupboard.

Thursday, February 20, 2014

Review: ZASC Bag Tags

These are some cool accessories I saw on one of the forums I am on, and put in an order. International shipping can be a real pain, but eventually, they arrived and I immediately put them to work. The philosophy of Zombie Apocalypse Survival Camp is the hope to teach its members to be a better survivor. They offer instructors for topics such as fire craft, water filtration, emergency bag necessities, cold weather survival and more.

They produced these tags as a means to help a survivor quickly and identify items in your cache, pack or bunker cupboard.

With a fire-craft, hydration, first aid, food-prep/rations and a glow-in-the-dark special edition illumination tag, I have labeled my every-day pack, the much vaunted Platatac Bullock Echo daypack .

These little tags haven't added any bulk, are relatively quiet and are certainly clear enough, with both colour and glyph making it pretty easy to distinguish between their purposes.

These offer a bit more variety than standard patches might, which certainly cover medic/IFAK identification but doesn't have a lot to offer other disciplines. Which is where the tags come in, filling in the gap. The etched flashlight on the glow in the dark tag is a bit hard to see both in daylight and in the dark, but it's not really been a problem thus far.

Obviously these wouldn't work for someone who needed to fully blend in, in matching camouflage, but when lugging and lumping it away from urban devastation, like in The Road, it certainly would do you some good.

Wednesday, February 19, 2014

Wish Lust: Skinth Solutions - TrailBlazer Pouches

Swiped from Skinth Solutions website
I have now had several people point me towards these pouches for some time now, and whilst I haven't managed to lay-hands on one, I still wanted to show them off, because they appear to have tremendous potential.

Although Skinth offer several different options of pouch, but I'm going to focus on one in particular.This is the TrailBlazerw (woops, [edit], Skinth let me know these pictures are the slightly larger Catch All ) which was was originaly designed by Skinth toorganize fire starting and small survival kits.
Their other pouches are different sizes, shapes, but all follow the same design philosophy, so this will give you a good idea of what they're about.

Constructed from 1000D Cordura, with V70 stitching, this is a hefty pouch, and is fitted with Fastex style buckles and is 3″ wide, 1.5″ deep and 4″ long.

Swiped from Skinth Solutions website
Internally, in the main compartment there is a divider to slide a regular sized Altoids tin survival kit against the back. Each side tube pocket is 1.25″ in diameter, lots of room for items and even 4″ multitools.
Swiped from Skinth Solutions website

As well as this there are as a standard feature, offering 5 pockets to organize small items. This "Penta-Pocket" system (one behind each side tube, one 2.5″x3″ flat pocket and two 1″x3″ in front) allows for a variety of small items to be secured. I can envisage ferrocerium fire-starter rods, Lockpicks, a WTF tool or any of the other small, needful items that I've covered thus far.

There are elastic pen-flaps sewn to the front panel, for pens, safety sheers or a clipped knife, adding to the gear-density of these pouches.

The backing of the pouch comes with 2″ wide hook-and-loop closing belt loops, but the joy of Skinth pouches is the "optional extra" options they offer. In the case of the TrailBlazer, they offer pairs of stainless steel belt clips, MOLLE attachment webbing or even horizontal strapping for bag strap carry. Key hanging loops, 13 colour options, even bag hanging straps.

These are a well designed bridge between chest-worn admin pouches and satchel like pouches. Stores your gear, where you want, for when you want. I've seen things like this being worn by nurses and EMT's at work, and would love to get my hands on one of Skinth Solutions versions.

Thursday, February 13, 2014

Review: Tactical Keychains - Large WTF

Here's another one of Brad from Tactical KeyChain's ingenious mind creator of the TiPiK and TiKeY, which came as an optional extra from his WTF Kickstarter project.

The is the "Large WTF", cut from the same titanium (Ti-6Al-4V) alloy as the regular titanium WTF's, but is significantly beefier in all respects. at 4.5mm (3/16th") thick, and 110mm x 33mm (4 1/4" x 1 5/15") in length and width. Featuring the same 1cm and 1/4" marking dimples done the long edges, this tool also features in its jaws; Imperial 1/4", 5/16", 3/8", 7/16", 1/2", 9/16" & 5/8" and Metric: 6mm, 8mm, 10mm, 11mm, 13mm, 15mm & 17mm wrench heads.


It also features a recessed neodymium magnet that sits flush with the face, allowing the tool to be stuck to a toolbox, to hold the bolt you just undid, or the like. I've used mine both to store the tool, and to catch parts.

This has been especially good when working in messy, cluttered spaces, I just attached the tool to a pipe, girder or the like, and kept working.

As with the Mini WTF tool, the titanium has a bit of "flex" which gives some leeway with nuts and bolt, the thickness of the tool keeps it from flexing TOO much, though. 

There is also a built in 1/4" bit holder, which is an invaluable addition, as it gives you significant torque advantage, when working on stubborn jobs. Make sure you use good quality tools, and the rest will follow.

The two spacer holes in the tool reduce the weight and add lashing points, should dummy-cording or spooling of paracord be desired.

Brad suggests that you could carry 7.5m (25') of paracord wrapped around the central mouths of the tool.


I had my Large WTF lightly anodized, which gave it a "olive drab" finish that worked nicely with my collection of khaki gear, and found that it fitted pretty well into PALS/MOLLE channels, spanning two channels, and three rows for a secure fit.

All in all this is a robust and useful tool, and well suited to a lot of tasks where lugging an entire socket wrench set might be impractical. Getting in to reach close-fitted nuts could prove tricky, but hey, more titanium for my collection, and distributed tools for my EDC and bug-out-bags.

Wednesday, February 12, 2014

Guest Post: Grat's Amazing Pickled Eggs

I recently saw a post that I felt I just needed to share as widely as possible. My friend Gareth and I share many self-sufficiency and Kickstarter-gadget loves, so when I saw this recipe, and marveled at not only the way it was written but the way it must taste, I knew I needed to get it out there. 

Pickling is an age-old form of food preservation that I have covered before and is an excellent means to make good use of a bumper crop, for trade or tribulation.

Without much further ado, I will bring you (with only minor annotations, added by me) Grat's Amazing Pickled Eggs:
*****************************************************************

[Or: Breaking Wind, the story of a high-school chemistry teacher who decided to get rich by making obscure home produce.]

This makes 3 dozen eggs, so alter proportions according to your needs. You need 3 dozen of these AT LEAST, right? 3 doz. is the basic unit of pickled eggs, also known as an Eggmouthsplosion. I have, in my gloriously wild past, made 4 Egmsplns at a time. EPIC

You will need:
- A very large sealable jar, or several smaller ones. Enough to hold all this stuff, obviously.
- A trip to the shops because you overestimated the size of the jars you already had.
- 1 small onion, chopped roughly
- Several large sprigs of fresh rosemary [dried is ok, fresh is better]
- 3 dozen eggs, or one Pre-Eggmouthsplosion [Smaller eggs are better if you don't want to wait ages, larger ones are good if you like lots of pickled egg in your mouth all at once which you do.]
- 1 head garlic, loosely chopped
- 2 tsp mustard seeds
- 1 tsp cloves
- 6 bay leaves
- 2 tsp cardamom pods
- 2 tsp whole peppercorns
- 1 tsp whole allspice
- 2 tbsp Tarragon
- 1 cinnamon stick
- 3 tsp salt [I prefer sea salt or rock salt to the refined stuff]
- 6-7 cups White vinegar [You can use apple cider vinegar or some other deluxe kind, but it gets pretty expensive, and all the flavour comes from the other stuff so you only need this for preserving the eggs and for the characteristic bite.]
- 2-3 cups spring or filtered water [Or at least, not Adelaide Tap water]
- Tweezers to get the eggshell out from under your fingernails. It will happen.

First, put the raw chopped onion and 2 of the rosemary sprigs in the jar. You can be fancy and arrange the sprigs up the sides so that it looks all food-artsy on the shelf if you want. I won't judge you.

Next, hard-boil your eggs. However you like to do them. I won't tell you how, if you don't know how to hard boil an egg, google it. Set them aside to cool.
This will take way longer than you expect, but they need to be cool so they're easy to peel, and trust me, after the first dozen eggs you're going to want them to be easy to peel. You *can* leave them in their shells and let the vinegar dissolve them, but that uses up the amazing power of the vinegar on dissolving shells rather than making your eggs taste like explosions, and leaves a gritty silt layer at the bottom of the jar that is just weird.

If you decide to take this easy path, just use vinegar and no water, to make up for the acetic acid lost to eggshell dissolving and your apathy.
So, assuming you peeled all your eggs, plonk them in the jar. Don't pack them tight, just put them in. Unless you want pickled egg-hexagons, which I did once. Because the whites go stiff and hold their shape. You could probably experiment with this bit and make d20-shaped pickled eggs. If so, I want credit for the idea and pics.

Now comes the fun, smelly eye-watering bit. Take everything except the eggs (and the tweezers) and put it in a big pot. Bring it to the boil, then let simmer for 15 minutes. Take it off the heat and let it cool to the point where, when you inevitably splash it everywhere, it's just annoying rather than a medical crisis.

Now pour this astringent nectar over the eggs. You can strain off the bits, if you're the kind of person who doesn't like to see what torment their food has been through.
Otherwise, just slop it on in there, seal it up, stick it in your fridge. You can keep it on a shelf out of the sun instead; I've done both, and it doesn't seem to make much difference except to how cold your eggs are when you eat them.

Now wait.

And wait.

And wait some more.

No, don't check them after three days, that RUINS EVERYTHING! Why would you do that?!
If you went with small eggs, give it a week, and in the interim fill a spare jar with tears of weakness and desperation as you are obviously ruled by your cravings for delicious vinegary eggs.

If you went with large eggs you are a hero and my champion, so wait two weeks for double the XP and a Pickled Egg Medal.

Once opened, scoff half of them in a few days and then hide the jar and don't look at those hideous yellowish-brown ovoids for a few months. Then get cravings and eat the rest.
Enjoy!

******************************************************************************

If you'd like to get in touch with Gareth, perhaps to spur him to write up more recipes,  you can find him on his Facebook, as Gareth Hodges, or via email.

Thursday, February 6, 2014

Review: Magnum - Amazon 5 boots

I lucked out with a eBay lot and snagged some new summer-weight boots, just in time for the scorching weather we've been having. I wear boots all day, every day, apart from when I am in my Barefoots, or in fact barefoot. I've been wearing the rather comfortable Danner Striker II's but I wore them out, the sides wore through, in this case, rather than the way both my Bates Delta-8 and Altama Desert boots dies, with splits in the soles. FOr heavy work, I fall back to my HyTest armored boots.

These are the Magnum Amazon 5 boots "Light Sand" boots. A discontinued line, the current Magnum equivalent is their Mach II Desert boot.


These 8" boots are fitted out with a suede / 1150 Denier ballistic nylon upper, with a friction and slip resistant outsole, it is even stamped Oil and Slip resistant. The outsole has a steel shank, which adds to the support of the boot (though it did set off the metal detectors at the airport at my last visit).

The tread is quite interesting, in what appears to be a proprietary Magnum pattern, unlike the Panama or Vibram styles I have been used to. They have given me no trouble, and give quite an even walking and running surface. I also like that they include a Flex Groove to avoid the split that killed my Altamas and Bates boots.


The boots are lined with a Dri-Lex® two zone comfort lining with Hydrofil® for breathability, and the FPS footbed with dual shock pads and antibacterial lining. Months of wearing these boots now, and they don't smell too bad, thus far.

The padded, broadly gusseted tongue not only keeps the laces from pinching and rubbing the foreleg (important for those of us with skinny legs), but it also acts to keep out debris, which has done so nicely.

 I also really liked the built in boot-strap, which was offset from the mouth of the boot, meaning that I can feed my laces through them, without it riding up over my ankle.

As well as the boot-strap, they also feature 4 sets of eyelets, a set of speed hooks and then four sets of speed loops. This makes putting the boots on, and with a quick pull, the laces simply zip up tight and you are good to go.

I've given them a coat of spray on suede protector, which has kept some of the grot of my day to day life off them, but one thing I can say is that these are some comfortable boots. I look forwards to many seasons of wear out of them, but, we'll see. I seem to kill boots on a regular basis. I'd love to hear about what boots YOU get a lot of wear out of or can recommend ...


Wednesday, February 5, 2014

Wish Lust: Beyond Vision - CiFer unbreakable carbon fiber card tool

I received an email from the creators of this tool who have an ongoing Kickstarter project, who thought that you (awesome, Equipped reader) and I might be interested in.

I've covered several card-tools in past, including the Card-Sharp 2 knife (don't forget to take it out of your wallet at airports).  I have a carbon fiber card tool already, the Kumquat but its only real "tool" is a bottle opener. Cute, but not overly functional.

This tool, however, has a lot more going for it, and I was only too happy to share it with you, to add an EDC option we can all carry. This is the CiFer "Unbreakable" card tool.


Constructed of a top layer of 2/2 Twill wave 200gr/sqm carbon fibre which is 0.27mm thick followed by 3 layers of 2/2 Twill wave 650gr/sqm carbon with a thickness of 0.6mm. This gives a final thickness of 2.07mm and the best possible strength.

The thin (0.27mm) carbon fiber fabric gives you the perfect looking finish and the addition layer of thin carbon provides a lot of reinforcing support. There WILL NOT be any kind of fiberglass, eGlass, performanceGlass backing layer.

Thanks to the extremely durable yet ultra light material - carbon fiber, CiFer only weights as much as two credit cards (11-12 g).

The CiFer is a iPhone holder, cable management card (headphones can wrap in the side notches and the earbuds feed through the bottle opener), a bottle opener, a 7mm, 8mm, 10mm and 13mm wrench (along with a second 8mm one in the corner as a keychain hole and an etched ruler.
The phone holder will accept many flat-sided phones and tablets, but will not work with the iPhone 3 series.

The folks from Beyond Vision also gave the CiFer the "will it blend" test, and whilst the carbon fiber took some dings, in the end, it was too much for the blender body, shattering the vessel.

This is a pretty cool do-dad that I'd be happy to put in my wallet, especially as it could be carried through metal detectors. I do hope this tool makes it through funding, check it out.

Related Posts Plugin for WordPress, Blogger...