Tuesday, June 3, 2014

Review: Vesterguard - LifeStraw


I picked up a LifeStraw when I purchased a box of the Mainstay Emergency Food Rations,and for a long while, it stayed in the bottom of my bear box, untried, untested. Eventually I found it, dug it out and got ready to test it. Then the dog found it. Talk about Disaster Preparation! I heard the chewing sound and rushed into action, rescued the unit, and decided it was salvageable.

The LifeStraw is a plastic tube 31cm long and 3cm in diameter. It has a Sieve end, and a mouthpiece end, both originally with a cap. The straw, as you might imagine is operated by placing the sieve end in your water source, and through some rather strong and vigorous sucking is needed to get water flowing, but when it does, you get a steady flow of water.

The way the LifeStraw works is that water that is drawn up through the straw and passes through hollow fibers that fill the tube. This bundled mesh of fibers filter particulates down to 0.2µm across, using only physical filtration methods and no chemical components to either run out, or leach into the drinkable water. The entire process is powered by the suction of the operator, and is reported to be able to filter up to 1000L (264gal) of water safely before clogging up.

Initial models of the filter did not remove Giardia lamblia, but this model is purported to remove a minimum of 99.9% of waterborne protozoan parasites including giardia and cryptosporidium. It is also touted as Removes up to 99.99999% of waterborne bacteria. It as previously stated also reduces turbidity by filtering particles of approx 0.2 microns which significantly improves the quality of water,

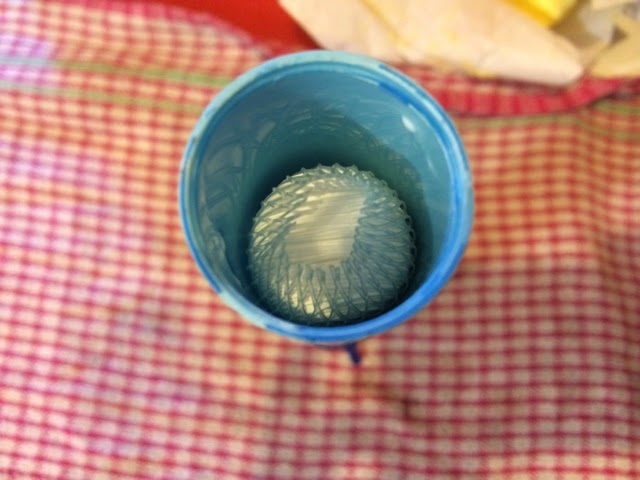
You can see the sieve end here, which keeps macro-particles from entering the straw, and for better or worse, after some dog-chewing, this end cap had popped off, exposing the internal fibers in their mesh packing sleeve.

The LifeStraw
did take some practice and perseverance to get going, but when it did, I managed to get some interesting results. I didn't want to take too many risks with my dog-chewed example, (giardia infection will ruin your whole day) so I opted for a more pedestrian testing regime. I chose to filter my fruit-concentrate cordial instead. I found that whilst still coloured, and sweet, the water I drew off certainly did cut the pulp and particles that were suspended, and I managed to drink the whole glass, with some effort. I expect that from a free floating and particulate light source, like a free flowing stream, you'd get swifter hydration. You can de-crud the filter by blowing back through it, expelling the contained water, and self-washing to some extent.

To recover and reseal the unit post-dog gnawing, I wrapped it in a cris-cross of tape, to ensure the seals and tube are air-tight. I think i will try to secure myself a new one, (which due to their awesome business model, then benefits kids in impoverished places) just because having a fully-working one is better preparation than relying on my already weathered and dinged one.


Friday, May 30, 2014

Review: Platatac prototype hydration carrier

Here is the hydration pack that I have been using for the last few Tough Mudder events I've done. This is an old prototype from Platatac that I picked up on eBay, and combines elements of both their Bravo hydration carrier that I have, and the MEOP Medic Pack both of which I've covered in the past, and are great pieces.

I found that wearing an extra set of straps was redundant when I was wearing a vest anyway on my Tough Mudder and similar adventures, which is why I looked for an alternative to the Bravo, which has served me well in other situations, and on my first Tough Mudder. When I saw this piece come up on eBay, I was thrilled to give it a go. It follows the same kind of design philosophy I've come to expect from Platatac pieces, with a tough 1000d Cordura exterior, and ITW Nexus hardware. It if "faced" with 6 rows of 4 channel PALLS/MOLLE loops, and features a hook-and-loop secured drag handle. Running down the flanks are nylon D-rings, three to a side, allowing shock or paracord to be run through these, to provide attachment points, or compression.

The wide-mouth of the pouch perfectly fits the Source Storm 3L hydration bladders main cap.

The baffled sides of the carrier allow for quite significant volumes to be carrier, without restriction, or perhaps even storage for other items besides a hydration pack. However, this particular piece lack the zipper-access of the Bravo, which means that the only access into or out of the inside is through the main cap.

This actually posed a problem when trying to run my hydration hose through it, and I bit the bullet and melted a channel in the backside to feed it through.

I also had to melt a drainage hole in the bottom, following the previous Tough Mudder, last September.
I found that the carrier filled up with nasty pond water when I took my tumbles, which really added to the weight I was hauling. No such trouble with a small drain hole melted in this time around.

The back of the carrier offers a variety of attachment options; Zippers paired with the MEOP carrier (which allows me to sandwich these two pouches nicely). It also features female Fastex clip ends top and bottom, tri-glide loops for all your clipping and looping needs. Best yet, the back features two sets of three three channel PALS/MOLLE PLMRS (Platypus Light Modular Recovery System) strips. These gave both a rock solid attachment and also load spreading capacity. I barely felt the 3kg that the full bladder weighed,and certainly not the sloshing side-to-side I might have with a pack-type carrier.

This was just a prototype, bridging the gap between the Bravo and the MEOP, but if you want to see the new production version, check out the Platatac Utility Hydration Cover. Looks like the logical next step.

Thursday, May 29, 2014

Wednesday, May 28, 2014

Review: Platatac Punisher 2014 CUS Shirt

Here is one of my favourite go-to shirts for when I have some serious adventuring to do. This is the Platatac Punisher Cool Under Shirts 2014 edition. I got mine in the 3-pack bundle, which means I can shirt-up and stay stink free for days at a time.

The shirts themselves are made from Drytech polyester and are designed to be worn under body armour, as a work-out shirt or whatever close fitting base layer you might need. Ive covered this kind of garment before in the Blackhawk! shirts and the Under Armour shirts. These kinds of materials wick moisture away from the body, helping keep you cool and also quick drying. I certainly gave this a test this year in both the Tough Mudder, and on my recent trip to Fiji.

There are even mesh panels under the arms to help with airflow, which really comes in handy if you are wearing a vest of some kind (be that a plate carrier, LBV or BCD/PFD) especially in a hot and or wet environment.


Decked out with Kryptek patterning printed onto the right sleeve, and fitted with a broad swatch of loop-field on the left, the tan material with subdued ANF for the platypus skull filler make this a cool-guy shirt that does its job. The back is printed with shout-outs to the major lines Platatac works with.

I've put this shirt through some pretty strenuous work; it's my running shirt, my Tough Mudder shirt, I wore it jetski-safariing and snorkeling. I've found it to be light, warm when needed, cool when needed and certainly quick drying.

I really liked having a loop-field to attach items from my ever-growing patch collection.

If you have need of a slick, comfortable and hard-wearing body-hugging shirt, you should totally give the CUS a try. Coyote adventure tested!

Tuesday, May 20, 2014

Review: Source - Storm WXP 3L hydration bladder


Here's a much loved but oft forgotten item in my survival, training and adventuring kit. This is the
Source Storm WXP 3L hydration bladder which has seen some pretty heavy use in the past, and I thought it was fully worth showing the light of day.

Ive covered some hydration systems in the past, such as the the Platypus PIB hydration pack and several hydration bladder carriers, such as the lustful Geigrrig Tactical Guardian (I'd love to get my paws on one of these) the 0.75L version that come in the Tactical Tailor Joey hydration pouch and the backpack style Platatac Bravo pack. This isn't my first Source 3L bladder, as I failed to follow the care-and-cleaning guideline of DO NO USE BOILING WATER ... they melt. Hot enough for your hands is hot enough. More on this later.

The bladder itself is constructed from a very special three layer, coextruded polyethylene construction with a very special low maintenance liner layer. Integrated Grunge-Guard™ antimicrobial surface. This  435 micron thick surface prevents bio-film build up, my being almost glass-smooth, (Source quotes it as being  2000% smoother than standard TPU films, with virtually no difference from glass itself. This reportedly improves the systems self-cleaning function.

The wide opening access at the top opens with a slide closure for easy filling, draining and cleaning. The fold and slide lock gives a strong, airtight seal. A retaining cord ensures clumsy finders don't drop it in the muck, or let it wash downstream. It also means that you can add ice, or powdered drink supplements.

I found all the seams, including those at the tube attachment point to be very strong and well placed to take any tension that the bladder is challenged with, so far.

The drinking tube attaches to be bladder with their propriety QMT™ Quick Mate Technology hose fitting, which offers push button convenience, no leakage, and click-in compatibility with USMC Miox filter system. Sometimes the clip can be a little stiff, but hardly much of an issue for me, as I rarely took these off, except to rinse. However, even at the tube tip the QMT is completely self sealing.

This means that even with a full reservoir you can change tubes, add valves or whatever, without worrying about drips or leaks. Great for fitting a full bladder into a pack that already has a hose run through it. Sometimes hydration tube ports can be a snug fit.

The drinking tube is 94cm (37") long, and contains its own valve built in. Again, no drips or leaks when changing the tip or feeding it through bags and gear. The tube cover both insulates and blocks UV-light.

This helps your water cool and bacteria free from first to last sip. I really noticed this when doing long stretches in the sun with this. the temperature gradient from tube-to reservoir was always delightfully small.


The very cool push/pull Storm Valve isn't a bite-valve, being a pull-open plug like on a sport bottle. It apparently delivers 25% higher flow than bite designs. The integrated valve has a twist-lock which will lock the valve in the "off" position, so you don't have to worry about inadvertent leakage. It is also set at 90 degrees from the tube, which apparently reduces the required tube length (for twisting it around to have kink-free drinking) by 25cm! It also rotates 360 degrees, allowing you to place the valve end on any side of your gear, and have access to it.

It comes with a dirt-shield cover, which is also dummy-corded on, and can be cinched with a dedicated slit, to stop it from dangling and rattling about when not used.


In addition to the Widepac wide opening access at the top, with its hanging slot,  the bladder also has a screw-top opening, which incorporates a carry-yoke. The yoke can be rotated to best suit your carry style, but allows even gloved hands to hold the bladder open for refilling without contaminating the reservoir.

The gasket screws down over the yoke to hold it in place, and is also dummy-corded to the wide-mouthed cap. I have had some troubles with the gasket winding loose, and this impacting on the seal the cap gets, but if its screwed down tight, all should work out well. 

Evacuating all the air from the bladder keeps it very quiet, no canteen-sloshing noise-disipline worries there, and the placement of the tube to the bladder means you pretty much get every drop emptying out, you can even set it to run continuously, using siphoning, to get regular irrigation, or when running detergent through it to clean it. The guys at Platatac recommended throwing it, washed but not dried into the freezer as a decontamination step, which is a far better idea than melting it with overly hot water, I have to say.

This particular bladder has seen me through camping, long haul drives, and three Tough Mudders, and it's going strong! I even inflated it and used it as a flotation aid when diving off one of the "Walk the Plank" high dives on Tough Mudder.

I'd love to try one of the Universal Tube Adapter  attachments, which lets you fill the pack from the drinking valve, from taps or bottles, without having to take it off your pack or out of a pack.

Thursday, May 15, 2014

Shout out Review: PowerTravellers - Power Gorilla

Kevin Martin over at BreachBangClear has done a cool piece on a hefty ruggedized power-pack for charging his devices out in the field, for extended times.

Here's the link to his take on the PowerTravellers - Power Gorilla. This tablet sized battery boasts 20,000 mAh of charge, and you can see that Kevin put it through its paces in some pretty rough conditions.

I've covered a couple of power-generation devices in past, the thermoelectric Tellurex-tPod1, and a wish lust BioLight campstove to generate power, solar systems like those found on the SLXtreme iPhone case and the other small solar systems I have tried
but as yet haven't really covered how to STORE that power, other than in those built-in devices. Worth checking out Kevin's findings, for sure!


Tuesday, May 13, 2014

Events: Tough Mudder #4 March 2014


I did my fourth Tough Mudder in March, which earned me both a green (x2) and a PINK (x3-6) Mudder headband.

It was also my first TM solo, whereas before I'd run it with teams of work-mates, or friends, this time I just tackled it on my own, along with the other 20,000 or so people who did it this time around. It was a slightly overcast and chilly day, and I was very glad that I had set myself up with my gear with this in mind.

This time around, as I had done previously, I geared up in all my "Zombie Control Officer" get-up, some for show, some for practical reasons. The core of my outfit was again the
FirstSpear OAGRE tactical vest which I've worn to all but my first of these adventure runs. This vest has given me both a platform to attach my accessories, but also provided me with a modicum of abrasion resistance, not to mention keeping my shorts on during some of the hairier moments, with its built in belt-attachment loops.

I mounted a set of Platatac twin 40mm pouches to my left side, which I filled with energy bars. On my right side, I mounted a Platatac SR25 pouch for another energy bar, a magnet to switch on and off my Contour GPS camera which has trouble in its waterproof case (see below). I would have also kept my spare battery for the Contour in there too, in a double-ziplocked baggie, as I've done in past, but alas, I couldn't find the damn thing till the week after the event, stuck in the bottom of a cable-jar.

On top of the vest I wore the same Platatac admin pouch as I had previously, with a cyalume stick, permanent marker and a small laminated map of the course. I tracked my progress, marked off obstacles and marked times as I went. I also lucked a large LARP foam fighting knife behind it, for photo-ops and in case any of my fellow competitors wanted to "go zombie" at me. No one did, haha. My loss. Wearing my Z.E.R.T. membership shield, call sign (Q3199) I got a lot of nods from the other costumed participants.

Also on my chest rig, I wore the UVPaqlite for power-fee solar dark-space navigation, and on my shoulder, opposite the ITW-Nexus Picatinny mount for the Contour, my PrincetonTEC Switch MPLS-light, which alas didn't survive the course, and judging from the few photos I found, looks like it came off at least in the first third of the course. Makes me sad, but I guess I'm in the market for a new helmet light...

I wore a Platatac Punisher-2014 CUS shirt under the OAGRE, which kept me cool but not cold, dried quickly and chafing free for all 23km of course.I clipped my bib number to my MOLLE with plastic side-opening ALICE clips.

I wore running skins under my TripleAughtDesign Amphibious Shorts which cut down on abrasions even further, and kept me a little warmer when the wind hit us. They also helped keep my BlackHawk! kneepads on and in place, and again, without the bleeding hamstring regions I've had previously. Skins are definitely an endurance asset. This time around I also opted to wear my BlackHawk! elbow pads too, which cut down on my elbow gravel-rash immensely. A little cumbersome, and made getting hauled up by helping hands a little more challenging, but so worth it. Between the skins, the knee and elbow pads you could hardly tell I'd done the course (apart from the usual behind-the-thigh bruises) just a day or two after.

I had a Source 3L WXP storm bladder on my back again, in an early strapless version of the Platatac Bravo hydration system, which was PALS/MOLLE locked on tight to the OAGRE vest.

This time I also wore my Paleo- Barefoots ANTERA paws with the neoprene inserts, the PAWS dots made a heap of difference, giving me all the grip I needed on events like "Twinkle Toes", which was a wet-beam crossing, and running up the quarter pipe of Everest. I also wore the Paleo-Barefoots BAMANOS paws, giving them their first big outing for me. Unfortunately, in their current form, without a lining, they chewed up my hands quite a lot.

I've passed on feedback to Jörg of GoSt Barefoots, and the roughness I felt when wearing them, especially on the hang-by-your-hands obstacles like the "just the tip" vertical wall-crawl, the "Funky Monkey" monkey-bars and "Leap of Faith" (jump off a platform, over water and climb up a dangling cargo-net, my favourite obstacle of the course.)

I completed the course around 45 minutes faster than my previous times, which included an extra kilometer of "Legionnaire" veteran course, and four extra obstacles. The Powerade / energy bar combination meant that I didn't stop running for water or snacks the entire time. My map was a great morale boost, as well as helping me keep my orienteering awareness up.

These events are a great hobby for me, they test my body, determination and gear.


Here's a shot of me fiddling with my camera, when in its case I need to use a magnet to switch it on and off, which isn't always easily done. Especially when all caked in mud.


I only managed to get a couple of clips from this Tough Mudder, because of problems with the switch. Don't mind the muddy banter ....


I had a really good time, signed up for the next Melbourne event on the day, and made it home in time for dinner.

Thursday, May 8, 2014

Review: Platatac Light Weight Long Sleeve top

Following up on my recent long sleeve DriFire post and because it's still cooling down here, I thought I'd cover several of my other long-sleeve tops, much like the TruSpec Combat shirt I covered last winter.

I like to watch eBay for the occasional one-off item from brands like Platatac, much as it pains me when I don't have the disposable income, or when out-bid. However, this is one such item.

This is a "Lightweight Long Sleeve" top, from Platatac. Made from 100% cotton, it is a lot like a very much cut-down version of their CUTS pattern shirts, with none of the frills, just similar lines. I really liked that even in only a L size, which meant my super-long arms run a bit short, the waist length is super long, well below my hips. 


This means it sticks in my pants no matter what I'm up to, keeping my skin covered up in all circumstances, like a base-layer should.

Being a cotton garment, you need to consider the risks of wearing it in cold and wet survival situations but that can just be a matter of good planning and situational awareness.

One of the things I rerally liked about this design (and this follows with the CUTS designs too), are the high mandarin collar gives great protection from both the elements (sun/wind/sand/grit) but also shields against chafing and rubbing when wearing harnesses, plate carriers and tightly strapped packs. 

The chest-level zipper, lets you vent, when you aren't worried about covering up as much, and frankly, lets your inner "hello ladies" out.

When I need to either block the sun, or keep warm in the cold and dry, this is the kind of thing I look to have as a base-layer. Keeps we draft-free, nonrestrictive and takes up little to no room for adding more layers.


Tuesday, May 6, 2014

Video Reviews: AK -Super Colubris, UC M48 Walking Axe, Skinning Axe, ZT - Deuce

Here are a few clips I've been saving for a rainy day, and there have been quite a few of these recently.

1. Kitchen knives and a pig head


2. American Kami Super Colubris vs pig head

My full review here:

3. United Cutlery M48 Walking Axe vs pig head

My full review here:
Follow up review here:

4. skinning axe-knife thing, vs pig head


5. Zombie Tools Deuce vs pig head

My full review here:

I hope you enjoyed these as much as I did making them, if there is anything else you'd like to see my cutting with, or cutting into, please drop me a line, and I'll see what I can do for you.

All bio-waste either goes to the pot, or to the critters. No wastage, no freeloaders...

Sunday, May 4, 2014

Review: DRIFIRE Lightweight Long sleeve tee

The weather has turned here, and it's been time to break out the longer sleeves. My first selection, was this light but warm number from DRIFIRE, the Lightweight long-sleeve tee from their Layering Shirts and Tops range.

I got mine in XL, because of my super long arms, but was pleased to find it didn't swim on me, I assume this is due to the skin-snug fit they generally get worn with.

Some of the nice features of this shirt are that the ribbed collar maintains its shape, keeping it high and snug, without being constrictive. The soft fabric has given me no troubles with chafing, no matter what I've been doing, or how I've been layered.
Better yet, the antimicrobial blend of fabrics is designed to resist odor (proven after several days camp-side wear). It is also moisture-wicking and fast-drying, not through any coatings or washes, but through the propriety materials used. they wont wash out, or wear out.

Best yet, DRIFIRE gear is made with no-melt, no-drip fabrics, so apparently they will not melt or fuse to skin when exposed to flame or fire.  This is excellent, as I really do not like being on fire. It's one of my least favourite things. Fire resistant clothes. This is a feature I'm willing to stake my skin on. Hopefully not one I'll put to the test though.

The seams are well placed, and flat woven, which also cuts down on the chafing risk, especially when laden down with pack straps or under a plate carrier.

For a long sleeve  street-wear alternative to my other regular stand by, like the Truspec combat shirt or the short sleeve UnderArmor shirts I really like this shirt. Feels like a soft cotton tee, wears like a performance garment.

Tuesday, April 29, 2014

Review: Arena FlackJak goggles

I picked up a set of goggles a while back which I have added to my gardening, crafting and disaster preparedness kit. It's been a whiles since I have had a big set of goggles, my last set being a paintball mask, as I've made do with safety glasses or my much loved (and currently broken) Barz Optics goggles glasses to protect my eyeballs, in a way that my slim glasses just don't.

High speed fragments, harsh chemicals, dust and smoke in the eyeballs are just no fun and will ruin both your day and survival odds, which is why I look for ways to protect mine.


These are the Arena Flakjak goggles as seen under my Ops-Core style bump helmet This is the kind of setting they are specifically designed for, and you can see by the sleek fit, they really marry nicely with the brim of the helmet. They even fit my glasses reasonably well, although there is always a little skew one way or another when nose piece shares space with nose frame.

Arena state that their goggles feature what they call Razorback technology, which deals with fogging, particulate and moisture, by providing the a good airflow rate with a really interesting ridged vented filtration to create non-fogging conditions behind the lens while preventing debris like sand, moisture, and flying debris to enter the goggles.


The lens itself as well as the anti-fogging coatings, features OptiWide geometry which really makes for some really good optical clarity and distortion free peripheral vision to at least as far as I can see clearly with my glasses on, and only reduces my overall angle of vision by about 2cm or so at each side.

The lens material is ballistically designed for maximal eye safety exceeds Z87.1 - 2003 Plus standard and meets MIL-STD-662F (as related to .22 caliber, 17 grain, Type 2 fragment simulating projectile) standards. Which means my assertion for using it for for yard and craft work is probably spot on. Power tool fragments are not your friend.

One really nice feature of the goggles are the Buckle Management Retention Fastener (BMRF). This system allows for both quick and easy strap replacement, but also sturdy fitting both over a helmet, and against your bare head. The fits are quite different, and the rotating fastener really allows for this.

The modular buckle system also provides the goggles to integrate with a variety of helmet platforms, I tried it with my bump helmet, but also my Pro-tec Classic helmet and a couple of the hard-hats I have laying around.


One really important feature of any goggle is the lining and seal. The lining of these are made of the VS Foam, which is a proprietary goggle foam designed to wick moisture away from your face. The surface is comfortable, and the body both compressed enough to make for a good seal, but also not so soft as to over-compress.

I recently took them out for a running test which gave them a pretty good test of the fogging as well as the fit.

The certainly fit very nicely, were stable and very comfortable, but after about a km in, at 12kph, they began to fog up, and stayed that way, on or off, for the duration of the run.


I suspect that in a dry environment, they would probably work out pretty well, or perhaps if there had been more of a breeze, and a third party de-fogging treatment might well prove effective. It was a shame to find how fogged they became, as I can imagine in a hostile environment, or undergoing other strenuous activity (as I'd also found this to happen whilst doing some grinding and drilling and home) that this could be quite a risk to be aware of.

Still, I'd rather have some goggles than NOT have some goggles, and these will certainly have their place in my preparedness kit, to be sure. 


Friday, April 25, 2014

Home Front: ANZAC biscuits

Today being ANZAC day, I wanted to share something that perhaps some of my international readers might not be aware of, but certainly fit with the other offerings I've made around both recipes and cultural observations. A key component of ANZAC Day observance, and Australian culture in general are   ANZAC Biscuits. 

Made for turn of the 20th Centuary shipping times and wartime frugal living, the ANZAC biscuit is a solid, long lasting and nutritious supply that would be just as fitting in a Diggers chow bag as in a Preppers long term supply. 

The main trick is not eating them right away!

I used the http://www.taste.com.au recipe, many variants exist, but this worked out well. Ingredients combined in a bowl, balled and flattened on baking paper, baked for 10-15 minutes at 170oC.  
  • 1 cup rolled oats
  • 1 cup plain flour
  • 2/3 cup brown sugar
  • 2/3 cup desiccated coconut
  • 125g butter, chopped
  • 2 tablespoons golden syrup
  • 1/2 teaspoon bicarbonate of soda

I hope you have a go at this iconic Australian snack, and see how they might supplement your own long term food cache, care packages to troopers overseas and snack packs for prospective scouts, rangers and foragers.

Lest we forget. 

Tuesday, April 22, 2014

Home Front: just pop to the supermarket

Here's the thing. We (and I presume most of you, my readers) live in the industrialised world. Hot and cold running water, 24/7 power, high speed(ish) internet. A industrialised food transportation system. We have supermarkets, corner stores, grocers and the like, a stones throw from our homes. Perhaps a short drive in your Urban Assault Vehicle.

We can just assume that the shelves will be stocked, the lights will be on, and we'll be able to pretty much do all our shopping in one spot.


The problem is, even in industrial and affluent society like mine, these services can be disrupted but simple things. Power outages of more than a few hours tends to make supermarkets cull their perishable stock (pay attention, urban scavengers, you might be able to pick up a truckload of just-begin-to-thaw frozen goods).

Imagine what fuel shortages, road closures, quarantines or other long time disruption to supply chains would do.

My local supermarket is a marvel of modern convenience, is only 650m from my house. Easy walking distance for a bottle of juice, or a bag of chips, and we even drive when we do a big shop. How would it fare in the event of a disaster? How long would it take to empty of supplies? How long would it hold up if locked down?

It gives me pause for thought,  perhaps it might for you too.

I certainly have a mental list of "what to grab in the first few days of an event" which I will write up and share shortly.

Wednesday, April 16, 2014

Update: 5.11 Tactical - TDU Kilt re-release

The good folks over at Soldier Systems have reminded me (and now from me, to you) that 5.11 Tactical have re-released their Tactical Kilt.

I love mine, in fact, I'm wearing one right now. I brave both weather and the harassment of the ignorant (and actual Scots) to be comfortable and bad-ass. Pants are tyranny and I love freedom. Don't you?

Check them out at:
http://www.511tactical.com/kiltoff
http://www.511tactical.com/tactical-duty-kilt-134360.html
and hopefully on http://www.511tactical.com.au/ soon

Available with the following colors: Khaki (a greenish brown), Coyote (a tan brown), TDU Green, Tundra (a deep green), Charcoal, Dark Navy, Black, original MultiCam, and Realtree Xtra and in sizes 28-54.

If that wasn't cool enough, 5.11 are also donating $10 from every kilt sold to FBINAA and We Salute You Veterans.


Monday, April 14, 2014

Review: United Cutlery M48 Spear


Here's a fun item that I've had sitting by my front door in the umbrella stand for a while, and thought I should give it screen time. I've had a soft spot for spears for a long time, perhaps not as long as with swords, but still, a good long while. My first spear was a Kenyan Maasai spear, and I've previously shown off my Cold Steel Boar Spear which is as impressive a spear as you're likely to ever wave around and at 208cm (82 1/8"), it's not something you carry around lightly.

This is the M48 Kommando Survival Spear, by United Cutlery. This is another of the M48 family, which I have covered before with the Walking Axe and the very handy Ranger Hawk.
Sharing the same 30% fiberglass haft as the Walking Axe, which measures 92cm (36 1/8”) this is actually quite short for a spear, and reminds me of the Zulu Assegai and Ikiwa spears.

As with the Walking Axe, the haft is about 10-15cm too short for me to use as an effective cane, unless I wanted to grasp the head, never a good idea, really.

With the molded finger grips at the head end, and flared throat to prevent over penetration, the spear itself balances nicely when held here, one handed. Two other grip points, in the form of a series of inset groves about midway and at the butt-end allow for a number of different holds.

 Certainly in the places I'd want to be grasping a spear for close fighting, or in a shield wall, if that were my thing.

With a 20cm (8") head, featuring a rather impressive flat grind bevel on both sides. It manages this by being extremely thick, at almost half an inch at the middle, which features some fluting and holes through the spine, which drops the wight a little.

All up this piece weighs 1kg (2.2lbs), mostly at the head. Given the solid design of the head, I expect that it would take a lot more abuse than the head of the Walking Axe, which as you may have read, experienced some structural failure (but not catastrophically) on my last camping trip, chopping firewood.

I expect the M48 spear to pack a lot more wallop, but a spear is not an axe. I'll have to give some thought to how to demonstrate this effectively. Once again, the length of the spear gave me pause. Longer than a knife, longer than a sword, but not really long enough to keep a foe at more than "arms length". The other option was hunting medium sized game.

I haven't had a chance to go out far enough away from prying eyes to fling it around, but at 1 kg, it makes for a pretty dense package for a thrown weapon. It would make a very substantial club though.

Still, it's size allows it to go a lot of places a full length spear like the Cold Steel Boar Spear just can't. Like across your back whilst scrambling up a ravine, or climbing through a building.

It will fit in a car boot, or even lashed to a bike. That big broad head isn't suited to spear-fishing, but I can imagine that in survival situations it would work nicely for both sea-side wildlife and deterring land predators.

Perhaps the most telling aspect of this spear is its cross section.

I used a pizza box to demonstrate the cross section, and you can see just how solid the M48 blade is. This thing pokes big holes.Perhaps not as wide or deep as the Cold Steel, but certainly broadly.

I've not really had much opportunity to put it thought its paces, the fox that took my last bunch of pet rabbits hasn't been back since I threw the Walking Axe at it (close is NOT a hit, in this case) but I think that local livestock protection and vermin control might well be the best option for this piece, until it comes time to go house-to-house and ventilate a horde.

Wednesday, April 9, 2014

Home Front: Bug Out Jar

I've been looking at putting together Bug Out Kits, to offer online, and possibly put up on Kickstarter, to get out to a wider market.

I've been thinking about what to include in such a kit, and what to put it in. My thought was to have something that could rattle around in the boot of a car, in the corner of a ruck or by the front door at home. It needed to be small and unobtrusive, rugged, easily identified but not standing out as a prize.

I happened to have a stash of bio-bottle containers, not unlike the Patho-Pack containers (or as we call them at home, "Dead People Jars"). The Bio-Bottles are biohazard rated, air and water tight shipping containers, 850 ml capacity, with a "size in carton" of 12cm x 12cm x 17cm, which meets UN3373 regulations, meeting 95kPa pressure testing. Good solid containers!

The contents of the kit I have been pondering, based in part on my own EDC and adventuring kits in past, and my experiences camping, LARPing and travel around the world. I have also been working on a tight budget, so have kept the items pretty generic where possible.

I've included in this beta version:
A wire saw
A space blanket
A fire starter (which includes a button compass)
A 100' length of paracord
A knife (which includes a rescue hook/strap cutter)
A steel paracord shackle
A WTF multitool
A multifunction spork
A 850mL Bio-Bottle

I may include some other contents as options, including a couple other excellent items, as well as carry-pouches, and even upgraded, expanded kits.
Hopefully, there will be some interest in these, and I'd love your feedback as to contents, carry and packing thoughts and I can make this happen.

[EDIT] Check out the jars, now in my online store, for sale!

Thursday, April 3, 2014

Review: Original SOE Gear - Combat Cock

Awaiting me when I got home recently was a package from Tay of Hornest, Singapore. Tay and I have worked together looking at some cool kit previously, like the Helinox Packable folding chair, the Jil Lite UV light and the Jil Lite Constel LED lantern as well as a bunch of other cool things.

This most recent item is a lot of fun, just for fun. It's time to rock out with my cock out, behold, the SOEGear Combat Cock.

Crafted from 1000d cordura nylon, the Combat Cock is fitted with a length of 1" webbing and a tri-glide buckle under the tail-feathers to facilitate attachment to any number of items.

Each flank of the Cock is fitted with a 75mm x 50mm (3" x 2") colour-matched loop field for attaching your favorite patches, I've thrown on one of my also-new MOTUS/Hornest exclusive patches.

With drainage grommets for eyes, and a hook-and-loop opening on the underside to access the stuffing, for either re-fluffing, or replacing it with what-have-you. It could make an innocuous stuff-sack for secret needfuls, even SERE gear.

I've been thinking about stuffing mine with a Headover to give it double duty as a fun accessory, storage as well as an impromptu travel pillow.

I really like this little guy, and look forwards to photo-bombing a bunch of things, places and events with my khaki Combat Cock! Get yours now, we'll see who's has been more places ...


Tuesday, April 1, 2014

Review: Tactical BBQ apron


I've been holding off posting on this one till an appropriate juncture, and I think this day has arrived.

This is the Tactical Chef Apron by ThinkGeek, and I just had to tell you about it today.

I'm all for being equipped, and being caught out at the fire-line without the right loadout can mean the difference between slabs of hot steaming, bleeding meat, and charred inedible ruination.  That is when having this kind of kit is essential, if not life-saving.

Made of 100% cotton, you can expect the apron to protect your thorax and groin from all but the worst boiling-oil splashbacks, and flare-ups, and perhaps even the exploding kernels of maize.

Featuring a top section of 6 rows of MOLLE loops, with 6 usable channels in the mid chest, and 10 channels at the rib-line, and a further three rows of 10 at the bottom of the apron, this is a modular combat chef's dream.
Twin sets of triple D-rings, mounted  at the upper regions allow for a variety of hung items, and twin snap-clasps at the the waist line give direct attachment and retention options. Three PALS/MOLLE compatible hook-hand-loop fastening pouches, one triple set and two larger sets, one with a look-filed for ID, unit or morale patches offer a variety of mission specific load-outs.

The lower section of the apron features three dump-pouch pockets, for a variety of accessory and brain-grenade carriage capacity.  Watch out for the pocket stitching cutting through MOLLE loops though.

The wide shoulder straps are not adjustable, but come "hero-sized". Fastex style clasps secure front and back, with webbing sliders expanding to allow for the more substantially proportioned combat-chefs.

The back features even more MOLLE loops as well as a broad loop-field for further ID and insignia.
Tactical Chef Apron 
Click the picture to be taken to ThinkGeek to buy one!

This is a fun piece, which I enjoy throwing on whenever I face flames, steaming flesh and the wailing of mouths, screaming for blood.

Related Posts Plugin for WordPress, Blogger...