Tuesday, March 5, 2013

Review: Tactical Tailor - Hydration Joey Pouch

I was very fortunate to have one of my articles snapped up by David Reeder of KitUp! and he then put me in touch with Casey Ingels of Tactical Tailor to do some reviews for them. I of course was overjoyed to be part of the team, so here we go. 

First up, in quite the pique of humor, the guys thought it would be funny to have me look over the Joey Hydration Pouch. For those of you who don't know, a joey is a baby kangaroo  so, it's a perfect name for this little pouch. Here is what I can tell you.
Made from 1000D Cordura, and in coyote brown here, this pouch fits the Source 0.75L bladder that comes as optional extra through Tactical Tailor.

The double zipper closure gives not only very secure storage, but also gives considerable protection to the contents as well as giving easy access. Paracord zipper pulls eliminate metal-on-metal tells and drain holes at the bottom of the pouch ensure you don't scoop up too much of the wilderness as you are adventuring, without exposing the bladder to significant risk.

 The back of the pouch is a close stitched 5 row, two column PALS/MOLLE region, which arrived with two 5" MALICE clips giving you a variety of attachment options.

I fed mine through the 3" loops, to give it a belt-wearable test, but it would do just as well lashed to the side of a daypack, or chest-rig.
The entire body of the pouch is wrapped in three rows of PALS/MOLLE to make the pouch even more useful, as a platform

 
The lid of the pouch has a panel from under which the hydration tube can escape, left or right, but the brilliant thing about this pouch is that it not only fits the 0.75L Source pouch, but also a 1L (32oz) Nalgene bottle.


Here is me out testing the pouch. As I said, I wore it on my belt, here lashed to the d-ring of my Triple Aught Design Amphibious shorts via the hook-and-loop retention strap on the source drinking tube.

This setup has allowed me to go for my run, drink as needed and drop the tube, without it slipping and slapping all over the place, or letting Tactical Baby get too good a grip on it as she slipped through before taking me down in classic hapkido fashion (I presume).

For times when lugging a whole 3L bladder is just too much effort, when considering the need for a bag to carry one, like the Platatac Bravo and only a small volume is required (or for those weight conscious expeditions) this is a dream come true.

Between this and my ITS Skeletonized Bottle Holder I don't intend to go thirsty any time in the city, ever again. This is an extremely well put together pouch and certainly lives up to the expectations of something named after Australian wildlife.  Stay tuned for more from Tactical Tailor ....

Monday, March 4, 2013

Events: IRL Shooter - Patient Zero

I was fortunate enough to manage to get a team together to do the full immersion Lasertag LRP event by IRL Shooter before the season closed. I had originally been booked in for the week that I found myself hospitalised, and missed out.

I really enjoyed the event, and thought I would give you all a heads up on what was all about, how it ran, how it worked and most importantly how it tested me.

Before going in, I met up with my team and laid out several sets of vests, webbing and plate carrier sets. Five sets in all, in various levels of hooah, to give them all a chance to suit up in "the real gear" so we all matched and looked like a unit, of sorts. My collection of coyote-brown and khaki gear really would have looked good, but all but one of them opted out. So much for my dreams of a bad-assed looking team of operators. I wore a heavily de-tooled version of my Apocalypse Equipped loadout, as IRL Shooter have a strict no-weapon/lights/electronics rule. (yes, I know... I'm the mayor of POG central ...)


Arriving at the facility we were greeted by a cheerfully brusque NCO in Grey Area Protective Services (GAPS) blacks, and signed us in. Prior to the event each member of our six person team had been mailed a RFID card, and documentation regarding our mission and service duties. We signed in with the NCO, I stepped up as the team leader, and we were shuttled into the main facility. we were asked if we wanted the PG language version or the R-rated, extra salty. We unanimously chose extra-salty, much to the delight of all the GAPS staff. Sr Drill Instructor Hartman would have been proud of the creative use of language.

We were greeted by a second, far less cheerful NCO, who gave us all a fairly resounding chewing out for being late, and called out one of us for being the latest, with a "drop and give me 10" pushup penalty. They were, at least, impressed with my rig, and the rig the other guy wore. Yelling.

We were loudly ushered through the comms-hut, where several workstations of controllers sat, with multiple low-light security camera feeds and communication boards were set up. Frog-marched through this area to the armory, we were fitted out with helmets, and standard black-SWAT vests for those who didn't have them already. I had booked in to have a helmet cam, so my helmet had a mounted Contour cam. More yelling.


Through to the armory proper, we were issued with our lasertaggers, very realistic M4/M203 mockups. These pieces were movie-prop quality, and each weighed around 4kg. The M203 barrel housed the lens system, much like the ones we use for Stargate LRP, but had a built in single/auto selector switch included on the electrics housing, built into the right side of the M203. A reload button was indicated, and the speaker was built in to the left side. Holographic red/green sights were minuted and we were instructed in reload, fire selection and sight lighting settings. The M4s also had a weapon light mounted. More yelling and "how to shoot and clear rooms" instruction. Being team leader I was fitted with the teams single push-to-talk Motorola, which I mounted in one of my many pouches. Always good to have the right tool for the job... Likewise, I put my own sling on my M4, which came in very handy later on. We were told we had 30 round magazines, with "unlimited reloads" so to go to town. I opted for single fire anyways.

We were instructed in the correct anti-zombie safety: we take damage incrementally if within 3m of the zombies, from a mixture of toxins and contagion. Head shots are the only true stoppers. Just because they go down doesn't mean they will stay down. Then came the safety briefing. No touching the actors. No hand-to-hand. No breaking down doors or walls. No using the M4's as pry-bars or sledgehammers.

The mission was simple: kill all the zombies we found, find the missing "Team Alpha" (we were "Team Delta") and determine what had become of the mad scientist responsible for the outbreak in the first place, in the labyrinthine medical-research facility that had been sealed off. More yelling, on the ready line, and..... GO!

The facility used for the game was a disused boot factory complex in one of the Northern suburbs of Melbourne, only a couple of streets away from my partner Anastasia's place. The weather had been quite hot, although a cool change had come through, but it was still hot on Australia Day as we entered a dark, smokey, noisy and destroyed facility. The set dressings were really good. We passed through infirmaries with rows of curtained beds, cafeterias, kitchens, toilet and office blocks, or multiple floors and levels.

The radio connection to the comms center provided instruction as to our route, local objectives and always, always "hurry-up, hurry-up". Every radio signal was expect to be followed up with a reply, and produced a sense of constant pressure. Each order needed to be relayed to my team, whilst we encountered random zombies, reanimating bodies, blinking, flashing and swinging debris to work through and around and all the while, in poor lighting. It was great.


Photo swiped from the website
I broke our six person team into three 2-person fire teams, and we swept-and-cleared with quote good efficiency for a scratch team who had never really worked together in this fashion (two of the people were work colleagues from IT, one was one of the guys I did my first Tough Mudder with, a friend from kendo, and their friend. That last team-mate was the only one of us with actual military experience, but at least all of us had some some kind of Lasertag, paintballing or actual shooting. We kept pretty good communication up between us, and the fairly linear nature of "Patient Zero" made it easy for us, as "go forwards, consider anyone you come across to be infected, kill all the zombies" is a pretty easy SOP and Rule of Engagement to follow. I bolster that with an additional proviso, in that as there was the suggestion that there might be a second , hostile organisation present, we would "kill everything we found, unless otherwise ordered" this led to a couple of "I wasn't finished with that survivor yet" moments, but all in all we made a ruthless, efficient and effective sweep-team.

The RFID cards opened doors along the way, (plot allowing) and the radio worked (even if the storyline was occasionally verbose, but totally entertaining). Technically, a couple of elements I found might need a little work. The M4's lacked any force-feedback, but that would be a cherry on the cake of an otherwise excellent prop, but it was the gun-lights and speakers that I would recommending improving. The gunshot-sound effect, and health feedback grunts were quite soft, especially over the ambient sound effects and radio calls. This meant knowing how many shots were going off around you, your own shots, injuries to yourself and team-mates was difficult. Even of distorted, volume over quality would have been an improvement. I understand the need not to blind the actors too, so a 600Lumen tactical light from SureFire mighty overkill, but the lights we had were very hard to pick up on the helmet camera. Perhaps a compromise of boosting the levels on the camera might suffice. Again, the darkness was great for the atmosphere.
 

From an operations point of view, I was pleased how I managed my team, we were a surprisingly cohesive force, I think most of my instructions were easily understood and tactically sound (even the part where we went "off map" by pushing through some cardboard boxes to get to a door I spotted through a barricade). We achieved our mission objective of locating the missing Alpha Team, interrogating them (but perhaps being to thorough with our "kill everyone" policy, before all information could be extracted, due to some motivated trigger fingers in our team. I located and collected the "origin virus" sample, and although my secret contact had been killed, (yes, ere are secrets between teams and Command) was able to successfully pass this on.

The gameplay was fast and frenetic, the game world was rich and wide (check out the masses of in-game web links to parent, competitor and whistle blowing entities related to GAPS). Here is a lot more to this than "shoot the zombies" Lasertag. The prosthesis on the actors were awesome, they looks the part, for sure, and all had creepy mannerisms to really bring the fear. The biggest issue we had was the intricate "all or nothing" booking, which was difficult to navigate and coordinate, but in the end, totally worthwhile.

I found it really challenging, enjoyable and certainly a test of nerves under pressure. I'll be back for more, for sure!

Stay tuned to http://irlshooter.com/ their FB page http://www.facebook.com/IrlShooter and twitter @irlshooter for details of the upcoming season.


Friday, March 1, 2013

Review: Zombie Outbreak Hydro Bugout pack

Following on from my Zombie Outbreak Grunt Plate Carrier review, is another item in this line, again, thanks to Global Gear for sending them my way. This time I'll be showing you a daypack. This is the Hydro Bugout Backpack and here is what I can tell you about it:

Styled closely to that of the Maxpedition Typhoon or the Maxpedition Malaga from their Gearslinger range"

This is a smallish pack, measuring in at 30"W x46"H x 5"D with a storage capacity of 25L and happens to be loaded with features. One of the first things you notice about this pack is that it has some serious compression strap options. The front strap arcs over the top of the pack via two straps forming a v-shaped yoke over the front top external pouch, then connects to a webing strap that runs the whole length of the pack, with a Fastex style clip closing the two ends, and a D-ring pull toggle to assist in compression. The v-straps have sliders to adjust their tension as well.


The backside of the pack shows off the adjustable, and removable shoulder straps, a feature I really like, as it gives a whole new dimension to modularity and storage, carriage and orientation of the pack. At the top side of the straps, two close d-rings give a friction-feed closure to the shoulder straps, via the thick and heat-sealed webbing straps, before meeting the closed-cell padding of the harness. The front side of the shoulder straps feature more webbing, with PALS/MOLLE loops here and there, and more d-rings for attachment options. A light sternum strap, again removable, and can be relocated to best suit your needs.

The bottom of the shoulder straps is a more traditional tri-slide type buckle, but is seated on reinforced triangular flaps, giving a nice secure mount to the back, without pinching or pulling the pack. A wide belt with adjustable and removable straps finished off the mounting options. It's also good to note that the back is of a breathable mesh. The last notable feature of the back is the hydration bladder pocket, with a broad hook-and-loop closure and an internal webbing loop to hook a bladder to. I have had trouble fitting a 3L bladder in it, it simply isn't tall enough.


This is the top, front pocket, which is both surprisingly deep, and compressible, is a double sided zipper closing accessory pocket. The front of the pouch features a loop-field backing which has a single row of five channels of PALS/MOLLE loops. However, because of the stitching, only three of these rows are available. The loop field, being bisected by the MOLLE loop webbing, is only just wide enough to carry a nametape.


The front bottom pocket is even more spacious, holding my 1L Zombie Squad Nalgene bottle with plenty of space to each side, for more accessories. Again, as with the top pocket, it features twin zippers and deep sides, and has the main compression strapping running over the top of it. This poses something of a problem, as it limits the ability to get into the pocket to some extent. The front of the pocket features two of the same strips of PALS/MOLLE as the top pocket, this time backed with webbing bands instead of the loop fields of the top pocket. Two short compression straps mount to the bottom band, and allow you to really bind the pack, cinching it in tight.

This is the first and front of the two big internal compartments. It is a fully unzippable pocket, allowing it to be opened flat, and emptied fully, easily. You can see the utility pocket, with it's twin pen holders, and a single deep utility pocket. This is a good shot of the material used in the bag, it is a heavy, plasticized fabric, quite rugged, and whilst not a Cordura type of finish, it seems to hold up to wear well, and presumably adds some significant waterproofing.

The stitching is also clearly visible, and is of quite reasonable quality. The internal seems are all taped, which is great, as it lends considerable survivability to a pack like this, especially if things are constantly being stuffed in, and hauled out roughly...

Inside the second main compartments , which this time does not quite unzip all the way due to the bottom compression straps riding slightly over the base of the zipper, is deeper than the first compartment, and also has the additional bonus of two large pockets. The first sits against the back of the first compartment, and is made of mesh, and is deep enough to hold my iPad comfortably, and securely. The second is against the back of the pack itself, and is zipper closed, but only runs about a third of the depth of the pack, presumably to not eat into the hydration bladder space.

Here is the whole pack, stuffed full of blankets, books, bottles, clothes, and showing you the V-straps of the top compression straps, as well as the two additional single row, double channel PALS/MOLLE loops that are found on the side of the pack. The top seam also features webbing loops for dummy-cording or running a hydration bladder tube which I always like.

You can also see the drag-strap type of heavy rolled webbing handle at the top of the pack, and perhaps under that you can make out the mysterious elastic webbing square. I had initially thought this was the feed-hole cover for the hydration tube, but there was no slit for that purpose. It is also covering a square of loop-field, again, with no clear purpose that I can discern. A mystery, but not an unpleasant one.

Here is my typical load out, when I was teasing carrying it around. It packed quite nicely, and I was please with not only how each compartment filled out.


Lastly, I'll leave you with this: some might call the ultimate test of a daypack: here the Hydro Bugout is stuffed under my Virgin Australia Airbus 330 seat...

I like this little pack, it is well put together, full of features and carriage options. Certainly a good bug out bag option. I think I will be loading it up and putting it in a easily accessible location for the whole family.

Monday, February 25, 2013

Review: Tellurex - tPod1

As I said in my recent review of the Tactical Whistle, I'm a sucker for a shiny Kickstarter project, and the tPod1, by Tellurex is another such example.

What is it all about I hear you ponder?
The tPod came stands for thermoelectric-power-on-demand. This is a tea-light candle powered unit, (there is also a bigger, propane powered version, the tPod5) but this one runs off the standard tealight candle, which we happen to have a glut of, as it seems we buy a slab of them each time we visit Ikea.

Tellurex tests indicate that  a continuous output of 0.25 to 0.35 watts over a 4 hour period using a paraffin candle in an environment of 20oC (70oF) ambient temperature.  The cooler the ambient air the better the tPOD1 will perform, conversely, the higher the ambient temperature, the less output that can be expected.  They also conducted trials using bees wax candles resulting in a  higher peak output. Something to look into .... 


The thermoelectric effect is coupled to an output port which allows the included 25 LED light to dock, which comes at the end of a swan-necked adjustable metal cable. The base is a silicone shoe, keeping the candle in place and maintaining an easy to transport package, when it is all hot. This adds a safety element to the usual "bare-flame" worries of tealights.


The soup can sized thermoelectric converter's heat-sink fins are encased in a protective plastic case, and delightedly anodized in Ferrari red.

The whole unit is about the size of a can of soup, and only weighs 340g (12 oz).


As well as the LED lamp, the tPod comes with a USB adapter, (along with a warning from Tellurex that they wont be held accountable for changing-related damage to devices charged from the unit), but for purposes of charging a needful device in the event of being off-grid (or as they put is, "denied-grid"), the risk would probably be worth it. Similarly for camping situations, when you had to get a message out on an otherwise unchargable-device. Tellurex indicate however that the tPod will not charge a phone directly however, but will trickle charge a battery recharger and the battery recharger can then be used to charge a a smartphone.


We lost power over Friday night, when a truck clipped our overhead lines, and the power company cut our power for "safety's sake" till lunchtime the next day. This was the perfect time for me to break out my tPod, and you can see here how well it performed in our 35oC (95oF) conditions we have been facing this weekend.

Here is a comparison, with the LED lamp off and the same scene illuminated by tealight alone.

Having the source of electric light, produced by our ample stock of 4hour tealights was a real boon to us, and it would similarly be useful during other blackouts, when camping, or for any other reason find yourself off (or denied) grid. This is a very cool item, and I'm glad to have added it to my stock of alternate power and light sources.

Friday, February 22, 2013

Review: Tactical Whistle


I really am a sucker for shiny Kickstarter projects, and this was no exception. A -tactical- whistle you ask? Well, the Cybernetic Research design engineers built a whistle that meets many aerospace and MIL-spec standards, and designed it to perform in all kinds of environments, conditions and do so well.

It features a "three flute" design which provides three specific "voices" which were designed to increase audible recognition over long distances, cut through the background noises caused by weather, rushing water, air and ground traffic, as well as other noises.

According to Cybernetic Research the primary central frequency is 3150 Hz which they cite government regulations as producing the most piercing sound over the widest range of detrimental conditions. The other two voices are designed to fill what they call the "overall acoustical profile at frequencies between the primary 3150 Hz output and its various harmonics both above and below the primary".

With no moving parts, no rattle, a stepped knurled surface for positive grip under poor conditions, and a really low-breath requirement for sounding it, this is a great little whistle. They offered it in anodised aluminium, stainless steel, brass and titanium. I opted for the OD green aluminium, which weighed in at 14.6 g, and sits all but unnoticeable in my pocket, waiting for a need to be heard. The split ring allows for lanyard or pack-attachment, and I think i'll be adding mine to my keychain.


Here is a video of my testing it, with my iPhone volume app, "Sound Level" , and as you can see, (and hear) it gives a 100+dB scream, and the clip doesn't give the ear-ringing multi-phasic tone justice.

Signalling with a whistle is one of the simplest, easiest and most recognizable means of survival communication, and I can't recommend them enough. This is a whistle that will certainly make an impression should I have the need, and I think I'll be able to depend on it to always be ready, no matter what.

Wednesday, February 20, 2013

Review: Zombie Outbreak - Grunt Plate Carrier


I was very pleased to see when I got my email newsletter from Global Gear that they were going to stock a fun new line, the Zombie Outbreak: Tactical Response Gear. I got in touch with them to see what they could tell me about the line, and they were kind enough to send me a few examples, which I'll be reviewing over the next few weeks.

Here is the first example, a Plate Carrier called the Zombie Outbreak Grunt in multicam.

I was really excited as I haven't looked at a quick-release/cutaway plate carrier before, and this one looked feature packed, which is something I always value.

This is a fun set, and I am really glad to have added it to my costuming collection, it will give me some great additional costuming for my MilSim and Stargate Lasertag LRP events.

Here are some of the things that I can tell you about the Zombie Outbreak Grunt plate carrier:
  

It comes with a front and back section, which includes flank flaps, in place of a cummerbund. Those flaps connect with hook-and-loop as well as having Fastex-style buckles (which are part of the Quick Release Cutaway system, and I'll get to that later). The shoulder connections are again hook-and-loop, with additional adjustable nylon webbing fastening to add to the security and load-bearing of the set.

The front and back are fully PALS/MOLLE webbing covered, but unfortunately the top four set of strips don't match up fully to the bottom four sets, either in rows, or the 1" gap between channels, making cross-linking of accessories a bit difficult, but not impossible.  You can see the drag handle at the top of the back, it is nicely reinforced and bar-tacked onto the shoulders of the back panel.

Some of the stitching was a little off, too, but again, you'd have to be looking pretty close for this to matter.


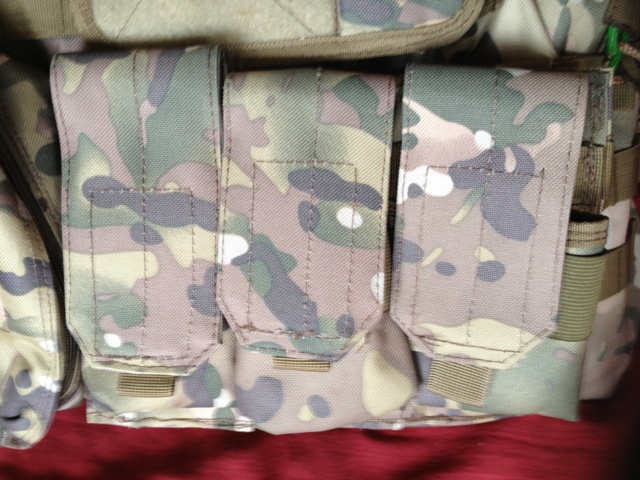
The first set of accessory pouches that come with the Grunt are a three- M16/M4 magazine style set of pouches, half-magazine sized sides, with elastic siding and a hook-and-loop closure on the lids. The backing features plastic reinforced PALS/MOLLE strips, to allow it to be connected immediately, without any accessories like the ITS Tactical MOLLE Stix.

The second accessory pouch included is an admin panel, which features two paperwork pockets, eyelets for threading dummy-cording, and a GPS/phone/flashlight pouch, with a hook-and-loop webbing strap. The admin panel also features a broad square loop field for affixing patches.  As with the first pouch, the backing features plastic reinforced PALS/MOLLE strips for attachment.

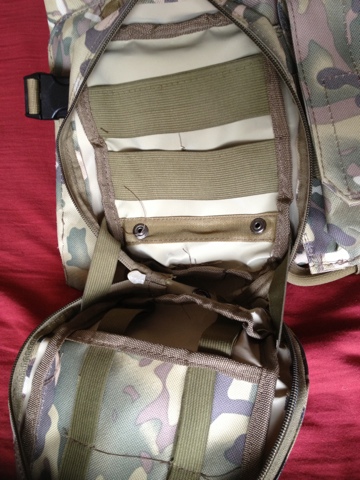
The third and final included accessory is a utility / flashbang pouch, which was originally mounted on the back panel, but I prefer to have my pouches around the front for ease of access. Elastic webbing pockets, on the back and front of the pouch give plenty of storage options, drainage grommets and webbing hinge-holders add to the functionality of this zipper closing pouch.

As with the first two pouches, this accessory features plastic reinforced PALS/MOLLE strips for attachment.

The inside of this pouch is also a little informative. You can see the pale green backing of the backside, which shows what appears to be the textured, heavy vinyl construction of both the pouches, and the entire plate carrier itself, rather than the woven 500-1000 denier nylon that companies like Cordura produce, and is the mainstay of tactical gear and apparel.


The plate carrier pouches inside the front and back panels were a nice touch. They included a sheet of closed-cell foam padding, as well as a sewn-in webbing strap to assist in removing the plate, and a hook-and-loop closing pouch style closure. You can see here that I've included my typical plate substitute polyethylene cutting board. You can also see the internal finishing, and again, the vinyl material the set is made of.


Here is the inside view of the front plate carrier pocket, obscured by the Quick-Release Cutaway cables (yes, in lurid Toxic Zombie Green, much like the scales of my KA-BAR Zombie Killer knives.) The strapping for the Cutaway system sort of closes off this access, which means to load it with plates, you'd need to activate this system first, then replace it.


Lets have a look at that Quick Release/Cutaway system now. For those of you who have worn body-armour of any description for a length of time, you will probably agree that getting it off in a hurry can be a real pain. More so when having to do it in an emergency. (boo hulu) Injury, accident and duress add to this, so having a system that does it swiftly is a real boon.

The system is that a pull on the webbing loop at the bottom of the front of the plate carrier pulls these plastic coated steel cables, releasing the cords thread through eyelets that hare holding the sides, and tops of the plate carrier together. Here you can see the wire nestled in its seating, and the cords looped around it.

Once the cable is pulled free, the buckles and webbing holding the plate carrier together can be bypassed, letting the user tear the hook-and-loop free, and clearing the way to treatment or escape.


Here is the same system at the shoulder, where the cords wrapped around the cable, and fed under webbing to keep them out of the way, when pulled free, allow the shoulder pieces to tear away.

This is a really ingenious system, and whilst it is a pain to put it all back together, I'd rather have those extra seconds of medical aid/egress or mobility in almost any situation, to have the time to spend putting it all back together when needed.


here's me giving it a test.....


So, to finish off, here are some pictures of me in it. As I've said, I was really pleased to receive these (and other items, to come) and they have certainly added new dimensions to my wardrobe and costuming options. It was great to get to see how a quick-release system works, and definitely has some nice features, but I was a little surprised by the construction, both in the materials and care put into finishing. However for a substantial fraction (along the lines of 1/3 - 1/4) of& the price of leading lines, this is a option that really looks the piece, without breaking the budget.

Don't get me wrong, this is an excellent costume piece, and would probably even suit paintball, airsoft and recreational hunters as well for those who are happy with form over function, but it isn't what I'd stake my life on. A real bargain for what it is, especially with all the included accessories, and it certainly "looks the part". I expect to see a bunch of these at IRL Shooter events coming up!


Monday, February 18, 2013

Home front: vertical gardening


I have been wanting to make better use of the resources at my disposal for a while now, and grow more veggies at home. The problem being, we live in a very sandy location, and a lot of things that we like to eat just don't grow well. That or the possums, and snails, not to mention tiger slugs eat them before we get a crop out.


In order to avoid these pitfalls, and make better use of our bright sunshine, the water barrel I have out the back, and a lot of recyclable bottles I had had ready to go, I wanted to use the same kind of design as seen in a Kickstarter I backed in 2011 (but haven't yet seen) : Windowfarms.


The idea is pretty simple, plastic bottles, 1.25, 2 or 3L bottles, with the bottom cut off, have holes punched around the base, and then strung together in a stack.

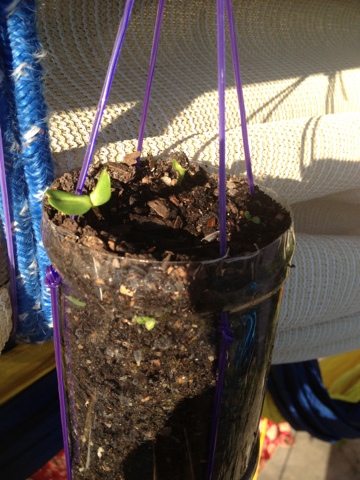
Here is the top of my stack, and you can see the potting mix is already sporting some growth, sunflowers for Triceratops Girl.


I used just simple potting mix in my bottles, beccause it's what we had on hand from seedling planting to stock up the front veggie patches. I am hoping to keep building up our collection of these and get the most from the summer sun. I think a vermiculite substrate would be awesome but until I have a cheep source, its potting mix already-on-site for this project.

The line I used for these was the 2.4mm star sectioned trimmer line from Ryobi that I had on hand from my mostly unused line-trimmer. This thick, strong and sharp-edged line seemed ideal for stringing these up, bot for stability, but also giving the creeping vines something to hold onto, as well as possible deterring unwelcome mouths.

Below the sunflowers, are a mixture of carrots and onions. Yes,  I know that being root vegetables, hanging gardens will become packed with them, but my thought was to germinate and establish in the hangers, then transfer and replant as needed. All going well, I'll do this in the next batch of bottles we collect.


Next down the stack are daikon radishes.


Again, a big root vegetable that will need to be thinned out in order to get the best crop, but we go through a lot of plastic bottles, and I have lots of surfaces to hang vertical gardens from. One great thing about Daikons are that you can eat the leaves as well as the root, and both tops and bottoms pickle really well, which I hope to do with as much of the crop as I can manage to make successfully.

I strung the bottles before filling them, from top to bottom, knotting the trimmer line as I went and adjusting the tension to ensure that the spout of the bottles pointed directly down to the bottle below. Once filled with potting mix, I poured a quantity of water into the top bottle to moisten it, and add weight to gauge the tension. Some minor adjustments to the knots leveled everything up, and I loosened the cap, just enough to allow water to pour through, without being in danger falling off and washing my soil out.


After a few days of hanging and watering, without any catastrophic failures of bottle, cord or lids, I got the family together and we planted the seeds.

You can see in this shot that the sunward side of the bottles have developed a lovely green moss carpet, and there is a clear divide between the dry inch on top and the moist lower soils, even after 40oC days of summer sun here in Melbourne. This was a big test, and I'm pleased to say that not only is there life in these hanging gardens, that the system is sound. I only water the top bottle, every other evening or so, and each bottle below gets its fill, from the dribbling through from the bottom above.

The water than comes out of the bottom bottle is brown and peaty, so i know i'm loosing some nutrients along the way, but its hardly worth worrying about at this scale. I have a number of bottles of carp-based fertilizer  to bolster my crops, when it comes time to do so.


Here is the crowning (can you say this, when it's the bottom rung?) jewel of our hanging gardens, the peas.

We've tried growing sweet peas in the front gardens for the last few years, and have managed the sum total of three pods, before snails, slugs and possums have killed the plants. This time it will be different!

Our hope is that the peas will climb up the cords, and give us five sets of four cords worth of climbing pea-laden vines.

All in all, this was a really good project, the kids love looking at it, it made use of useless space, recycled materials on hand and otherwise being thrown out, and will hopefully start putting food on our plates in the next couple of months.

More planned, possibly with other crops, and I also have an old cargo strapping net to use as a watermelon vine trellis!


Related Posts Plugin for WordPress, Blogger...