Showing posts with label Training. Show all posts

Sunday, May 17, 2015

Events: Battle Apocalypse lasertag

I previously offered my review of the Oz Apocalypse : Zombie Apocalypse lasertag event as a topic near and dear to my heart, but they also offered to take me and some friends along for one of their Battle Apocalypse events too.

This wasn't a scripted "make it through the maze" event, but rather a totally open-plan player- verses -player event. The connecting walls, closed by hurricane fencing for the Zombie Apocalypse event to make for a pretty linear dungeon-bash were opened up, such that all the areas were available, including the previously hidden "staff-access" areas, in between sets.


I've played a number of lazer-tag type games, and paintball, as well as the NERF-based LRP events, such as "After the Fall" but the realistic weapons, both in size and weight and in operation and action were a step ahead than anything I'd done previously.


We combined two times slots of teams, and got double-time in-game as a result (thanks everyone) and broke into two pretty evenly numbered teams. Initially we had a couple of people opt to wear the pain-belts (myself being one) but it turned out that an unfortunate glitch in the system would have seen me getting a shock not only anytime _I_ took a hit, but also anytime someone used the re-spawn transmitter in my line of sight, which also operated over IR much like the guns and targeting belts. We all opted out after a few false-shocks.


Given the frequency of deaths in every game, that was a wise move. We were all initially set up as a two-hit kill, with approximately 150 shots per magazine, with unlimited refills available, but back at the re-spawn site. I opted to go semi-auto for much of the first few bouts, gaugeing how effective I was with the taggers. I flipped over to 3-round burst later on, to be more effective.


It was a good example of seeing how different people act under pressure. The broken light, noise and tension was quite effective, and some people, communicated well, others didn't at all. We all suffered from "dead-men-tell-no-tales" violations, myself included, but I like to think I also backed up, and notified my team pretty well.


We were set up NOT to have friendly-fire count, which was a two-edged sword, but it meant for "safer" gameplay. I had adjusted my rig from the previous event slightly, and I also wore my Propper Multicam and Platatac CUS Punisher shirt combo, which kept me cool and pretty dry, though I did work up a sweat from stress and the activity in my plate-carrier and pads.


I had a blast, again, and we had a good time, as well as dong "better" than our opponents. My three friends and I worked pretty well together,
in so much as that we all had done this kind of thing before, some more professionally than others, I must say, be we certainly benefited from -his- experience, I would have to say.

Unfortunately the Oz Apocalypse season is over, I hope some of you managed to get a go in, and if not, get to have a similar experience soon, because it was a lot of fun.


Thursday, May 7, 2015

Events: After the Fall: New Hill City

I went to a Live Action Roleplay event not too long ago,  which went over three days and two nights. it was an immersive post-apocalyptic themed event, which was perfect for me.


This was billed as a resource and group survival driven event, with three distinct factions, which meant we had to depend on each other, and fend the other off, as the situation required.   


We were to delve into the world of After the Fall.

This LRP group is based in  Melbourne and aimed to have a high degree of costume, set dressing and role playing at this event.

The setting was this:

The year is 2030 and things have changed. The world that we will be playing in is a dystopian American future where corporations have accumulated so much power and influence that the government has been made redundant. There hasn't been a president for 5 years and nobody has really cared. Most of the USA has been reduced to a wasteland as laws are not enforced and infrastructure not supported.  

There are fortified cities that are run by corporations and wealthy individuals but they are few and far apart.

Different parts of the country will have unique dangers. There are irradiated areas and parts where chemical waste has caused nasty side effects.


https://www.facebook.com/waghorn.photography
I signed up as a PC (Player Character) for the game so I was to choose to be a member of one of the 3 factions. We couldn't play as an independent character. This was a story of how groups of people survive and interact in this setting. 

There were a small number of NPC's (Non Player Characters) who swaped roles from time to time in order to provide some plot based encounters for the players to interact with but the intent was that a lot of the roleplaying and conflict will be within or  between the factions.
Due to the violent and dangerous nature of the game setting it was recommended that we considered multiple character ideas in case our first characters died or was taken out of play for whatever reason. Sickness, radiation and chemical poisoning as well as a reasonable injury recovery period was expected. 
The internal combat system was with un-enhanced NERF-type weapons (decoration was however required) and LRP approved foam close combat weapons. Generally, unless you had representative armour props, two hits would kill. LRP events are based on an honour system, and the system worked pretty well. Brutally so.

Especially when we consider the resources aspect. I'll get to that. 

The three Major Factions:
The town of New Hill City
Slowly the groups found each other, banding together for survival. People who wanted to make a future for themselves and not just live in the violence of the present. In their travels they found an abandoned town in Kansas, Hill City.


Taking over some of the buildings they have begun a new life. It is a difficult life on the frontier of chaos but they work hard to make it succeed.
  
The Soldiers of the True Americas:
Born out of an anti-government militia from before the fall, STA has been trying to gather resources and personnel to bring back the good old USA to its previous glory. They are
ruthless and accept that not everyone will have a place in the new world.


The Legion of Steel
Nobody remembers who founded the LOS but they have been terrorising the roads and highways of the Midwest for several years now. Due to their violent lifestyle they have an incredibly high turnover. But there are always more people wanting to join and rampage across the country. They take what they want and kill anyone who gets in their way.


I  opted for the STA, because I like trying out my kit, have a bunch of it already, and wanted to have a couple of different layouts to run about in, and generally like to see how it works in stressful situations.

https://www.facebook.com/waghorn.photography
I set up as "Ronin" who was heavily supplied, armed and armoured. I also set up as "Coyote" who was lightly kitted, armoured and armed.

The real kicker was the ammunition situation. Even the STA faction, which was military based, had so little ammo that we were rationed only three NERF rounds each. This was a dire situation to be in, especially when you consider the range and hitting power they have, as well as outdoor windage. Fortunately we all had melee weapons as well. I had a dagger and a machete as my backups, as well as a pistol I never bothered to load, along with the NERF rifle I had. I had a scope on it (more to save carrying binoculars than to actually be useful with a NERF gun) and a light at the muzzle end. I took both off when I swapped to my "Coyote" persona.

I wore ATACS-AU as "Ronin" and MultiCam as "Coyote" and I'll talk about that in a future article.

We also all brought gas-masks. I have to say, fighting in a gas-mask is really, really hard. If you have a mask, and intend to use it in the event of a disaster, get it out, and PRACTICE. My "Ronin" character was killed in a bottleneck when blindsided by marauders.


The three factions set up in widely different areas of our site; the STA set up in a wide flat grassland, a circle of tents within a ring of faux-barbed wire, (I camped in my SMr Nube hammock slightly away from the main circle), slightly hidden, because I'm paranoid like that. I wasn't really happy with the wide-open setup we had, but, I wasn't in command ....

The LOS set up in a far distant corner of the site, enclosed by trees and shrubs, and then they build a stockade from pallets and the like, they decorated their area in classic "cannibal ganger" fashion, and it looked a treat. Well done to all of their hard work getting it on-theme.

The New Hill City Townies had the on-site cabins, and rec-hall set up as their town, and tavern, and the difference between cabin-dwellers and tenting-nomads was really apparent. Made for a great feel to the game.


The main push of the game was both survival and resource gathering. This was covered in two ways. Each group was issued "rations" in the form of in-game medical suplies (anti-chem, anti-rad and "healing" meds), random cans of food (beans, spaghetti, stew, fruit-salad) and "non-contaminated water", we even had a jar of Vegemite ). as both our food supplies for the weekend, but also as trade goods. There were also "non-consumable" supplies we were supplied as props.

We could eat well, or be rich, our call.

Caption by Michael Brady
Then there was the ammunition situation. We were one of the most heavily armed factions, but literally had 2-3 rounds each at deployment.

There were in-game mechanics for raiding each other's camps, and also "random dropped items" to be found around the site by the organisers.

Caption by Michael Brady
There was also looting! we routinely looted the bodies of the fallen, (within reason) to collect those in-game resources (no fair stealing other peoples kit), and this also extended to that food and water ration we all had. We also traded for resources, both goods for goods, and goods for service and information.

It was a really fun opportunity both for characterization, but also for negotiation skills.

https://www.facebook.com/waghorn.photography
We also had a number of people with personal trade items (and skills and services) on offer, to add to the whole experience. I had a collection of KFC moist towelettes and sauce sachets that I traded for some eggs in town, for the STA.

We had some in-game hazards as well, from areas of radiation contamination, including water supplies, which made our characters "debilitatingly sick"

Raiders, chem-clouds, a bio-engineered nanite plague and just human nature all played a part in making this not only a challenge, but a struggle for survival.

In the end, we all had a good time, got to run around as cannibal savages or misfit soldiers, camp and cook beans like real post apocalyptic survivors...

I had a really good time, and will be back for more when their second event comes out later this year. I think I will work more on my loadouts, and also my gas-mask operation too, before the event, as well as trying to get a more cohesive feel between my faction members and small unit tactics in the field.


Monday, October 13, 2014

Wish Lust: books - The Knowledge

Its been a little while since I have done a book-review, which is a bit poor on my part, as there is a lot of preparation, survival and readiness material out there, and you are remiss if you rely only on the ephemeral and transient internet for this kind of learning and discovery.

My last report on this was to discuss the  Guide, Canning, Freezing, Curing & Smoking for meat keeping, Tan Your Hide! for turning skins into leather, The Urban Homestead for its down-home DIY ideas and Toolbox for Sustainable City Living for more of the same.

Several people have now suggested I check out this best-seller listed book, by Lewis Dartnell, "The Knowledge: How to rebuild our world from scratch"

I haven't sourced a copy yet, but from the excerpts and reviews I have read and been recommended, I think it will certainly be right up my, and perhaps your alleys. Here's what the website has to say for it...

"Maybe it was a viral pandemic, or an asteroid strike, or perhaps nuclear war. Whatever the cause, the world as we know it has ended and you and the other survivors must start again.
What key knowledge would you need to start rebuilding civilisation from scratch?
The Knowledge is a journey of discovery, a book which explains everything you need to know about everything. This is a quick-start guide for rebooting civilisation which will transform your understanding of the world – and help you prepare for when it’s no longer here…"
I'll add that the website also expands on the book, and the author has not been resting on their laurels, and has been adding content and links to other similar works. I get the feeling that he really cares about the topic, and it's not just a "publish or die" project but rather a central passion. I was impressed, and can;t wait to have a read myself. 

Thursday, June 5, 2014

Review: Exoskel shin guards

I love armour. I love scrambling and climbing. I love not bashing my body to pieces or exhausting myself.

So when I saw these awesome pieces on SoldierSystems I knew I had to see if I could get some too. Stephen Guiney of ExoSkel was kind enough to get back in touch with me and as it happened was traveling on my side of the planet, and hooked me up with a pair. I've worn a variety of shin-guards in the past, through both my LRP days, roller-blading and when I've been doing a variety of adventurous things I'd rather not crack a shin whilst doing. I've worn several different kinds of knee-pads in the past, but these are something entirely different.

These are the Exoskel X1's (X2 being the production model on sale now).

Constructed from an advanced polymer, with closed cell foam backing and heavy duty stirrup strap, buckles and webbing and Fastex-type calf straps, these are some very rugged and rigid shin pads, which come in at only 500g (1.1lbs) apiece. They come with Self Extinguishing Fire Resistance, which is UL94 VO rating.

The most striking aspect of the guards is of course the five rows of teeth that make up the face of the guards. These are sculpted directly into the face of the guard, each with a downwards facing slope and butted tip, these are designed to grab and hold any surface that you happen to be scrambling over.

Where in regular climbing situations the usual rule is "3 points of contact; feet and hands only" in practice, and in stressful situations this goes right out the window. When going through a window, up a ravine, over a wreck or refuse, knees, shins and elbows all come into play. That is when something like the Exoskel's come into their own.

The guards (teeth, buckle, stirrups) hold in excess of 450 kg (1000lbs) when vertically loaded, which is equivalent to a drop of 150kg (330lbs) from 50cm (19"). The good folks at Exoskel went as far as to explain these figures as the following: "The measured strength of the dynamically loaded Exoskel products tested was higher than the maximum dynamic load estimated for an assumed in-field loading scenario with a 330 lb (150 kg) user and a 19 in (50 cm) drop onto a hard object."

A 50cm drop is a long way to expect any wearable piece of retention gear to take when that laden. My 215Gear Retention Lanyard is 17" long and stretches to 26" meaning you are limited to a maximum of a 26" drop, and that is a dedicated safety line. These are not designed for that kind of thing.This is a climbing aid, not a safety tool.


In fact, Exoskel stress their product is to be used for stabilization assistance and lower limb protection only. It is not a climbing safety device or harness.

That said, I was quite happy with dangling myself off a packing crate with a shin on each rung, no problems. I have tried them on a variety of surfaces and materials now, and have been really pleased with both the bite and stability of those teeth. Where normally I've felt the need to kneel up onto a surface, committing that much of a lunge to my ascent, being able to go "half-way" with a shin gave me a lot more scope to choose how I ascend, and potentially limit my exposure in doing so.

I took this shot to show the tooth-marks the Exoskel's put into the hardwood packing crate I posed these pictures on. You can clearly see the three splintered spots where I moved up and down, and also the two divots in the corner where I dangled.

Very impressive, I must say.

Some of the excellent additional features they come with, such as the emergency stirrup replacement and calf-strap holes, which enable the user to use up to 12mm (½") rope / cord to tie the guards back on in the case of breakage. There are also guide-holes divoted into the perimeter of the guard to enable drilling and sewing of the guard directly to pants.


The channeled foam lining not only helped with the breathability issues often found with form-fitting guards, but the design, and thickness as well as the exterior shell itself added considerable impact protection. I'm no kick-boxer, nor did I take a sledge-hammer to my legs, but I kicked a few trees, and clubbed myself a few times to gauge the kinds of impacts I might expect to take and resist, and didn't come close to bothering myself. I'm pretty sure I'd have lost footing before the guard broke. You can even wear them over existing knee-guards, depending on the fits.

As a Close Quarter Battle tool, or restrain device, I can only imagine how unpleasant it would be to be on the receiving end of a kick with one of these, or to be knelt on, but I have little doubt as to their effectiveness as a compliance tool, if needed.

They were quick to fit and remove, whilst being comfortable and stable for day-to-day wear, and low profile enough that I didn't find myself snagging on anything. This is a really great innovation and I'll be adding them to my adventuring kit, for sure!


Friday, May 30, 2014

Review: Platatac prototype hydration carrier

Here is the hydration pack that I have been using for the last few Tough Mudder events I've done. This is an old prototype from Platatac that I picked up on eBay, and combines elements of both their Bravo hydration carrier that I have, and the MEOP Medic Pack both of which I've covered in the past, and are great pieces.

I found that wearing an extra set of straps was redundant when I was wearing a vest anyway on my Tough Mudder and similar adventures, which is why I looked for an alternative to the Bravo, which has served me well in other situations, and on my first Tough Mudder. When I saw this piece come up on eBay, I was thrilled to give it a go. It follows the same kind of design philosophy I've come to expect from Platatac pieces, with a tough 1000d Cordura exterior, and ITW Nexus hardware. It if "faced" with 6 rows of 4 channel PALLS/MOLLE loops, and features a hook-and-loop secured drag handle. Running down the flanks are nylon D-rings, three to a side, allowing shock or paracord to be run through these, to provide attachment points, or compression.

The wide-mouth of the pouch perfectly fits the Source Storm 3L hydration bladders main cap.

The baffled sides of the carrier allow for quite significant volumes to be carrier, without restriction, or perhaps even storage for other items besides a hydration pack. However, this particular piece lack the zipper-access of the Bravo, which means that the only access into or out of the inside is through the main cap.

This actually posed a problem when trying to run my hydration hose through it, and I bit the bullet and melted a channel in the backside to feed it through.

I also had to melt a drainage hole in the bottom, following the previous Tough Mudder, last September.
I found that the carrier filled up with nasty pond water when I took my tumbles, which really added to the weight I was hauling. No such trouble with a small drain hole melted in this time around.

The back of the carrier offers a variety of attachment options; Zippers paired with the MEOP carrier (which allows me to sandwich these two pouches nicely). It also features female Fastex clip ends top and bottom, tri-glide loops for all your clipping and looping needs. Best yet, the back features two sets of three three channel PALS/MOLLE PLMRS (Platypus Light Modular Recovery System) strips. These gave both a rock solid attachment and also load spreading capacity. I barely felt the 3kg that the full bladder weighed,and certainly not the sloshing side-to-side I might have with a pack-type carrier.

This was just a prototype, bridging the gap between the Bravo and the MEOP, but if you want to see the new production version, check out the Platatac Utility Hydration Cover. Looks like the logical next step.

Wednesday, May 28, 2014

Review: Platatac Punisher 2014 CUS Shirt

Here is one of my favourite go-to shirts for when I have some serious adventuring to do. This is the Platatac Punisher Cool Under Shirts 2014 edition. I got mine in the 3-pack bundle, which means I can shirt-up and stay stink free for days at a time.

The shirts themselves are made from Drytech polyester and are designed to be worn under body armour, as a work-out shirt or whatever close fitting base layer you might need. Ive covered this kind of garment before in the Blackhawk! shirts and the Under Armour shirts. These kinds of materials wick moisture away from the body, helping keep you cool and also quick drying. I certainly gave this a test this year in both the Tough Mudder, and on my recent trip to Fiji.

There are even mesh panels under the arms to help with airflow, which really comes in handy if you are wearing a vest of some kind (be that a plate carrier, LBV or BCD/PFD) especially in a hot and or wet environment.


Decked out with Kryptek patterning printed onto the right sleeve, and fitted with a broad swatch of loop-field on the left, the tan material with subdued ANF for the platypus skull filler make this a cool-guy shirt that does its job. The back is printed with shout-outs to the major lines Platatac works with.

I've put this shirt through some pretty strenuous work; it's my running shirt, my Tough Mudder shirt, I wore it jetski-safariing and snorkeling. I've found it to be light, warm when needed, cool when needed and certainly quick drying.

I really liked having a loop-field to attach items from my ever-growing patch collection.

If you have need of a slick, comfortable and hard-wearing body-hugging shirt, you should totally give the CUS a try. Coyote adventure tested!

Tuesday, May 20, 2014

Review: Source - Storm WXP 3L hydration bladder


Here's a much loved but oft forgotten item in my survival, training and adventuring kit. This is the
Source Storm WXP 3L hydration bladder which has seen some pretty heavy use in the past, and I thought it was fully worth showing the light of day.

Ive covered some hydration systems in the past, such as the the Platypus PIB hydration pack and several hydration bladder carriers, such as the lustful Geigrrig Tactical Guardian (I'd love to get my paws on one of these) the 0.75L version that come in the Tactical Tailor Joey hydration pouch and the backpack style Platatac Bravo pack. This isn't my first Source 3L bladder, as I failed to follow the care-and-cleaning guideline of DO NO USE BOILING WATER ... they melt. Hot enough for your hands is hot enough. More on this later.

The bladder itself is constructed from a very special three layer, coextruded polyethylene construction with a very special low maintenance liner layer. Integrated Grunge-Guard™ antimicrobial surface. This  435 micron thick surface prevents bio-film build up, my being almost glass-smooth, (Source quotes it as being  2000% smoother than standard TPU films, with virtually no difference from glass itself. This reportedly improves the systems self-cleaning function.

The wide opening access at the top opens with a slide closure for easy filling, draining and cleaning. The fold and slide lock gives a strong, airtight seal. A retaining cord ensures clumsy finders don't drop it in the muck, or let it wash downstream. It also means that you can add ice, or powdered drink supplements.

I found all the seams, including those at the tube attachment point to be very strong and well placed to take any tension that the bladder is challenged with, so far.

The drinking tube attaches to be bladder with their propriety QMT™ Quick Mate Technology hose fitting, which offers push button convenience, no leakage, and click-in compatibility with USMC Miox filter system. Sometimes the clip can be a little stiff, but hardly much of an issue for me, as I rarely took these off, except to rinse. However, even at the tube tip the QMT is completely self sealing.

This means that even with a full reservoir you can change tubes, add valves or whatever, without worrying about drips or leaks. Great for fitting a full bladder into a pack that already has a hose run through it. Sometimes hydration tube ports can be a snug fit.

The drinking tube is 94cm (37") long, and contains its own valve built in. Again, no drips or leaks when changing the tip or feeding it through bags and gear. The tube cover both insulates and blocks UV-light.

This helps your water cool and bacteria free from first to last sip. I really noticed this when doing long stretches in the sun with this. the temperature gradient from tube-to reservoir was always delightfully small.


The very cool push/pull Storm Valve isn't a bite-valve, being a pull-open plug like on a sport bottle. It apparently delivers 25% higher flow than bite designs. The integrated valve has a twist-lock which will lock the valve in the "off" position, so you don't have to worry about inadvertent leakage. It is also set at 90 degrees from the tube, which apparently reduces the required tube length (for twisting it around to have kink-free drinking) by 25cm! It also rotates 360 degrees, allowing you to place the valve end on any side of your gear, and have access to it.

It comes with a dirt-shield cover, which is also dummy-corded on, and can be cinched with a dedicated slit, to stop it from dangling and rattling about when not used.


In addition to the Widepac wide opening access at the top, with its hanging slot,  the bladder also has a screw-top opening, which incorporates a carry-yoke. The yoke can be rotated to best suit your carry style, but allows even gloved hands to hold the bladder open for refilling without contaminating the reservoir.

The gasket screws down over the yoke to hold it in place, and is also dummy-corded to the wide-mouthed cap. I have had some troubles with the gasket winding loose, and this impacting on the seal the cap gets, but if its screwed down tight, all should work out well. 

Evacuating all the air from the bladder keeps it very quiet, no canteen-sloshing noise-disipline worries there, and the placement of the tube to the bladder means you pretty much get every drop emptying out, you can even set it to run continuously, using siphoning, to get regular irrigation, or when running detergent through it to clean it. The guys at Platatac recommended throwing it, washed but not dried into the freezer as a decontamination step, which is a far better idea than melting it with overly hot water, I have to say.

This particular bladder has seen me through camping, long haul drives, and three Tough Mudders, and it's going strong! I even inflated it and used it as a flotation aid when diving off one of the "Walk the Plank" high dives on Tough Mudder.

I'd love to try one of the Universal Tube Adapter  attachments, which lets you fill the pack from the drinking valve, from taps or bottles, without having to take it off your pack or out of a pack.

Tuesday, May 13, 2014

Events: Tough Mudder #4 March 2014


I did my fourth Tough Mudder in March, which earned me both a green (x2) and a PINK (x3-6) Mudder headband.

It was also my first TM solo, whereas before I'd run it with teams of work-mates, or friends, this time I just tackled it on my own, along with the other 20,000 or so people who did it this time around. It was a slightly overcast and chilly day, and I was very glad that I had set myself up with my gear with this in mind.

This time around, as I had done previously, I geared up in all my "Zombie Control Officer" get-up, some for show, some for practical reasons. The core of my outfit was again the
FirstSpear OAGRE tactical vest which I've worn to all but my first of these adventure runs. This vest has given me both a platform to attach my accessories, but also provided me with a modicum of abrasion resistance, not to mention keeping my shorts on during some of the hairier moments, with its built in belt-attachment loops.

I mounted a set of Platatac twin 40mm pouches to my left side, which I filled with energy bars. On my right side, I mounted a Platatac SR25 pouch for another energy bar, a magnet to switch on and off my Contour GPS camera which has trouble in its waterproof case (see below). I would have also kept my spare battery for the Contour in there too, in a double-ziplocked baggie, as I've done in past, but alas, I couldn't find the damn thing till the week after the event, stuck in the bottom of a cable-jar.

On top of the vest I wore the same Platatac admin pouch as I had previously, with a cyalume stick, permanent marker and a small laminated map of the course. I tracked my progress, marked off obstacles and marked times as I went. I also lucked a large LARP foam fighting knife behind it, for photo-ops and in case any of my fellow competitors wanted to "go zombie" at me. No one did, haha. My loss. Wearing my Z.E.R.T. membership shield, call sign (Q3199) I got a lot of nods from the other costumed participants.

Also on my chest rig, I wore the UVPaqlite for power-fee solar dark-space navigation, and on my shoulder, opposite the ITW-Nexus Picatinny mount for the Contour, my PrincetonTEC Switch MPLS-light, which alas didn't survive the course, and judging from the few photos I found, looks like it came off at least in the first third of the course. Makes me sad, but I guess I'm in the market for a new helmet light...

I wore a Platatac Punisher-2014 CUS shirt under the OAGRE, which kept me cool but not cold, dried quickly and chafing free for all 23km of course.I clipped my bib number to my MOLLE with plastic side-opening ALICE clips.

I wore running skins under my TripleAughtDesign Amphibious Shorts which cut down on abrasions even further, and kept me a little warmer when the wind hit us. They also helped keep my BlackHawk! kneepads on and in place, and again, without the bleeding hamstring regions I've had previously. Skins are definitely an endurance asset. This time around I also opted to wear my BlackHawk! elbow pads too, which cut down on my elbow gravel-rash immensely. A little cumbersome, and made getting hauled up by helping hands a little more challenging, but so worth it. Between the skins, the knee and elbow pads you could hardly tell I'd done the course (apart from the usual behind-the-thigh bruises) just a day or two after.

I had a Source 3L WXP storm bladder on my back again, in an early strapless version of the Platatac Bravo hydration system, which was PALS/MOLLE locked on tight to the OAGRE vest.

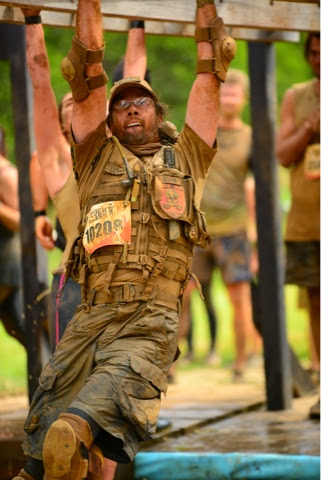
This time I also wore my Paleo- Barefoots ANTERA paws with the neoprene inserts, the PAWS dots made a heap of difference, giving me all the grip I needed on events like "Twinkle Toes", which was a wet-beam crossing, and running up the quarter pipe of Everest. I also wore the Paleo-Barefoots BAMANOS paws, giving them their first big outing for me. Unfortunately, in their current form, without a lining, they chewed up my hands quite a lot.

I've passed on feedback to Jörg of GoSt Barefoots, and the roughness I felt when wearing them, especially on the hang-by-your-hands obstacles like the "just the tip" vertical wall-crawl, the "Funky Monkey" monkey-bars and "Leap of Faith" (jump off a platform, over water and climb up a dangling cargo-net, my favourite obstacle of the course.)

I completed the course around 45 minutes faster than my previous times, which included an extra kilometer of "Legionnaire" veteran course, and four extra obstacles. The Powerade / energy bar combination meant that I didn't stop running for water or snacks the entire time. My map was a great morale boost, as well as helping me keep my orienteering awareness up.

These events are a great hobby for me, they test my body, determination and gear.


Here's a shot of me fiddling with my camera, when in its case I need to use a magnet to switch it on and off, which isn't always easily done. Especially when all caked in mud.


I only managed to get a couple of clips from this Tough Mudder, because of problems with the switch. Don't mind the muddy banter ....


I had a really good time, signed up for the next Melbourne event on the day, and made it home in time for dinner.

Wednesday, March 19, 2014

Review: Ti2 - PB9 parabiner pulley

I seem to be fully addicted to both Kickstarter, and awesome titanium pieces. Fortunately, this means I not only have a bunch of cool kit to play with on a semi-regular basis, as well as helping people get their ideas off the ground and into your hands, but also I have things to write about.

This is one such item, which I've been sitting on for a little while,This is another creation of Mike Bond, creator of the Sentinel s4s cache, the Sentinel X and the EDCPen (link coming VERY soon). This is the PB-9 Para-biner

The PB-9 measures 48mm x 111mm x 9.5mm thick (1.875" x 4.375" x 3/8") and weighs 100g (3.5 oz) and almost the whole thing is made from grade 5 titanium. This is the biggest of three variants, and features 9 tool options, being a very versatile tool.

There are two versions of the PB-9, in Imperial (SAE) and Metric, each offering a range of wrench openings:
SAE: 15/16", 3/4" 9/16", (5/8"), 1/2", 7/16", 3/8", 5/16", 1/4" (bit driver) MM: 24mm, 19mm, (16mm), 14mm, 13mm, 12mm, 10mm, 8mm, 1/4". I bracket out the 5/8" and 16mm wrench options because they sit in where the pulley pin and wheel reside, and I don't thing they are really accessible. the pins, split rings fastening them, the pulleys and whole assembly would need to be removed to have this option used. However, the pulley significantly outweighs the wrench need, in my eyes. Both feature a "hidden" 1/4" bit driver, inside the locking gate.

That gate is 12.7mm (1/2") or so wide, and features a hook-and-pin overlock, giving a really secure structural gate. Instead of a regular spring, the PB-9 features a torsion spring, cut from a piece of grade 5 titanium as well, as rustproof as the rest of the piece. Outstanding.

The PB-9 has two pulley options, both made from high strength bearing grade bronze 544 (The prototype pin was stainless steel, the production version is also titanium)

The single pulley option allows for lines up to 1/2" diameter, whilst the twin pulley was specifically for use with paracord. I found that it would take paracord, 3mm plastic coated clothes line, 6mm nylon sheath cord, and even the plastic coated braided steel cable from a laptop lock.


 Using two PB-9s with twin pulleys in a "double tackle" setup allows for a 4 to 1 mechanical advantage when lifting loads.
The tool also features a wedge shaped "Para-Cinch" notch for quick lashing of paracord (or as a bottle opener)

The non-pulley end also features a flathead screw-driver, whch could easily be used as a short pry-par, Mike even suggests as a box-opener. This tool has it all!


One of the things I loved about this Kickstarter was the engineering that went into it, and how that was shared. Watching the test-to-destruction clips of all three Parabiners was amazing. The fact that the prototype PB-9's broke at 1771kg (3,905lbs) is amazing. That's around the weight of a car! Having these tests, and subsequent improvements described along the way was a real eye-opener, and very heart warming.

Seeing the hooked gate go into the design, as well as the living/torsion spring enter the process really gave me a sense of being part of the experience, and has lead to an outstanding tool.All part of the Kickstarter joy.

If I had a gripe about them, it might be that the gate only opens 1/2" or so, which limits what I could clip them to directly. I certainly made do with braided steel cable, and could have used chain, just something I noted.

These are totally going into my bug-out kit, and I look forwards to being the guy with the pulley when it comes time to lift an obstacle.

Saturday, March 15, 2014

Review: GoST Paleo Barefoots Antera Paws

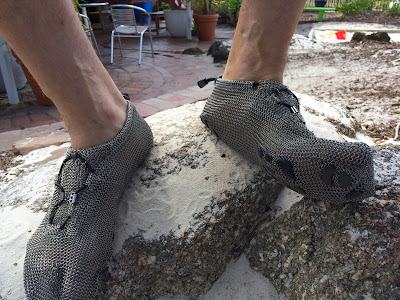
 I was really happy to receive the GoST PaleoBarefoots BAMANOS gloves with Paws grip-spots, and I was really looking to try the ANTERRA versions that Jörg sent along with them. As you might have read previously, where I've talked about how I really loved the ANTERRA and PRONATIV shoes, but noted that as per the PaleoBarefoots recommendations and warnings, they don't react well to polished and artificial surfaces. The steel links just slide, with nothing to find purchase on.

Adding the Paws grip-spots immediately ended this issue, providing immediate regular shoe traction with surprisingly little loss of tactile response.
They added some pressure points on the foot that had not been present in the "bare-sole" version, but this was not unpleasant by a long shot. 
 
The area taken up by the Paws is slightly larger on the links than on the ground contact, and only very slightly permeate into the shoe, essentially imperceptibly. This means that you still have all the flexibility, and articulation of the originals with none of the slip-sliding.

I also found that the extra buffer the Paws provided gave me a little relief from the heat of the Australian summer, when standing still on hot surfaces. It was also interesting to note that the placement of these spots matched very well to the shape and contours of my feet. It's obvious after wearing them that a lot of care and thought had been out into the shape and placement of the grip-spots, and it was more apparent than in the BAMANOS, because of how they traced the contact points of the sole.

This version certainly improves upon an already eye-catching and effective barefoot shoe system, with very little change to the basic function and draw cards of the originals. 

After many kilometers of running and both beachside and urban walking in them throughout the summer, I can confidently say that these are the best yet, and the adjustment period was minutes at most. 

Given that the silicone rubber is melded into the rings directly, I would expect that the Paws will last for many years, wearing down and degrading slowly as I slog through rough terrain and gritty city streets, and will eventually need to be resurfaced. 
However, even then, the stainless steel of the primary shoes will go on working as indefinitely as any of the classic versions. No structural integrity was lost in the adding of the grip-spots, that's for sure.
I very much look forwards to completing my next Tough Mudder in these and with the BAMANOS gloves. 

The combination of the steel and silicone gripping surfaces significantly improve the disaster situation practicality and all-round wearing of this unique kind of footwear.


Related Posts Plugin for WordPress, Blogger...