A place for me to review the various rugged, nifty and needful kit that I've accumulated, for every-day preparedness in the event of accident, disaster or world-shifting end-times Apocalypse, be it zombies, triffids or Mayan divide-by-zero errors.
One of my friends lent me this piece to compare. I have covered the Fishbones Gravity Hook a number of times, and have been involved with beta testing, so my appreciation and bias is pretty well known.
It appears that the Kickstarted design that Eldrick Garcia and his team developed, over many iterations, and put into production has been copied and is now for sale and being plugged online. Now, I am all for free market, and it's inevitable that great ideas will be copied, I wanted to try at least to compare and contrast the two designs.
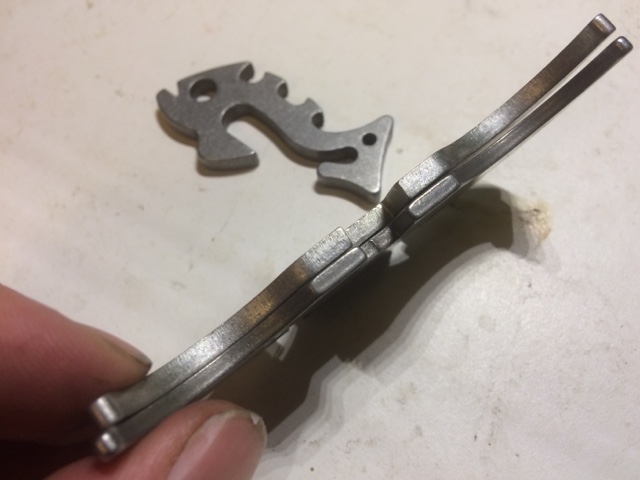
Here are the two hooks side by side, with the Fishbones version on the left, and the Molibao version on the right. You can see they are essentially identical, remarkably so. The "arms" of the hooks are essentially carbon-copy of each other. The arcs, bolt-holes, the middle-notch hole and even the curves of the hooks are identical.
The mounting hardware is different, but bolts and self-locking nuts are ubiquitous, as are the shackle loop at the bottom. No big issues with that, obviously.
The batarang cross-hook pieces indicate pretty well the differences between the two pieces however.
The Fishbone cross-hook is obviously thicker, which is true for the entire construction which is made out of 1/8" thick 304 stainless steel and all of the Gravity Hooks and weighs 360g all told.
You can also see the finish of the Fishbone hook is much neater, with the Molibao finish having a notch still present inside the cross-hook. Thicker steel means stronger steel in my books, assuming it was the same grade, which I have no way of knowing.
The differences between the thicknesses of the steel used between the two Gravity Hooks have been taken into account in the Molibao version, which was good to see.
The notch-holes were differently spaced, and adjusted to still ensure a good fit, so the hook actually works identically to the original.
Essentially, if you didn't know that it wasn't from the original manufactures and had one to had to compare with, you wouldn't know it wasn't an original.
One thing I wanted to cover, then, was the price point. I went back and checked the Fishbone website and the steel Gravity Hook is $39.99, the titanium version is $79.99
On the Nifty Thrifty Store site, where I -think- you can get the real deal (maybe, given the use of the official promo-shots) they are $65.37.
The Molibao versions are on AliExpress and other cheep-gear sites, but really, you get what you pay for. I know you're not supposed to be putting your life on the line (literally) with the Gravity Hooks, but, why not spend a little more, for a better quality, original product, and give back to the people who are doing the innovation in the first place.
I was lucky enough to be taken up to the snow for my 40th birthday not long ago, by my mum, who kindly took my whole family up for a long weekend at the Falls Creek snow resort in the Victorian Alps. Snow, in Australia? Yes, it snows here. Sometimes, in a few places. When we went there was a base-cover of around 80cm and it was forecast to be between -3oC and -6oC, with 24cm sow expected each night, or thereabouts.
It was a 5 hour drive, including an hour on the shuttle-bus, as we didn't want to go through the hassle of snow-chains and on-mountain parking, as well as windy, icy mountain roads. Leave it to the professionals, I say, and have a nap on the way.
That said, when we arrive mountain-side, it was sleeting pretty heavily, and continued to do so for the majority of the day. We lost a bunch of snow cover and everybody got damp. Some more than others. That's kind of what I wanted to cover in this post. What I wore to stay warm and dry. What gear I took. Now, I cheated to some extent in that I hired ski-boots, and the outer-layer jacket and ski-pants for when we actually went skiing, (my first time in 20 years, since I lived in Calgary, Canada).
However, I also packed accordingly, for the times I wasn't skiing, and I'm glad I did.
I've had quite some experience in cold climates, both Canada, the UK, Danmark, as well as holidaying and I know they key elements to not having a bad time are to stay dry and warm. Not always both, but if you are one, or the other, you can usually get by. Cold AND wet? You're going to have a bad time.
Here's my layered approach to a trip to the snow:
I wore as my base-layer, the Platatac fleece leggings, and DriFire long sleeve shirt. I don't have any fancy socks, but tend to get hefty heavy-duty socks from the supermarket and wear them to death These ones are Kirkland's,, from Costco. nothing special, but long lasting and don't get stinky.
I wore my Danner Striker ii GTX combat boots, which could do with a thorough polishing, but I hit them with a liberal coating of Kiwi boot waterproofing spray and they worked a treat, even when I stepped through slush up past the ankle. Be sure to open the laces right up if you're waterproofing boots, and get in around the tongue to ensure you don't miss any leakage points.
I looped the leggings foot-hole stirrups over my socks, so they didn't ride up, and I had full coverage from toe to belly-button. Tucking my shirt into the elastic waist of the leggings then carried that all the way up to my neck. No cold draughts.
For my outer layer, I took my snow-proven Propper Adventure Tech shell outer pants, which offer a wind and water proofing layer that I really appreciate. They don't have a lot of pocket real-estate, but I made do, and didn't either loose anything, or lack anything on my adventures.
Over the DriFire shirts, I wore the lightweight Propper windcheater which provided me a really good lightweight dry-layer, as well as having a good neck-seal. My one was a bit too shirt, so my super-long arms tended to poke out, but I had a plan for that anyway.
As my outermost top layer, I chose my Baubax multi-function jacket, which is a semi-hard shell with a hood and thumb-hole fitted wrist extensions. I'll be covering this in detail some time soon. It held the sleet off really well, although the cuffs and the wrist extensions got pretty sodden. They could do with a dose of waterproofing spray as well, I think.
As far as outer layers went, it was a spot on combination for what I was expecting, although had I wanted to stay even dryer, I should have packed my Hazard4 Poncho Villa but I erred on the side of less gear. I should have left out my spare 90's era snow-pants I got when we moved to Calgary, but I'll pack it next time.
For head and hands, I wore my Peruvian fleece caps, along with one or two Headsox to keep my neck, mouth and ears warm. I wore my dual layer, long wristed Condor Nomex gloves which I also gave a liberal waterproofing. That can of spray was an excellent addition and I can't recommend them enough. I think I shall trial a few different ones soon.
I wore a skiing helmet, to which I mounted my Contour Cam in its waterproof case. I gave the misty fogging Arena Flakjack goggles, with a smoky lens fitted, which remained mostly useable when I was skiing, but I needed to keep taking them off and wiping them off. The goggles really helped me have a clear and wind-free view of where I was going at upwards of 40kph downhill, who knew? I didn't hit ANYTHING this time. (I killed two aspen saplings at least, when living in Calgary).
All in all, I was really pleased with my loadout, but most of all, I can't go without saying that my favourite bit of cold-weather kit was the SORD StormTrooper belt-fitted muff. Not only did it's pockets keep my needfuls (like my Manta emergency strobe, CLIF bars, and the like), they also were a place for me to stuff my gloves, and also just plain keep my hands warm. Warms hands mean good-times.
It's been a while since I've covered a non-pouch, non-gadget, so I thought I'd cover one of my other staples. PANTS. Generally, I subscribe to the philosophy that "pants are tyranny"
I wear a lot of cargo-style pants, almost every set of pants I own in fact, not to mention my collection of cargo and tactical kilts. So when it comes to new pants, I have a few requirements and points I look for. I need to have cargo pockets that let me stow my iPad Air, at a minimum. I go to a lot of meetings, and use my technology heavily, but also like to go hands-free as often as possible.
It also helps to have copious loot storage when it becomes necessary. Snacks, shiny and pointies, discarded kit, whatever. Big pockets are a must. I also want strong crotches, as I seem to tear mine with alarming propensity in some pants, so good gusseting is important. The Genuine Gear pants certainly met my needs.
The military-inspired construction and fit of the Genuine Gear pants pulls from some pretty classic design elements. A zippered fly with button closure sits over the reinforced seat, as well as having all the seams, inseam, outseams and seat seams being "felled" which is to say double stitched. This makes them pretty sturdy. There are six pockets in the design, regular front pockets, twin button-closure back pockets with button flaps, and two large cargo pockets with double button flaps.
The bellowed pockets also feature drainage pockets and the pocket flap seams are fused for clean, professional look, however, I wasn't all that impressed with the outcome, as the flaps didn't sit flat.
In fact, the pants are billed as fade, shrink, and wrinkle-resistant, but I found them to take wrinkles quite easily and made them a little higher maintenance than some others I've reviewed. The ripstop material however, was quite resilient, and have both kept their colour and shape very well, and have resisted wear handsomely. They also feature adjustable waist tabs for secure fit which are a nice addition, as well as durable tape drawstring leg closures to keep rainbows, carnivorous cursed scarab beetles, dust and grit out of your pants.
The belt loops were a little narrow, which is probably the weakest point with these pants. I personally prefer thicker beltloops with more reinforcement sewn in, but they are still fully functional.
The fabric is very comfortable, and hasn't chafed or pinched on the inseams like I have had other pants do on occasion, so they have been comfortable for long hikes and adventurous clambouring.
They fit well, and were it not for the less than wrinkle-proof effect, I'd be over the moon with these, but on the whole, they are totally adequate, and robust enough for both outdoorswear, adventure and regular wear.
We had a scheduled power outage at our place over the weekend, which we had completely ignored, and it took us a little by surprise, but thankfully, we have gas-for cooking and hot-water.
What we didn't anticipate is the power-hungry nature of the ladies Pokémon GO running iPhone 5's. We might have lost wireless internet, microwaved cooking and refrigeration but they still "gotta catch 'em all!"
We were fortunate that even though the power-outage went 3-4 hours over time (apparently the pole-replacement was too big for the hole dug) it was not as cool as it had been, getting down to 5oC at nights, as all our inside heaters are electric. However, running the stove, boiling water in the PowerPot for hot drinks as well as generating power, and our collection of candles and lanterns for lighting.
Outside, I ran our BioLite thermoelectric stove much to the delight of Tactical Baby, who insisted in roasting marshmallows over the flames, whilst I charged yet another Lithium 4400 battery and phones directly. I cut wood to run the BioLite, as it only takes short sized lengths of wood and twigs before dark set in. We were preparing to cook by candlelight when the power came back on.
With good use of ambient light, not opening our fridges and freezers, and gas-cooking and water, we were hardly inconvenienced, and with my collection of thermo-electric power sources, we has device-running power aplenty.
This was a very interesting piece I saw, from the Walden Labs who offer "Solutions for Self Reliance" which I wanted to share with you all. I've reblogged from Walden Labs before, they have great content. For those of you who have ever been out fishing and are a bit of a klutz, there is the very real chance that you might have stuck yourself with a hook.
The folks at Walden labs found this clip from Total Fisherman which demonstrates five different ways of removing fish hooks that are buried deeply in a persons body. Total Fisherman goes as far as really hooking himself to demonstrate these techniques.
Warning: If you don’t like seeing fish hooks going in and out of skin don’t watch this video.
Published on Apr 24, 2013, he buries and removes five fish hooks from my hand, arm, and leg, to show us whether or not the "best" fish hook removal technique actually works.
It appears to be working by securing the base of the hook as firmly as possible, against the body, and after fitting a larks-head knot to the hook end and with a quick jerk, aiming to yank the barbed hook out with the tension in the metal itself.
Normally this is pretty bad-first aid advice, to pull a penetrating object out, and there is always a risk that pulling a barbed hook out will do more damage, however, in a field expedient situation, this is probably a better solution than trying to push the hook all the way through and cutting it.
There are all kinds of cool-guy articles about putting lead to steel at
the range, also many articles with serious-looking folks in pajamas
bending arms and throwing bodies. But something I haven’t seen a lot of
are action shots of the Japanese training method known as “tameshigiri“,
or practice cutting. Much like ballistic gel is used to simulate how
bullets react to human flesh for firearm testing, the practice of tameshigiri involves
cutting practice on a realistic simulation of human flesh, without all
the mess (and paperwork).
I have fifteen years of kendo
(Japanese full-contact fencing) and hold a 3rd Dan grading, but even
with all that my school never trained with live blades nor practiced tameshigiri.
So whilst I had countless hours of swinging at and hitting my
opponents, we did so in the knowledge that it was all blunt-force.
Again, we were simulating combat, and simulating cutting.
I am fortunate enough to know a senior instructor of a different art, iaido,
another modern Japanese martial art and sport that emphasizes being
aware and capable of quickly drawing the sword and responding to a
sudden attack.
But whilst its practitioners use metal blades, and at
advanced levels, live blades, they don’t participate in full-contact
opposed combat. Because, well, dismembering your training mates is poor
form.
They do occasionally practice tameshigiri however, to
test the techniques they are performing. The targets are made of wet,
tightly rolled tatami mat sheets, which need to be cut correctly or they
bind up or crumple, immediately demonstrating an ineffective technique.
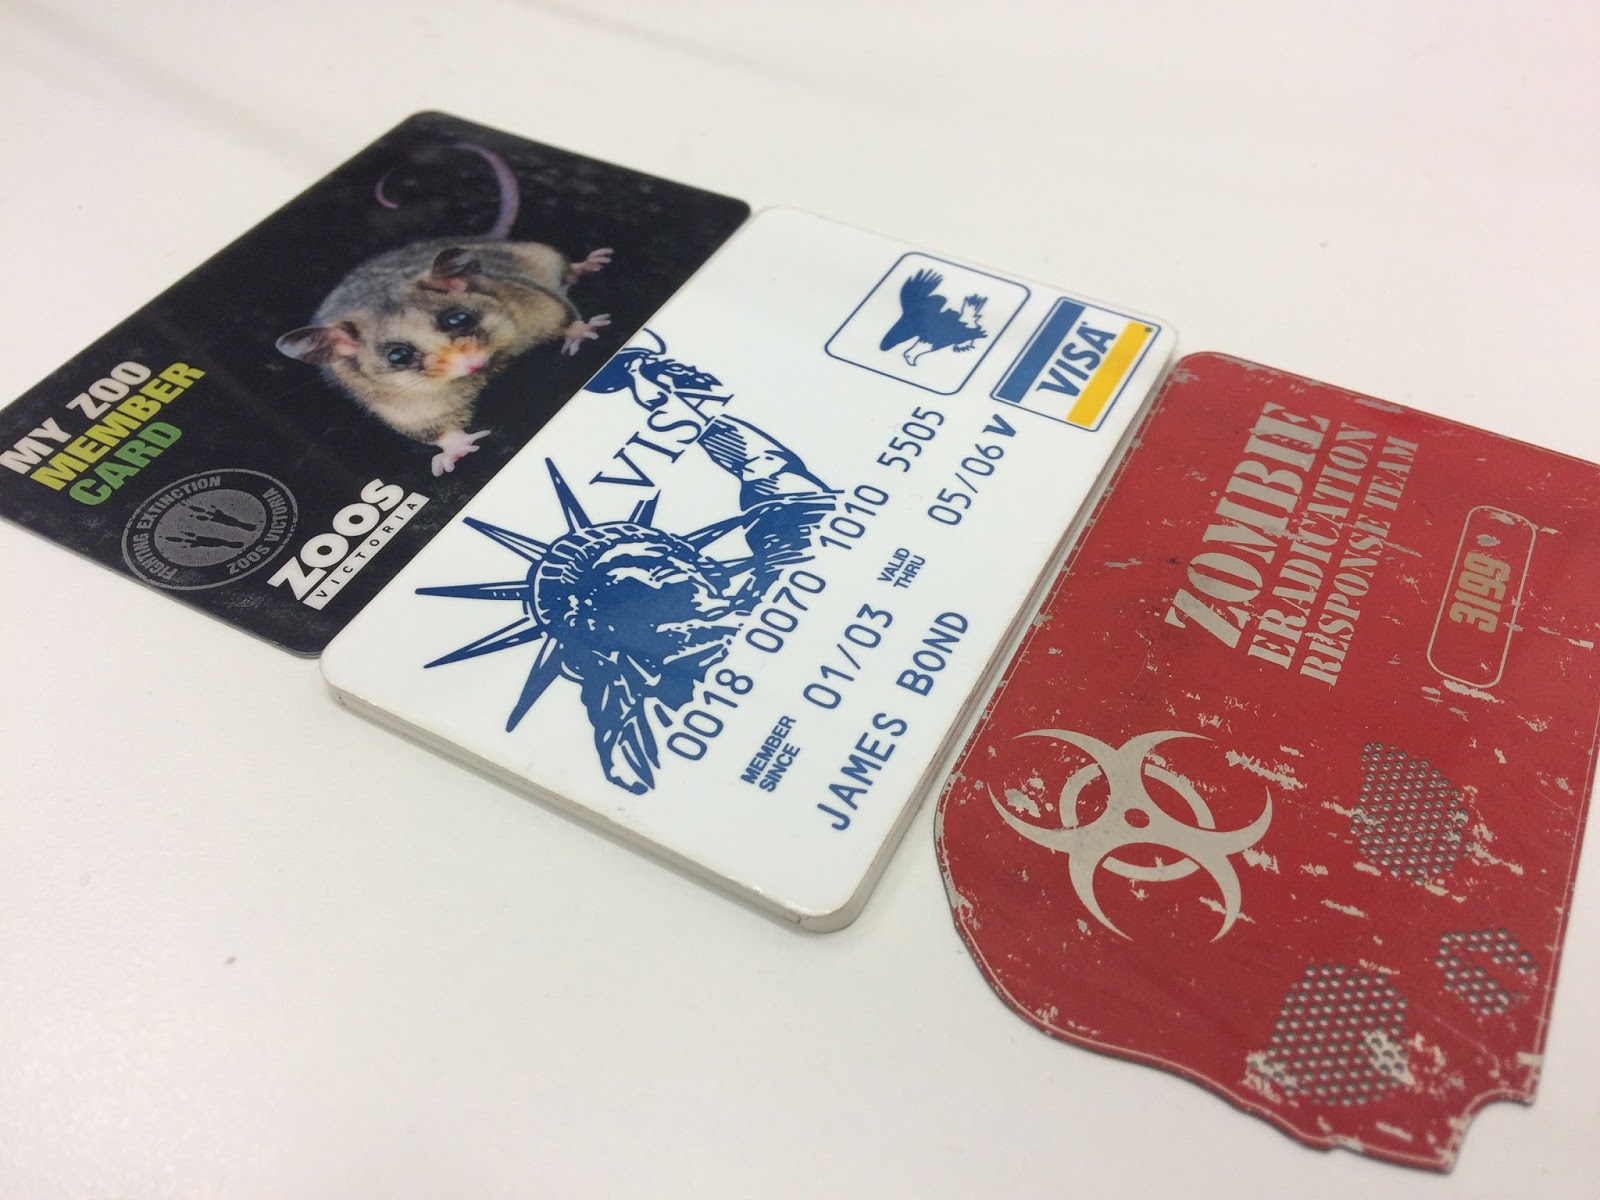
These appeared in my mailbox a long while ago, and have sat unobtrusively in my gear mound for a long while to boot, both in my EDC and in the Bunker, and I probably would have forgotten to report on them if I hadn't recently thought about other mystery arrivals I have had. It is a "concealed" set of lockpicks, cunningly disguised as a NQR credit card.
Labelled as belonging to a Mr Bond, James Bond, raises no eyebrows I'm sure, along with its not-quite right "VISA" and American Express looking skin. At least the numbers suggest it's expired, hey?
However, this cheesy exterior contains a clever design. Upon getting it out again, I fooled around with it for a little.
There are 5 tools secreted within the card exterior, 4 stainless steel picks, and a double-ended tension tool all cut from 0.035" spring stainless steel, which all fit into three cavities in the 1/8" thick card, which slide-slots into itself to seal your tools in (mostly).
This is a new kit, apparently available from the James Bond Lifestyle website (no, really) credit card pick set!There is an S rake, a hook, a ball and a full rake.
As far as as a set of lockpicks goes, I wasn't all that impressed. The press-cut tools were a little too thin and short to be ergonomic, far less so than my much shorter, but not flat titanium Bogota entry set from Oscar Delta or the heftier handled but really long professional set from HPC. However, I realise that these tools are designed for obfuscation, rather than strictly for utility.
However, they are functional enough that they pick locks, with a little more effort and less finesse than the HPC's, and with less comfort than the really well made Oscar Delta's.
I managed to pick some padlocks I found at work, and opened a desk drawer with them. Hardly 00 series tasks but then again, these didn't come from Q either.
As a last ditch back up set, or as a novelty to really task yourself by using less than ideal tools.
Still, there is a certain delight for having another set, squirreled away, and secretly waiting for next time I need them.
Every now and then a piece of gear comes my way through .... unconventional means.
One time an IR strobe mysteriously appeared in the post, another time the same thing happened with a set of lockpicks. Other times I have found gear discarded and added it to my collection (some would say hoard).
This time it truly was a case of "gear adrift is gear a gift", in that in the flotsam and jestam of my local beach, I spotted a water-filled bottle, and fished it out.
It was full of fresh water, and had obviously snapped loose, fallen overboard or been washed away, as the lid-to-bottle retention strap had been snapped away, and only a stub remained on the lid.
I am all for reusable drink bottles, and the clear-plastic, wide mouthed Nalgene's that I have been using for years have served me well.
That link is for a slightly different design, as the one that washed up appears to be no longer available but here is the Dead link anyway.
Apart from the obvious aspect of having a reusable and sealable water bottle, that holds a liter of water for hydration purposes, this kind of bottle also has the capacity for storage for any number of small needfuls to set it up as a survival cache or just as a waterproof storage system for those of you with phones or still use paper money still ...
As a reusable drink bottle, it is only 155g (5.5oz) Eastman Tritan co-polyester, which makes it both odour and shatter resistant, freezer safe as well as withstand temperatures up to 100 degrees for washing in a dishwasher. They aren't recommend for hot beverages as the plastic will become too hot to touch but make for a great hot-water bottle if you wrap a t-shirt around it once it's sealed up tight. Even after being lost at sea, and losing its retention strap, and being sandblasted rather thoroughly, its held up really well. The volume increments are still visible, which is good for measuring cordial or tracking how much I've drunk and how quickly, but that's not nearly as useful as the addition of moulded finger grip points on both sides of the bottle.
When you've just filled the bottle, or washed it, or worse, filled it AND washed it they get slippery. so having a textured gripping surface really adds value to the bottle. I dummy-corded a new retention string to my bottle, so I don't loose my lid, and have something to tie MY bottle down with, so I don't loose it overboard.
Certainly a good addition to my bottle collection, and the price was right, that's for sure.
Always be on the lookout for gear adrift, it's gear a gift. I'm still enjoying a number of items I salvaged off the Tough Mudder courses I've run.
Hot off the press, here is a Kickstarter project that was brought to my attention by its creator, Phillip Kauffman, who was the mind behind the ScrewGrabber Kickstarter, I covered a while ago. This time, in a totally different direction, he has a set of flat-packing trail fireplace, specifically designed to be mounted on a trailbike, or outside of a 4WD.
The concept is not dissimilar to other "fold-flat" grill systems, but this one is designed to be vehicle mounted, and as such, it is bigger, sturdier and rather than back-pack or pocket packable, to be accommodated by an existing mounting system. A rod runs through the middle, and clamps tight to give you a secure mount. The MotoGriddle is designed to use that same mounting system.
When folded flat, the MotoGriddle is designed to be mounted underneath the Rotopax jerry can system. Check out Rotopax system here: Essentially it's a modular locking system that lets you fix a range of proprietary jerry-can's to the back of a motorbike, ATV or other outdoors adventure mobile.
The original Motogriddle was very practical but a flaw became apparent; size. It was too small for a big camping trip. So the team scaled it up to create the 4WD and Trail Griddles. As a result, the 4WD Griddle is their new favorite in the Motogriddle line.
The original MotoGriddle (Small) for motorcycle mounting comes in at 9" x 13.5" x 5/8" when flat-packed, and 9.25" x 12.5" x 13.5" when set up. It weighs 5kg (11 lbs) without the top-plate grill, and 5.8kg (13 lbs) with the grill.
The Large for 4WD or RV carriage, is offered in either "4WD" or "Trail" patterns, but these appear to be aesthetic differences only.
When packed flat they are 16" x 14.25" x 5/8" and when set-up: 16" x 14" x 12". Bigger means heavier, so it's no surprise that they weigh 8.6kg(19 lbs) without the grill, and 10kg(23 lbs) with it. Hardly back-pack ultralight gear, but it's not intended to be.
Cut from 0.07" (3/32") A36 mild steel, these are intended to be for campers looking to comply with camp fire regulations. and have a complete solution no matter were they go. I've built fires in sand-dunes where you might despair for a couple of rocks to prop things up on, but with nothing in sight. This would be perfect.
Construction appears to be as simple as inserting tab-A into slot-B a couple of times and you're ready to go!
Both the 4WD and Trail Griddles easily accept pre-cut sold firewood, making preparation for a camping trip simple. With the larger size you get a larger cook top, more heat, and more light. Built in folk holes for levering off the grill-top for adding more wood and skewer-notches add to the functionality and really present the thought that has gone into these products.
The practical uses to the Motogriddle, the 4WD, and the Trail Griddles seem endless. The makers have used the Motogriddle on motorcycle trips secured by the Rotopax mounting system. They have also used the 4WD Griddle in campgrounds that had fire pits solely so they could move the fire where they wanted it.
Its a good looking invention, and whilst not the first of its kind, the inclusion of the Rotopax mounting system and overall size make it a very appealing project for those of us who camp from vehicles.
I wanted to give the guys behind Platatac another shout, as I haven't had the folding cash handy to add to my gear-wall in the bunker for a while (damn life expenses!) but they have some cool and useful new gear out there and being fielded as we speak.
One of these is the daypack sized G2G of in keeping with the Platatac tongue in cheek naming convention, the Good-to-Go.
The Platatac G2G pack is one of the lightest packs they’ve released to date weighing just 715g (25oz) with straps. Designed with a low profile exterior void of any MOLLE it is great in the field, on and off base environments, not to mention when you want to keep a low profile in an urban setting. Much like the Nomad line of bags they have.
This pack looks perfect as a lightweight day pack, being small and lightweight so it can be stored in the top of your pack and grabbed out to carry rations or needfuls when caching bigger long-haul packs. It is also perfect for use as a day-to-day back pack for the carriage of gym clothes, food, documents, it will happily fir a standard 13" laptop and other similar sized items.
This pack features a capacity of around 26L (1586Cu. inch) in its main zippered compartment containing one mesh pocket and a 3 litre hydration bladder sleave with hook and loop bladder hanger. On top of the pack is a bar-tacked hydration tube/cable routing port. This keeps grit, gunk and crud out of your pack, whilst letting you access your hydration, and run cables.
Externally, the pack features one zippered pouch for quick access to items such as gloves, pens, keys, ID, food and batteries. Externally Platatac have also added a cinch cord system for bundling up garments such as the Platatac Harry series of jackets.
Also the pack includes side tensioning straps for when the pack is full to capacity, especially useful if you are a gear hoarder like I am.
The pack has a very small pack-down size and can fit inside anAlice Pack's External pockets (with straps detached).
The G2G pack has been constructed from a mix of 500D and 1000D cordura for heavy duty abrasion resistance. Platatac have utilised a lightweight foam sewn in chevron patterns to provide structure and padding without affecting the ability to fold the pack up for storage.
A heavy duty grab handle has been made from 38mm web tape and has been flag stitched for strength.
Here are its vital statistics: the main pocket: 460mm (H) x 320mm (W) x 180mm(D). The
front pocket 190mm (H) 210mm (W).
Inside the main pocket, the internal mesh pocket 120mm (H) x 23mm (W).
The G-2-G also features a 70mm x50mm hook and loop field for IFF, V-Lite, or just morale patches.
As well as reinforced stitched drainage grommets, the G-2-G also features Bar tacking on all major sew points, reversed YKK zippers to keep crud out of your gear, and industry standard and trusted ITW Nexus plastic hardware, throughout.
One of the things I really liked about the G-2-G line, as well as its subdued, no-external PALS/MOLLE webbing, are its range of regular-guy colours; as well as five kinds of camouflage, beat-cop blue, as well as a khaki, tan, ranger green and grey and black.
I really liked the looks of these, when I checked them out in the retail shop, and at the SSAA SHOT show, and thought that there would definitely be a place in pretty much anyone's pack line-up for a bag like the G-2-G.
Check it out, and perhaps throw Platatac some interest. The more they get, the more they will innovate and develop new packs like these!
ZU do small batch runs of their knives, usually on pre-order. They are an Australian owned and operated edged tool manufacturing
business, who specialize in CNC manufactured, industrial strength, edged
tools. All their products are 100% Australian made, with the entire fabrication process being local, from the initial
machining right down to the final edge sharpening. They use high impact
tool Cryodur 2379 (D2) steel for all their knives.
This is the Nomad, their new piece, the blade is 10.2cm (4") long and 0.6cm (1/4") thick. The handle is just over 4" long and just over 1cm (3/8") thick. A deep fuller down the blade and a skeltonised handle of this single CNC milled-piece cut the weight down to just 147g (5.1oz) without sheath, even with the large ring at the pommel.
The Nomad, like all the ZU Bladeworx blades are double tempered and cryo heat-treated with a black oxide finish (although there is an optional battleworn finish which is rubbed down black oxide available).
Double edged, this is a serious fighting knife, and comes with a kydex sheath with a friction lock. Being double edged makes it a dagger in Australian law, so be advised if you are intending to get one, and be aware of your local laws, but there''s no denying it's a rugged looking piece.
All our ZU Bladeworx' tools are warrantied against manufacturer defects and damage
during normal use. They expect their tools to be able to handle abuse, but you need to be sure to remember the warranty only covers against reasonable use, not deliberate
abuse! They are hard tools, for hard use. My Mechanik doesn't get nearly enough use, but when it does, I know I can depend on it.
I wanted to have a go at making rope from plastic bags, a project I had seen online from a few sources, like MAKE magazine which I had a subscription to for some time (thanks Wombles) and Instructables, both excellent sites for finding crafts to engage in, especially to check out a range of ways to do similar things. There are certainly projects that would suit a range of needs, check them both out.
I started collecting plastic shopping bags when we went shopping, bags I would have ordinarily recycled either when we did our fortnightly recycling bin, or back to the supermarket to the dedicated bag-recycling point. I also had a friend bring a butt-load of them as well.
The primary construction of a strand of bags rope is to cut the bag from the bottom of the handle loops, on both sides, down to the bottom sealed hem. this gives you a double loop of plastic fabric, that is very sturdy in the up-down axis.
It's possible to then loop one bag into another with the working bag looping through the exposed loop of the standing bag, and then through itself, and when the knot is sured up, a very solid join is made.
Repeating this process, with a fresh bag being looped into the end of the standing end, the chain is continued for as long as you want. I wanted to braid my strands, so I created three fifty-bag chains, and lined them up. This was a mistake.
I found that having the full lengths meant that when I was braiding the lengths were constantly getting tangled with each other.
My solution was to bundle up the three lengths into some of the heavier bags I had left over. These gave me a far more manageable bundle to braid with, but were still bulky.
A far better idea would have been to make short lengths of 6-7 bags long and added more as the braid progressed.
One trick is to ensure that the three chains are off-set such that the knots don't bunch up in the braid, and this gives the rope something that ALL "primitive" non-monofilament ropes benefit from. Weakness in individual strands are overcome by the braiding (or twisting in twisted ropes) and whilst there may be individual components of the cords that have damage, or weak points, the overall effect balance that out, and supports itself.
One thing I found during the braiding process, I encountered many of the sides of the cut edges hanging outside the braid, and these tags of plastic can be woven back into the rope fairly easily. Where I could, I knotted them and ensured they would not spring loose. I could have twisted the chains in order to capture the tags, but that would have increased the effort needed to make the rope considerably. All in all, once I had my three strands of chained bag-loops, the weaving process took around an hour, and was a reasonably simple process. Keeping a uniform braid is the key aspect for this, and those first few meters were the hardest to keep even, mostly because of the super-long chains I started with.
Making the chains was another time consuming but simple process, light work made quick by my Big Wet cyberpunk pals one evening as we watched John Wick (epic, awesome movie!) one evening. Ensuring the side-seam cut was correctly made, and didn't cut too far to either side, leading to failure of the loop, was one problem, and lead to some wastage. Generally, the plastic gags were remarkably robust, and the chains themselves were quite sturdy, especially if given a slight twist to gather them up.
Once braided, the resulting rope was really quite sturdy. I was able to loop it over a post and pull on both ends with all my strengths without any problem, and lean back with all my weight on it. I had hoped to get some better way to test it, but I'd say that for a static load, they are quite stable. I suspect they could be used for any number of lashing, binding or dragging tasks, but I wouldn't want to use them for any life-sustaining tasks unless there were no alternative.
So, from approximately 150 bags, I made a 10m length of braided, 3-strand chain rope, purely from salvaged shopping bags. None too shabby.


