Thursday, December 29, 2011

Review: Gerber Bear Grylls Basic Survival Kit!

I came across a pretty good deal the other day on Catch Of The Day which I thought I would share with you here. I'm not usually one to buy into the "celebrity swag" but looking at the contents listed, I thought this would be a good investment, not only for my own collection, but also as a guide for what goes into a good "survival pack". I did Outdoor Ed whilst living in Canada, and I've kept a variety of packs going over the years. I've seen the Bear Grylls show, and some of the products that have been branded with his name, and whilst I may be skeptical of the contents of the show, I most certainly enjoy the extremes he is willing to go to to prove what one could do to survive. I also enjoyed seeing the swag of Gerber tools including Bear Grylls branded kit on AMC's "Walking Dead" but that isn't quite where we're up to yet. There is more to survival in a disaster than just hacking and chopping (as much fun as that may be). Other needs need to be met, and a kit like these can go a long way to seeing to those.

Included in within the bright orange ripstop baggie is a second, waterproof bag and the following: a signalling whistle, always a good inclusion, as yelling is hard, and anyone can make a loud noise with a whistle. I have a three year old, and if she can effortlessly give an ear-splitting whistle with it, so can you, even if fatigued, injured or otherwise occupied. a packaged set of long beaded matches and a striker, good for getting a fire lit in less than ideal situations. A cotton ball, for kindling. Waxed twine, which has many uses, be it binding, mending or setting snares. The copper wire is just that, snare wire, not easily chewed by the poor unfortunate critter that will serve as an impromptu meal, but much hardier than just waxed twine, a length of nylon cordage which whilst not paracord, would serve in a variety of circumstances, and is light and bright. A Bear Grylls branded fire steel and bottle opener which is a great addition to any kit, as they are all-weather, very long lasting sources of of fire.
Also included is a very sweet little Gerber Paraframe-Mini blade, sporting a drop point, half serrations, a skeletonised handle and frame-lock. This hungry little knife makes an excellent addition to any survival kit, so much so that I tried to push it on my partner to be part of their EDC, but was admonished to leave the kit whole, as intended. The final part of the kit is a little booklet with Bear's how-to's. I haven't had a look yet, I'll leave it as a surprise for when disaster strikes.

I haven't decided where to keep this kit, but I'm glad I have it.

Wednesday, December 28, 2011

Review: Opt Silicone Armor iPhone case

When I upgraded to my iPhone 4S, I decided that I needed a new, rugged case.  I had looked into a Kickstarter program for a rugged, waterproof case, but when the big fuss over what the iPhone 5 would be like when it was released, and I chickened out. big mistake. There was no 5, and the 4S as we all know looks just like the 4. So I backed out, and thus, missed out. In the mean time, I needed something that would protect my new shiny iPhone. In my foray into the local iPhone skin shop, I came across this. Here is the Opt Silicone Armor Case. This isn't the first semi-rigid rubberized iPhone case I've had, however I think it is the best one I've had.

It has a grippy texture, rather than being slick, with ample knobby structures to give it positive hold in my hand, but not so much as to make it snag when withdrawing it from ones pocket. The case itself has openings at the back for both camera and flash, and an opening to show of the Apple logo, but fits so snugly that I haven't had an issue with dust accumulation. The earphone jack and mic opening is also sufficient for every headphone I've used with it thus far (a problem I've encountered in past) and the data port at the bottom works on the bases I have.
Most impressive however is the wire exoskeleton that holds the whole thing together and gives it its rigid structure, as well as protecting the corners (a common breakage point, I've noted). It also gives the case an attachment point for the included webbing and carabiner, which is an excellent means of retention. I clip mine onto my vest harness, along with my keys. This not only keeps my phone from falling, but the distance it gives is pretty much perfect for me to check my phone for messages and access to apps, all with "drop everything" security. It isn't the full immersion case that I was initially looking for, but it's sturdy, grippy and latches onto my kit, belt, bracelet, whatever. Good compromise, and keeps my shiny toy safe.

Monday, December 26, 2011

Review: CountyComm Breacher Bar

Here's another awesome piece of steel from the good folks at CountyComm, who's keychain-tool goodies I have reviewed previously and i wanted to write about here. This is the EOD Robotics Breacher Bar. When I first saw this, I initially thought it was a solid blade with an unusual flat tip but after further investigation I discovered a much more interesting fact. It's a pry-bar, chisel and chopping tool all in one. Made from a single slab of 1045 high carbon steel and reported as being  heat-treated to a Rockwell hardness of over 45, this is a very solid piece.

Because of it's hardening,  it can be hammered either along the spine, or at the base, to chisel, puncture or get good purchase for prying.
There are four holes drilled in the body of the handle, three centrally, with two at the base and two along the midline with one diagonally offset. This offers a variety of attachment points for adding code grip and lanyard loops for retention. I opted for paracord, using one of the patterns is saw on CountyComm's website.

I really like the feel of the solid utility this piece offers the hand, which very nicely corresponds to functionality in the field. I've used it to pry apart packing crates, lift the corners of heavy stacks and pry jammed doors and windows. I also wear it on my webbing as it fits nicely between the bands of MOLLE, (such as this piece of Platatac accessory strapping) and adds to my carriable tool kit when I am out at my Stargate LRP events, looking for all the world like a knife, without the edgy risks. This is great tool for all kinds of close-at-hand breaking, opening and smashing where a bigger tool is either overkill, or impractical to carry about.  Be warned, it it -not- stainless, and will require some maintenance to remain rust free.

Here is a movie that CoutyComm put out, demonstrating some of the features and uses of this awesome tool!

Review: Packlight

I am a firm believer in the Kickstarter program which enables people with great ideas but no capital to ask for backers to see them to their seed money. One such project was by the folks at Big I Design who had the idea to pack 45 high performance LED's into a flexible silicone body, make it USB rechargeable. I knew I needed to be a part of this, so I backed them. The reward bundle that I chose was pretty awesome, in that I got two Packlights (one red, one black) with USB charging cords for each, two packets of  Reflective tape and as an extra bonus two Solar Recharging Units, complete with plugs and fittings to recharge mini-USB, phones and iThingies. Pretty awesome bundle. 
I like the idea of a water resistant light source, that I can strap or affix to things and leave there to illuminate. Torches are great, but are not always the best tool for the job. The flexible body of the Packlight means that I can bend it across the back of a pack, the trunk of a tree or onto a wall. Each light has two hanging holes, which will fit a good sized carabiner or loops of paracord lanyards. The ends also house neodymium magnets, the "thin" end makes sufficient contact to support the whole unit from the side of a fridge under its own power. 


One of the most exciting things about the Packlight are its variety of lighting options. A tap of the power button gives a low output illumination of 1, 2 or 3 of the columns of LED's, as a battery life indicator. Holding the power button brings up the lights to full with the following options: Full Power, Outer 2 Columns, Middle Column, All lights flashing in a 1.5 sec interval, all lights flashing in a strobe pattern, rotating column (1, 2, 3) lights, SOS of all lights.
They are -bright- with a listed output of 260 Lumen, I see stars after looking at it.The lights come in at 330g which i think is pretty good considering the size and functionality that comes with the package. 

Aesthetically the only downside is the battery-pack/circuity node, but all that power and programming has to go somewhere, and when strapped to a backpack, I'm sure I wont care. We'll have to see how the USB plug pans out, I have a feeling I will want to tape it over if I know I'm going to be rained on a lot, but otherwise, an awesome addition to my adventure kit!

Sunday, December 25, 2011

Review: Ontario Black Wind

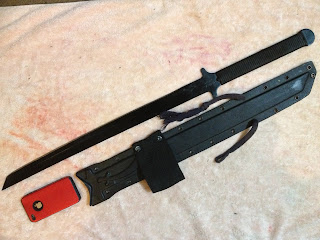
Say hello to my little friend. This is an old faithful of mine. Let me introduce the now discontinued Ontario Knife Co.'s Black Wind.

It came into my collection when my parents moved to the coast in 1999. Their house was surrounded by tea-tree (which for the non-Australians, is a dense, scrubby tree) and they wanted a path cut to the beach. Sure I could have used a machete, but I'm a two-hand blade kind of guy. I could have used a chain saw too, but that might have alerted the neighbors to our plans. I had seen this in the display at a disposal store in the city, and decided to offer my parents to cut the path for the cost of the tool to do it. They were dubious. Dubious that I could clear them a path, dubious that I could do it by hand, and dubious that I could do it with a sword. It took me about 45 minutes, and I cleared a path wide enough for two to stroll down, with overhanging branch cover, for about 170-180 meters, in about an hour, through to a clearing which led to the beach.

The blade is a single piece of 1095 steel, 76cm from tip to end. It has a short cross guard built in, and a tightly wrapped paracord grip. The whole sword weighs 900g. It is both marked and was marketed as a "katana" and whilst it is a gently curved, single edged, two handed blade, it isn't really a nihonto it is however, more than a machete. I was cutting tea tree tree trunks and branches as thick as my wrist in single cuts. The entire piece is powder coated with black paint, except the edge, which was razor sharp when first purchased and appears to have been sharpened with wire brushes, as it had many micro-serration like lines along the whole length of the edge. It sheen many years now, and lots of chopping later, and I gave it a test cutting not too long ago and this is the result... Bamboo shinai slats, dry but very flexible. The one in the middle was shattered (hence why it was replaced) but as you can see they all cut very convincingly. It's weight fills the hand nicely, the balance is well suited for both one or two handed wielding, and whilst a little shorter than I am used to, this rigid and stiff blade makes short work of any gardening tasks I've used it for. It comes with me on every camping trip I go on.


The scabbard is kydex, and comes with a wide webbing belt loop, and several kydex loop fittings on the back and fed a length of himo to assist in tying it off. I moved the webbing from opening at the top of the scabbard to fitting it through the included eyelets around the middle balance point, so I can wear it on my belt in approximately the the right position for a katana, blade up. It has an odd scimitar looking pattern pressed into it, which was odd. The blade is held into the scabbard with a very secure and easy to fit by friction alone. It's never come undone inappropriately, and with the adjustments, sits on my hip very comfortably. I've found that when cutting through thick or tough material it can be a bit jarring, as the paracord doesn't provide much padding for shock resistance, but does give a good positive grip. This is the blade I leave by my bedside. I have far nicer swords, but I can trust the Black Wind to do what it does. It was marketed at battle ready and I have no doubt it would excel at that.

I call it my Tree Chopping Sword, and until I lay my paws on a Zombie Tools blade, this is the tool I'll be reaching for to cut my way to freedom and survival when the dead rise.

For Christmas. Zombie Christmas....

Friday, December 23, 2011

Review: Platatac CSI Folder.

Before I get into the more juicy and hard-core content from my friends at Platatac I thought I would cover what is probably an unsung winner in their range. Let me introduce to you the Platatac C.S.I. Folder This is an zippable, A4 capable folding administrative binder. I got mine in khaki, as its unobtrusive in my work environment, but still fits within my aesthetic (healthcare IT fixit-booyah, in case you were wondering). You'll note that as well as the subdued Platatac plata-skull logo on the front, which I love) there is a large square of hook-and-loop for patches (AFT's Ranger and MilSpecMonkey's Zombie Hunter decorating mine) and a business card holder. The whole folder is made from Cordura, the same as all of Platatac's gear. I filled the carry handles with a couple cable-ties each, giving them a little bit more substance, and ensuring I always have a few more at hand, JIC.


The folder zips open fully to reveal a variety of storage options. On the right hand side, a clip board which is backed with some sort of semi-rigid material. The left hand side is where the action is! There are 4 card holder sleeves, in two of which I keep my work and personal business cards, the other two I've stored cards I've collected and ID when needed. I found that my cards frequently spilled out, but a small clip sorted that. There are three pen pockets, and a larger pocket that I keep a multi-tool and yet more cable-ties in. 

A firm believer in redundancy, I have a small adjustable wrench and another tiny multi-tool with LED attached to that pocket via a recycled HDD magnet. There are two small general purpose pockets, (one with a hook-and-loop closure, the other with elasticized mesh), in which I keep memory-sticks, a Dexim iPhone battery ,  spare headphones, needle and thread, electrical and milipore tape and safety pins. All things I frequently find need for. I also keep a permanent marker and have recently added my fully awesome UV laser to it. 

There are also two internal document pouches, one opening at the far left, which is accessible when the folder is being carried, if the top is left unzipped. I store a variety of paperwork here, as well as my iPad, which has been a real boon, not only providing a case for that, but also giving me a handy place to stuff paperwork that comes my way. The second document pouch opens between the general purpose pouches and the pens-and-cards pockets, essentially a secret compartment, where I store my sensitive papers and infrequently needed items.

The final feature of this folder is that behind the left hand side of the folder, and closed by sets of hook-and-loop, are two middle-seam opening plastic map windows, which are capacitive, i found, and not only have been useful to use when orienteering, but will also protect my iPad for use "in the field" in the rain.

I love this folder, I've had a few over the years, but I can honestly say that I can not expect to retire this, unless Platatac comes up with something even better! Boardrooms or bushwacking, a very solid piece of adminstatum!

Wednesday, December 21, 2011

Review: Crumpler John Thursday 100

 After my last Crumpler review I got some good feedback from the company, and thought I would go on to review the other things of theirs I have. It seems I'm all about brand loyalty, where its due. In this case, I feel totally justified. So, here we go. 

This is the John Thursday 100 pouch. 

I bought it sometime in 2003 I think, to go along with my very first digital camera. I had already had good experiences with Crumpler, having one of their plain black original messenger bags (which I've regrettably since gifted away) and wanted something to secure and protect my precious new tech. After a little umming and ahhing, I settled on this little guy. It matched the colours of my original bag, which was nice, but also fitted my camera really well. 

Neoprene in the body was not only elastic to hold it in place, but offered padding, which I felt I would really, really need, given the adventurous clambering I often do whilst fully kitted. Sometimes you just NEED to be up that tree with your camera and packed lunch, you know? I did try several pouches, as I recall, but settled on one that matched my other kit, and had the happy kokopelli looking logo. It helps that the Kokopelli mythology rings a very sweet tune in my rather multicultural ear. However, on with the pouch. Lined with the same 300D rip-stop liner and1000D Cordura outers as the other Crumpler porducts, coupled with neoprene this pouch has never given me pause to worry about falling apart, or exposing my toys to harm, but the lid does not cover the entire pouch, leaving the insides a little exposed to incidental rain.  An internal pocket in the lid has ample room for the SD cards of the day. Both the lid and the internal pocket are hook-and-loop closures.  

On the back, the pouch has a openable, double sided hook-and-loop closure for a belt loop, and a lanyard loop at the top which offers two means of attachment, although I've always used the belt loop. That double-sided hook-and-loop is the only drawback, as some of the stitching lifted after time, needing to be re-sewn to ensure positive closure and retention. The pouch fits nicely over the shoulder strap of my messenger bag, as well as on my hip. It even feeds nicely into MOLLE and I've worn it as a part of my Stargate LRP kit when i still had space for it, and nothing that filled the same purpose that matched. Now that I'm using my phone as my primary camera, I dont have as much need of a camera bag, so I'm looking to repurpose it. 

Snack-pack is likely!
Related Posts Plugin for WordPress, Blogger...