Wednesday, December 4, 2013

Review: Excel Physics - APOC mini radiation detector

I'm a scientist by training and inclination, if no longer by profession. I love measuring things. My phone has all manner of measuring and mapping apps.

When I saw on Kickstarter that a pocket-sized radiation detector was coming up, I was thrilled. Following on from the 2011 Tōhoku earthquake and tsunami,
and subsequent Fukushima Daiichi nuclear disaster, it seemed that having my own gamma and high energy x-ray detector would be a great addition to my burgeoning toolkit.

The APOC Mini Radiation Detector Kickstarter fit that bill perfectly. The people of Excel-Physics put together a very compact, and easy to use package, which they offered in kit, or "built" forms. Being  pretty much devoid of electronics experience, I opted for the "built" kit.

When it arrived, I was delighted to find a very robust package, with a couple of connector cable, and a bridge component (which came in handy, as I needed to add it to make the device iPhone compatible.)
The clear plexi-case allows you to see right into the device, the circuit-board, wiring, batter pack, speaker and LED indicators, along with the copper-foil covered detector.

It features both a human readable LED/ speaker setup, with blinks and a "click" for each measured event, as well as a "data" setting that feeds to a device via a 3.5mm mic jack.

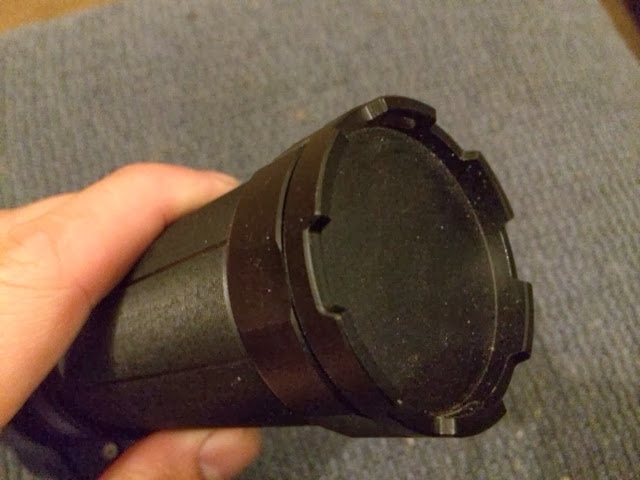
A simple Off/On/Data switch lets you change between settings, and on the other side, the data-port for the data cable. Access to in innards ( to change the 9V battery, or to adjust the sensitivity, if needed, is by unscrewing four little screws.

A cut-away on the bottom (in classic radiation trefoil format) gives a nice accent to the detector array.

I connect my detector up to my iPhone, using several apps, (Spectrogram and iOS7 Voice Memos) to track the "clicks", although I am waiting on a purpose built app to be put out by Excel Physics ...

Primarily a gamma and x-ray detector, it will also detect alpha particles (such as found in household smoke detectors) but can pick up interference from Bluetooth devices, according to Excel Physics. The old brick building I work on gives me more background clicks than the even older weatherboard I live in, as expected.

I have used this at home, and been pleased to see the LED flash every minute and a half, or so with its characteristic "click", but wanted to give it a real test, so took the whole lot into work, and visited the Diagnostic Imaging / Radiology department, and spoke to my pals in the "hot lab". They were bemused at the idea I had my own personal radiation detector, so were happy to point me at some "sources" to scan.


So, as you can see, I had a lot of fun with it. Between the rather rapidly decaying medical radionuclides and the strong but slow long half life Cs137 we got some great signals. I'm still trying to work out the best way to record and display the signals I get, but at least I have a portable, cheep to run detector for all my Mad Max water testing needs!

Monday, December 2, 2013

Events: Two years!


Two years ago, one of my lovely partners, Omega said I should start blogging about all the gear I had been collecting. It had been a whiles since I had done any writing,and I thought I would give it a shot.

For a while I worried about Impostor syndrome, as unlike many of my peers in the blogoshpere, I have never had military service, or LE service. I'm not a paramedic, firefighter, SES worker  nor any kind of professional hero. I'm just a guy, who likes camping, MilSim roleplay and has lived an exciting life in exciting places.  I feel the weight of your scrutiny heavily, and just stick to my guns, knowing that I have an opinion, have critical thinking, and a message to spread.


 I started this blog, in the beginning, with my manifesto such as it was, that I would cover gear, situations, preparation and the mentality of becoming "Apocalypse Equipped". Not with any clear suggestion of impending doom, but rather, "what if...?"

I'm not overly concerned about any given event, I don't really consider myself a conspiracy theorist, or any more connected to the data, but instead, I like to take my day to day life, and see if I can improve it, to suit the tumultuous world around us.

100 posts in, I did a recap, and again at 300 posts (This. Is. BRIGHTON). I was pretty excited when I clocked over at 100,000 page views,  and am constantly amazed at my daily, weekly and monthly  tally of hits.

I owe a lot of thanks to the fine folks who have supported me, either big companies who have sent me gear to review, or individual kit-makers who have cut me a sweet deal, and even just the folks in-store who have been kind enough to hear me out when I've asked "I want to put 'this' into 'that', and be able to hang upside-down ...." or let me guest-post on their blogs.

Last month was my best-tracking month yet, and I had a very gratifying connection with someone who has directly benefited from reading, so I hope that I can keep up the interest, as well as keep on top of my own prepping, and writing!

It's going to be a hot, dry summer here, so I'm sure I'll have lots of inspiration.

Stay safe, Ready For Anything!

Friday, November 29, 2013

Review: Hazard4 labs - Poncho Villa

With the fickle Melbourne weather, the prospect of being caught out in the rain in the afternoon, following a bright sunny day is all too common. Wearing a coat is all good and well, but can be a bit of overkill day to day. I have kept a poncho in my bags for years, for this very reason.

When I saw that Hazard4 Gear had produced a modern, fully featured and rugged poncho, I was all over it, and just had to wait for it to go into production, from early rumors and show-demos.

This is the Poncho Villa, a sombrero-tip to the prominent Mexican Revolutionary general, Pancho Villa.
 
I finally managed to get my act together to order one (along with the Ventrapack admin case and the LaunchPad iPad sleeve.) I was not disappointed.

This poncho is a far cry from the crinkly vinyl or shopping0bag style plastic material of others I've used, instead being constructed from a sturdy water-resistant/breathable soft-shell fabric, (86% polyester 14%spandex), with 4 way stretch, and a polyester lining layer.

It features fully-taped seams that are reported to be 100% waterproof, and rugged enough to be used over and over without splitting or tearing, let alone leaking when you need it least.

I was really impressed with the design and the additional features that really make this a technical garment, and not just a plastic bag with a head hole.

Loop fields on the shoulders give you a large unit ID display area (and the cut is such that it falls nicely, and prominently. I have my large Z.E.R.T. 702 shield here, to give you an idea of scale. There are also two much larger panels, for "agency style" patches, as well as a panel on the back of the hood. Lots of ID infrastructure there. I liked the CHEF patch from my new BBQ apron ....


 The hood itself houses some great features. Cinches are found at the base of the skull, and two at the throat, offering quite the variety of adjustment. All three cinches are concealed behind hook-and-loop panels, to ensure snag free operation, and the cord-locks are sewn into the garment, to give even more control. 

As well as having a hook-and-loop closure, the chin panel also has a hefty zipper, which really makes the whole poncho button up tight. 

On top of that, the sides each have two press-stud snaps, to prevent it flapping about and keeping you extra dry, as well as there being large grommets at each of the four corners. Each of these are heavily reinforced and independently stitched in, no more torn eyelets when using a poncho as a bivvy!


Between the modern materials, and the clever tailoring, both the introduction of the loop-fields and the cinches, as well as the jacket-like fit of the shoulders, this is a great improvement in design over the original versions.

But wait, there is more!

That big pocket on the chest, under the front loop-filed, is big enough to happily store my iPad, and a bunch of other items, kangaroo style, and features dual hook-and-loop closures (although I was a little disappointed to see these in black and not colour matched as all the others had been). The pocket also features a single, double sided zipper. Double sided? I hear you ask...

The kargaroo pouch doubles as a storage pocked to fold the entire poncho up into!

When self-stuffed, the outside features this descriptive info sheet, but is normally hidden away inside the pouch it becomes. The bag in this format has a lanyard anchor loop for hanging, and a drainage grommet for ventilation.

When stuffed into its bag, it measures 30cm, (12"), 24cm (9") by15cm (6"), but this can be compressed a fair amount. Bulky, but not a big issue. It also makes a great pillow!

I wore it camping, I've worn it in the rain, and in the wind. Its very comfortable and not at ALL like wearing a plastic bag.

With the hood up you have excellent coverage, although I found the material of the hood was a very strong sound insulator.

The fit of the poncho was excellent. I'm a very tall critter, at 193cm (6'4"), with extra long arms, and I get very good coverage in the rain.

All that coverage also gives the poncho another useful characteristic. It allows you to throw it on over a pack and not only cover the pack, but also maintaining the shelter for my legs. Even when wearing a pack OVER the poncho, there was very little loss of coverage, except for about the forarm-to-elbow area.

I really like this garment, and almost look forwards to the spring rains we are seeing the ends of. Summer trains will be an adventure. Even autumn and winter rains will be less arduous with this.


Thursday, November 28, 2013

Home Front: Pervasive mentality


I know I spend a lot of time talking about gear. Packs, gadgets, clothes, pointy things, and this is a really important part of the message I like to get out there to you all, but obviously that's not all that it is about. Having the right gear is only part of being "Equipped".

For those of a gaming bent, you'll already be familiar with the idea of "stored" vs "equipped" gear and items. Having the right goodie is totally different to having it to hand.

Take this pile of loot: All on me, all day long, more or less.


Great, but what about the bag you left in your car? where IS your car, how do you get to it, and once there, how do you get away from a crisis?

I tend to take a photo of the bay my car is in, so its on my phone in the event I can't find it, or need to relay that information along.

That kind of thinking, which my friends at Oscar Delta would refer to as "Disruptive Thinking", and I am all for it. Know your exits, and as Gen Mattis, USMC (ret.) was once quoted as saying "Be polite, be professional, but have a plan to kill everybody you meet"
Harsh, perhaps, but certainly through provoking.

I live in a very permissive environment. I can for the most part, go where I want, when I want. There are some places that I can go, and things I can do that I might not be supposed to, that I am able to, without dire consequences. I'm lucky. I also know that that might change. Access might be blocked, briefly, or permanently, through cataclysm, legislation or hostility.

The best I can do, is to try to be ready. to be mentally prepared, and aware. To be trained, and tested. For me, that also includes passing this mentality on to those around me, even very subtly. Be safe, be aware, out there. 

Wednesday, November 27, 2013

Review: AquaYak - Aqua II tandem kayak


A little while ago, I showed you all the AquaYak Snapper-Pro, that was loaned to me by the good folks at AquaYak Kayaks. A couple of months ago, I saw that there was a sale going on at AquaYak, and we took the plunge (so to speak) and went out to check out the showroom. It was the tandem's that had caught my eye, both for load-hauling, but also for family-moving purposes. We settled on a Aqua II tandem, in their Granite Spa colour, with a full load of accessories.

Tactical Baby promptly claimed is as "MY BOAT"

The kayak is a direct extension from the Snapper Pro, just bigger.

It features the same scupper hole and circular storage hatch system as the Snapper Pro, giving self-draining capacity to each of the two, deeply molded seats which as well as adding stability, and having their own mounting points for the padded fabric comfort seats, also feature the molded foot rests, drink holding wells (between the thighs) and anchor point for lashing dummy-cords (between the calves).

The central storage hatches had bags fitted, so your personal items don't get lost in the hull-void.

Fore and aft hatches, are the main structural difference between the Snapper Pro and the Aqua II. These hatches are held in place with a clever shock-cord mechanism, and can be unstrapped and opened with minimal effort, without being a loose or an accidental release risk. These open directly into the hull-space, and afford a very spacious cargo storage area, if you first consider the width of the openings. Stuffable packs and items will work well, but larger items might need to ride on top.

I found that I made use of the Grab Lines, which are mounted by brackets running all around the hull, for both maneuvering the kayak about on the land, as well as for giving Tactical Baby and Triceratops Girl places to hold onto when they were riding with us. As part of our deal, we bought a family's worth of life-vests including a red and black and  coyote/OD Stormrider YAK PFD for the adults as well as lurid red and yellow kid and toddler sized ones (which I will cover later). I also got several 10L dry-bags to go in the hull, and scupper plugs, to reduce incidental water splashes. 

You can get an idea of the depth and size of the two fore and aft hatches with this shot of my arm, along with the padded seal that makes up the inside of those hatches.

The same propriety 'alkatuff polyethylene' material, which holds a UV certification for maritime plastics, is used to make up all the AquaYak hulls, and whilst I have noted that my dragging, and beaching has scored the keel and sides of the hull, its all cosmetic, and a very tough, resilient material. 


At 3.8m (12.5") long and 0.9m (just under 3") wide at the beam, and weighing in at 30kg, it is quite a bit larger than the Snapper Pro, and harder to man-handle when out of the water.

At 30kg it is not all that to lift, but the size of it makes it awkward. The two sizable heavy-duty handles at the bow and stern make for easy lifting and hauling, even when fully laden with safety gear, seats, paddles and even the occasional squealing child. I've dragged it up a grassy hill by looping some webbing through the front handle. Wheels might well be in order (and AquaYak offer them)

In the water, It handles really well, thanks in part to having two sets of paddlers but is very operable with only one, even being quite maneuverable when solo.

We've it out on The Bay a number of times, and whilst its bulk means loading it onto and off my vehicle can be a pain, once its in the water , it is a lot of fun.

With a stated carrying capacity of 200kg, even with two adults, and two kids riding, unencumbered by gear, we've ridden very high in the water, and have had little trouble staying course, and upright, even on our first trips, are probably largely due tot he great design, including this tri-keel, which helps with tracking and stability, even in the moderate swells we've encountered.

I feel that if we needed to get off-shore, as simply as possible, this is a real option for us, both is speed, and limited cost. Get it on the vehicle, get to the beach, onto the water, and away ... Load it up with MALICE 2 pack, a Platatac Light Field Pack, and supplies in Dead People Jars, we could have quite the getaway. 


We put the kids in their Mudlarks All-In-One suits, to keep them warm and dry, with the PVD vests over the top, and went for a paddle one sunny spring afternoon, having been visiting with friends.

You can see that there is quite a bit of room the in the kayak, and we have found that the kids can site between our knees as we paddle, but that space could just as easily be full of packs and supplies. This is the saem beach as I reviewed the Snapper Pro, with a high grassy hill from the carpark to the beach. The weight of the fully laden kayak, over grass, down a hill was no issue at all. It even maneuvered well.

Once down at the waters edge, it was a simple matter to alight and shove off.


You can see here how high on the water we were, and whilst heading right into waves gave us some spray, we were a long way off ever taking water over the side and into the cockpit. I think we could have laden the hull with a lot more kit, and still have been positively buoyant and dry.

All in all, I am really pleased with this acquisition, and plan to spend a bunch of time on The Bay over the summer, as well as trips to local lakes and rivers.

I heard recently that AquaYak are going to stock a Windpaddle sail for their kayaks, and that is a great idea...


Tuesday, November 19, 2013

Review: Fenix - TK-51 light

I had the good fortune to be introduced to Braent Hong,
Asia Pacific Sales Manager for Fenixlight Limited at the SSAA SHOT Expo by my friends at LEGear Australia and made an impression about my love of all things lighting.

He recommended I contact their marketing department, and sign up to be a beta-tester, and after many month of negotiations, I received this pre-release TK-51 model light. This is a BIG light, and it certainly performs.Here it is stacked against the HexBright crowd-funded light, I have covered previously.

Let me tell you about the TK-51 ....
At 18.8cm (7.4") long and having a grip diameter of 4.8 cm (1.9"), and weighing 430g without the batteries, this is quite a serious hand held light. At the buisness end, it features two  Cree XM-L 2 (U2) LED's, in a tear-drop configuration of reflectors.

The body of the light is made of machined aircraft alumiunium, Type III hard-anodized and features a toughened and anti-reflective coated glass facing. The two Cree LED's sit in differing reflectors, one large and deep, the other quite shallow. Both reflectors were mirror finished. The glass was in-set from a smooth lip.

The tail-cap was crenelated, and two of the opposing crenelations feature a strap hole for securing a lanyard. The tail cap unscrews to expose the battery holder, which is well labeled to ensure that not only the battery holder, but the batteries themselves are properly loaded, avoiding any misloads.

Speaking of batteries, it is designed to take three 3.7V Li-ion 18650 batteries, which for those who don't know are the big-brother of the CR-123A batteries becoming so prevalent in the resilient gear market. It will also take six of the CR123A's in place of the 18650's, and even the 3.2V 16340. In the absence of a full load, it will even operate with one or two batteries alone, but at much reduced performance.


the TK-51 has some interesting controls, with individual controls for the spot and flood LED's, which ramp up from Low, to Medium, Medium-high and High modes, each accessible by a tap of the appropriate control. It also features a memory, such that the on/off button will recall the previous settings for both LED's. Momentary Strobe can be produced at any time by holding either LED controller, and cycles between two distinct flash frequencies. Momentary "TURBO" mode is achieved by depressing the on/off button, and gives full power to both LED's. Which is a LOT.

Each LED has a Lumen output of 10, 150, 400 and 900. This effectively ramps up with a button press for each LED control, offering considerable control of light output for the user, given their need. with a Single LED runtime, running from 420h at Low for a single LED, to 1h 45min for both LED on high, there is also considerable operational variety. I found that the buttons were perhaps -too- easy to press, being raised from the surface, and had a very light pressure needed to activate.

Fenix state the beam distance is effective to 425m, with a peak beam intensity of 45200 cd. Put simply, it packs a whole lot of light, and can throw it a long way.

This shot is of the TK-51 with both LED's at high, in TURBO mode, putting out 1800 lumen, and lighting up my whole street. I angled the spot down, so as not to side-blind passing cars at the end of the road.

Low Flood
Low Spot
The low flood and spot were hard to catch on my iPhone 5s, but the reflective paint of my old car glinted well enough, remember, this is 10 lumen
Medium Flood
Medium Spot
The medium options, at 150 lumen match most over the counter service station and supermarket lights that I've had. My trusty "household blackout light", the 5.11 ATAC-A1 is only 103 lumen (but off a single AA) .
Medium High Flood
Medium High Spot
At Medium High, the TK-51 is putting out 400 lumen from each LED, doubling that of my CR123A powered Surefire 6pX.
High Flood
High Spot

At High, the LED's are outputting 900 lumen, which even outstrips my HexBright FLEX, and is just shy of my new car headlights. On top of that, the built in circuitry has both output lock-out, meaning that it will produce the same light output for as long as the charge allows, then drop to the next level, and so on, rather than dimming gradually. At the lowest power levels, the light will blink its LED's three times as a last-ditch indicator of power loss. There is also overheat protection, which down-shifts the output until the light cools. During my use if the light, the finely machined texture on the grip was good in the hand, and the light had surprisingly good balance. I hate to think what it would feel like wielded in anger.

Combined with the mass of the light, its 1m shock resistance, and IPX-8 (2m) water resistance, this is a serious light, for serious use. I bought rechargeable batteries for it, and a charger, which comes wit ha car-adapter, which I think will greatly expand the use I get from this light. Now to find a pouch for it!


Friday, November 15, 2013

Review: GoSt Paleo Barefoots - Anterra


I've been running "barefoot" for quite some time now, as part of my ongoing fitness regime. I received a set of the GoSt Paleo Barefoots PRONATIV shoes early in the year to review, and have never looked back. In my discussions with Jörg of GoSt Barefoots, he suggested that for the colder months, wearing the liners they have would make the cold more bearable. They run on ice and snow in Germany, so I thought "what the hell, why not?". He also suggested I could try out their new liner, the Paleos®-Lining-Socks, and recommended that I try some Paleo's with regular socks as well. To do that, however, he suggested I try a size up in the Barefoots, and that he would send me the ANTERRA's in a size larger than my PRONATIV's.

The PRONATIV is on the left foot here, the ANTERRA on the right.

Made of the same "4 in 1" welded 0.55 mm gauge "1.4404" stainless steel  with a 4mm external diameter chain and an internal diameter of 2.9 mm as the PRONATIV's, the ANTERRA's have a slightly different lacing and tongue pattern.


These use three metal brackets to act as tensioners, linked directly to the mesh, with the shock cord running through them and bunching to give a secure fit. They also feature a higher tongue, with extra mesh running up the forefoot.

The larger size is still very wearable, and more comfortable over a more heavily padded foot, it did tend to fold over itself as I ran though, leading to an added "lumpiness" to my cross-country runs. When I wore the socks, this was far less an issue. 
I was training for my third Tough Mudder, which I had previously run in boots. The Paleos didn't let me down and I completed the course in my best time, with fewest falls and certainly my best recovery time.


Lining Socks

 There are my favorite of the foot-savers, well suited to my long feet, and keep them clean, without sacrificing tactile ability.


Neoprene Running Kit socks

These are fun and light, but as with all neoprene, they are sweaty, but certainly protect the upper surface of my forefoot and ankle from any chafing.


Ankle Wraps

These were the hardest to get right, but also the most minimal of the foot-savers. Almost Olympic in their design, this modern take on the Phaecasium certinly have their place, but were not for me.


Basic Sock

I didn't really like the fit of the Basic Sock, but the certainly did protect my forefoot and ankle from any chafing and some grime that accumulates from urban and suburban wear of the Barefoots.


This is my feet (and Tactical Baby's) following a day of running about, climbing boulders and wandering in the city, without any of the socks. Left foot is the PRONATIV, right foot is the ANTERRA. You can see the different patterns of city-grime that have appeared; the baggier-fit of the larger sized ANTERRA's left my right foot a touch cleaner, but with a more uniform ring around the ankle.

This neatly indicated the coverage provided by the two different styles. I think because of the fit, I prefer the PRONATIV's, but the ANTERRA styling is a bit more fancy, with the metal buckles giving a more intricate look.

However, for the purposes of barefoot running, either are adequate, for sure. That I ran the Tough Mudder in mine, without becoming mired, or worse, losing my shoe, as I saw many of my fellow Mudders (even team-mates) doing, is testament to this. The protective ability of the links are amazing, and in over 130km of off-path running, I've only been stuck by a single thorn, and not deeply either.
Related Posts Plugin for WordPress, Blogger...