Thursday, April 4, 2013
Wish Lust: 5-11 Tactical - Tactical Duty Kilt
Last April Fool's Day, 5-11 Tactical issued a statement that they would be producing a Tactical Duty Kilt, to go alongside their Tactical Duty Shorts and little did they know that they would be swamped, inundated with demand for it. They actually produced a small run of them, and unfortunately I was unable to get one here in Australia, even getting in touch with Alex Kavgas in Inside Sales at 5-11 Tactical (Australia).
All for naught.
In the last few days, following on from this years April Fool's Day, Scruffy Wallace of the Drop Kick Murphys issued a challenge to the CEO of 5-11 Tactical, Tom Davin and news was out!
Today in my Facebook feed, I saw that Mr Davin not only accepted the challenge, but upped the stakes, the winnings to us the kilt wearers, and to the charities that will benefit.
As a long time kilt-wearer, I am fully looking forwards to seeing this come to fruition!
Wednesday, April 3, 2013
Review: Paleo Barefoots PRONATIV

I was pleased to hear from Jörg Peitzker of GoST Paleo Barefoots following my Wish-Lust review, and after being in touch for quite some time, and doing some editing, discussion and interplay on their forums (go check it out...).
I was fortunate enough to have a pair sent to me all the way from Germany to Australia. (This was a Herculean undertaking in it's own right).
Now, it is important to get this right out there first up. Measure, measure, measure!

There is no give to steel! If you don;t measure it right, they will not fit, and will and can not "wear in and stretch to fit" Luckily, I did just this.
The second key element to these amazing shoes is, they take some time to get used to. Both the feel and the wearing of the Paleo's takes a little getting used to, mostly due to the texture of the maile on the ground, but also the absolute absence of padding.
Fortunately, I have experience in bare feet, moccasins and camp-slippers, so adjusting was a quick process.

The shoes themselves are very comfortable, mine fit well, not too open, not too tight. The elastic cord closure that weaves through the top of the shoe had a tendency to pinch a little, but once adjusted (and acclimatised) it gave me no further issues. I may have lost a few hairs, but I was never aiming to be a Hobbit ...
So, I tried out my Paleos on a variety of settings, from seaweed and shell encrusted rocks, to hot sand, overgrown garden beds and in the Australian bush.

One thing I found was that they really did protect my feet from incidental stabbings. They also became pretty much forgotten once on, as long as I kept an awareness of the terrain changes in urban environments, (which is to say the polished floors of shopping malls, tiled floors and big stonework flooring in train stations) the world was my oyster.
I walked over broken glass, hot asphalt, mounds of shells and piles of branches. Not a single scratch. The fine links of the maile kept almost everything out, but obviously not everything. I found that the occasional spike of hay, or prickle made it through to give me a poke, but that was the extent of it. Sand and grit can make it's way into the shoes and if it's large enough, it stays. A tad annoying, but a good fit should eliminate most of this.
As well as being very comfortable completely bare, much like a continual massage, there are three sets of accessories that also come to assist in your comfort when the conditions require it.

I took the Paleo's out running a few times in different conditions: along the beach, in parks, and in the bush, and occasionally I have felt the need to give myself some extra protection, and that's where these come in. Originally they shipped with the black neoprene socklette shown here, which act both to pad the top of the foot, and add a little warmth in cold conditions.
I'm wearing the Ankle-socks here which are a large, but felt really tight, but gave me the most protection. The wraparound ankle-sleeves were more difficult to get fitted, but in fact were a lot more comfortable, mostly because they adjusted to my foot and added padding where I needed it.
One thing I can say is that they leave your feet filthy, especially in an urban setting, where road-crud works its way everywhere, into my skin, my toe nails, everywhere. This however, pales into obscurity when you look at this. Those two round contusions are ring-maile wounds!
 I was chopping firewood in my Paleos at ConFest and was hit with wood-shrapnel in my right big toe knuckle, and left toe side. This would have ruined my weekend if i'd been barefoot, and unpleasant if booted too. the rings may have caused this little wound, but saved me from serious bruising or mangling. All in a package that balls up and sits in a pocket when not needed.
I was so very impressed! I wear mine a lot, any time I get the chance. I get a lot of attention out on the street, at festivals, around the house and out shopping. I think they have significant wilderness applications, and survival options. These appear to be indestructible. Indestructible is a real asset in the event of a disaster, as is reliability. The Paleo shoes are comfortable, rugged, and fit any natural surface (barring polished artificial surfaces).
I am glad to have these in my kit.
Swimming 1
Swimming 2
Urban environments
Slippery polished stone floors
City surfaces
Beach run
Beachside surfaces!
Thursday, March 28, 2013
Review: Platatac - PIB Platypus Insertion Bladder

The Easter Goldfish left something better than Lincoln Logs in my sock drawer, this year. Following the announcement of their own entry to the hydration bladder game, I got my sticky paws on one of the PIB's from Platatac.
I've been a big fan of the Source bladders and have used them in my Bravo and Bullock Echo packs to stay hydrated on the go, and having witnessed the demise of many Camelbak bottles on both Tough Mudder and Stampede courses I have been very happy with the 3L Source bladder. However, when this came out I was quick to jump onboard and check one out. I've been using it in my Light Field Pack and taking it to kendo to rehydrate after training. It looks like there are in-line filters available for the Platypus range of bladders, presumably these would fit as well. Very important for disaster stricken and less-than first-world conditions.
 One of my workmates also got a Platypus bladder the same week, one of the civilian looking ones. The first thing we did was to check the fittings, both valves and mouthpieces seemed to be fully compatible. The bladder features a reinforced connection point, where the hose fits into a clip-lock, and is placed such at the last drops of the reservoir can be sucked out as the bladder flattens. The hose itself is a resilient plastic, which is covered by a length of tan colored neoprene, stitched to form an insulation and protective sleeve for the tube. At the drinking end, a stop-switch is a great addition, even before reaching the mouthpiece. The mouthpiece itself is also at the end of a clip-lock, and is a rubber bite-valve, protected by a plastic cap with a hefty retention tab. No losing this in the field!

Molded right into the satiny plastic of the bladder is a measurement strip, incremented in 500ml all the way up to 3L and 100oz. Warnings also decorate the bottom of the bladder, admonishing the user to not to use it above 50oC or below -20oC, not to fill it with fresh fruit juice, or alcohol, or milk, if I am translating the glyphs correctly. I found the satin feel of the bladder very pleasant, and easy to grip, when I was filling, fitting and removing it from my packs. Low glare and friction, and in subdued colours meant it was easy to use, and not a glaring, gleaming unit to have standing out in the field.
I gave it a petty hard workout, jammed into the Light Field Pack and pressed by my kendo armour, and the only trouble I had was once when I fitted it, I didn't re-seat the hose-to-bladder connection quote solidly enough, which lead to a dribbling leak and puddles. A quick adjustment and all was well again. I'll be taking this bladder to ConFest over Easter, both for the long drives up and back, but also when roaming around the site with Tactical Baby and Triceratops Girl needing a lot of running around after.
Monday, March 25, 2013
Review: Aquayak - Snapper Pro


I was driving past a series of shops recently, and stopped at a set of lights and looked over and there it was, my local Kayak shop. I felt it was time, given the water only five minutes down the road from me and the fact that I haven't really covered any sort of transport caught my mind. I have used kayaks before, mostly in lakes and rivers in Canada, in the Rockies.
I dropped them a line after looking over their website and I was delighted to be offered the chance to trial a couple of their models. The first is the Snapper-Pro, the fully kitted version of the Snapper.
This is a 2.7m (8'10") long ‘sit-on-top’ kayak with a range of features, including coming in a range of colours, all in their propriety 'alkatuff polyethylene' material, which holds a UV certification for maritime plastics. Pretty impressive.
The hull is deeply molded and 0.8m (2'7") a the beam. It also only weighs 18kg empty (just under 40 lbs). I lugged it out of the shop, lashed it to my vehicle (more on this later), drove it home and looked it over before taking it out on the water.

I wanted to get a closer look at the hull cross section that had been hinted at on the website. It did indeed have a very interesting profile, and I was keen to see if this unique low-drag underwater shape that provided the speed and tracking through the water without the need of a complicated rudder that they advertised.
The last kayak I had used was a "sit-inside" type, you traditionally see, and required "eskimo-roll" survival training in the event of capsizing. On the AquaYak boats, you just climb back on like a surfboard.
 Here is a cross-section of the hull, sitting as a display in the shop. The polyethylene hull is both spacious and well reinforced with supporting pillars scattered throughout. The pillars seen here actually form part of the self-draining system the boats share, as scupper holes that allow sloshed in water to drain back though the boat. The hull is around 6-8mm thick, and has most of the major features molded right in, with very few cuts or holes drilled into the body.


 As I mentioned earlier, I didn't have any trouble moving it around, even on my own. I keep a couple of karate-belts i have collected over the years in the boot, which make for excellent roof-rack ties. The smooth edges of the hull laid right on the roof of my car and I lashed it through the built in safety lines. Getting it up and down was a pretty simple exercise, the biggest trouble was doing so in the high gusting winds I had on my paddling day. I have roof-rack rails, which aided in lashing, and I could, if i needed, have put a specialized kayak carrier on, but it didn't really need it.
 Here's where I went, a little sheltered bay on Port Phillip Bay. You can see that it wasn't a very clear or fine day, it was drizzling on and off, a strong wind was zipping in and there was a bit of chop. There was also a fair bit of a hill to portage the kayak over. All part of the test I wanted to give it.

 Paddling out into the bay, it took me a few minutes to remember how to coordinate arms to hips, to ensure stability, and not to dig too deeply when on the shoreward side of waves.
  All along the rim of the Snapper-Pro is a safety line, a heavy cord, mounted securely to the hull by a series of hard plastic loops. There are also two drag handles, fore and aft, to assist with hauling and climbing back in, should you go over. You can see here that my feet were right up to the front of the cockpit, as I have really long legs.
It wasn't uncomfortable, but an extra few inches would have made a difference for me.
One thing that I hadn't anticipated was the scupper holes letting water into the cockpit, and right into the seat of my pants. As I say, I had anticipated getting wet, so this wasn't a problem, but just be sure that you bear this in mind. For those with shorter legs than mine, there were a series of channels in the sides to act as in-situ footrests, which was a really cool idea.
I found that I could access the center port with no difficulty, but the fore and aft ports were moslty out of reach.
 The kayak was very stable in the water, and responsive too. I haven't paddled for 15 years, and quickly found myself zipping over waves, from end to end of the little bay, against the current, against the wind, and across both. It was only when I over-paddled and over-balanced that I had any troubles controlling it.
 You can see over my shoulder, the elastic cargo netting, which I left empty for my trails, but would fit a decent sized pack, like my Platatac light field-pack or a child quite happily (obviously, you don't put the child under the straps). You can also see the aft drag handle. Both the inter-hull cargo compartment, and the external cargo compartments in the aft and between my knees, so there is plenty of space to haul cargo, or passengers. Bear in mind the weight limits, and get your bug-out -kit waterproofed!
I had a couple of tumbles whist finding my water feet, and found that I could quickly (if not easily) haul myself back on board.

Not only did the kayak handle well, and was easy to right, haul and lug, it was sturdy and stable. I feel I could have fished happily off it (using either of the two built in rod-holders in the aft) although I would need practice to get my cast coordinated so I didn't dunk myself.
I had a real blast with this, and I think I will be trying to include more watercraft skills in the future in my planning.I also took a bunch of Contour Cam footage, and have included it below:
http://contour.com/videos/watch/aquayak-snapper-pro-1
http://contour.com/videos/watch/aquayak-snapper-pro-2
http://contour.com/videos/watch/aquayak-snapper-pro-3-dunkings
http://contour.com/videos/watch/aquayak-snapper-pro-4
http://contour.com/videos/watch/aquayak-snapper-pro-5-hauling
Wednesday, March 20, 2013
100,000+ views!
I just noticed a pretty amazing milestone, I've cleared 100,000+ page views sometime today, and I just wanted to say thank you to my readers, and to the people who have helped me out since I started it at the beginning of December 2011

As you can see, I've had some great items, and topics to cover, and I couldn't have done it without the support of some people I wanted to give a shout out to...

To the guys and gals of (in reverse alphabetic order):
Zombie Tools
Utilikilts
Tactical Tailor
Snow Lizard
SARGlobal Tool
Platatac
OscarDelta
LEGear
KitUp!
HorNest
GoST Barefoots
Global Gear
EcoFuture
CountyComm
5.11 Australia
and to anyone else I may have missed ...
thank you all for your support, encouragement, reposts and putting up with my crazy questions, requests, and wacky alternate uses of your gear.
Review: Tactical Tailor - Concealed Carry Sling Bag

I'm always keen to include inconspicuous items to my repertoire, both in my EDC, and how I go about lugging it. Recent air flight trips reminded me that having a high density and easy to store carry-on bag is very desirable. My trial of the Zombie Outbreak Hydro Pack was a good experiment, but when it comes down to it, I want something rock solid. I am happy to say that the Concealed Carry Sling Bag by TacticalTailor is that. Made predominantly from a 500d Cordura, in blue-grey and black, this is a sporty looking pack that has a sting in its tail.


This is an ambidextrous pack, with a single central main padding shoulder strap, with twin detachable straps, with an interesting styled clip at the end of each, anchoring to a ring at the end of the shoulder strap. Each of the detachable straps features a long webbing, sufficient to create a "third leg" style wrap around connection, to keep the pack stable on your back when running, climbing and generally adventuring.
The shoulder strap is heavily padded with a breathable mesh covering, giving both really solid padding, broad coverage over the shoulder and a wide attachment to the body of the pack, giving a very stable connection. The top of the strap to pack connection also features a very sturdy carry handle. It appears to have a Helium-Whisper compatible loops down towards the strapping end, but I don't have anything compatible to test that out on.
 Another nice feature is that both detachable straps have a padded "wing" for where the webbing would otherwise dig into your kidney, both of which have webbing stitched in, not quite PALS/MOLLE proportioned, but certainly compatible, if you wanted to affix an accessory. Topping it off, there is a pocket behind the wings on both sides to stow the detached strap, if not being used as a "third leg" to get rid of dangling cords for a more streamlined fit.
 Inside the main compartment, which has double zipper pulls, each with a hefty cord pull-assist, which works to give out a full opening compartment, which as you can see can fit a variety of goods. When filled, this compartment nicely fits the depth of my Zombie Squad Nalgene, so that makes a good guide for how much stuff you can lug in this section.
Inside the front compartment, which is fitted with a long daisy-chain of webbing loops running vertically over it's surface, and sporting another two cord-fobbed zippers for closure, you'll find the first of two hidden surprises is pack had to offer. Fitted to the loop field that makes up the entire of the back surface, is an adjustable pistol holster. This hook-backed panel loops around on itself to give an adjustable width, and has an accessory strap to accommodate the length of your pistol. Off to the side of the panel is an elastic loop to hold a spare magazine. I've not decided what I will use this holster for, not having a pistol to carry, myself, but I'll be sure to find something to use it for. This compartment easily holds a Nalgene bottle, with some spare room at the sides.

Again as with the front compartment, this has a broad loop-field panel, encompassing the entire back, and comes with a very thorough admin panel, but this can be fitted to the front compartments panel, swapping out to suit your needs. Currently I am keeping my iPad in is compartment, until I can think of a better use for it, but as it is, it's a very secure and stable storage pocket, with a billowing inside backing to accommodate your packing needs, without giving away your secrets.

Here is that admin panel, showing off its five internal elastic webbing loops, for pistol magazines, flashlights, multi tools or a variety of other chunky items. On the outside, two more wide elastic loops run lengthways, each topped out with a second, narrower elastic bang, sectioned into two, ideal for pens, glow sticks and markers. Finishing it off is a zippered pocket, giving you a very versatile and being hook-backed, modular piece of accessory to suit your needs and loadout.

Lastly, here's a shot of me having slung the bag from back to front, showing off how level it rides. From here I could quickly access all three compartments with a yank of the cord-fobs, and get at my needfuls. Ideal in a travel situation, ideal in a hazardous situation. When I'm hauling a big load on my back, but still want access to my iPad, papers, food or EDC kit, this functionality, being able to have a comfortable, slung pack at my belly comes in very handy. Whilst a bit too small for my comfort as an everyday pack, (because I haul a lot of junk around) my partner Omega was quick to snaffle this one up as an out-and-about pack, that wouldn't weigh her down, be too "hooah" looking and tough.
This sling bag is all of that. And more.
Sunday, March 17, 2013
Review: Shemaghs and Furoshiki

I had a request from a reader to cover the myriad uses that the Arabian headcovering, the shemagh (or keffiyeh, or ghutrah as I learned the word) has. Rather than just covering the one form of "big square of fabric" I thought I would mix in the very similar, but culturally diverse Japanese multipurpose carry-cloth, the traditional Furoshiki.
Whilst fairly divergent in purpose, each style relies on the same thing: a single, square piece of fabric.
Fabric is everywhere, and whilst patterns, weaves, materials, sizes and shapes may differ, it is a fairly simple thing to be able to put your hands on. With the increased Western military presence in the Middle East (yes, its been 22 years since the First Gulf War,) this fairly ubiquitous piece of Arabian attire has worked its way into the mainstream western culture. I lived in Dubai between 1989 and 1991, and the red-and-white ghutrah in the middle there was from then.
 Starting up kendo in 1997, I was exposed to the use of squares of fabric to bundle up our keikogi and hakama, in furoshiki style, which allowed us to keep it neat, tidy, transport it and also letting the often very sweaty clothes dry after a hard session. At least, far better that it would if stuffed into a plastic shopping bag, or gym bag.
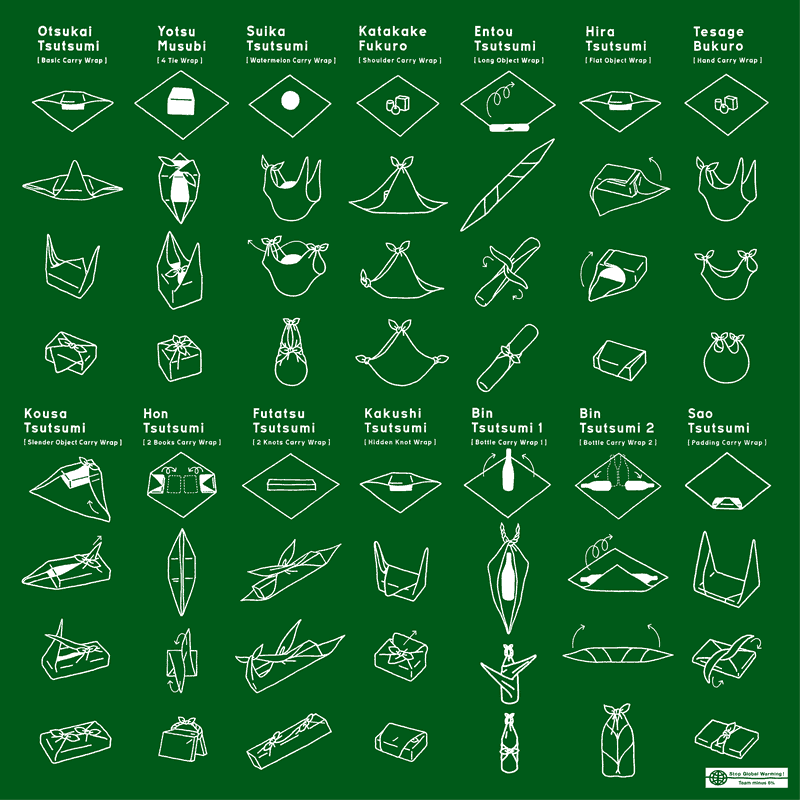
I wont spend a lot of time on furoshiki, as it is an art all to itself, rather I will show you a couple of links. This picture was produced by the Japanese Ministry of Environment as a means of demonstrating the many ways different sized packages and items can be bundled into a square of fabric, offering stable, padded and accessible wrapping for a variety of goods.

I've mentioned shemaghs before, as I picked one up off the street her ein Melbourne as part of my eagle-eyed urban-salvage mentality, but I have quite the collection of them. Warm in winter, shady in summer, easily stowable and highly variable in wear and use, the shemagh is a versatile and essential part of being apocalypse equipped.
There are a variety of sites that can show you "how to tie a shemagh like the military"so I'm not going to go through a step by step, rather, I will show you some of the ways that I have worn mine, and that you might find useful.
 Most of these involve folding the square into a triangle, which leaves the little dangling tassels on the short edges, rather than the forwards long edge. I learned to wear min in Emirati and Bedouin style, which usually consists of a single triangular fold, and topped with the double ringed agal but any cord or banding could suffice, and keep it on your head, whilst providing much needed shade.
Even without an agal, it is possible to keep it on your head in fairly easy terms. Just flicking one of the corners around your neck and towards the back will give it enough weight to hold it down onlt your head, and less lifting surfaces to blow off as easily.
You can wear it like this to cover your nose and mouth, both as a dust/sand/debris hand smoke filter, as a sun-block, but also to obscure your identity if that kind of thing is useful to you, say if you were throwing rocks at tanks in Gaza or new York...
I've worn mine like this in the sun, rain, hail and snow, and have found that it's a very versatile piece of clothing able to be adapted to meet the ever changing Melbourne weather.

Rolled loosely, that same triangular fold gives you a long length of insulating material I wrap around your neck, whether it be to trap heat in the cold, or soaked in water to give evaporative cooling to the wearer. In this way, it acts in similar fashion to the HeadSox and HeadOver tubes, but far lower-tech.
It's worth noting that certain colour patterns may be more significant than you might think, and it is well worth looking into when you are traveling, but there isn't really a hard and fast system in place. If in doubt, ask a local, or wear something in "modern" patterns.

Pulling up the front of that self-same scarf, you have a very functional face-shield to guard against identification, sun, dust, sand and debris, even some (it has been often claimed) dispersion agents like CS gas with a vinegar treatment, apparently.
A slight tug and it's either up or down, and you can also cover your ears with the same fabric.
I've also used mine as a sieve, putting fruit in it and washing them through it...

Having also spent a bunch of time holidaying in south east Asia, I've seen similar fabrics worn wrapped around the head in a ring, more as a sweatband than as a sunshade. Worn with the tassels on the outside you also have built in bug-bothering dangles not unlike the mythical cork-strung hat of the Australian bush.
Not just a piece of clothing, however, the shemagh can be utilized in a variety of ways (such as in its Japanese configuration, for furoshiki) and I hope I can show you a couple of these too.

So here is me having using my shemagh as a triangular bandage to immobilize an arm, something I covered recently in my First Aid Certificate Level 2 course (yay, skills ...)
Depending on the circumstance, and the need, this can be done extremely quickly. I moved from the SE Asia head wrap to this sling in about 15-20 seconds. If you take a little more time, you can make a much neater, much more supportive sling.
Similarly, I could have rolled it into a tight rope, and used it as an emergency tourniquet, or as the binding of a splint.
Other uses that I've had for it is as a shade cloth, picnic tablecloth, as a belt, a child-toy-leash and as a mondo wet-towel-snapper.

When folded up, a cotton shemagh makes a quite reasonable bandage, either as a deep square, to stem urgent bleeding, or to hold down dressings. Filled with ice they make cold compresses, left alone they make good padding for bruises, sprains and bites.
All in all, whether it be for headware, packaging, or all manner of other applications, this simple piece of cloth, however it is names, coloured or decorated, is an essential piece of kit, that I wouldn't want to travel or adventure without, let alone survive without.
Subscribe to:
Posts (Atom)