Following up from my recent review of the ZU Bladeworx FFSA knife loaned to me by a friend, I wanted to do this second blade he was kind enough to sling my way, the equally interesting HHA Razorback CQC. I'm a big fan of the chunky and no-nonsense badassness of the Hardcore Hardware designs, especially the LFK blades that my partner Omega and I both have an example of as well as the TWI pen that is in my EDC.
It was really interesting to see what HHA are calling their "first signature blade in the fighting arts genre," but I'll give it the same caveat that I gave the FFSA, this kind of knife is not the kind of tool I've trained and sparred with in the limited knife-fighting training I have done, but I'm happy to tell you that it is certainly an impressive piece of steel.
Featuring the same 6mm (0.236") thick, full tang, D2 tool steel blade,
as all the HHA blades this back-swept, double re-curved blade features
two hollow ground faces on the sharp edge, and another on the spine of
the blade.
HHA report that it is engineered for
slashing, thrusting and trapping, and designed for the same type of the reverse grip as might be used in Arnis (but again, it's not my martial field of expertise).
The combination of live and non-live edges however makes the Razorback
gives you the opportunity for both both offensive and defensive techniques. For expanding on those blunt force, defensive striking and less-than-lethal applications,
the Razorback also has an extended glass breaker, strike/hammer pommel, in keeping with their other designs.
A large finger notch is devised to ensure a secure grip to increase
weapon retention substantially, and I found it rested in the edge of the hand really nicely in that reverse grip.
The knife is 235 mm (9.25") overall, with 115 mm (4.52") of that being the blade, and is 368 g (0.81 lb) of hungry steel and G10.
To reduce grip weight and optimize balance, both the tang and handle scales
have been skeletonized, with a cavity in the handle which could easily double as a
hidden storage space for emergency items. However, those scales are secured
with Torx screw all steel fittings, so you might find it difficult to pull of a Jason Bourne style recovery without that particular driver.
I found the backwards sweep of the blade a little difficult to adjust to, mostly because I wasn't sure of the arcs it was offering me, but it certainly felt good in the hand whilst moving it around. I imagine in a practiced set of hands it would be extremely dangerous.
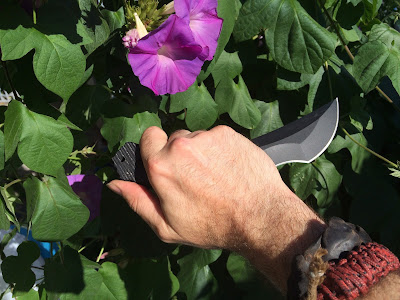
When held in a forwards grip, the blade was no less dangerous feeling, and I certainly didn't have any trouble cutting with it, though I didn't care for the broad double-recurve of the edge and handle combination. No fault of the knife, it's just engineered the way I like a knife to be.
With its ambidextrous Kydex sheath, with a
Tek-Lok belt mounting system it can be customised in vertical,
horizontal or angled positions to suit your rig, or even lashed via eyelets. It also comes paired with a BlueGun style HIVIZ blue trainer, which matches the blade in weight at 369 g (0.81 lb), but with thoroughly safe edges and points. I'd have no qualms training with it, and letting enthusiastic people pretend to do me harm whilst getting better at using the real thing.
All in all, the Razorback is a substantial, solid, scary-looking and well thought out blade, that just isn't right for me.
A place for me to review the various rugged, nifty and needful kit that I've accumulated, for every-day preparedness in the event of accident, disaster or world-shifting end-times Apocalypse, be it zombies, triffids or Mayan divide-by-zero errors.
Wednesday, January 20, 2016
Monday, January 18, 2016
Review : Klecker KLAX Lumberjack axe
I finally received my KLAX Kickstarter axe-head in the mail, after languishing I development hell for a while, getting the engineering tweeked. The KLAX is a multi-tool built into the head of an ax. It allows you to attach the ax head to a handle quickly in the field. It uses the nested clamping system shown here. The clamps rotate out from the handle for use. The multifunction options are what really drew to me to the KLAX, and I was very curious to see how the fold-away stow-away option worked.
The Lumberjack is the Klecker high-end stainless steel model with the most features. The first three models are all made from heat treated SUS420J2 stainless steel which is perfectly balanced for keeping an edge and maintaining strength. Klecker do offer a Gucci, titanium version of the Lumberjack model as well, but I wanted to stick to steel for a hatchet head.
The Lumberjack features, as well as a fairly broad axe head, an Ulu knife blade, a hammer head,
cutting/gut hook, a set of skeletonized hex wrench set (19mm, 15mm, 13mm, 12mm, 10mm, 8mm), as well as a 1/4” hex bit driver socket, an inch ruler along the hammer-head, a lanyard hole and an inset wire-gate carabiner (which can be used to clip the sheathed axe-head to the outside of a pack) and a bottle-opener (mate!), all coupled with their Patent Pending clamping system.
The hardness of the axe is around 48-52 HRc. The purpose of this hardness level is to give it the strength it needs to work as an axe but keep it from being too hard. Too hard, and you risk chipping and shattering.
The clamps are centered on a 1/4"-28 threaded bolt shaft which requires over 450kg (1000lbs) of load to shear it, so you're talking a fair amount of chopping to risk that.
The "front" clamp is threaded and rides along the threaded section of the bolt shaft. It is activated from its stowed position by rotating the nut at the back. When the head is inserted into the handle, it is screwed down and clamped in place by turning the knob the other way.
The "rear" clamp rotates out of the handle and is spring loaded to drop into a notch specially shaped to hold it in place. Once the clamp is tightened, it cannot be turned, bent, or otherwise moved until you loosen the system with the nut.
The KLAX is cut from a 5/16" thick SUS420J2 piece of steel plate with a water jet and then machined to add the side bevels, the caribiner pocket and the cutting edges on axe blade.
The clamps themselves are also 5/16" thick and are extremely rugged as well. Like the head, the clamps are heat treated in order to increase their strength considerably.
The clamps are working correctly when they are seated in the handle notches and have been fully "seated".
To seat the clamps into the handle, its just a matter of tightening the nut, hitting the axe a few times (blade or hammer, it doesn't matter,) the first few times you use it, and tighten the clamps as tight as you can by hand.
Repeating the process, until the head is secure and then it is ready to go. Given the transitory nature of the attachment, it makes good sense to to check the head periodically and re-tighten as needed.
Kleker suggest that typically it will no longer loosen after about five minutes of use, but make sure to check it anyway.
I've had some fun chopping wood and things with it thus far, and it certainly seems like a great back-up axe to stow in the outside pockets of a hiking pack, and even without the custom fitted hardwood handle, taking the Lumberjack into the field allows you to use a locally sourced piece of wood,trimmed and split with the ulu blade, and then slid over the head. The clamps just need the roughest of notches for the clamps to seat into, and the self-compressing nature of the clamps will pinch down a split log to give an extra tight grip.
I haven't had a chance to try this out yet, and Klecker recommend only using filed-expedient handles when needed, as they can't be readily depended on, but it sounds like a fun activity.
So, all in all, the KLAX succeeds in providing a very useful tool to use in a pinch. It will do a good job at a lot of small tasks, but won't replace a full sized dedicated tool but packs a lot into a small package. Just my kind of multi-function tool.Check them out at this years NSSF SHOT show, on right now.
Labels:
axe,
carabiner,
hammer,
Kickstarter,
KLAX,
Klecker,
lanyard,
Lumberjack,
modular,
NSSF SHOT show,
steel,
Wood,
wrench
Thursday, January 14, 2016
Wish-Lust: Dwyer Custom Goods knives
I had a good opportunity come my way in regards to some news to share with you all.
I just got a bundle of pictures and data from a press release from the knifemaking powerhouse of Dwyer Custom Goods.
Dwyer Custom Goods will be represented at SHOT Show 2016 next week, so it's a perfect time to get to know a very fancy maker.
In particular DCG would like to invite members of the media and discerning custom knife aficionados to come and visit with the "better half" of the Dwyer Custom Goods custom team: Sheila Anders-Stronegger (or as you might better understand: Dwyer Household-6 Actual).
Mrs. Dwyer began her knife apprenticeship with Duane Dwyer, Mick Strider and other notables in the custom knife making community in 2009 after a career as a model and on television. In 2013 she began building her blades on her own and is now releasing a number of her own designs.
For more information, or to make an appointment to speak with Mrs. Dwyer, e-mail Dwyer Custom Goods at DDCustomGoods@live.com as her blades are certainly both elegant and deadly looking. Artisinal metalwork just took a step up.
I've gutted to miss yet another US SHOT Show, but have a bunch of friends who are on their way, so look forwards to a detailed brief.
I just got a bundle of pictures and data from a press release from the knifemaking powerhouse of Dwyer Custom Goods.
Dwyer Custom Goods will be represented at SHOT Show 2016 next week, so it's a perfect time to get to know a very fancy maker.
In particular DCG would like to invite members of the media and discerning custom knife aficionados to come and visit with the "better half" of the Dwyer Custom Goods custom team: Sheila Anders-Stronegger (or as you might better understand: Dwyer Household-6 Actual).
Mrs. Dwyer began her knife apprenticeship with Duane Dwyer, Mick Strider and other notables in the custom knife making community in 2009 after a career as a model and on television. In 2013 she began building her blades on her own and is now releasing a number of her own designs.
Sheila's
knives are all built by hand, from the profiling to the grind. All are
smaller than other Dwyer Custom and Strider Knives, and while suitable
for a male to carry and fight with, they have an undeniably feminine
influence. Her focus is predominantly on the small and concealable.
“I build knives to be beautiful,” says Sheila,
whose favourite steels to work with are Damascus and SM-100, “but nasty
and dangerous too…a concealable, hard use, capable tool.” I couldn't agree more. As you may have gathered, I much prefer a small quick blade over a big blade, unless I then progress to short swords.
Mrs. Dwyer is passionate about building knives, particularly with regard learning from the artisans around her.
“I
started by doing grunt jobs at the shop,” she says. “I’ve done blasting
and polishing, the surface grinder and every other machine in the
place. That’s how you get there, you start at the ground level and
evolve. I love looking at true craftsmanship. I love to learn
from other knife makers; how to improve a lock or a way to perfect a
finish technique. It brings me joy to learn.”
As
you can see, although the learning continues – as it should with any
artisan – Mrs. Dwyer’s knives are meticulously crafted and worthy of
bearing the DCG name.
Dwyer
Custom Goods will be collocated with the Strider Knife booth at the
show, though the Dwyers and their staff will frequently be roaming the
floor visiting other knife makers and catching up with friends and
acquaintances in the industry.
For more information, or to make an appointment to speak with Mrs. Dwyer, e-mail Dwyer Custom Goods at DDCustomGoods@live.com as her blades are certainly both elegant and deadly looking. Artisinal metalwork just took a step up.
I've gutted to miss yet another US SHOT Show, but have a bunch of friends who are on their way, so look forwards to a detailed brief.
Events: 700,000 page views!
So here's where we are, I've done 563 posts, with 10 drafts in progress, 343 published comments (some are spam, I've been lax in deleting those) , I cross post on my Facebook Page, my Twitter, on Pintrest as well as Google+, and even Instagram, so follow my all over the place.
I also opened Tactical Coyote, my web-store.
Writing more and more (upwards of four times a month) for Breach Bang & Clear has been a great lift for me, there are some really good folks over there, I respect them a lot, they tolerate me and my lack of uniformed history, and I don't make fun of the cowboy hats and hoo-ah cold-dead-hands talk.
I think 2016 is going to be a really good year, lets see what we can see, and how prepared we can get for whatever is coming our way.
Tuesday, January 12, 2016
Review: ZU Bladeworx - Floro Fighting Systems Knife
As first seen on Breach Bang & Clear....
One of my good friends let me know, ll beaming smiles and swagger, that he had landed a beauty of a knife, in the ZU Bladeworx Floro Fighting Systems Knife, and was kind enough to lend it, and its accompanying trainer, for me to put together a review. Now, I'm a firm believer in having the right tool for the job, and also in having a fine, rugged and dependable blade to hand when the need arises. As it turns out, I had already been eyeing off one of the other ZU Bladeworx knives, so this was an excellent opportunity.
The Floro Fighting Systems is a system of edged weapon combat and defence that is reported to be not only simple to learn, but one of the most effective systems of self defence available today. I've not had the pleasure to attend any of their training, but the friend of mine who lent me the blade suggests they are fully legitimate.
Billed as efficient, direct and immediate, FFS is one of the very few styles that is still based on the blade, and is used by civilians and members of the military, and law enforcement agencies worldwide.
Reported to have over 30 years of experience, Floro has instructed internationally: US Special Forces, Korean Special Forces, various SWAT teams, and the New Zealand Police and nationally members of the Australian Federal Police and Military have individually sought private instruction. So, it seems the FFSK comes from a pretty grounded fighting system, so you'd expect their blade to back that up.
The blade itself is a karambit style knife, blended with a far straighter blade shape than those of the 5.11 Tactical Tarani CUB or the HHA-LFK01 far more like the Fairbairn-Sykes fighting knife.
The FFSK is 235mm (9.25") long, 100mm (4.5") of which is double edged, hollow ground blade. The blade comes to a very severe point. A deep fuller ground into the middle of the blade lends rigidity as well as dropping the weight. Be very aware of the legal ramifications of your knife ownership and carry ramifications.
The 10mm (0.4") thick blade is cut from a single billet of A2 steel which has been double tempered and cryo treated to a RC58 hardness. The blade itself has been ground down to be 6.5mm (0.25") thick and a couple of holes have been drilled in the handle both to reduce weight and to add lashing cords should they be desired. It weighs in at around 200g (7oz) which is (33% lighter than the other ZU knives, the Punisher and 14% lighter than the Ghost), so it's a lean, mean fighting machine, Cerakoted in sniper gray.
The large ring at the butt end of the knife, in keeping with traditional karambit design generally being for the index finger to fit through. This can be used not only to retain the knife, but also as an impact weapon, to add force to a punch or as a hammering attack.
I was told that the Floro fighting system has a lot of punching style strikes, which seems to fit nicely with the traditional butt-ring acting as a knuckle duster, and the forwards sweep of the blade presents the edges for slashing or stabbing strikes nicely.
The blade comes with a kydex sheath which includes a clipping belt loop, and offers a snug fit for the bade, and is adjustable for left or right hand draws, it is set up to wear horizontally.
This is the official knife of the Ray Floro Fighting Systems syllabus and ships frighteningly sharp, sharpened in-house by "Dirty Harry", with the blade being designed and built in Australia. Even though I am unfamiliar with this kind of knife style the blade is very nicely balanced in the hand, and certainly feels like something you don't want to mess with. I can't say I like the cant of the blade, personally, but I can certainly see the intent behind it.
One other thing that I was both surprised and concerned about was that the accompanying trainer is really quite sharp. The Benchmade SOCB CQB trainer was weighted exactly the way the live-edge blade was made, but was fully blunted for some pretty serious full-speed stabbing and slashing action. The ZU trainer only weighs 60g, made of anodised aluminium but is every bit as pointy as the live-edge blade. I wouldn't want to do any training with this any faster than I would with the live blade. I'll leave that to Grand Masters and Jedi alike.
That all said, this is a fine knife and it certainly appears to be very purposefully designed, bearing the ZU Bladeworx "sterile" appearance and no-frills rugged design. If you're likely to be using a Filipino inspired style of knife combat, you might well be interested in this blade.
Sunday, January 10, 2016
Review: SpiffyLab - Tactical Marker
I back a lot of Kickstarter projects, and sometimes they're just on a whim. I have plenty of tactical pens, I like the metal body construction, and the durability that comes with that, not to mention the ability to increase the tool-bearing nature of an every day item like the common pen, so when the chance to get a tactical pen that is built around a Sharpie permanent marker, I jumped at it.
The Tactical Marker upgrades the Sharpie refill from a simple writing implement into a rugged multi-function writing tool, making it a value-added item for camping, work or using as part of your EDC.
As well as the casing for the Sharpie Refill pen, the Tactical Marker includes 3 tool tips machined from 7075 alloy different to the more lightweight but durable 6061 alloy the barrel is made from. The cap and tip tools are made from super tough 7075 alloy (7075 is even used in the M16 series of rifles), which is useful, given the intended uses.
The smaller "Tapper" is fine great for little tasks such as dislodging items, or tack-driving and other small tasks. The "Hammer" is especially handy when you want to leave the house without dragging your tool box along. Neither are especially weighty, and won't effectively drive nails into timber, but for breaking small things, and dislodging items, defrosting a freezer or the like. If you need a proper hammer, get a proper hammer.
The “Spike" end works for punching leather, plastic and sheet metal or using as an awl, breaking hard ground, breaking and gripping ice, boating, prying, rope work and the like. Even being a hard-wearing alloy, the 7075 is still just aluminium however, and the end will bur and bend under hard use. Again, if you intend to do hard punching work, get a hardened steel tool.
Without the cap, it measures about 145mm (5.75") in the standard configuration and about 165mm (6.5") with cap in the standard configuration. The "Spike" adds and is about 2.30" making the tool a fairly sizable 215mm (8.5") long. The “Hammer” end puts it at around 195mm (7.75") long. The TM weighs in at about 60g, for the "Tapper" 70g, for the "Spike" and 80g for the "Hammer". 80g isn't much for a hammer, but it's not bad for a tactical pen.
The Tactical Marker pen cap attaches with a screw cap requires two hands, but holds very tightly, with o-rings at both cap and tool ends, to ensure the ends stay snug, without putting undue strain on he threads. One problem I had with the tool is that the tool-ends and pen-cap ends are not interchangeable, and their threads are not compatible. It would have been nice if the cap and tool could have been combined into a smaller tool.
The Tactical Marker is also available in 'non-sparking’ Aluminum-Bronze, for use in high risk work environments, which is a nice thought, as well as a carbon-fiber barrel option, for extra fancy flair. I mostly got this tool to help with rope-work and rough and ready hole-punching in sacks and hags and the like when camping, but it's a well thought out tool for what it is. Good for hobby-use and workshop tasks when a light touch is needed.
Wednesday, January 6, 2016
Review: Go! Outfitters - Apex Camping Shelter
Here's an addition to my camping hammock collection that I really wanted to get out to you ASAP, as it was a pre-release and is being launched via Kickstarter imminently. You may recall the Go! Outfitters camping hammock that I backed and covered not too long ago, as an addition to my hammock suite, which was a fully enclosed two part hammock, with an asymmetrical cut, to allow a flatter, more comfortable sling.
The enclosing flyscreen made it an ideal hot-weather outdoors hammock, and its built in ridgeline made it fairly easy to sling a waterproof tarp, or a poncho over to add some protection from the weather if needed, but Jason and the folks behind Go! Outfitters
already had something in mind, and that has come to fruition with the Apex Camping Shelter.
Less involved than the Seirra Madre Research Nube, the Apex is essentially a stand alone, purpose built shelter tarp, designed to be used in conjunction with the Go! Hammock, but equally suitable for any hammock, or even on its own.
The Apex is made from 70D polyester with PU (polyurethane) waterproofing, in a elongated hexagon shape, much like an animal hide, and measures 335cm (11') along the ridgeline, and 290cm (9.5') wide. This makes it both long enough to enclose the G0! Hammock, but also wide enough to drape down around it, with a sizable leeway given at the top to stand up in, giving you ease of entry and exit to the hammock.
The ridgeline seam is factory sealed with tape for additional protection not only from the weather, but also taking the strain of keeping the Apex taut as well as reducing sag or bowing.
The Apex comes with a set of 6 stakes, and 8 guy-lines for both attaching to the tree you are hammocking from, but also to stake down the sides of the tarp. It comes with 6x 240cm (8') guy-lines and 2x 455cm (15') guy-lines, which really adds versatility to your set-up. The supplied lines are from a pretty common kind of nylon cord, not my favorite, but water-resistant and light.
Along the perimeter, 20 tie-out loops have been sewn in, for maximum versatility in the way and stability of the layout, given the situation you set up in. Each tie-in loop is affixed with a large triangle of sewn in reinforcement, which was an excellent consideration. As well as the ridgeline and corner points, the edges featured an additional 3 loops per side, whilst the ground-facing long edge of the Apex has a single extra. The side loops are likely to play host to a rumored Door Kit (watch this space), and the long edge loop can be set up with additional poles to add an even roomier, canopy-like interior.
The whole Apex kit comes in its own stuff-sack, which I was sad to see wasn't sewn into the body of the tarp, which would have matched the elegant solution the Go! Hammock had, but I can see why it wasn't. Doing so would leave a sag at which ever edge it was sewn to. An engineering problem for the next version perhaps! All told, it weighs around 800g (28oz) with 225g (8oz) being guy-lines and stakes and
565g (20oz) for the tarp itself.
The Apex Camping Shelter will be coming in Forest Green and Slate Grey and really rounds out a camping hammock kit, without adding significant bulk or weight to the mix. It was super simple to set up and pack-down, and I think it will be coming with me whenever I go camping and even out on long hikes. Staying out of the weather can not only be comfortable, but in some settings, really conducive to your survival.
Check it out when it goes live on Kickstarter!
Subscribe to:
Posts (Atom)