
I have been wanting to make better use of the resources at my disposal for a while now, and
grow more veggies at home. The problem being, we live in a very sandy location, and a lot of things that we like to eat just don't grow well. That or the possums, and snails,
not to mention tiger slugs eat them before we get a crop out.
In order to avoid these pitfalls, and make better use of our bright sunshine, the water barrel I have out the back, and a lot of recyclable bottles I had had ready to go, I wanted to use the same kind of design as seen in a
Kickstarter I backed in 2011 (but haven't yet seen) : Windowfarms.
The idea is pretty simple, plastic bottles, 1.25, 2 or 3L bottles, with the bottom cut off, have holes punched around the base, and then strung together in a stack.
Here is the top of my stack, and you can see the potting mix is already sporting some growth, sunflowers for Triceratops Girl.
I used just simple potting mix in my bottles, beccause it's what we had
on hand from seedling planting to stock up the
front veggie patches. I am hoping to keep building up our collection of these and get the most from the summer sun. I think a
vermiculite substrate would be awesome but until I have a cheep source, its potting mix already-on-site for this project.
The line I used for these was the
2.4mm star sectioned trimmer line from Ryobi that I had on hand from my mostly unused line-trimmer. This thick, strong and sharp-edged line seemed ideal for stringing these up, bot for stability, but also giving the creeping vines something to hold onto, as well as possible deterring unwelcome mouths.
Below the sunflowers, are a mixture of carrots and onions. Yes, I know that being root vegetables, hanging gardens will become packed with them, but my thought was to germinate and establish in the hangers, then transfer and replant as needed. All going well, I'll do this in the next batch of bottles we collect.

Next down the stack are
daikon radishes.
Again, a big root vegetable that will need to be thinned out in order to get the best crop, but we go through a lot of plastic bottles, and I have lots of surfaces to hang vertical gardens from. One great thing about Daikons are that you can eat the leaves as well as the root, and both tops and bottoms pickle really well, which I hope to do with as much of the crop as I can manage to make successfully.
I strung the bottles before filling them, from top to bottom, knotting the trimmer line as I went and adjusting the tension to ensure that the spout of the bottles pointed directly down to the bottle below. Once filled with potting mix, I poured a quantity of water into the top bottle to moisten it, and add weight to gauge the tension. Some minor adjustments to the knots leveled everything up, and I loosened the cap, just enough to allow water to pour through, without being in danger falling off and washing my soil out.
After a few days of hanging and watering, without any catastrophic failures of bottle, cord or lids, I got the family together and we planted the seeds.
You can see in this shot that the sunward side of the bottles have developed a lovely green moss carpet, and there is a clear divide between the dry inch on top and the moist lower soils, even after 40oC days of summer sun here in Melbourne. This was a big test, and I'm pleased to say that not only is there life in these hanging gardens, that the system is sound. I only water the top bottle, every other evening or so, and each bottle below gets its fill, from the dribbling through from the bottom above.
The water than comes out of the bottom bottle is brown and peaty, so i know i'm loosing some nutrients along the way, but its hardly worth worrying about at this scale. I have a
number of bottles of carp-based fertilizer to bolster my crops, when it comes time to do so.

Here is the crowning (can you say this, when it's the bottom rung?) jewel of our hanging gardens, the peas.
We've tried growing sweet peas in the front gardens for the last few years, and have managed the sum total of three pods, before snails, slugs and possums have killed the plants. This time it will be different!
Our hope is that the peas will climb up the cords, and give us five sets of four cords worth of climbing pea-laden vines.
All in all, this was a really good project, the kids love looking at it, it made use of useless space, recycled materials on hand and otherwise being thrown out, and will hopefully start putting food on our plates in the next couple of months.
More planned, possibly with other crops, and I also have an old cargo strapping net to use as a watermelon vine trellis!
 One of my old friends and readers shot me a message a while back saying "I went to Bunnings (read: Home Depot, USAnians) and got a bunch of things to try out for the Apocalypse ..." and I thought it was high time that I gave them a bit of a write up. This is a decided departure from regular store-bought "tactical" gear, and look towards what "found items" might be converted into impromptu hand to hand weapons.
  The second piece was a fence-post-topper, the kind of thing you see decorating fancy fences which my friend decided would make an excellent mace-head.
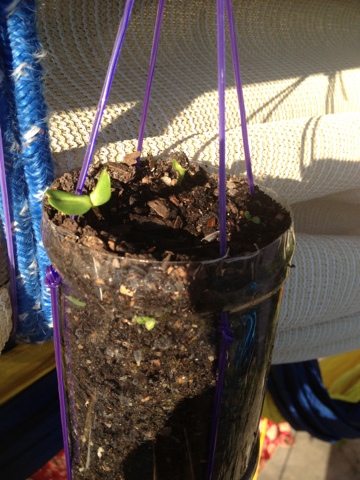


