Saturday, May 11, 2024

Review: King's Adventure Stove

 During the opening rounds of Covid lockdowns in the summer months of 2020 it occurred to me that disruptions might linger on till at least winter. Though I live in a temperate city, which rarely dips below freezing, I wanted to ensure I had a source of heating for both warmth and cooking that was off-grid. I have a variety of BBQ's both charcoal and LPG (I also acquired spare LPG cylinders). At the time
I even had a cast iron wood-stove I was restoring. I had seen portable wood stoves for ages and even camped near some on occasion and thought they would suit my projected need quite nicely. Bigger than a backpack pot-stove but not as big as one of my kettle BBQ's or the cast iron one. I wanted something I could use to burn household and reclaimed timber if needs be, more so than logs and branches that an open-fire pit might be used for. Portability was also an important consideration.  

The ads I'd been seeing pointed me towards https://www.4wdsupacentre.com.au/ which seemed to be a reliable source for robust camping kit. Kings Premium Camp Oven Stove | Wood-Fired BBQ | Enclosed Firepit | Steel Construction | For Camping or Backyard Use - 4WD Supacentre

It seems the particular model I chose is out of production and the current models are square sided, rather than rounded, but this plays very little part in its utility as a camp-stove. 
The curved sides of the stove feature a welded bar on one side, acting as a hanger for tea-towels, tongs of what have-you, for drying and keeping out of the dirt and off the stove itself. It also acts as a barrir to stop things touching the hot sides of the stove. 
 
Stove pipe sections all fit inside the stove for transport and storage. 
On the other side of the stove a similar bar forms a hinged handle for carryig the stove, briefcase style (before setting up). It could also be used for hanging things, but more care needs to bwe taken as its stand-off distance from the belly of the tove is far less than the fixed bar on the other side.  

The three legs of the stove are hinged and fold flush to the belly when in transit, held in place with pins, each with their own retaining chain. The legs each have a round foot, each with a couple of holes drilled through for tent pegs to secure the stove in place. 

The legs, once unfolded, are held in place by those same retaining pins as used for storage. The rigid stove-pipe sections are easily fitted to the stove-body, which features a small section proud of the cook-top for ease of mounting. Its worth noting that one section of pipe features a flue control valve, just a simple spinning disk on a rod that can be angled to choke down the fire as needed.  The five stove-pipe sections do not feature a spark arrestor, or an end-cap, but it has been easy enough to make one with a re-purposed soup-can and a couple of tent pegs. With all five pipes connected the whole stove tops out at 2.45m (~8'), which puts smoke well out of the way, but well worth staking the feet to avoid any tippage. The stove top measures  45 x 24 cm (1'5" x 9 3/4") and has a trio of divots pressed in for rigidity, as well as a 15 cm (3") diameter removable burner lid, with retaining notches and a recess for a hook to pull it off the fire. 

The door is a simple circle, hinged on one side, with a notched latch to secure the fire closed, or cracked open for air-flow. 

The door is also 15 cm (3") diameter, which along with the internal length of the stove at 43cm (17") or so, limits the sice of the wood it is loaded with, but not unreasonably so. A small curved ash-lip is also provided, and slots in under the door to catch and embers that spill whilst filling or stoking the fire. It also provides a nice rest for roasting foods on a stick, in the stove. 

With the burner lid off you can get quite a a roarimg fire going, especially good once the fuel has all caught and the flue is drawing any smoke through. This lets you build a good bed of coals to cook with. You - could- cook directly on the stove top as the bare metal gets quite hot, but I prefer to put a pan or pot on, to assist with cleaning. I've found that the surface does rust if left in the open so have taken to oiling it, as I would to season a cast iron pan which has helped protect it. Obviously this can lead to a bit of smoke as it burns on, but well worth it to keep the stove in good condition and leaves a great finish.


A piece of good fortune came in the form of the thick walled cast iron pot that I salvaged and restored fits perfectly into the burner lid opening, which both speeds the hating process but eliminates any smoke escaping. Its important to keep an eye on the cooking progress as with any wood fired stove, it can develop hot spots. 

Whilst obviously not a hiking stove, all together in its canvas carry bag the stove is quite portable, with space inside to carry the stove sections as well as a couple of fire poker tools. 

I dont have a hot-tent, nor much desire to do much cold -weather camping, but if I did, i'm certain this stove would make a fine addition to camp. My famly certainly enjoy the occasional fire-side, back-yard gather, without the concerns of smoke in the face or embers blowing that an open fire would bring. 

Whether its kranskies on-a-stick, a pot of beans, that old classic marshmallows, or a simple pot of tea, there is somehing magical about having your own fire. 

Easy enough for littlest-coyote to set up on their own, compact enough to throw in the back of the bug-out vehicle. 


Thursday, May 9, 2024

Blog rating!

I happened across a mention alert in one of my feeds for this blog and was very pleased to find that the aggregator service Feedspot had rated and included Apocalypse Equipped in their rankings. They ranked "Tactical blogs" by Relevancy, authority, social media followers and freshness. Based on their assessments, this blog ranked 35th out of 60 (out of thousands that exist)

Needless to say,I'm thrilled and proud. 

Since starting this blog in January 2012, I've made 724 posts, and received some 1,862,102 views. I've had the good fortune to work with Industry leaders like Platatac, Propper, 5.11 and Breach Bang and Clear

I've slowed the pace of my reviews in the last few years, focusing more on living life with my family, but look forwards to sharing many more needful items, tips and tricks, continuing to bring you all my honest, considered and thorough reviews of kit and gear. 


Friday, April 26, 2024

Retrospective: Long Term Plans (pt. 2 of Terrorists! Plague! Zombies!)

  Going back in time for a bit, I went back and reviewed my old LiveJournal (June 2003 - September 2017) and found this gem I thought I'd share here too. Written in 2003, in the halcyon "before times, pre-Covid, pre-"The Walking Dead", I pondered what to do in a "28 Days Later" style disaster, in two parts. Much has changed in the 20 years since I first wrote this. I have two children now, and the very world has changed. Here are my un-edited "long term plans"Circa 2003. Enjoy.

Short term plans post here:

is this your hand?
the story so far
LONG TERM PLANS


been a bit too busy to do much more on this until now, I had a good talk with arcanumveritas on the topic too . .so here goes

High security habitation:
as noted originally, I would go for a construction site (say a five of six story office building or some such), which I could easily modify to be "skilled climber only" access (once again assuming the zombies can't climb, only scramble.
This site could be readily fortified in the long term, (lots of raw materials and equipment just lying around. My ideal site would have a couple of buildings neighboring, from which a rope traverse could be strung (a two rope bridge - one for the feet, one for the hands), again working on the premise that the zombies can't cope with the skill needed.
Another feature of building sites are the region of clear ground surrounding them, generally, there needs to be room for all the equipment and material drops, so this leaves a pretty good killing zone around your encampment. Equipment keys may be found in the site office, as would plans and such. Having multiple redundant escape routs means that if you are chased home, you can get up either by your main route, or by any of the rope connected buildings on either side.
Hurricane fence around the site would be a plus (solid walls might be bashed down, but the flexi links would give more than break) it might be necessary to cross truss the poles of the fence to better brace them (another good point about hurricane fence is that it is see through, and you can shoot or spear through it without damaging it overly). Again, camping and adventure stores would provide ropes, slings, pullys and the like.
Ground floor should be cleared of all heapable debris, as should all the walls of the structure. First floor should be fortified with more hurricane fence and have noisemaker alarms (snapable twine tripwire holding a can of nails off the roof - I know this works, I’ve used it) around access points. Barrels of fuel or other pyrotechnics (like home-made napalm) could be tipped on approaching zombies, or even set the whole floor on fire - concrete doesn't burn too well, and you needn't set fire to the world, just enough to cook some zombie-ass.
Second floor should be barricaded but could be used for supplies (why would you want to haul stuff higher than you need to, except what was at risk from a "scorched earth" attack see above.
Habitation could be on the third floor (or other floors as long as there were a couple of roofs above you for heat retention in winter and coolness in summer. By lashing planks to concrete support beams it would be possible to nail heavy plastic sheets to enclose areas, making rooms out of bare floors. (Drilling concrete is hard to do right, and no power to drive your electric masonry drills either . . .)
Wood fires in 44 gallon drums for heating (in ventilated "rooms" - duh) to conserve bottled gas for cooking and water purification. Sanitation by over-the-edge-dunny, just like in castles. Sponge baths and retaining "grey water".

Personal Protection Equipment:
As previously stated; waterproof (gore-proof actually) rugged gear like motorcycle leathers and racing suits, motor-cross armor and helmets, 3mm wet suit, respirator/face-mask, gloves and such. In the long term, you would want several full sets, for yourself (replacements) and for any and all survivors you come across.
Industrial containers of cleaning products wouldn't go astray.

Weapons:
As long as there are zombies in your area, there are going to be risks, and after a while, "culling" may prove to be worthwhile (once you are established and secure). Assuming you are not directly competing for resources (-do- the zombies eat or drink?) they still want to kill -you-, and will not stop trying. But you have the use of your thumbs, and long range firearms. Raiding the few rifle stores in the city, police stations and maybe local army barracks might yield some more firearms, and whilst I would keep my shotgun and sword handy at all times, you could do with some rifled weapons to pick off zombies at range. By setting up a killing zone somewhere (not near your habitation, you don’t want to advertise) again, a raised secure location, with a clear field of fire, you could draw the zombies to you; car horns explosions, yelling, etc and pick them off. The risk is of course being overwhelmed. Several fall back positions are essential, as is not only a supply of easy to access ammo, but also of weapons, in case of jams and fouls, just ditch it and grab another - you can always get it back later, its not like they are going to steal it . . . )
Military hardware might be an option if you know where to get it, and there is anything you can use laying around.
Home made explosives and pyrotechnics would likewise be good if you know how to make them (I can do some) but may be just too difficult to use effectively.
Traps around your area (sign-posted for any survivors who stumble into your area [zombie’s cant read]) would also be good; deadfall, pits, spikes (swinging and emplaced). No need to go non-lethal, that will just end in catching a loud zombie, who will bring more friends, and wreck your trap.

Transport:
Likewise, i'd stick with the diesel flat-bed truck i initially proposed, unless i came across an army UNIMOG or ASLAV
and again; stockpile spares, fuel and another vehicle. arcanumveritas suggested that when traveling, coasting the last 500m (as best you can) before stopping and getting out of your vehicle would enable you to arrive without alerting the zombies.
Having a boat might also be of some use, its a mobile habitat, and could move you to one of the islands off the coast, but you would have to see if zombies could swim first to check whether or not that would aid you overly. Similarily any of the big ships in the harbour would make quite the prize, once any gang-planks were knocked down, and ropes were made secure (keeping zombies off) but big ships require crews and skill to move. But they would be nice and secure to live on.

Supplies:
Venturing out would probably be the most dangerous task a survivor would face, and should be done as infrequently as possible, and be done as prepaired as possible. Mid morning departures and late afternoon arrivals avoiding dusk and nightime travel, when not only the zombies are more active, but also visability is lowest. Securing the exit point would be the first step, either by leaving as quitely as possible, and resecuring the perimiter defences, or ifthere are zombies in the area, by killing them off as quickly and efficently as possible, and leaving rapidly. This would leave your compound exposed, and would require patrolling of the interior upon your return, which, would take time, so would by necesity cut excursion time, to allow for daylight search time.
Once local supplies had been exhausted, it is likely that further and further travel would be needed to reteive supplies. By avoiding major routes (Highways and Freeways) which would probably be clogged with abandoned cars you could still reach suburban shopping centers. Backing up the truck, and loading packaged goods in bulk directly from store-rooms would be quick and efficent. Once local and suburban supermarkets are exhausted (which would take some time) the outlying supply depots would be next in line. By collecting supplies in bulk (keeping in mind a balanced diet, as best you can with tins) you would be able to supply yourself for quite some time with a couple of truckloads. Likewise army bases (if you can get to them) would be filled with all kinds of goodies. However, raiding large greeneries may well supply you with garden vegatables and fruits-trees, which you could populate your upper floors with, giving you a source of fresh vegitables, as would orchards and the like, there are several only just out of Melbourne. You might even collect livestock from the proximal farms and bring them back either live, or as fresh meat.
Hopsitals have supplies of medication, saline, and surgical gear, but most of the pharmesuticals have short shelf lives and many need to be chilled.

Community:
Ok, so now io get to address the "save the girls from the college dorm" suggestion taavi made, untill i was situated, i wouldnt go looking for other people, no way in hell. But once settled, it would be worth while. In fact, very worthwhile. An extra set of eyes means extra security, be it on an excursion, or while constructing defences (long, hard and noisy) and if nothing else, for the community of it.

Rescue:

(more to follow)

Retrospective: terrorists? plague? zombies? what i'd pack for 'the hills'

 Going back in time for a bit, I went back and reviewed my old LiveJournal (June 2003 - September 2017) and found this gem I thought I'd share here too. Written in 2003, in the halcyon "before times, pre-Covid, pre-"The Walking Dead", I pondered what to do in a "28 Days Later" style disaster, in two parts. Much has changed in the 20 years since I first wrote this. I have two children now, and the very world has changed. Here is my un-edited "short term plans"Circa 2003. Enjoy.


zombie
so after watching 28 days later i've been thinking about what I would do in the event of discovering that I needed to escape. Now, I have the advantage of having already had to do this for real just before the first Gulf War in '90 (well we never actually left, but we were packed and ready), but I thought I'd have another think, as an excersise in logistics. Major movie spoilers included as background, beware.


Situation:
Terrorists (or misguided animal rights activists) have released a virus which zombifies anyone who gets infected (infection is by fluid-fluid transfer, limited direct aerosol and requires a primate host). The infected undergo minor physiological changes, but psychologically are rendered incapable of rational thought and most survival instincts, such as fear of fire, and presumably feeding and drinking. Their only actions are rest and the pursuit of non-infected individuals to attack and kill or infect. Within days of release the plague has spread throughout urbanised areas, and whole population centres vanish. Government efforts to slow the infection are overwhelmed. Infrastructure such as power, water, gas, food distribution and communications cease. Perhaps one in one hundred thousand people is neither infected or killed. Presumably the infection is worldwide, but this is unknown, without a means of communication.

You (me) wake to find yourself in an empty room, an empty hospital, and empty world. signs of chaos abound; looted shops, car wrecks, and bodies, many many bodies. Scattered newspapers and graffiti indicate the end of the world.
You meet a couple of other survivors, they tell you the rest. You meet some of the infected and flee, some are killed as is one of your fellow survivors, by the other.

What do you do?
First up, I would hole up and assess the situation, it would be freaky and I'd be very freaked out and need a chance to think.

The it would be logistics time.
Where to live? Do you risk the city, or head out into the country? There are supplies in the city, and they count.

So, short term,
high security habitation:
in my opinion, most buildings are not equipped to hold off ravenous hoards, too many fire escapes, glass fronting and the like, sure buildings without fire escapes are "death-traps" but for fighting off the zombies, you want security of flesh, not just of mind. Why not a bank? you might ask, well, most security requires power, to open (and lock) all those magnetic locks, un bolt all those doors and the like. Without power they just sit there, jut like in the movies, they need to be 'opened' by skilled people with tools. well, that's not me, I'm a guy all alone in a dead city. then I thought height. office towers and the like, still, fire escapes. this would require a bit too much fortification. whilst the zombie masses cant do locks and such, I figure they could probable shamble over blockades, bash through simple reinforcing and the like. ever try to cut a fire escape down? it wouldn't be easy.
The other problem with high density populations like in towers would be the resident zombie population, odd are, the more people that used to be there, the more zombies there are now.

So in the end, I figure in rooftops, places where it takes quite a bit of skill to get up to, like factory rooftops or construction sites, where the stairs aren't up yet (remember the lifts aren't working). Go high enough to see around, and to give some space between any noises you make and the zombies listening for you. Get rope (climbing or hardware stores, there are several in and around Melbourne, most cities would have them) Knock down any scaffolding that gives access. When you need to get up, use your rope, when you are up, pull it up after you. Build some shelter, secure as best you can with what you have.

Personal Protection Equipment:
So you splatter mrs zombie with a baseball bat, that's great, did you make a mist of her brains all over yourself? woops.
Raincoats, plastic raincoats. Rubber gloves! Goggles and dust masks! id head to a fire station, get a face mask, and a fireman's outfit. Or motorcycle gear, nice and new from the empty shops, wack a raincoat over that and you have a splatter and tear resistant set of armor. Sure, if you know where to find riot gear, go for it.
Detergent and antiseptic! wash wash wash change clothes, get out of splattered gear if its not sealed up good. You may get hot, but when your have to go out, do it safe. Get some body armor, once again, motorcycle shops have it. Some 3mm wetsuit probably wouldn't go astray either, not too heavy, or thick, but tough waterproof and resilient.

Weapons:
Lets be fair, zombie comes after you, you want it to go away, quickly, and from as far away as you can. Me, I know pointy things. screw baseball bats. screw having to hit someone multiple times to put them down. I'm going swords. Sword verses bare-hands gets messy quickly. But that puts you very close to the action, and given the choice I'd be a bit further away. so what to do? a spear or lance is a good idea, especially if you have a cross bar on it, good for sticking your zombie and holding them at bay till the 12 inch, broad leaf head does its job. Even then, that's a bit close for me, id rather not be close enough to have to go hand to hand. That brings us to projectile weapons. initially I thought of bows; quiet, light but a bit slow between shots. Rifles? well not as prevalent in Melbourne as in the US, but more so than in the UK, but again, there are problems, they are loud, and alert the zombies as to where you are and like an arrow, a bullet is a precision object, it either hits or misses. my answer, shotgun. packs a punch, good enough range for venturing out for supplies with added bonus of spray, for those close in situations where seconds would count. sure its loud, but if you are using it defensively they already know you are there. If you were taking the fight to the zombies (which I wouldn't want to) then you might want to find some military hardware (good luck).

Transport:
Diesel, there are lots of trucks, they have big tanks and there would be lots of fuel sitting around. (petrol stations would not work, they have pumps). Flat bed trucks are the way to go I think, plenty of storage room, no where for zombies to hide, pretty good pickup, and range. get one with a bull-bar and you are all set for zombie bashing fun. jerry cans of extra fuel just in case. make sure its got a jack and spare tyres.
Actually finding a vehicle might be an issue to start with, if everyone is dead, where are the keys? I would start looking for depots, "leave your keys" parking lots and the like, get -something- and upgrade later.

Supplies:
No power, no water, no food distribution.
Fresh produce would be all rotten or going that way, but canned and preserved good will last for ages. Presuming they haven't already been looted, supermarkets would be a goldmine of supplies, so would the distribution centers that supply them. Bottled water has become very popular and can be found in bulk. Canned meats, vegetables and fruits are all easy to find as are vitamins and antiseptics. Rice lasts forever if its kept dry and pest free, and also comes in bulk, but needs to be cooked. Batteries and torches, gloves and salt.

Camping stores would supply cooking stoves, sleeping gear and outside wear and adventure gear (ropes, harness and such)

Hospitals would have medical supplies, but how many of us know how much of what to take and when? I can plug a hole, and -look up- antibiotic dosages, but that's long term as far as this scenario goes. They also have plenty of cleaning agents and protective gear.

Syphoning water from tanks would work for a while, until the rains, likewise fuel, from parked vehiclesPart 2 here:

Friday, February 16, 2024

Review: Back Country cusine Beef Terriyaki


Time for a food post. When on the trail, camping, bugging out or even bugging in, it is advantageous to have tasty, easy to prepare and storage stable meals. I've covered Back Country Cuisine meals before as well as the similar Outdoor Gourmet Company meals Even compared to the main meal components of MRE ration packs they compare well. One thing I really like about this kind of dehydrated meal (which I fondly recall from way back in my Houston childhood,) is the NASA like retort the meals come in.  The main meal  I selected was the beef Teriyaki, which weighed in at 175g dry, and called for 438 ml (1¾ cups or K2 fill line) of boiling water be added to meal pouch. Stir and stand for 10-15 minutes. Serving size 613g (once prepared). The pouch has an internal ziplock to seal in the meal and heat during the re-hydration process. The retort bottom blouses out at the bottom to allow it to stand on its own. 
The meal itself  consists of freeze dried beef, rice and vegetables in a soy flavoured sauce. The meal is both Gluten free and had no added dairy, both good to know for those with dietary requirements like Coeliac's such as I have in my family. One thing I neglected to pay attention to was the full ingredient list and one of the vegitable components was dehydrated capsicum to which i'm allergic. Thankfully I was able to pick out even after re-hydration, with no ill effects. The squares of dehydrated beef reconstituted nicely as did the rice. The dish, once water is added, and left to stand for 10-15 minutes, and given a good stir ( right down to the corners of the retort), the meal thickened up into a very satisfying consistency. Easily spoonable without being sloppy, it was easy shared out.  
I shared this meal in order to help vette it for future stock-ups  (a very good policy, taste-test your food preps). 
As well as  being a hot, fast and tasty meal, nutritionally they offer quite a lot. A single serve meal provides Energy 3180kJ (759Cal), Protein 34.1g, Fat 22.7g, Fat - saturated 9.3g, Carbohydrate - total 103g, Carbohydrate - sugars 27.1g, Sodium 1990mg. Probably not what you'd want to eat every day, but certainly suitable to have on adventures or whilst in the midst of crisis. The flavour was mild and inoffensive and as an all-in-one meal it certainly works. 

I've made mystery-can meals before, but having a balanced and blended meal was an excellent step up in preparedness and certainly a vast improvement in palatability over compressed rations biscuits. Family approved!


Hal


Thursday, February 8, 2024

Prepping shed

As the final part of our move from the original home of Apocalypse Equipped Actual, we installed a garden shed in order to store my copious accumulated camping and prepping gear. No room in the new house or garage. My parents were kind enough to gift us this flat-pack, DIY ABSCO 3x3 shed. We built it over a couple of weekends, in a quiet corner beside the house, which was a nice project for me and my good-father. The shed consits of a frame to which pannels are afixed. Assembly is made easier with the help of pre-drilled holes and Absco’s patented SNAPTiTE technology that allows panels to lock into channels without the need for screws. (note, it came with screws and is screwed together, but self-tappers all the way.)

We found there was some manufacturing variance on the pre-drilled holes that needed occasional modification to set things secure and square. The shed is designed to be bolted onto a pre-poured concrete slab, but rental property constraints meant that we instead used a treated pine sleeper frame we anchor-plated together and bolted down to star-picket anchors we pounded into the soft ground. The bare grass we built over was covered in places by salvaged pallets or timber sleepers to set things upon. I put a long table in, along the back wall and a couple of ‘duckboards’ to avoid any seepage that might occur. 

I loaded my collected camping gear ( tents, sleeping systems, cookware and other needfuls, into some old ikea shelves on the table, and many, many stacked Tactical Milk Crates full of my other preps (canned goods, MRE's, and the like) that i'd collected before and during the Covid years. I also have spare tools, crockery and other super-numerate supplies. I also had a number as as-yet unpacked boxes of stuff from the previous house. Initially I just tetras-packed it all in, floor to ceiling in order to get it all in so I could free up other spaces and make them functional. This didn't lead to a very accessible and orderly storage system. 

A process of consolidation and rediscovery over a couple of sunny weekends enabled me to make a little more sense out of my collection, both for ease of access but also to make room to store more stuff and even use the space for additional supplies and furniture, like this cupboard unit, which makes for good assorted pack and kit storage (I have sleeping bags, hydration systems and some tools). 

I also managed to collect all our only occasionally used cold weather snow gear, as well as my various cammo outfits. Under the big table, I've been able to stack my foldable tactical crates. which makes good use of that space whilst having these easily available in the event of a bug-out or camping trip.

 The placement of the shed puts it in the shadow of our side fence and beside some trees and the back corner of our house. It's in the full daylight ark, but has some wind shelter. We placed it on a flat spot but the area is in a slight depression so the duckboards and pallets  keep all the stuff off damp ground. (I open the doors of windy/ sunny days to ensure it doesn't get too humid in there).

I'd noticed condensation on the roof and walls, so I made sure to space my stacks so there was some clearance on all sides (which also improves ventilation)and even though I have  a mix  of storage containers ( crates, chests and bags) I've managed to make an orderly store for my preps, in a safeish, dryish, dark place. I haven't yet put a thermometer in there. but I expect it gets pretty warm in there  (which will obviously affect shelf life of my food preps) but that's a next stage concern. 

How do you store and organise your preps?


Tuesday, January 9, 2024

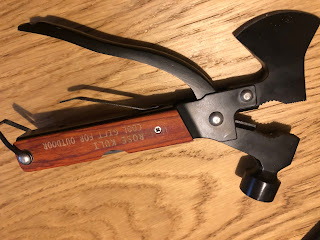
Review: Rose Kuli hammer multitool

Multitools have a special place in the heart of all preppers. They make for a resource rich bundle that can provide a lot pf utility in a small package. whilst the ubiquitous Swiss Army Knife is probably the first multi-tool for many ( it certainly was for me), the Leatherman or Gerber belt tool has taken the place in the eyes and EDC of many and whilst these paragons of utility assuredly have their place, they don't do everything. That's were something like  the Rose Kuli hammer tool comes in. 

Prominently featuring a split hatchet head and a hammer head, the jaws opening up to expose pliers and cutters, with a spring assist for the plier arm. The Rose Kuli tool features red wood scaled handles, screws recessed in at the high end and riveted at the bottom end, the plyer-arm retaining loop seats into a notch in the bottom of the plyer arm, preventing the plyer head from opening up unexpectedly. 

The hammer-head sits directly in line behind the hatchet head to maximize impact efficiency for both tools. I found that the small hatchet head being only 4cm (1 1/4") broad but was plenty enough tool to carve a notch in some logs i have seasoning at the back door. You wont be felling any mast logs with it, but it'll work nicely delimbing small logs, and even baton splitting, the hammer head providing a good strike face. I worried that the hatchet head appeared riveted in place and would come loose but it turns out that top rivet only holds the sides in place and the hammer/hatchet pieces were secured by the pivot rivet and marry up tightly when the plyer arm is closed. 

The plyer jaws have both a fine toothed and a broad toothed section, for both fine and coarse tasks as well as a 1cm (2/5") cutting jaw, for wire or nail cuttings. 

The hammer itself drives nails quite well, for such a light tool at 400g (14oz), and I could tap one into my new treated-pine fence-posts with ease. The wood scales and plyer arm make for a comfortable grip on the palm and fingers. the hammer-side handle-face holds a surprise in the form of a selection of folded tools.There are 5 fold-out "blades" to further supplement the tools over-all utility.  From left to right there is a simple leaf-point single edge blade, a Phillips head screw-driver, a wood-saw with fish-hook disgorger tip, a 4-size hex nut wrench (5,6,7,10mm) with bottle-opener and pry head, and a serrated blade  with a file and flat-head driver tip. I would have liked a can-opener, and none of the tools lock, but each are functional.

As Corb Lund would sing "Well it's a vise grips for pliers, and pliers for a wrench
A wrench for a hammer, hammers everything else
"

It came in a flimsy nylon sheath with a hook and loop flap that barely covers the heads, leaving the edge of the hatchet somewhat exposed. 


For a light-weight tool, it certainly bridges the gap between belt-multitool and camp-hatchet.


Related Posts Plugin for WordPress, Blogger...