Showing posts with label First-Spear. Show all posts

Tuesday, May 13, 2014

Events: Tough Mudder #4 March 2014


I did my fourth Tough Mudder in March, which earned me both a green (x2) and a PINK (x3-6) Mudder headband.

It was also my first TM solo, whereas before I'd run it with teams of work-mates, or friends, this time I just tackled it on my own, along with the other 20,000 or so people who did it this time around. It was a slightly overcast and chilly day, and I was very glad that I had set myself up with my gear with this in mind.

This time around, as I had done previously, I geared up in all my "Zombie Control Officer" get-up, some for show, some for practical reasons. The core of my outfit was again the
FirstSpear OAGRE tactical vest which I've worn to all but my first of these adventure runs. This vest has given me both a platform to attach my accessories, but also provided me with a modicum of abrasion resistance, not to mention keeping my shorts on during some of the hairier moments, with its built in belt-attachment loops.

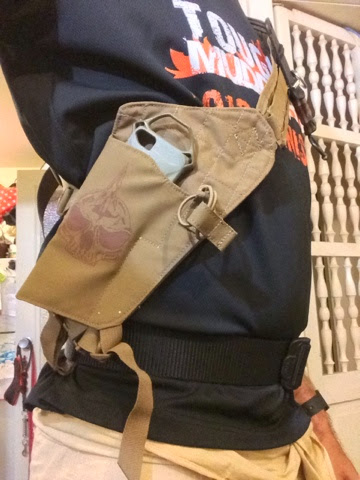
I mounted a set of Platatac twin 40mm pouches to my left side, which I filled with energy bars. On my right side, I mounted a Platatac SR25 pouch for another energy bar, a magnet to switch on and off my Contour GPS camera which has trouble in its waterproof case (see below). I would have also kept my spare battery for the Contour in there too, in a double-ziplocked baggie, as I've done in past, but alas, I couldn't find the damn thing till the week after the event, stuck in the bottom of a cable-jar.

On top of the vest I wore the same Platatac admin pouch as I had previously, with a cyalume stick, permanent marker and a small laminated map of the course. I tracked my progress, marked off obstacles and marked times as I went. I also lucked a large LARP foam fighting knife behind it, for photo-ops and in case any of my fellow competitors wanted to "go zombie" at me. No one did, haha. My loss. Wearing my Z.E.R.T. membership shield, call sign (Q3199) I got a lot of nods from the other costumed participants.

Also on my chest rig, I wore the UVPaqlite for power-fee solar dark-space navigation, and on my shoulder, opposite the ITW-Nexus Picatinny mount for the Contour, my PrincetonTEC Switch MPLS-light, which alas didn't survive the course, and judging from the few photos I found, looks like it came off at least in the first third of the course. Makes me sad, but I guess I'm in the market for a new helmet light...

I wore a Platatac Punisher-2014 CUS shirt under the OAGRE, which kept me cool but not cold, dried quickly and chafing free for all 23km of course.I clipped my bib number to my MOLLE with plastic side-opening ALICE clips.

I wore running skins under my TripleAughtDesign Amphibious Shorts which cut down on abrasions even further, and kept me a little warmer when the wind hit us. They also helped keep my BlackHawk! kneepads on and in place, and again, without the bleeding hamstring regions I've had previously. Skins are definitely an endurance asset. This time around I also opted to wear my BlackHawk! elbow pads too, which cut down on my elbow gravel-rash immensely. A little cumbersome, and made getting hauled up by helping hands a little more challenging, but so worth it. Between the skins, the knee and elbow pads you could hardly tell I'd done the course (apart from the usual behind-the-thigh bruises) just a day or two after.

I had a Source 3L WXP storm bladder on my back again, in an early strapless version of the Platatac Bravo hydration system, which was PALS/MOLLE locked on tight to the OAGRE vest.

This time I also wore my Paleo- Barefoots ANTERA paws with the neoprene inserts, the PAWS dots made a heap of difference, giving me all the grip I needed on events like "Twinkle Toes", which was a wet-beam crossing, and running up the quarter pipe of Everest. I also wore the Paleo-Barefoots BAMANOS paws, giving them their first big outing for me. Unfortunately, in their current form, without a lining, they chewed up my hands quite a lot.

I've passed on feedback to Jörg of GoSt Barefoots, and the roughness I felt when wearing them, especially on the hang-by-your-hands obstacles like the "just the tip" vertical wall-crawl, the "Funky Monkey" monkey-bars and "Leap of Faith" (jump off a platform, over water and climb up a dangling cargo-net, my favourite obstacle of the course.)

I completed the course around 45 minutes faster than my previous times, which included an extra kilometer of "Legionnaire" veteran course, and four extra obstacles. The Powerade / energy bar combination meant that I didn't stop running for water or snacks the entire time. My map was a great morale boost, as well as helping me keep my orienteering awareness up.

These events are a great hobby for me, they test my body, determination and gear.


Here's a shot of me fiddling with my camera, when in its case I need to use a magnet to switch it on and off, which isn't always easily done. Especially when all caked in mud.


I only managed to get a couple of clips from this Tough Mudder, because of problems with the switch. Don't mind the muddy banter ....


I had a really good time, signed up for the next Melbourne event on the day, and made it home in time for dinner.

Monday, March 31, 2014

Review: First Spear - Walt holster

I had a flash of madness a while back, and bought myself something fairly silly, for me. A very specific purpose piece with very little chance of cross-purposing. But so damn cool looking.

This is the Walt torso holster from First Spear. I've been extremely happy with my First Spear OAGRE vest, which I've taken with me on my adventure and obstacle runs. These folks make some good gear, well thought out and put together.

The Walt will apparently fit the 1911, M9, 226, Glock, M&P, XD and other similarly sized pistols, none of which do I own, or have any reasonable expectation to do so any time soon (awww).
That said, its a really nice piece, and I wanted to have it to have an alternative to my Hazard4 RG Harness or the venerable EDC harness before that.

The holster is skinned in a grippy hypalon, which keeps it snug and slip free in position, and is lined with a micro-suede finish. Sewn to accommodate the trigger-guard, but reported not to take any optics or lights, a shock-cord and hypalon tab is set up for weapon retention. I found that the holster took my Strike Industries iPhone 5 SHOX case nicely.

Loops on the top and side of the holster are to affix the ITW G-hooks which give a quick but secure attachment for the baldric which as it happens, is set up with a single row of PALS/MOLLE loops along its length, until the webbing finishes of in an adjustable loop, for fitting. I mounted my awesome little ODDJob knife by SAR GlobalTool to mine, because it was a perfect addition to the rig, for the uses I have been putting it through.

The holster is designed to be worn under the right armpit, giving a left-hand pistol draw, which I thought was a little odd, but that's where I put my phone, anyway, so it worked out nicely for me.
I'd have to put the question out to the serious pistol carriers out there, as to your thoughts on this kind of set-up.

The bottom of the holster was open, to allow for longer barrels, and options for those of you who don't want to disturb your neighbors when shooting geckos and the lowest edge is set up for belt connection with the same kind of Quick Release buckle as seen on the OAGRE chest rig, being a looping hook-and-loop with press-stud to ensure a very secure connection, especially of the belt you are wearing features loop-fields to do just that.

Between the materials, the construction and the form, this is a pretty cool holster, with the gnarly First-Spear logo on the side, and its wrap-around PALS/MOLLE loops makes this a sadly under-utilised addition to my collection, but I like to pull it out from time to time when I can get away with a bandoleer ...


Wednesday, September 18, 2013

Events: Tough Mudder #3 September 14th


Last weekend I participated in my third Tough Mudder challenge. Previously I reported on what I wore on my first and then subsequently, for the Stampede and then earlier this year, my second Tough Mudder. I see the Tough Mudder challenges as more than just an Endurance Sport event, but as a training and testing opportunity for me. Training myself to overcome obstacles, and go the distance, but also in anticipating the hardships my team-mates will face, and either preventing or mitigating them.


The Tough Mudder Pledge is a good starting point for this:
  • As A Tough Mudder, I Pledge That ....
  • I Understand That Tough Mudder Is Not A Race But A Challenge.
  • I Put Teamwork And Camaraderie Before My Course Time.
  • I Do Not Whine, Kids Whine.
  • I Help My Fellow Mudders Complete the Course.
  • I Overcome All Fears.

My team mates did not feel up to running the length of the course, which is fine, I hate running, but I can, and I have been training to do so. However, the discipline of NOT running, of not leaving a team-mate behind for personal glory, was what it was all about.

Here's the course for this time: MelbourneSpring2013-CourseMap
There were all the old favourites, as well as some new ones.
 One set of Berlin Walls was replaced for forwards sloped walls, giving no purchase to climb over. There was a "Warrior Carry" where team mates had to carry each other for a distance. A couple of different "over and under" climbs and my favourite, the Cage Crawl, where you had to navigate a long caged-in, water filled trench.

I took my iPhone along, in its SLXtreme waterproof case which unfortunately suffered a non-spectacular failure, with one of the hinge-caps breaking off, causing it to leak. This took my phone offline for a couple of days (rice in a take-away-tub, by a heater recovered it) but I managed to track half of our progress with it here: 11.84 km run with @RunKeeper.

That was a bit sad, but that's the way these things go. I also trialed a couple of other pieces of kit: I fitted my Contour GPS to my shoulder via the Picatinny adapter and fixed it to an ITS Picatinny-MOLLE adapter which in turn I mounted to my trusty First Spear OAGR vest.

Knowing there would be dark tunnels, I fitted my Princeton Tech Switch MPLS light to my MOLLE on my chest, along with my ill-fated SLXtreme case, and a  glow stick from UVPaqLite. I also tried out my newly-acquired rejected prototype Platatac hydration carrier that I scored from eBay, filled with Gatorade. I'll cover that separately, but it served its purpose adequately. TAD Amphibian shorts and my x-strapped (this held them on, but rubbed me raw) Blackhawk kneepads rounded off my regular load.

I kitted out with my Z-E-R-T patch and call-sign tab, as well as another off-market Platatac prototype admin pouch, which I kept a laminated copy of the course map, and a spare cyalume stick in case my team-mates needed some encouragement in dark places, when all other lights go out.

Lastly I wore my GoST Paleo Barefoot PRONATIV's along with their Lining Socks, which, after a 2km walk from parking to the event, 18km of course, and another 2km back to the car, were amazing.

This time I decided to collect loot, and picked up two discarded hydration packs, one I gave to a team-mate, the other I slung, as well as several "technical shirts" and a bunch of gloves. We'll see if any are salvageable.

I had a really good event, it was lots of fun, cold, wet, dirty fun. I feel that again I have proven to myself that I can not only achieve this kind of goal myself, but can also aid others in doing so too. Orange Headband ahoy!

Tuesday, July 23, 2013

Review: TruSpec Combat Shirt


 I snapped up this shirt from eBay, and have gotten a lot of utility from it. Not surprising considering its design origins.

This is the TruSpec Combat Shirt from Atlanco.

The key thing about this kind of shirt, and the reason I wanted one, was that it combines a 60/40 cotton/nylon blend t-shirt material body with a rugged 65/35 polyester/cotton ripstop blend arms and shoulders. Cool and comfortable torso, tough and rugged arms and shoulders for hard wear and outdoorsy adventure.

Basically I wanted a work shirt that would be good to wear in the long hot Australian summer, in or out of my gear. I always look first to military gear, because i know that it is often built extra hardy, and, essentially, for badassness.

The TruSpec shirts however, have added functionality that is well worth covering. As well as being a breathable, wicking and fast drying ,aterial, the "No Melt, No Drip" Cordura Baselayer fabric is reported to reduce the severity of burn injuries and helps protect against flash fires.

Considering my proclivity for being too close to fires, both controlled, wild and just being stupid, I thought this was a great additional feature that whilst I didn't intend to test to stringently, would come in handy.  As well as what it is made of, the folks at Atlanco gave some thought to those who might be wearing it, and what other utility they would look for. Both biceps house a zippered storage pocket, angled for ease of use.

They also feature loop-fields for attachment of patches, here i've got one from Strike Industries, who make the Simple Plate Carrier pack and Tactical Sling Catch i'm so fond of

I've also got a double sided call-sign panel from PatchPanel and one of their IR IFF squares in the built in tape-covered area. Very clever way of making this a "need-only" system of ID.

The other arm features flag, rank and nametape fields, as well as the zippered pocket.

You can also see here the padded elbow patch, with its double stitching and placement to really add to the build.

It was also great to not e that there were no shoulder seams, and all the seams were flat, which really minimizes chafing and pinch-spots, especially noticeable when carrying a pack, or doing repetitive work like chopping wood or digging in a field.

I also liked the cuffs, which also featured hook-and loop closures, to keep nature out, but also the gusseting that kept the fit true.


They offer these in several different sizes, in a variety of colour schemes. I opted for Large/Long in order to accommodate my super long arms, but could have done with a "medium" body fit, i think. The Khaki/Sand option sat nicely for me. You can see here how the tough shirt sleeves poke out of my First Spear OAGRE vest, whilst my torso has the softer wicking cotton/nylon t-shirt.

All in all a very comfortable, rugged and practical shirt, and one that I expect to get a lot of hard wear out of, no matter what I throw at it, or myself into.

Wednesday, February 13, 2013

Events: Tough Mudder #2 Melbourne 2013

 I ran the Tough Mudder again this year, January 19th, which was a lovely sunny, breezy day here in Melbourne.

The event was held at the Phillip Island Raceway again, which lays an hour and a three quarters drive from Melbourne, and backs onto the Bass Strait. I had only recently been given the all clear from the ankle troubles of late last year, and had not had a lot of preparation, baring three or four runs, of 2 - 5km, so I wasn't sure about how I would cope, not only with my ankles, or my general lack of CV fitness as a result of my injury, the prednisone treatment (25mg daily, dropping 5mg each week to wean away).

Regardless, I had booked in, and was raring to go. I had tried to drum up interest from the folks I ran with the previous year, but no takers (although it turns out, a couple did the event as it happens).

For those who don't know what the Tough Mudder is, it is a 20+km endurance challenge, with 25+ military inspired obstacles. The events run world-wide, in all conditions, and feature some signature obstacles, namely, lots, and lots of mud, electrical wire filled corridors, and pools swimming under barriers, ice filled pools and all manner of climbing, crawling, and of course, running. I hate running.


The above pics are me before the race, in my running kit, pretty much the same outfit that I wore for the previous endurance event I did, the Stampede with the First Spear OAGRE vest, with my Source 3L bladder in the back, and snap-fixed to the 5.11 Tactical TDU belt, keeping the vest snug to me and my TAD Amphibious Shorts with my trusty Blackhawk! kneepads, which were again, a real bonus, so, "i told you so" to all the scoffing runners out there. You can see me, fresh from the Arctic Enema/Chernobyl Jacuzzi ice bath and dunk, fishing a couple of ice-cubes out from my kneepads. I also wore my iPhone, in its SLXtreme case mounted in the Platatac PRR pouch I got specifically for the event. On my head I wore one of my caps, which I had modified to carry a picatinny rail, in order for me to mount my Contour GPS helmet-cam to, via the Strikemark adapter I have. I also added a chin-strap to the cap, to help deal with the added weight of the camera, which seemed to work pretty well. I wore one of the Under Armour t-shirts from the previous Tough Mudder and my Ironclad gloves.

I also swapped out boots, having put my Altama's into retirement and for this event, I wore my Bates Delta-8's which really held up well, and cleaned up tremendously.

Here's one of me having scaled a 2m "Berlin Wall" and torn my number off in the process. Lesson learned, bring my own safety pins or lashing system. Their little pins were ineffective!


This is me and my running-mate, #7819 :) doing the SHINBASHI salute after coming over the Bale Bonds.

She and I knew each other socially, and upon hearing my interest in a running-mate, signed up, regardless of trepidation and obstacle-shyness. Far better a runner than I, we kept a good pace, she kept me going on the straights, and I helped her along on the climbing, jumping and swimming, crawling and squelching.

She started the race with a black headscarf to match her all-black running slicks. I was referring to us as "day-ops" and "night-ops". My gear was already mud-coloured, and my head higher up, so don't think that I was getting away unscathed ...

We did the course in just under 4 hours, I felt that it was actually a lot easier this year, even without all the extensive running I did prior to the previous events. This may be in no small part to mental preparation, and experience. There were no "I haven't done it before" nerves. I made it over every obstacle on my own steam, climbed every wall, made it across the slippery monkey-bars, made it up the Everest half-pipe on my first run. I was rally pleased with not only my pace, but the speed I overcame the obstacles in my path, but also how I was able to help me fellow Mudders.


Here I am, following the event, having stripped off the OAGRE, sporting my celebratory headband, and working up the guts to pull my boots off. Not a blister, or scratch, but a lot of grit and muddy water. It turned out that the time-lapse application I had hoped to run on my iPhone hadn't begun, but the SLXtreme and PRR combination had worked like a dream. The Picatinny rail I had mounted the Contour cam on needed to be at more of a down-angle, I took a lot of 3/4 sky footage, but see below for my links.

I dinged my shin whilst hurdling a log, and gave myself this exciting bruise on the back of my left thigh. Last year I had two of these, one on the back of each thigh. This year I pegged the moment when I got it ... scaling one of the 4m Berlin Walls, lesson learned? major muscle groups do not make good leavers!

A great event, a good challenge, and certainly a good conditioning and preparation experience.

Will I do it again? hells yes. As many, and as often as I can manage.


http://contour.com/videos/watch/tough-mudder-jan-2013-1-1
http://contour.com/videos/watch/tough-mudder-jan-2013-1-2--6
http://contour.com/videos/watch/tough-mudder-jan-2013-1-4--3
http://contour.com/videos/watch/tough-mudder-jan-2013-1-5
http://contour.com/videos/watch/tough-mudder-jan-2013-1-6
http://contour.com/videos/watch/tough-mudder-jan-2013-2-1--3
http://contour.com/videos/watch/tough-mudder-jan-2013-2-2--2
http://contour.com/videos/watch/tough-mudder-jan-2013-2-3
http://contour.com/videos/watch/tough-mudder-jan-2013-2-4--4
http://contour.com/videos/watch/tough-mudder-jan-2013-2-5--3
http://contour.com/videos/watch/tough-mudder-jan-2013-2-6
http://contour.com/videos/watch/tough-mudder-jan-2013-3-1
http://contour.com/videos/watch/tough-mudder-jan-2013-3-2
http://contour.com/videos/watch/tough-mudder-jan-2013-4-1
http://contour.com/videos/watch/tough-mudder-jan-2013-4-2
http://contour.com/videos/watch/tough-mudder-jan-2013-4-3
http://contour.com/videos/watch/tough-mudder-jan-2013-4-4
http://contour.com/videos/watch/tough-mudder-jan-2013-5-1
http://contour.com/videos/watch/tough-mudder-jan-2013-5-2
http://contour.com/videos/watch/tough-mudder-jan-2013-5-3
http://contour.com/videos/watch/tough-mudder-jan-2013-5-4
http://contour.com/videos/watch/tough-mudder-jan-2013-5-5
http://contour.com/videos/watch/tough-mudder-jan-2013-6-2


Monday, December 24, 2012

Review: Mystery Ranch - Cinch Strap

This is an awesome piece of kit that I saw from footage of the 2012 SHOT show, and when I saw that the guys at HorNest also stocked MysteryRanch gear, I was really excited. Mystery Ranch makes hardy, heavy-duty packs, accessories and other needful gear, that is specifically NOT "ultra-light". They cater for Military, Backpack hunting, Fire/Rescue and Adventure users.

They have some really innovative kit, and their pack designs really set them aside from many others, and from all accounts, you get what you pay for.
The item that caught my eye most was a piece of load-relief called the Mystery Cinch. This 60g (2oz)
strap and buckle system is designed to offer relief to one of the worst aspects of wearing a backpack, the dreaded arm-pit pinch.

This occurs when a pack's straps slip over the side of your chest, and snag the sides of your pectorals, digging and chafing, biting into the underarms. Over long exposure, this can cut, blister, bleed and could lead to chronic long term injury to serious load-luggers. 

The situation is made worse for those wearing a chest-rig, plate carriers or the like. Shoulder pads of carriers and vests alike tend to slip backpack shoulder-straps off their intended wearing locations, get them hung-up and generally leads to the arm-pit digging... The Mystery Cinch acts to alleviate this problem, and it does so in a really interesting way. You can see here where the cinch has pulled the improvised  straps of my Platatac Bullock Echo daypack out of my armpits and onto my shoulderpads, where they could do their job.

Here's where the magic is. The ends of each Cinch is a tab of rigid plastic, with a press-stud fixed to the middle, and it fits into the channel of your chest-rig's PALLS/MOLLE, between two rows, and the straps loop-end affixes around it, locking it in place. This gives a really secure attachment, using your harnesses own integral construction to give a rock-solid means of mounting this accessory.


Pack-based sternum straps don't offer nearly the same kind of functionality.

The strap closes with a powder-coated metal buckle and tongue, much like a seatbelt, with a press-stud security clip, to ensure you don't get a premature release (and no one wants that). This is really useful, because the buckle itself is a very-quick release, almost a hair-trigger, even. This is actually an advantage, because it means that if your pack is set up right with plenty of strap length, a quick pull of the release tab will let you shed the pack in a moment, no more wrestling strap over shoulder pads and harness when unpleasant things are happening to you and yours.
Here you can see the Cinch set up on my FirstSpear OAGRE tactical-vest running it under the bottom of my ZuluNylonGear CAOS admin pouch showing how the webbing of the MysteryCinch folds around to capture the strap of my pack and keep the top side of the straps vertical and out of my underarms, and the bottom side snug to my waist. The cinch straps don't take up very much room, and apart from placement right at the edge of the pectorals, but could be adjusted to suit your build and rig.


The key is that it needs to be placed to keep your straps out of your armpits and have the buckle accessible to make use of its quick-release functionality. 

Some of the other features of the MyseryCinch are the little details they have included to round off the product. The tongue-end of the buckle includes a hook-and-loop webkeeper which rolls up and secures the excess webbing included for one-size-fits-most loads and users.  All the stitching and hardware are top-notch and thoroughly dependable feeling.

When not hooked up to a pack, the Cinch can just be clipped up, and stows out of the way across your chest, not all that different to the clasps of the OAGRE or Platatac MAC front-opening panel, or on a plate carrier, just out of the way.

This is a rock-solid accessory, with some real advantages for wearers of PALS/MOLLE equipped chests who have to lug packs about. Adventure, Fire & Rescue and Military folks would be really assisted by this really simple addition to their load-out. 

Wednesday, November 7, 2012

Events: Stampede Run


I've talked quite a bit about my training and get-up for Tough Mudder that I ran in May 2012, and I think I got the bug. I also challenged myself to the Stampede.

The course was divided into a 5km run, and a 10km version (splitting off at the 5km mark, and rejoining for the final few obstacles.

The Melbourne 2012 run was held at the the Glenbrae Equestrian Centre in Wandin, and made good use of the site and facilities.


Under and Overs - log crawl and climb
Rope Tango - mud crawl whilst pinned down by a cargo net
Human Window - climb though odd shaped holes
Wrecking Yard - crawl through, over and on top of wrecked cars
Ice Bath - wade through and dunk in an ice filled pool
Bus Stop - climb over cargo netting up and over a bus
King King - big pile of tyres
Spiders Web - climb through a stand of trees wired with bungy-cord
Giant Slip and Slide - a long, long water slide into a pond
Trauma Tunnels - Crawl through piping and squirm through flat plastic sheeting
Sand Blast - do a circuit with a sandbag
Quick Step - run through flat tyres
Hay Stack - climb over giant rolled hay bales
Devils Cave - a darkened shed with falling water, and hay bales
Cable Chaos - climb over a series of stacked cable spools
Gladiators - run past a gauntlet of pugil-stick and boxing pad armed opponents
Tunnel Under - climb through tunnels
Dumpster Jump - climb in and out of a set of dumpsters (one with apples)
Half-Pipe - Scale a high sloped ramp
Sunday Roast - run over fire
Mud Buffet - crawl under barbed wire through mud
Bug Zapper - dangly cable filled hall some of which running with 10,000V!
As well as these, there were numerous stretches of thick, gluggy mud. and wading through murky ponds, and the occasional equestrian hurdle.


copyright to Supersport Images Pty Ltd  

This is my taking a leap over the bonnet of the last car of the Wrecking Yard. It was obstacles like this, and the crawling ones, that made me choose to wear my BlackHawk! Advanced Tactical Knee Pads v2.0 I've had these for a while, and they have done good service, although I have skinny legs, and found that they did slide a little being on bare skin, when I was crawling through mud-filled tunnels. I wouldn't have wanted to go without them though. Wearing suggestions anyone?
copyright to Supersport Images Pty Ltd   


This is me wading through the barrel filled dam, I wanted to give some of my other kit a good solid workout, and opted to go with my First Spear OAGRE vest, that I got from the folks at LEGear. As well as being well fitting, and totally as rugged as I have previously reported, I found that the belt-ties ensured that I didn't have to worry about my shorts coming off, and gave me some significant rash-protection when rolling over and crawling through obstacles. I also ran with some patches: A TAD logo Ranger-eye, I also wore my Stargate LRP nametape, to see how that held up and my ITS "Crew Leader" Tab. I pinned the Stampede ID number to the MOLLE, rather than using the sticky label, knowing the challenges it would be facing. On the back of the OAGRE I laced my "Zombie Control Officer" laminate, for a bit of fun, which got a lot of cheers as I passed folks, and the Tough Mudder patch on the back, under the drag handle. The 3L Source bladder that came with my Platatac Bravo pack fitted pretty well inside the OAGRE.

I also changed what I wore on my hips. Lesson learned from Tough Mudder earlier in the year. As awesome as my Survival Utilikilt is, it is not optimal attire for an endurance obstacle course like this, which is why I was so pleased with the new addition to my clothes-pile, in the TAD Gear Amphibious Cargo Shorts. As they were new, I didn't want to risk running-rash, and wore some boxers under them. Useless, they waterlogged and sagged. I would have been better off going my usual commando. Great shorts, fast drying and mud-shedding, comfortable and good for adventure!

copyright to Supersport Images Pty Ltd 

I opted for a hat over sunscreen, which gave me somewhere to mount my Contour GPS, in its waterproof casing, as well as keeping my hair out of the way. I wore my Platatac Tactical cap, which also somewhere to out my MSM "Zombie Hunter" patch. The Contour in its case assed quite a bit of asymmetric weight to one side of my head, I think mounting to a chin-strapped bump-helmet will be my next option. I also wore my Headsox scarf-tube, which helped keep the sun off my neck, keep the vest from chafing and also as a smoke filter.

I wore my Platatac Punisher-Skull logo CUS shirt which was a dramatic improvement in comfort over the Jackeroo safari shirt I wore for Tough Mudder. It dried, it breathed, it wicked, and was pretty bad-assed to boot!

I kept my delicate hands safe from harm with my trusty Ironclad Landscaper gloves.


So here I am at the end of the race, having crawled under barbed wire covered mud and been shocked by electricity over and over. I wore my much abused Altama Tan Desert Mil Spec boots, veterans of years of summertime wear, Stargate LRP and the Tough Mudder. This may have been their swan-song.

I did the 10km course in just under 2 hours, keeping a pretty constant pace. I'm not fond of running, it hurts, but I managed to jog pretty much the entire course, giving aid to people who needed it, and taking my time. I loved the obstacles, was happy with my effort, and the little preparation I did to be ready for it. Since May, I've gone for perhaps 4, 8km runs at lunchtimes at work. I feel that I am able to get from A to B in good time, regardless of the obstacles in my path.

Wednesday, August 8, 2012

Review: First Spear Oagre Tactical Vest

I was very fortunate to receive one of these
Operational Assault Ground Reconnaissance Exploitation (OAGRE) Tactical Vest made by First-Spear from the folks at LEGear. You may remember I reviewed a couple of things from their lines, the Maxpedition SITKA bag and iPhone holster, and they were kind enough to hook me up with this cool vest. Cool to review and cool to wear, but we'll get to that. The first thing I noted was the sheer amount or real-estate on it. Not being a plate-carrier, like my Platatac MAC, it doesn't have to conform to the function of fitting armour plates, and can wrap right around the body. This is First Spear's khaki, which is a tab more brown than the Platatac khaki.

The main front zipper which secures the vest, is supplemented by three ITW G-hook closures, in adjustable webbing, which not only give a rock-solid close to the vest, but also allow for it to be secured shut without being fully zippered up, a benefit in hot conditions.

As far as PALS/MOLLE real-estate goes, there are 5 rows of 8 channel loops at the bottom of each front panel, with an additional 5 channel row on top and a 4 channel row above that. A loop field for name and designation tapes sit adjacent to the top MOLLE loop, as well as an additional downward loop of webbing, (mirroring one on the bottom, which correspond to the attachment by more G-hooks for the First Spear Beat Up hard plate armour.) Remember that this is a vest, not a plate carrier, but having that option would be a welcomeP one, for those in need. Each of those loop-fields features an access buttonhole, to feed cables or tubes, as needed.

The shoulders have a high friction panel at each shoulder, giving a good place to rest the butt-stock of a rifle or simply the straps of a pack, and afforded a nice solid placement. Those panels didnt move or slip, even when the vest was "naked". The shoulder straps also featured tube and cable securing elastics. On the back lay 7 rows of 6 channel PALS/MOLLE webbing. A drag handle is secured with a narrow hook-and-loop piece, to reduce snag risks, and is sewn down the whole length of the vest. A second hook-and-loop patch gives another ID point.


The front and back panel are joined at the waist by a series of buckles and webbing, which in and of itself isn't too exciting, but they allow for a variety of sized and shaped wearers, and the excess webbing is kept tidy by a very cool method: A Tactical Toggle is integrated in the end of each webbing, and bundles it away by rolling and looping with the shock-cord end. Clever use of an ancient system.

Here are a couple of close ups of the metal G-clips and nylon Tactical Toggles. It's also worth mentioning the "downwards through-MOLLE" quick-release belt loops, featuring a hook-and-loop and press-stud closure, and Fastex style quick release, these give the wearer the option to fasten the vest to a belt, useful if you've ever found yourself dangling upside down. Having your kit sliding up around your ears does not make freeing yourself (or force-pulling your Lightsaber) any easier.

One thing absolutely worth mentioning is the use of closed cell foam pads, in the shoulders, at the waistline and lumbar region of the vest. Secured and kept in place with pockets, these pads act as a buffer between you and your kit. Especially useful if you are going to be laden down with a lot of steel to sling, the placement of the pads acts to cushion the bottom most rows of MOLLE, where pouches would intersect bony hips (mine especially). These pads are easily removable to replace or augment, and First Spear suggest they add to the positive boyancy of the vest. Certainly do no harm in that regard. The back panel also has a hook-and-loop strap for securing a hydration bladder, up to 3L in capacity.


Additional to  all the innovative closure systems, intergrated padding, ample PALS/MOLLE real estate and loop-fields, one thing I haven't yet touched on is the material itself. At just over 1kg (2.24lbs) and made from a heavy-duty mesh, the entire body of the vest (apart from the shooter-shoulders) is breathable, and wicking. This is a rig for the greenhouse and the sandbox, for sure. The construction of the whole vest is excellent, with closed seams and heavy stitching. This is a dependable and feature rich platform that would give the wearer many many options.. Options are always worth having, especially in a medium to low-profile vest such as this.

Related Posts Plugin for WordPress, Blogger...