Tuesday, August 2, 2022

Nano Oil for your Knives, Tools, and Firearms

Another Guest Author, by way of BB&C,  Jim Davis presenting Nano Oil:


Always on the lookout for cool, different ideas, I happened upon a product that caught my eye. Not just for the content of what's in the containers, but the way the containers deliver it to the target. Nano Oil offers some unique and innovative methods of dispensing lubricant onto firearms, knives, and anything else where you want to deposit a controlled amount of oil into a small space.

They have a few various dispensing containers that I'll outline here.

Nano Oil containers
Nano-Oil comes in handy, syringe-like containers. Here is a package with three different weights: 5, 10, and 85 weights.

What Is It And What's It Good For?

First, though, a bit about Nano Oil. It does not contain any of the following: Silicone, PTFE Resins, Graphite, Molybdenum Disulfide know as Moly, Teflon, Copper, Lead, or Silver. They state that there are "absolutely no metals or harmful solvents."

StClair claims that Nano Oil is suitable for high temperature applications, extreme pressure (load bearing metal to metal), roller bearings, chains/sprockets, machine tools, marine equipment, metal working, mining and printing equipment, armaments, knives & multitools, and a ton of other uses. The list is quite expansive.

It works on bicycles, motorcycles, cars, tractors and farm equipment, and RC racers.

Regarding armament, they claim that it increases muzzle velocity and smooths all moving parts while protecting from rust and corrosion. The oil adheres to microscopic crevices and penetrates metals, which provides a very low friction dynamic.

Weights

There are a couple different weights that are offered for various uses.

*5 Weight. This is the lightest weight oil that is offered, noted for deep and fast penetration. They refer to it as "WD-40 on steroids."

*10 Weight. This is a light weight oil that is suitable for guns, flashlight threads, knives, fishing reels, locks, hinges, bicycles, bearings, cables, chains, sprockets, motorcycle forks, electric motor bushings, model railroads, and more. This one seems to be the most useful weight, in general, as it addresses a lot of different uses.

*85 Weight. This is a heavy weight formulation, developed for the M-14/M-1A and other rapid fire firearms.

I ordered and received one each of these weight lubricants in the Micro Oiler with stainless blunt needle, which contains 8cc/ml of oil. These are extraordinarily handy because that needle can get the lube precisely where you want it. Note that the same weight oils can also be had in 1/2 ounce and one ounce bottles.

Nano Oil containers and applicator tip
One of the beautiful aspects of Nano-Oil is the blunt metal applicator tip that allows the user to get the oil where it needs to go. These are the micro oiler containers.

I also received an applicator of Nano-Grease NGL, which is a Lithium Complex Hi Temp & Extreme Pressure lubricant. The uses for it include bearings, boats, buses, cars, bicycles, chains, conveyors, dozers, excavators, graders, laundry equipment, and a bunch of other items. And since the M-1A/M-14 series of weapons are supposed to be lubed with grease, that was my main intention of buying this, as I am using it with my M-1A Scout Squad Rifle.

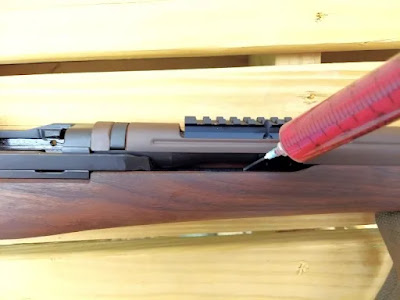
Grease syringe M-1A
With the grease syringe, getting into the chamber area of the M-1A Scout Squad Rifle a snap.

Chamber area of the M-1A
Greasing up the operating rod on the M-1A is no longer difficult either.

Operating rod on the M-1A
Nano Oil states that adding its formulations to other existing lubricants will improve their anti-friction qualities.

I have not tried the following, but they are listed on Nano Oil's website:

Gasoline Engine Oil Treatment, Diesel Engine Oil Treatment, Manual Transmission Oil Treatment, 4-Stroke Engine Oil Treatment (Motorcycle, ATV, Snowmobile, Outboard Motors), Small Engine 4-Stroke Oil Treatment, Automatic Transmission Oil Treatment, and Marine Outboard Drive Treatment.

Dispensers

The first is a pen that has something similar to a ball point. The user presses the tip onto the surface where he wants to deposit oil, and the oil comes out. It's fairly controllable too, so you can get a small dot, a larger puddle, or a line. The pen container I received contains 16cc is 10 weight oil, which is listed as "All Purpose." I'd say it would work great for firearms, knives, and anything with moving parts in general. The cap even has a protrusion for hooking onto the user's pocket, so it can be conveniently carried anywhere. The container is white and not see-through. At the time of this writing, one of these pen dispensers costs $27. It appears that it should last quite a while.

Nano oil Applicator
The pen is a very handy container to have around!

Tip of Nano Oil Pen Applicator
The tip of the pen is similar to a ballpoint pen, in that when the tip is pressed, it dispenses oil. The user determines how much oil he wants to come out.

The next type is a Micro-Oiler, which is see-through and has a long, blunt, metal needle for getting the lubricant just where you want it.  This is especially useful if oiling knives and firearms. Normally, I run my knives dry or nearly so because oils tend to attract dirt and other gunk. The 5 Weight oil will be especially useful for knives because when it dries, it leaves very little residue behind, yet still retains lubricant qualities. This is good stuff!! A 3-pack of these dispensers with 5, 10, and 85 Weight lube, at the time of this writing, costs $49.00. At the rate in which I use lube, I believe these will last me for quite a while.

Finally, the grease dispenser is like a giant syringe that comes complete with a long, blunt metal needle, which gets the grease into those hard-to-reach places. This is especially useful when applying to the M-1A rifle, as it allows the user to get the grease into the areas where the bolt rides in the receiver. Those little grooves can be a pain to reach by other means, but with this setup, it becomes very easy. At the time of this writing, this one costs $21.75.

Nano Oil Grease syringe metal tip
The grease syringe has a large volume and the metal tip is perfect for getting the grease where you need it to go!

Does It Work?

Naturally, I went totally overboard trying Nano-Oil out on most of my firearms. Those that know me will not be surprised, as I tend to go all-in on my endeavors.

So far, I've used Nano-Oil on my S&W CSX 9mm, S&W Airweight .38 Special Revolver, Glock 43X, Ruger MK IV .22 Long Rifle pistol, Two AR-15s, an AK-47 (AK-63D) Underfolder, and my M-1A Scout Squad Rifle from Springfield Armory. I plan to use it on my bolt action rifles and my Henry Arms Survival Rifle (AR-7). In other words, I will use this stuff on all my firearms and knives.

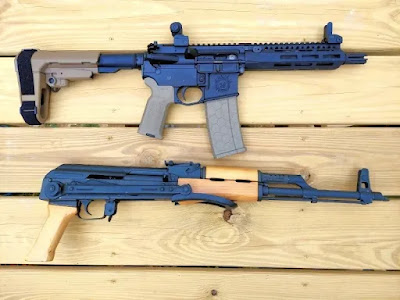
 AR Pistol and AK-63D Underfolder
This AR pistol by Xtreme Gun Worx (of Emmaus PA) and the AK-63D Underfolder benefitted from an application of Nano-Oil.

Ruger MK IV .22LR, Glock 43X, S&W CSX, S&W Airweight 642 .38 Special revolver
The pistols that I tried Nano-Oil on, from top to bottom: Ruger MK IV .22LR, Glock 43X, S&W CSX, S&W Airweight 642 .38 Special revolver. They all said they liked Nano-Oil!

Speaking of knives, I've used it on my Emerson Knives Desert Roadhouse. Some of my Spyderco folders will also see Nano-Oil. The nice thing about the 5-weight oil is that it dries up and doesn't leave a gunky residue on knives, but the lubricating benefits still remain.

Nano Oil being applied on a Emerson Desert Roadhouse knife
Getting oil into specific points of a knife action is now easy! Here we see the Emerson Desert Roadhouse getting some care.

I can honestly say that Nano-Oil is good stuff; my firearms' actions were nice and smooth after using it on them. So the quality of the oil and grease itself is sound. Beyond that, what I really found refreshing is the applicators that come with the oil. These really made all the difference when I used them to apply the oil, and they made the job so much easier on most of the guns.

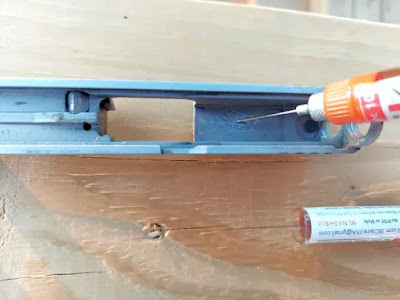
Glock 43X Frame Rails with Nano Oil
Glock 43X frame rails getting a dose of Nano-Oil. Nano Oil is an obvious choice for gun care, but works well on a variety of other things as well - particularly knives and tools. 
Inside of the Glock 43X Slide
And don't forget the inside of the slide where parts create friction.

Those hard-to-reach places that used to be a pain to get oil into now are easy to reach, so I expect this will improve the reliability and longevity of my firearms.

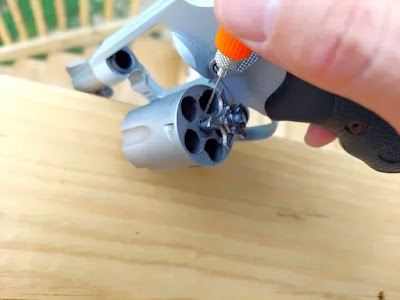
Cylinder of the S&W 642
The cylinder of the S&W 642 getting some lube.

Ruger MK IV bolt being coated with Nano Oil
The Ruger MK IV bolt being coated with 10-weight Nano-Oil. Getting oil inside the receiver is now easy as well.

A special mention here goes out to the Nano-Grease. Applying it to my M-1A Scout Squad rifle is so much easier than trying to get grease into the area where the bolt goes than using a Q-tip. The metal syringe tip placed the grease precisely where I needed it, not only for the channel where the bolt goes inside the chamber and on the receiver, but also onto the operating rod. Kudos to Nano-Oil!

M-1A Scout Squad Rifle
The M-1A Scout Squad Rifle from Springfield Armory is basking in the glory of being freshly lubricated by Nano-Oil.

The Ruger 10/22 will function smoothly with Nano-Oil applied. This is the compact model.

As well, applying it to knives also becomes a breeze, getting the oil in those hard-to-reach places without saturating the entire action of the knife in oil. The user has good control over how much oil comes out of the needles.

All in all, Nano-Oil has a successful product that really delivers (no pun intended). The price is not too high for what the user gets, and the supply should last quite a few cleaning and lubes for one's firearms. This is a great product that I wholeheartedly endorse.

About the Author:

Jim Davis served in the PA Dept. of Corrections for 16 ½ years as a corrections officer in the State Correctional Institute at Graterford and later at SCI Phoenix. He served on the Corrections Emergency Response Team (CERT), several of those years as a sniper, and also the Fire Emergency Response Team (FERT). For 25 years, he was a professional instructor, teaching topics including Defensive Tactics, Riot Control and Tactical Operations, Immediate Responder, and cognitive programs as an adjunct instructor at the DOC Training Academy. He was then promoted to the title of corrections counselor, where he ran a caseload and facilitated cognitive therapy classes to inmates. His total service time was close to 29 years. He was involved in many violent encounters on duty, including incidents of fatalities.

Jim Davis


Tuesday, May 31, 2022

Review: Sailors Compass - Oceanus Brass

I've covered compasses before, mostly as a generic " have a compass, navigation is important" tool and as part of a variety of multi-tool items or kits that include a compass but this one is a little different. I backed a kickstarter for a boutique compass with maritime style. Oceanus Brass specialize in nautically inspired items milled in brass. This is the Oceanus Brass - Sailors compass. Which I backed on Kickstarter. They're in full production now, so you can pick one up, or anything else in their range. Their latest Kickstarter is for a plastic bottle cord maker and looks great too
Brass is an excellent material for traditional nautical kit for several reasons: It is hard wearing to withstand long periods between resupply or repair options. Corrosion resistant to resist saltwater exposure. Non-sparking to keep powder and timbers safe and non ferro-magnetic so as not to throw off your compass needle. It also has a pleasing heft and a bright luster. 
The sailors compass comes as an un-embellished and unadorned puck, with a seam line running its circumference at the 2/3 of its height. The seam line is narrow when the lid is secured and both top and bottom edge of the puck are evenly beveled and smooth. The "lid" unscrews for two full rotations  along finely machined threads, with just index and fore finger and thumb vs palm needed to open it.
Inside the compass is a liquid filled needle chamber, with a well defined needle including a nicely pointed "head" featuring a glow in the dark "dot" for night-time navigation. The tail end flight is subtle and balances the needle both physically and aesthetically.
 
The bezel is gently notched for easy grip and rotates smoothly and features degree markings, in 20 degree major spacings, with minor marks for 10 degrees and 2 degrees. It's firm enough that it won't slide of its own accord but smooth enough that it will turn with a finger-tip's pressure. The backing of the bezel is a ring of glow in the dark material to provide a readable back lit bearing in the dark. A fixed red line serves as the index mark and a pair of embedded glow-dots in the base of the bezel chamber lines up with the North indicator. A central dot completes the after-dark navigation picture. 

The compass is moderately large for an EDC pocket compass, at 2" (55mm) in diameter, 5/8" (17mm) in height and 6.8 oz (194g) in weight, but its smooth and solid design makes it an easy carry. Whilst it would not take the place of a good lensatic compass for navigation. It certainly does the job for simple wayfinding navigation. 


 Solid brass construction provides sea-worthy durability. The Sailor's Compass can be dropped, frozen, banged, forgotten until it isn't. If i had to pick something I didn't like about the compass it would be that it's too smooth. The unadorned surface might lead to slick, fumbly fingers to drop a vital piece of kit and some knurling or a dummy-cord knob or thread-hole might go a long way to securing it. All told though, it makes for a very pleasant EDC pocket addition. 

Saturday, May 28, 2022

Sean O' Hare's Knife, the Badger

Here's a guest post, in conjunction with the good folks of Breach Bang Clear!


Sean O’Hare Knives has been making custom knives since 2001, and Sean began doing it full-time in 2009. He hails from Canada, and he is also a very skilled photographer. Sean makes fixed blade knives, including drop point hunters and tactical tantos, and folding knives, including flippers. If you’re into knives, you owe it to yourself to look him up on the ‘net and check out his knife creations. They are utterly beautiful, both in form and function. A Sean O' Hare knife can be very dressy and ornate, while others are simply well-executed and practical. For certain, he makes something for every taste that’s out there.

The fit and finish of his knives are extraordinary, whether we’re looking at the dressier knives or the knives intended for more hard, practical use. He prefers G10, stabilized woods, and Micarta for handle material on his fixed blades. He uses the stock removal method.

Sean O' Hare knife grip
The grip fits most hand sizes like a glove!

The Badger Model   

I have an example of one of Sean O' Hare's knives that I’ve owned for quite some time, over ten years. The Badger model falls under the tactical class of knives, although it could certainly be used for a host of duties, including Bushcraft/Survival, defense, hunting, or knife reviews.

Blade

The blade of the Badger is made from CPM 154CM steel and is approximately 4 ½ inches long, although the choil adds a bit of length (I did not count the choil portion as part of the blade). Blade configuration is of the drop point variety. The blade stock is somewhat thick and stout, but the flat grind lends this blade as an excellent slicer. The CPM 154CM steel is not the latest, greatest wonder-steel, but it is a solid performer that’s been around for quite a while. Its virtue is that it is relatively easy to sharpen and holds an edge for a decent time under use. I’ve been delighted with it.

Sean O' Hare knife striking pommel
The Badger in its natural environment. Note the striking pommel.

Pommel and Handle

A guard is built into the knife in front of the handle to keep the hand from sliding up onto the cutting edge. In front of that is the aforementioned choil, which is helpful if the user wants to choke up on the knife for added control during finer cutting chores. The handle of the Badger is full tang, and it has a triangular striking pommel at the butt of the handle, complete with a lanyard hole and jimping. The pommel edges were sharp and tended to abrade my side when I carried the knife, so I took a diamond stone to them and rounded off the edges ever so slightly, fixing that issue. However, it would still be very effective as a striking surface.

Holding the handle on are three mosaic pins that go all the way through, securing the scales solidly. The handle is made from smooth dark green canvas micarta, yet it provides enough traction for a positive purchase. It allows the hand to slide around enough to reduce friction and eliminate “hot spots” when chopping with the knife so that there is no discomfort to the user. At the same time, the knife is not likely to slip out of the hand during use. Sean got this aspect spot on! In addition, the shape of the handle fits wonderfully into the hand, filling the hand well but not being so large as to be uncomfortable. Several people have tried the knife and, despite having various sized hands, each remarked that it felt as though the knife had been made just for them.

There is jimping on the spine of the blade, where the thumb is placed, which does a perfect job of anchoring the thumb to that spot while not being overly abrasive to the skin.

Sean O' Hare Knife Feel and Finish

In the hand, this Sean O' Hare knife has the most “lively” feel of any fixed blade I’ve ever handled. Not to sound corny, but it almost strikes me as “magical,” the balance, weight, and configuration just become a perfect extension of my hand when gripped. The knife’s weight is 6.2 ounces, and I’m sure the low weight contributes to the liveliness in the hand. The balance point is right where the handle ends, and the guard begins, making the balance perfect. Sean did his homework on this point, and the finished product reflects that.

The finish of the metal appears to be hand-rubbed satin, which gives a pleasing appearance. The overall fit and finish of this knife is outstanding.

Personal Opinion

For years now, this has been my go-to fixed blade when I’m venturing into the outdoors and deciding to have a fixed blade with me. I would feel very comfortable using this knife for camp chores or other woodland tasks such as building a shelter.

Sean O' Hare knife with Spyderco and Glock
A great carry package for woodland jaunts. Fixed blade Badger, Spyderco Native, and Glock 43X.

Beyond that, I look at this blade as a serious defensive tool if it ever came to that. Let’s face it, if we ever have to use a Sean O' Hare knife to defend ourselves, we’re having an exceedingly bad day, but it is what it is, and I like to be prepared for all eventualities. And these days, one never knows what sort of misadventures might rear their ugly head. Knives never run out of ammo, if you know what I mean. And they’re relatively silent in operation. This particular knife would work great for defense, given its lightweight and nimbleness in hand.

The Badger is not huge, nor is it small, by any means. I’d call it slightly larger than medium-sized. It’s not something I conceal on my person when going about my daily travels. But for hiking and the like, it is just what the doctor ordered.

Sean O' Hare knife belt clip
Here the belt clip can be seen. Clipping onto and off a belt is quick and easy, but the sheath is held securely once clipped on.

 Sheath and Sharpness

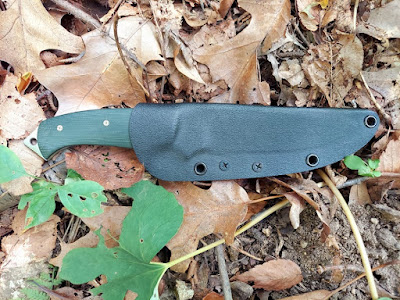
A word about the sheath: it is simple and excellent. Period. It consists of a piece of Kydex folded over and secured with rivets that allow cordage to pass through them if you want to lash it to a part of your kit. It has a belt clip that slips over your belt and hooks over it so that when you draw the knife, the sheath will not follow (see the photos, my description may not be the best here). It can be donned or removed quickly and easily yet remains secure when it’s on your belt. Tension retains the Badger in the sheath until it is drawn out.

Sean O' Hare knife sheath
The Badger in its sheath is a compact carry package.

How does it cut? Fabulous! Light wood cutting, chopping small branches, slicing through paracord, and a myriad of other tasks, passed with flying colors. However, it’s not a blade that I use regularly; I have smaller folding knives as my workhorses. Instead, the comfort that this blade provides simply by being there on my side makes it golden because I know it will perform, and it’s dependable when needed.

Final Thoughts

On top of all of what I listed above…this Sean O' Hare knife is simply a work of art. There’s no other way to put it, it just looks fantastic on top of being a functional piece of gear. Sean O’Hare is a real artist when crafting sharp, pointy things. If you haven’t checked out his cutlery, jump on the internet and look him up. Be aware, though, his knives are very much in demand, so it’s not certain if he will have inventory lying around ready to go out the door. There may be a bit of a wait, but I can personally tell you that it is worth it! There’s just something about holding a hand-made tool like this in your hand that gives a feeling of satisfaction.

These days, his fixed blade knives seem to be in the $425-$450 price range, but don’t quote me on that. Check ’em out, you won’t regret it!


About the Author:

Jim Davis served in the PA Dept. of Corrections for 16 ½ years as a corrections officer in the State Correctional Institute at Graterford and later at SCI Phoenix. He served on the Corrections Emergency Response Team (CERT), several of those years as a sniper, and also the Fire Emergency Response Team (FERT). For 25 years, he was a professional instructor, teaching topics including Defensive Tactics, Riot Control and Tactical Operations, Immediate Responder, and cognitive programs as an adjunct instructor at the DOC Training Academy. He was then promoted to the title of corrections counselor, where he ran a caseload and facilitated cognitive therapy classes to inmates. His total service time was close to 29 years. He was involved in many violent encounters on duty, including multiple unfortunate incidents of fatalities. He is a regular contributor to the KEEN INSIGHTS column on The Mag Life.

Sean O' Hare


Saturday, April 2, 2022

Horns and mugs.

 I've been really enjoying getting into Viking re-enactment these last few years. Part of this has been to get into the combat aspects, partly the crafting and the culture.  

Part of this is collecting and using period appropriate kit, part of it is becoming comfortable using anachronistic gear. Did you know its quite hard to chug a beverage from a drinking horn unless you tilt it to one side?

I now have three viking style drinking vessels. Two traditional and one more modern.

First up is the very slick and modern Goat Mug.

The Goat Mug is a 16 oz 470mL polypropylene horn shaped take on the classic keep-cup idea. Originally a Kickstarter project, now in full commercial production. It has been a mainstay of my desk since its arrival. With its silicone ring seal screw top and drip and spill proof locking clip, it's made a prominent workplace oddity. The best part is when people ask how it stands up. The molded leather hand-cuff inverts to act as a stand to support the horn with great stability, and protects the hand from hot beverage.  

The Goat Mug comes with a wrist strap and a shoulder sling for ease of carry, that clip to holes in the lid and tip respectively but I've never had much need of either.  I carry mine in my hand or table it in its holder. The seals are good enough to keep in a carbonated beverage and the horn keeps my mugs of tea hot for a lot longer than a similarly sized conventionally shaped mug would. They aren't even remotely period-appropriate but are perfect for adding flair to work or the open-pit bbq pig on spit Thing in the back-yard. The curvature of the inside presents some scrubbing challenges but I'm not phased by some tannin build-up and it's dish-washer safe.

Read the kickstarter Story here.

See their latest ideas here

buy one on Amazon here.


I also have a more traditional bulls horn drinking horn. This 8oz, 250mL capacity horn ( 9oz when filled to the brim upright) natural bull horn has a fine embellished brass rim riveted on and a brass tip fixed to the pointy end. The outer surface is well polished and the insides have been well cleaned and sealed to keep the horn structurally sound after long sessions of ale. The traditional horn has the drawback of not having a stable base to sit it down so once you get started its awkward to set it down till you've emptied your horn. 

I've knocked up a quick stand from some off-cuts for mine and you could always thrust it through your belt at the risk of spillage and wetting your britches. The brass fittings are handsome and lend themselves to adding some cordage as a sling.  It feels nice in the hand and it has a good capacity, and certainly looks the part.  

I personally like to be able to set a drinking vessel down when eating as a joint of meat on the bone can sometimes need two hands and pickled herrings are slippery.

 As i mentioned earlier, when drinking from a horn, its important you tilt the point of the horn downwards or to the side, not out in front or upwards when you drink, or you'll get an unexpected surge and slosh ypur drik all over your face, in your beard and down your chest. Amusing but wasteful and wont impress that sword maiden you've been waggling eybrows at over the fire.


 The final horn in my collection of drinking vessels is the "Eleet Original Viking Drinking Horn Mug"

 This elegant tankard has a 20 oz capacity and is fashioned from a worked ethically sourced ox horn in which the point of the horn has been bent back to form the handle / retention grip. The base of the is a colour-matched resin to seal off the mug and the inside is sealed with a 100% food safe non-toxic lacquer on the inside, in order to avoid the real horn odor and to avoid leakage. The exterior part is unpolished, unadorned and is kept real. The tankard feels great in the hand, it looks great and does the job. 


Being a natural product means each one has its own unique pattern and shape, but the true value is that it works. After a long day of swinging axes, hauling gear and arms and setting camp, let alone matching steel with the foeman and all the day to day challenges of the rustic Northman, having a large beverage to hand really brings home what is best in life. The "Eleet original Viking drinking horn mug" fits the bill AND I can set it down on the feasting bench to wrap an arm around someone close whilst feeding. 

 I don't think i'd want to put hot drinks in either of the horn vessels, (be it pine needle tea or the beans of Mocha for structural integrety reasons (hot water softens horn ...), but they're perfect for my home-brewed mead or cider. 
 
Its high capacity, flat base and broad handle make it the most convienient of my horns and mugs and as such keep it in highest rotation.
 

Tuesday, August 31, 2021

Review: MyMedic - MyFAK

Accidents happen. Burns, cuts, bumps and breaks can come to anyone at any time.  Having a first-aid kit to hand is a vital element to anyones preparedness loadout or lifestyle. Whether you're hiking in the bush, cutting firewood, camping, on a road trip, driving nails in the backyard or hitting pipe in the sandbox you'll want to be able to plug holes and tend to boo-boos to get on with the task at hand. I keep a generic first aid kit in the bottom of my day-bag, and have a small IFAK on my hiking belt, but there are some jobs they just aren't up to and frankly, being stuffed in the bottom of a pack does not make for rapid treatment in a critical situation.

This is where something like the purpose built MyFAK from My Medic comes into its own. Jam-packed with a very comprehensive collection of needful and useful items for treating a variety of ailments and accidental injuries. It does so all encompassed in a tactically minded form-factor. 

 With contents suitable for airway, bleeding, burn, hydration, outdoor safety, sprains and fractures and specialty surgical incident as well as topical treatment, the MyFAK  has packs that caters to both Basic and Advanced First Aid needs. (Available in two different configurations to suit your ability and need).

"By ordering MyMedic First Aid Kits you warrant that you have the required training and authorization to use the medical supplies contained within. MyMedic assumes no liability for their misuse."
  

The 1000D cordura pouch measures 6.5" wide, 7.5" tall and 5" deep, its no slouch. The advanced kit weighs 1275g, the same size basic weighs a mear 975g. The front of the pouch is rigged with 6" of loop field, in 3 2" strips, with a secondary layer of 1" strips straddling these to provide 4 channels of MOLLE attachment, for those of us who like pouches on our pouches or for stowing additional accessories likepens, lights, cyalume sticks or pry-bars. A 1" wide nylon strap runs all the way around the pouch, with a fastex buckle to keep it fully secured to the backing and fully closed> This is especially important as the backing, which features not only two press-stud closure MOLLE straps but the entire back is hook and loop for tear-away capability. a 1" nylon grab handle allows for positive grip and when unbuckled the MyFAK can be torn off your pack, or load bearing gear for ease of access or to pass on to someone who needs it.

The rip-away design makes for ease of access for what is otherwise quite a bulky pouch. being able to get at it without it being strapped to yourself or a pack would greatly improve your ability to get the components you need in a timely and efficient fashion. Crucial in a medical crisis. The fastex clip is no hindrance to access and does a great job in securing the pouch, but it has two easy-grip rubber toggles with medic crosses to pull the oversized zippers open. A lightly hook-and-looped nylon tab acts as a pull tab to assist in pulling the pouch open and holding it spread. Folding down to the front loop fields to stow out of the way when not in use.

The pouches hook field backing also means once removed it can be stuck to other loop-field surfaces at your leisure.
Opening the pouch up reveals its Tri-Fold Design

MyMedic created this pouch to give you quick access to your First Aid Supplies. This tri-fold design makes it easy to see what you need, when you need it.

Working from the innermost layer forwards the front the back panel has three Elastic webbing loops to contain items, a mylar space blanket, a hank of paracord, a cyalume stick and a RATS tourniquet. Behind that are two pockets with bandages, including quick-Clot and a chest seal. The back most pocket has a hook and loop  closure tab to keep it closed until needed.
The middle panel has more elastic webbing securing more bandages, irrigation saline and suture kits. An additional pocket behind the elastic webbing holds a compressed compression bandage.

I'm really impressed with the amount of material squeezed into this kit, both by clever arrangement of pockets but also arrangement of items. I was tempted to reorganise the kit but quickly recognised I wasn't going to get it any better packed or sorted.


The third section of the internals is the zippered mesh lind pocket panel. It is filled with small items; medications, electrolyte sachets, swabs, lotions and gloves. The section is itself a tear-away as well allowing you to pass it over or just get at it without disturbing the rest of your pristine supplies.

Whilst the rest of the kit is full of bandages, burn kits, and hole closers, the medication pouch holds pain killers, anti-inflammatories, anti nausea and anti-dirorrerals and electrolytes. The mesh panel allows the plastic pouch wrapped medications to be rummaged through. Good if you find yourself off-Oregon trail and not fancying dying of dysentery.  The flip side of the medication pouch provides a smooth field for laying out items: bandages, sutures, tweezers and such as you work on your patient, or just as a cover to prevent debris falling in your kit.

So, apart from being jam-packed with all kinds of goodies and needfuls, being well put together as far as design and layout, and having an excellent quick-release and access options go, this is an excellent First Aid kit.

I find it a bit bulky and heavy to put on my person, say on a battle-belt or on a plate carrier, except maybe on the back. Personally I feel it's suitable to go on a pack, or on a dedicated medic's harness. One thing I saw on their webpage and successfully tried myself was fitting  it to the headrest of my drivers-side car seat. Putting it in easy reach for shot-gun or back seat passengers should the need for road-side assistance come up.

Secured by its Molle straps, to the headrest prongs, it can be accessed by its quick release Fastex clip and pulled free by the webbing drag handle. If needed it could then be reattached in an upright position and unfolded to access its components in a secured place for out the door or back seat triage as needed. Perfect for on-the-move treatment. 

I have a Cert 1 in first aid which is basically: bites, breaks, bleeds and burns and I feel the contents and setup of this kit is more than adequate for my needs, and beyond what I'm trained for in its Advanced format, but not beyond my ability in extremis.

Wednesday, June 2, 2021

Review: Gerber - spork set

I treated myself a while back to a fancy new set of eating tools. Now, I am all for food on a stick, or if needs be, wrapped into a burrito or schwarma, especially when it comes to outoors cooking and eating. Every extra piece of tablware or cutlery you use is one more piece you have to bring, wash and haul back. A stick is good but limiting and eventully marshmallows and sausages loose their luster. Whilst I am also very fond of one-pot/one pan cooking, there are times when a fork and spoon are the right tool for the job, beans, scrambled egg and porridge don't work well on a stick. 

Gerber had an offering that I was keen on. A combi-tool set combining the Gerber Devour set with a plain spoon and spatchula to make a set called the Compleat.
The Compleat is made up of four individual tools; a Deep basin spoon, a long tined spork a spatchula with a serated edge and a multi-tool. the fork, spoon and tool all nest into a slot in the base of the spatchula securely until needed.

The spork has longer tines than im used to on a spork which is a nice change, making it easy to stab food and not drop it and loose it. They aren't yet so long as to be loose stiffness.  

The spoon has a nice straight edged tup, allowing it to scrape the bottom of a bowl or mug to get the last skeriks of food. The dish was deep enough to eat soup with and shovel food into my mouth without bulging out too much when nested. 

Both spork and spoon have a pattern of  stamped into their anodized 7075 T6 Aluminium handles. The spatula component is made of a high temperature nylon with a silicone overmold along the leading edge and one side. One edge has a serrated edge to use as a knife. The  knife isn't great but it'll do and the spatula isn't going to win any awards but it'll flip a pancake and get your eggs over-easy if you're patient. The nifty thing about this tool is that combining the fork or spork with the spatula will create tongs on one way and an extended stirring tool combined longways. Excelent for stirring with your face out of the smoke and for picking sausages out of a pan, respectively. 
 
The spatula's notched ends are directional and prevent the tools from falling apart mid-use. Though the spatula has an arrow molded into it but I routinely try to put them together the wrong way. I think  will scratch arrows into the spoon and spork end surfaces to remind myself in future.
 
I found the metal utensils comfortable to use, did not transfer too much heat to my hand and were certainly sturdy enough to both cook and eat with. 
 
They're also capable of lifting cast iron pots' lids off with ease thanks to both their curved cross-section but also the grip-improving texture lending them strength through engineering. I think I'd prefer the spoon and spork to be titanium rather than aluminium but it works just fine. The spoon/spatula combination tongs work well for fine tasks as well more standard kitchen tong uses. They work just fine ,with the plastic of the spatula providing sufficient "spring" for use, though they lack the "clack-clack" safety test-feature.


The last component of this set is the utility tool that serves to lock the other tools together. This powder coated steel tool features the following components; bottle opener of obvious utility, a sharp plane-style Veggie peeler, a Serrated cord-cutter and package opener hook/ can-opener and the all important bottle opener. 
 
All-over is sits at 20cm (7.75") long ant weighs in at a mear 65g (2.3 oz) which will neither overload or over encumber any but the most hard-core ultra-light packers.  
 
 
The set comes with Gerber's Limited lifetime warranty, but given its sturdy construction, youd have to be pretty careless with it to need that. The spatchula componant might burn/melt if left too close to your fire for too long, but it worked fine for my cooking needs.

 
Find it here on Amazon:


Tuesday, May 26, 2020

Cross-Post: DIY Rattlecan Paint Job in Multicam Arid by FDE


Few would argue that good camouflage, used well is both effective and useful. One thing I've noticed if that done poorly it sticks out like a sore thumb. Camo patterns not matched up is one thing, as is not suiting a pattern to fit your surroundings. Another aspect is only doing portions of your kit. But we don't all have the spare currency to custom cerakote or hydro-dip our gear.

The resourceful people over at Fifty Shades of FDE (Flat Dark Earth) have put out a DIY guide for putting multicam style camo paint onto items with spray-paint cans.

They put together a very informative and step-by-step clip on YouTube you should totally check out. Watch as they turn a scary black rifle into innocuous background foliage. Nice!
DIY Rattlecan Paint Job in Multicam Arid by FDE


Related Posts Plugin for WordPress, Blogger...