Showing posts with label salvage. Show all posts

Tuesday, October 27, 2026

Review: Fallout The Vault Dwellers Official Cookbook

 Fallout meals: fallout the vault dweller's official cookbook - Flip eBook Pages 1-50 | AnyFlip

I had the good fortune to have the opportunity to do a book review, for something that really interests me, Fallout and Cooking. The Fallout: Vault-dwellers Official cookbook. This 190 page, full colour hardback, in-universe cookbook features all kinds of in-game content, jargon, names and certainly has the feel of the Fallout universe. As well as an entertaining read, chock-full of game references without being cloying, but also full of very appealing recipes.  

The cookbook is laid out by courses, in usual cook-book style, which makes for convenient selection of recipes: Appetizers, Soups and Stews, Sides, Mains, Desserts and Drinks ( including, excitingly, a recipe for Nuka Cola Syrup). 

I wanted to try out some meals and keep it somewhat in-world, Sole-Survivor style, so I opted for finding three bush-pot, one-pot style meals. One-pot meals reduce loss of resources and ensure maximum nutrition retention, which is a good lesson for any lone survivor. I used my big cast iron cook pot for a good rustic authentic feel.  I settled on Cabbage soup, Pork and Beans and a game-meat stew. 


I wanted to go with simple and easy to come by ingredients to better mimic what a vault-dweller might come across on the Surface. The book has well laid out ingredients lists which made scavenging for ingredients from the ruins of Super Duper Mart or trading at a settlement for caps a breeze. I made these three dishes over the space of a few weeks to spread the potential impact to my family out a little. More out of a desire to pad out the potential stigma for "nerdy Fallout meals" rather than commentary of the cookbook or my cooking. 

First up was the Cabbage soup, not a glamorous start for sure, but wholesome and easy. This one called for:, Onion, Shallot, Butter, Celery, Carrot, Green cabbage, Purple cabbage, Vegetable broth, Red potatoes, Tomatoes, Parsley. just some salt and pepper to season.

The recipe was very easy to follow, the steps simple and efficient and after a couple of hours slow cooking, it was ready and delicious. I threw in some thinly sliced dried salami to increase the protein a bit, something my Hungarian ancestors would no doubt approve of. We ate it with some crusty bread rolls and it made for a filling, warming couple of meals for the whole family. Even the fussy eaters ate it, with some reservation.

The batch size made enough for a couple of nights worth of meals and whilst a robust meal, repeat reheatings made it a bit sloppy by night three. It could do with more meat, though the recipe didn't call for any.

Id heartily recommend hearty cabbage soup for any Vaultie that finds themselves with a sack of looted veggies and mouths to feed.


Second meal from the book was a more seemingly traditional survivor / frontiersman meal the redoubtable Pork n beans that any good cowboy would recognize. The recipe called for ingredients easily salvaged from suburban wastelands or the dusty back storerooms of long abandoned roadside diners, with the possible exception of bacon and onion.

The full list is here: Bacon, Onion, Jalapeño, Garlic, Ketchup, Brown sugar, Honey, Cider vinegar, Ginger, Mustard, Worcestershire sauce, Lima beans, Canned pork n beans. Not too bad of a shopping/scavenge list. I opted for canned Lima/butter beans, but dried beans in a sack would work just as well if take just a bit longer with a soak first.

In place of sliced bacon I used a small picnic ham and cubed it to add a meatier bulk to the dish, to make up for the light meat content of the Cabbage soup. I skimped on the Jalapeño as a concession to delicate palates but the recipe was very flavorsome even with only very simple seasonings. The flavors came through in the cooking and long simmering blended it all together nicely.

Eminently suited to a big cast iron pot, from the browning of the ham/bacon and the onions to the caramelisation of the honey and ketchup. I purposefully let it thicken up quite a bit as I didn't want to serve it with rice, but if you did ,leaving it a bit runny would be an easy enough variation.

For the third meal I wanted to make something a bit fancy, but in keeping with my "one-pot meal" idea, I opted for this game stew. 
Ok, lets be fair, this is a curry, and I used goat. It's goat curry and it was delicious. I like to think that goat would make a good stand in for something like a white-tail deer, though hopefully someone who's eaten both can let me know. Though I suppose either would be a good choice for a RadStag. I could have gone with venison from our local butcher, or even kangaroo but I thought goat would be a more in-keeping with the theme of the meal and everyone in the Vault loves goat.  


This recipe called for the most intense ingredients list, which might require a salvage/scrounge mission to  Super Duper Mart unless you happen to have a local spice-hut to hit up, but that said the ingredients weren't that exotic or hard to come by: Ginger, Garlic cloves, Lemon grass, Onions, Turmeric, Coriander, Cumin, Garam masala, Cayenne, Fennel, Serrano pepper, 2lbs goap/ Bambi, canned tomatoes, Bay leaf, Coconut milk.

After toasting the spices to release their aromatics the goat gets browned then spiced, before the wet ingredients (coconut milk and canned tomatoes) go in. Then it slow simmers till the meat is tender and falling off the bones tender. (beware small sharp bones).


I served it with plain white rice, and a sprinkle of coriander as garnish. It was delicious and well received. I accompanied mine with Mexican cola as we didn't make any Nuka Cola. (but there is a recipe for that!!!)

So, all told, three solid recipes, well documented, well laid out and adequately instructed. The cookbook itself makes a tremendous addition to any fan's library, both thematically and also in the context of an actual cookbook. Tall, hardback, glossy pictures and crisp printing. 

I'd have liked a bit more loot and salvage type content, but food health and safety obviously need to take precedence to avoid litigation. Be sure to grab a hard-copy before the EMP wipes out all the PDF servers!


Saturday, July 20, 2024

Review Oceanus Brass - Cablelaid cordage cutter

Here's another solid brass tool to add to my loadout of adaptive hardware. I'm always looking out for tools that can help me adapt to my environment or supplement my resources, especially if normal resources are unavailable or scarce. This particular tool turns plastic drinking bottles into cordage!

You'd be pressed pretty hard to wander too far anywhere and not find modern trash. Plastic drinking bottles get thrown out of cars along roadways, get blown or dumped into waterways and turn up all over the place. The trick is to turn this abundant waste into useful product! Thats where a tool like the Cablelaid by Oceanus Brass comes in. Machined from solid brass bar stock, the tool is based around a simple principle; a razorblade, held in place behind a channel to feed the leading edge of the plastic through and cordage out the other side. 

The top plate of the tool is held in place by three inset Alan key screws, to facilitate swapping out of the simple razor blade in the event it dulls, though flipping it would double your cutting mileage, before replacement or sharpening is required. 

The tool has three channels built into the side that both guide the bottle in to the razor edge but also set the width of the cord produced. Notches set at 8mm, 6mm and 4mm to the blade with a 2mm guide slot along the top of the tool. The tool works by cutting the end of a plastic bottle off, then feeding the edge into the desired notch and the razor begins to cut the bottle into cordage. the notch then feeds the bottle in measured width to the razors edge and cordage exits out the back of the tool. 

In order to maintain a constant pressure on the cutting edge and even bind-free cutting, it is beneficial to mount the bottle to the tool, such that it spools.


To facilitate this, the tool has a hole bored through it, that fits a pen, pencil or the purpose made telescoping feed rod, its also helpful to anchor the tool in place, and a couple of nails serve the purpose well. Thus braced, its a matter of cutting an even strand, which takes a little finesse, and more than a few false starts. The more even the initial cut of the bottle is the better the start will be. as notched cord is weak and often snaps as it is drawn off the bottle. 

I found that gripping the end of the cord in some pliers made for a good method, allowing me to focus on keeping an even tension on the cord, such that an even cutting would take place, free from pinching and mis-angled cuts. 


From a standard 1.25L soft drink bottle, with a good clean start and careful processing i've been able to reliably cut 10-12m (32-40') of 8mm wide cord.

I've found that removing the label and washing out any sticky residue helps keep the cutting smooth and steady, but the first, initial cut to remove the base of the bottle seems most important. I also found that cutting from bottom to top is most successful.


The tool is pocket sized, at 114mm (~4 1/2") long,  23mm( ~15/16") wide and  11mm(~7/16") tall weighing a solid 184g (~6.5oz) but it'r rock solid and comfortable in the hand the way that solid brass is.

It can take either standard razor blades or alternatively box cutter blades, which fit into machined spots inside the tool. 

The tail end of the tool features a lanyard hole, and comes fitted with a brass Bow-Shackle that is the signature of Oceanus Brass products. Versatile and useful on its own. A final nice touch is that the tool came with replacement blades, spare screws and Alan key as well as the telescopic rod in an all-included package.

Though the art of bottle-cordage conversion requires a certain finesse and practice, it's well worth attempting as an alternative to bought cord and thus far I've found a number of uses around the house and in the garden. More to follow.


Thursday, April 27, 2023

Review: restored Folding entrenching tool

 A couple of years ago, between lockdowns, I went for a bushwalk with the family, in the Churchill National Park just near my parents place, and on the way back we passed a couple of items, sitting rusting beside a tree. I'm a firm believer in the old Marine adage of "Gear adrift is gear a gift", and as it had obviously been left in the elements for some time, snapped them up. A good sized Dutch oven, and a wooden handled cast iron pot with lid, and beside them: a rusty entrenching tool. After some soaking, scrubbing, heat-cleaning and re-seasoning the pots have become a welcome addition to my outdoor cookware collection.

The entrenching tool appears to be a Bushtracks folding entrenching tool with Pick' which had seen better days. The screw-down locking bracket had partially seized but with a little elbow grease and liberal WD-40, I got it worked loose enough to unfold the shovel-head and the pick head, with a little extra work I cleared the screw threads of grit and get it working smoothly. 

The next step was to wash and scrub the rusted  shovel face and pick. Luckily the hinge and locking bracket were not especially rusted. Once the loose crud and dust was removed, I heated the shovel head over the gas range hood to drive off any remaining moisture and coated it liberally with linseed oil as a seasoning mechanism. I did this outside as the hot steel vaporized the oil into old-timey smelling white clouds.

The scrubbing and seasoning paid off  and the surface has remained rust-free despite quite a lot of digging, both in the garden and trips to the beach where I use it to fill ballast sand-bags for our sun shelter. I have previously reported on my black tri-fold e-tool and the much smaller tactical-dump trowel but i'll be comparing the two e-tools, as they're in the weight-class.

I'll start by breaking the tool down into its major elements: the shovel, the pick and the haft. 

The working end of the shovel is a triangular tipped square side shovel, with  a gentle scoop. The tip is rounded and the edges are quite wide for durability, unlike the tri-fold which has a decidedly sharpened edge. One of the square sides has a sawtooth edge cut into it. The shovel face is riveted onto the hinge piece with three hefty rivets. The shovel has three positions, folded flat, 90 degree "Pick mode" and full extension. when folded flat the "head" of the shovel between the rivets makes a half decent hammer face, perfectly suitable for driving tent stakes in, not so much for fine carpentry. 

The screw-down locking bracket features  a big washer to aid in keeping  a tight fit when tightened which has stood up to some enthusiastic hammering and digging.

When folded out in "Shovel mode" the tool stretches to a fairly decent 62 cm (24 2/5") length, slightly longer than the delta-handled tri-fold. Length is leverage and leverage is force, both have utility when digging, and the extra length has little impact on its pack-ability  at 42cm (16 1/2") fully folded.


The shovel face itself a little smaller than that of the tri-fold,, but the tri-fold has an inch or so "behind the shaft" so the usable length is all but the same. it certainly digs well and scoops tailings out of the way smartly.  It lacks as pronounced  a rolled-over back-edge to support a diggers boot-assist, and if you really wanted or needed to you could use the pick, folded down.  

At 860g (lbs 14oz) its a reasonable tool to carry around, especially if you know you'll need to dig more than a trowels amount (be it a fire-pit, latrine pit-trap or fighting position.) The wide edge does not lend itself to axe-like chopping in the way the tri-folds per-sharpened edges do ,though they could take an edge without too much effort (either hand file or powered grinding tool). The saw teeth could be sharpened up without degrading the robustness of the tool, but that's a project for another day. I have been primarily using this in the vegetable garden, tilling soil, digging up potatoes and shifting delivered soil into our raised beds.

The Pick tool folds and locks in place the same way as the shovel does. The most useful position being at 90 degrees to the haft. The spike itself is curved along the whole length of the pick for strength and extends out  21 cm (8 1/4") from the haft. 

It is possible to operate the tool with both shovel and pick extended, but its a bit cumbersome. Easier to use one tool and swap between the two.  The pick isn't sharp-tipped, featuring the same robust edge as the shovel, but its not expected to be a mining tool. 

The pick, when folded flat against the haft, can also serve as a hammer, though the rounded back face of the pick makes for a tricky strike surface, but possible.

The pick can also be folded "upwards" into a "spear" configuration, extending the tool into a length of 58cm. Good for getting to the bottom of a hole, reaching the top shelf or possibly ventilating an unwanted visitor to your trench.

Lastly, this tool can, when set into soft enough soil, make for a halfway decent stool, with some balance and practice. better than sitting in the dirt or mud, not as good as a proper chair. 

The original haft was held in place by a rivet through the throat of the locking bracket, and whilst giving the tool a good bash test, trench-club style, I managed to snap it off at the bracket. After sitting unloved in a pile of scraps for half a year, including a house move, I dug it out, ground down the rivet head with an angle grinder, whittled a new head to the shaft, fitted it after a little char-hardening and set it with a clinch-nail. This cost me 2-3 inches of over-all length, but with my longer than average wingspan, it's none the worse. 

Though it doesn't fold down as small as the tri-fold, nor stow away in its own belt pouch (though military surplus canvas pouches exist), this is a solid tool rich with utility and with years more life in it, both in the garden and on the trail.

At some stage I may throw a sharp edge on the shovel for root/brush chopping and i'm certainly going to try my hand at sharpening the saw edge, but all in all I'm very happy with this restoration and salvage of a "lost" tool.

For the God-Emperor! For Krieg!


Tuesday, February 7, 2023

Review: Stilletto titanium nail puller

I do love a  good salvage. Whether it be road-side junk-swap, flea market bargain or dump-harvest the idea of junk salvage strikes a deep chord in me from both a 

post-apocalypse survivor point of view  and 80's kids sci-fi. That said, sometimes having the right tool for the job, especially if you're working with aged or non standard materials. I do like to recycle timber, for garden-beds and storage shelf construction, and getting the nails out can sometimes be a real pain, especially in well seasoned hardwood pallets.  

Previously I have made do with my pair of  demolition hammers (the Dead-On Annihilator and the Stanley Fat-MAX FUBAR) which are brute force tools, even when paired with pry tools such as Jimmy and the ever rugged Breacher bar. I've had a lot of success with this combination of tools but they're inelegant. I'm also a sucker for titanium. I know its not a miracle metal, neither mithril nor vibranium/ adamantium but its pretty rad.

Now on to the tool!

This is the original Stiletto Titanium framing nail puller with the Patented nail removal feature! In essence it is a 30.48cm ( 11.5") pry bar, made of one piece of titanium. It has an open-truss design to cut weight but retain rigidity, weighing in at 300g (8.5 Oz)


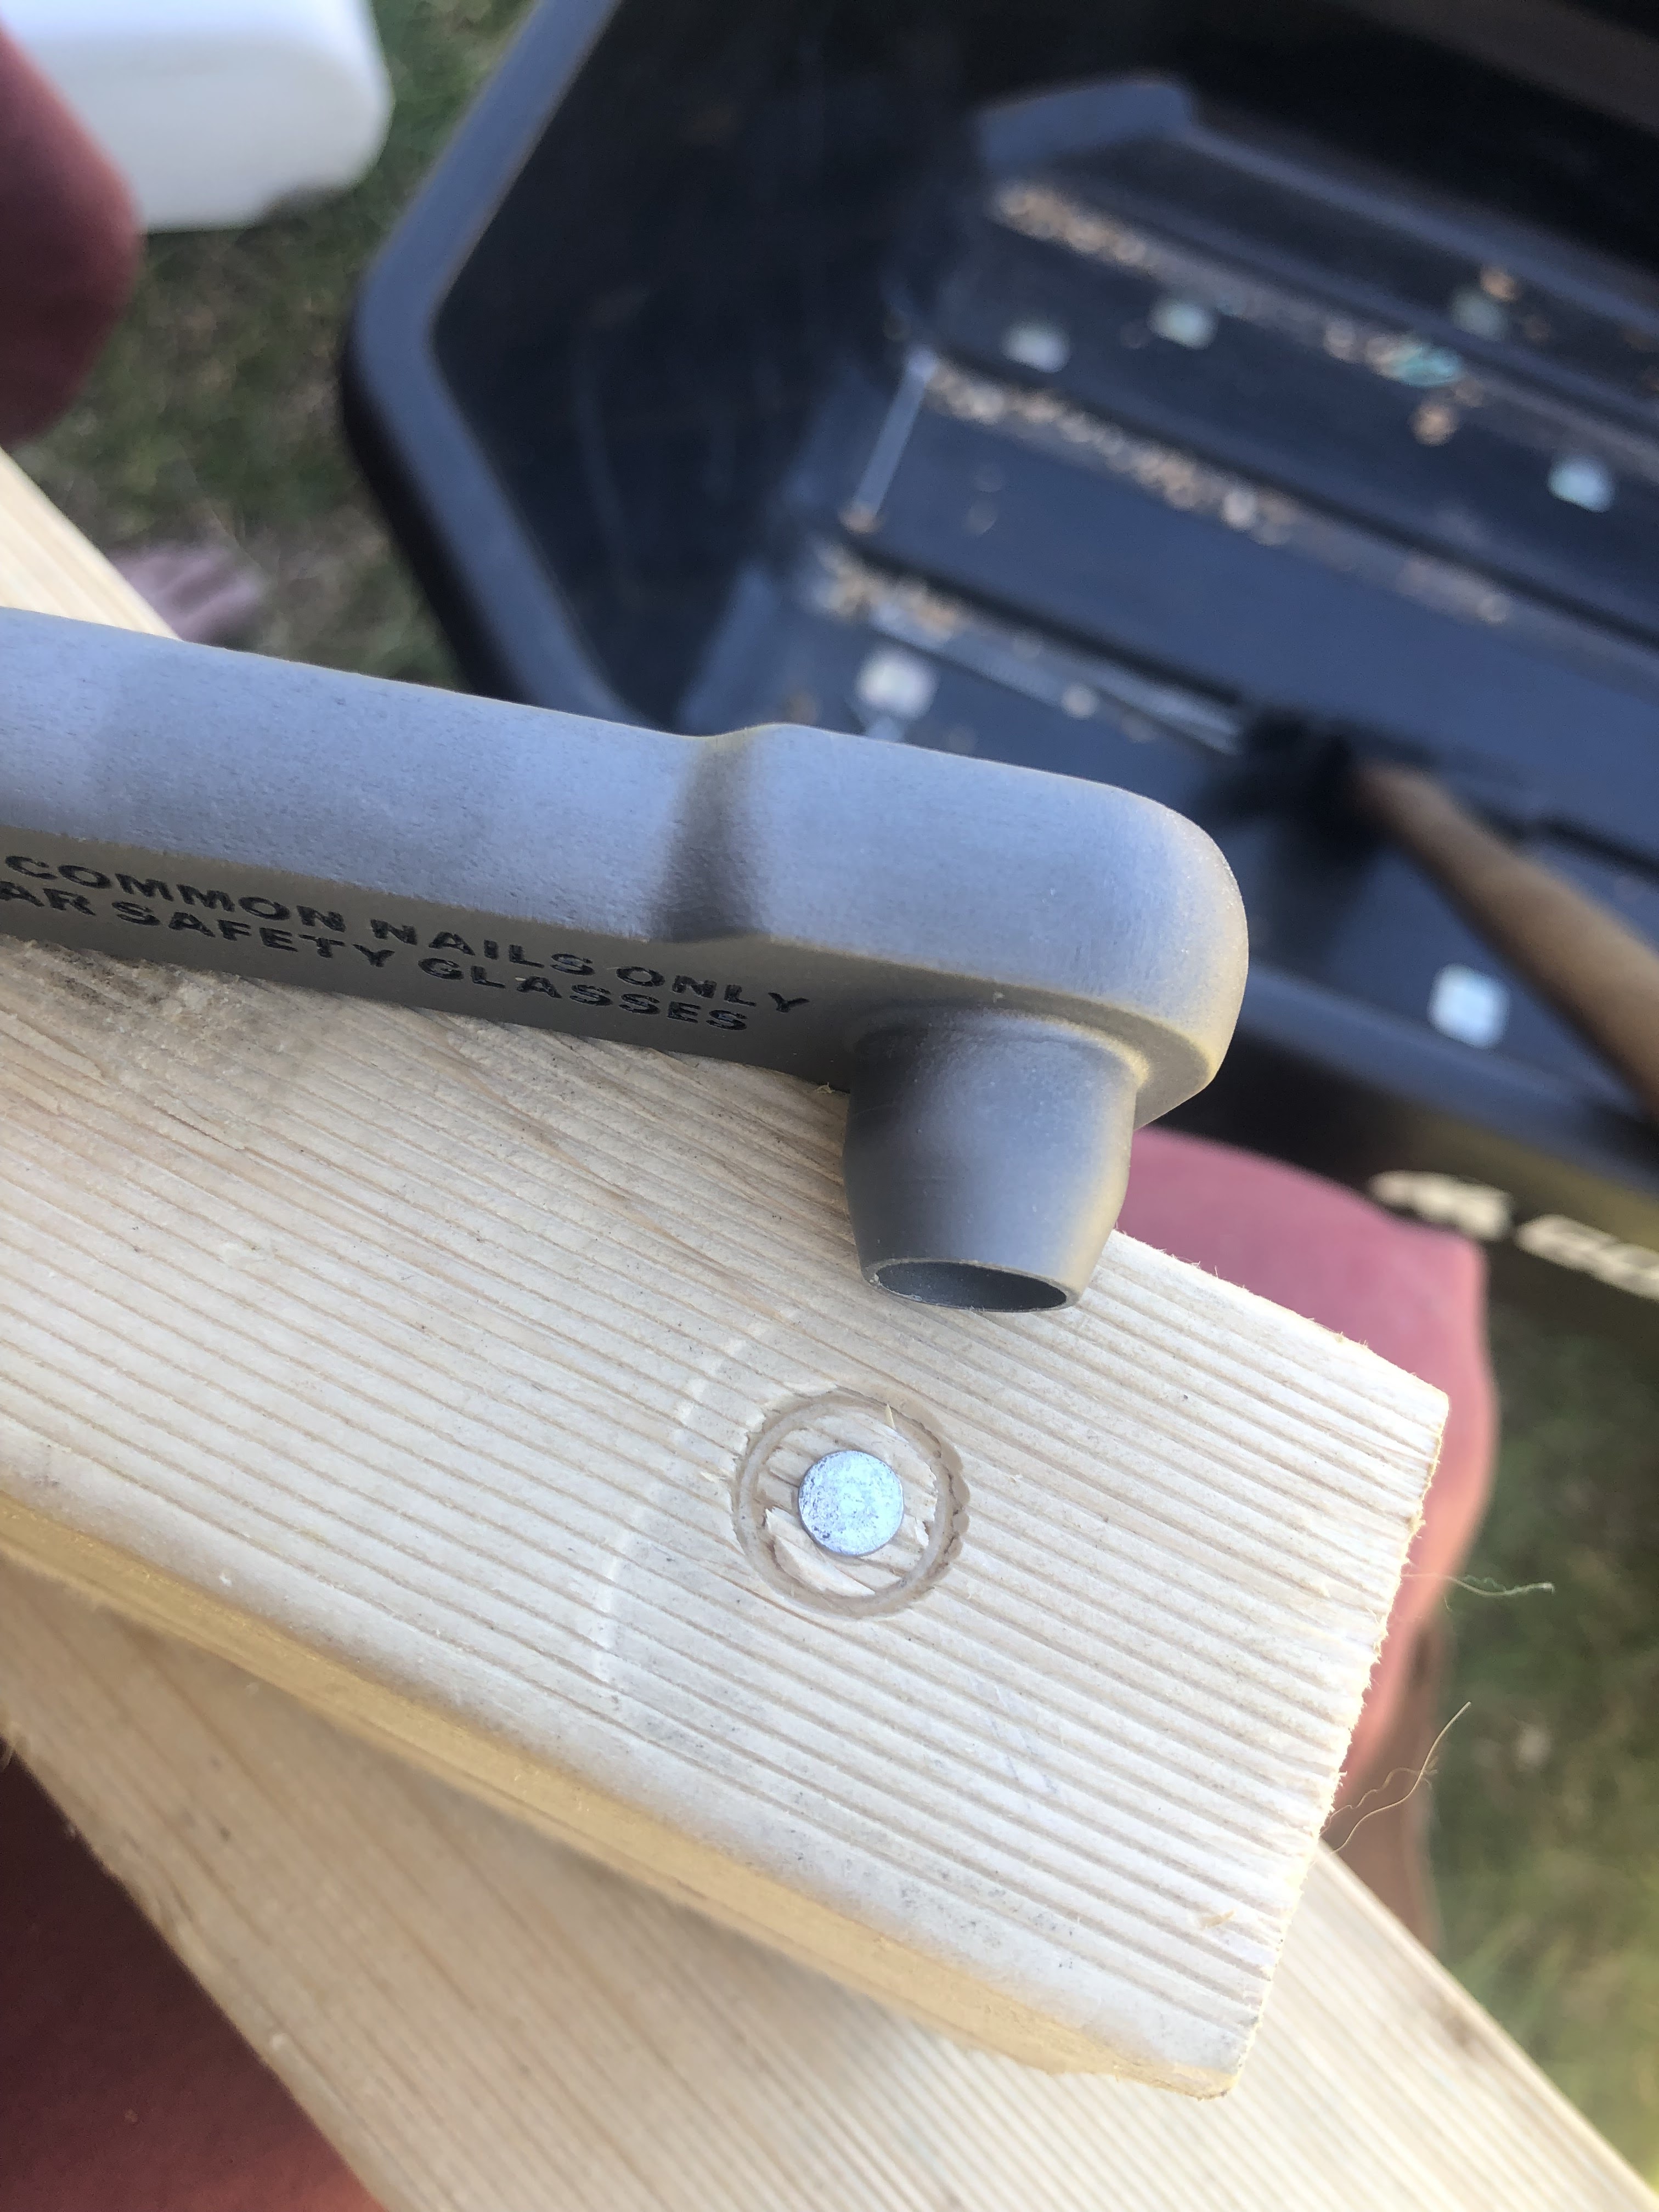
One end features a standard cloven hoof pry edge, which is quite pointy, for aggressive purchase finding, and the other end its a cat's paw, 90 degree pry bar, with a similarly pointy tined  cloven end, and a smooth, rounded fulcrum for mark-free nail-pulling. The key feature of the cats-paw end is the perpendicular dimpler. This open-ended conical protrusion is used to punch a circular indentation into the wood,below the level of the head of the nail, in order to allow either of the pry ends to find purchase and pull them out. This is achieved by centering the open end of the dimpler around the had of the nail and striking the back face with a hammer, hard enough to drive a dimple into the wood around the nail-head. 

The dimpler has an internal diameter of 1cm (0.4") which should be plenty big enough for common nails found in timber. Stiletto specifically state it be used for "common nails" only


The divot allows the tines of the nail pullers to be worked under the nail-head without gouging the wood too much ( divot aside). I found that for especially stubborn or embedded nails ( or punched down, or otherwise deep) that the tines can be driven in by hammering in the tool from the other end. It should be worth noting that Stilleto claim the titanium strike faces outlast steel bars 3X longer - doesn't spall, crack & mushroom like steel bars. I also use the back face of the cats-paw to drive some nails, and though it took some transfer marks, the satin matte finish was un-marred. It's a bit light to act as a hammer effectively but in a pinch, just fine. 


The open truss body is clean edged and smooth to the hand, allowing a strong grip be taken without roughing up your hand.
The shaft of the tool is slim enough to be threaded through PALS/MOLLE channels, for belt, pack or carrier  carry, but I wnt through my leather scraps bag and whipped up a quick holster with a belt loop for my use. I look forward to easy break-down of pallets and furniture for firewood or lumber needs.

Its a great tool, multi-functional, rugged and fit for purpose. 


Tuesday, September 20, 2016

Reblogging: Improvised Tanks for Tank Week

Here's a piece I wrote for Breach Bang & Clear

“Every normal man must be tempted, at times, to spit on his hands, hoist the black flag, and begin slitting throats.” ― H.L. Mencken, Prejudices: First Series

... and at times you want more than just a mean look and the occasional sandbag to be between you and harms way. Sometimes you want to call on the thunder of armour. However, you might not have the power of the military-industrial complex behind you. You might only have the local scrapyard, oxy-torches, sheet metal, and an innovative spirit.

Currently the world's undersupplied warfighters are inventing all kinds of home-brew armour options, and we've been lucky enough to catch a glimpse of them over the last few years. And I must say, we're lucky to have only been catching glimpses and not rolling into battle in them. Let's check a few out.


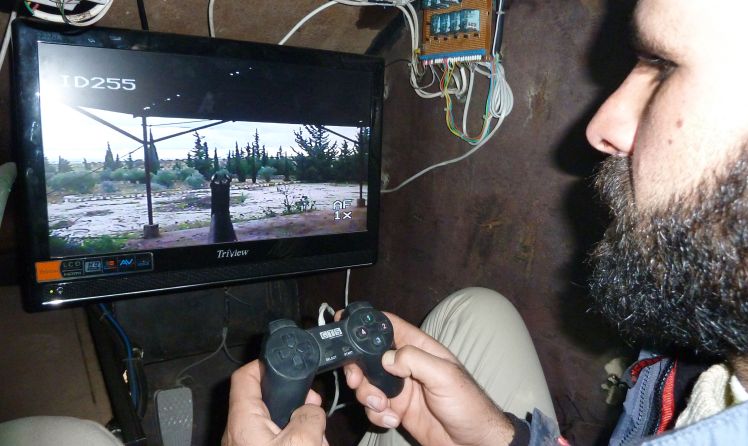
This is the SHAM II, a proudly "100 percent made in Syria" improvised armored vehicle. Put together by Syrian rebels of the Al-Ansar brigade, in Bishqatin, four kms west of Aleppo, it came to the world's attention on December 8, 2012.


Built on an old car chassis and covered in 25mm thick steel walls, it was reportedly able to resist up to 23mm cannon fire. At only 2m wide and 4m long, this is no Abrams. It is, however, fitted with a remote-operated (by a hotwired Playstation remote of all things) 7.62mm machine gun on top. It also has five cameras that give the humans inside a view from all angles.

In one of the original interviews, its primary operator said ‘This is my brother, a trained engineer, who got the idea, we got a car, left its diesel motor on the chassis and built the engine. Not including from the gun, the vehicle costs about £6,200($10,000)." This gives you an understanding of what these folks are doing with their spare time.

Read the rest here at Breach Bang & Clear:

Wednesday, June 29, 2016

Review: Kathmandu Wide Mouthed drink bottle

Every now and then a piece of gear comes my way through .... unconventional means.

One time an IR strobe mysteriously appeared in the post, another time the same thing happened with a set of lockpicks. Other times I have found gear discarded and added it to my collection (some would say hoard).

This time it truly was a case of "gear adrift is gear a gift", in that in the flotsam and jestam of my local beach, I spotted a water-filled bottle, and fished it out.

It turned out to be a very serviceable Kathmandu wide-mouth drink bottle.

It was full of fresh water, and had obviously snapped loose, fallen overboard or been washed away, as the lid-to-bottle retention strap had been snapped away, and only a stub remained on the lid.

I am all for reusable drink bottles, and the clear-plastic, wide mouthed Nalgene's that I have been using for years have served me well.


That link is for a slightly different design, as the one that washed up appears to be no longer available but here is the Dead link anyway.

Apart from the obvious aspect of having a reusable and sealable water bottle, that holds a liter of water for hydration purposes, this kind of bottle also has the capacity for storage for any number of small needfuls to set it up as a survival cache or just as a waterproof storage system for those of you with phones or still use paper money still ...

As a reusable drink bottle, it is only 155g (5.5oz) Eastman Tritan co-polyester, which makes it both odour and shatter resistant,  freezer safe as well as withstand temperatures up to 100 degrees for washing in a dishwasher. They aren't recommend for hot beverages as the plastic will become too hot to touch but make for a great hot-water bottle if you wrap a t-shirt around it once it's sealed up tight.
Even after being lost at sea, and losing its retention strap, and being sandblasted rather thoroughly, its held up really well. The volume increments are still visible, which is good for measuring cordial or tracking how much I've drunk and how quickly, but that's not nearly as useful as the addition of moulded finger grip points on both sides of the bottle.

When you've just filled the bottle, or washed it, or worse, filled it AND washed it they get slippery. so having a textured gripping surface really adds value to the bottle.
I dummy-corded a new retention string to my bottle, so I don't loose my lid, and have something to tie MY bottle down with, so I don't loose it overboard.

Certainly a good addition to my bottle collection, and the price was right, that's for sure.

Always be on the lookout for gear adrift, it's gear a gift. I'm still enjoying a number of items I salvaged off the Tough Mudder courses I've run.


Wednesday, June 8, 2016

Home Front: making braided rope


I wanted to have a go at making rope from plastic bags, a project I had seen online from a few sources, like MAKE magazine which I had a subscription to for some time (thanks Wombles) and Instructables, both excellent sites for finding crafts to engage in, especially to check out a range of ways to do similar things. There are certainly projects that would suit a range of needs, check them both out.

I started collecting plastic shopping bags when we went shopping, bags I would have ordinarily recycled either when we did our fortnightly recycling bin, or back to the supermarket to the dedicated bag-recycling point. I also had a friend bring a butt-load of them as well.

The primary construction of a strand of bags rope is to cut the bag from the bottom of the handle loops, on both sides, down to the bottom sealed hem. this gives you a double loop of plastic fabric, that is very sturdy in the up-down axis.

It's possible to then loop one bag into another with the working bag looping through the exposed loop of the standing bag, and then through itself, and when the knot is sured up, a very solid join is made.

Repeating this process, with a fresh bag being looped into the end of the standing end, the chain is continued for as long as you want. I wanted to braid my strands, so I created three fifty-bag chains, and lined them up. This was a mistake.

I found that having the full lengths meant that when I was braiding the lengths were constantly getting tangled with each other.

My solution was to bundle up the three lengths into some of the heavier bags I had left over. These gave me a far more manageable bundle to braid with, but were still bulky.

A far better idea would have been to make short lengths of 6-7 bags long and added more as the braid progressed.

One trick is to ensure that the three chains are off-set such that the knots don't bunch up in the braid, and this gives the rope something that ALL "primitive" non-monofilament ropes benefit from. Weakness in individual strands are overcome by the braiding (or twisting in twisted ropes) and whilst there may be individual components of the cords that have damage, or weak points, the overall effect balance that out, and supports itself.

One thing I found during the braiding process, I encountered many of the sides of the cut edges hanging outside the braid, and these tags of plastic can be woven back into the rope fairly easily. Where I could, I knotted them and ensured they would not spring loose. I could have twisted the chains in order to capture the tags, but that would have increased the effort needed to make the rope considerably. All in all, once I had my three strands of chained bag-loops, the weaving process took around an hour, and was a reasonably simple process. Keeping a uniform braid is the key aspect for this, and those first few meters were the hardest to keep even, mostly because of the super-long chains I started with.

Making the chains was another time consuming but simple process, light work made quick by my Big Wet cyberpunk pals one evening as we watched John Wick (epic, awesome movie!) one evening. Ensuring the side-seam cut was correctly made, and didn't cut too far to either side, leading to failure of the loop, was one problem, and lead to some wastage. Generally, the plastic gags were remarkably robust, and the chains themselves were quite sturdy, especially if given a slight twist to gather them up.

Once braided, the resulting rope was really quite sturdy. I was able to loop it over a post and pull on both ends with all my strengths without any problem, and lean back with all my weight on it. I had hoped to get some better way to test it, but I'd say that for a static load, they are quite stable. I suspect they could be used for any number of lashing, binding or dragging tasks, but I wouldn't want to use them for any life-sustaining tasks unless there were no alternative.

So, from approximately 150 bags, I made a 10m length of braided, 3-strand chain rope, purely from salvaged shopping bags. None too shabby.


Related Posts Plugin for WordPress, Blogger...