Wednesday, August 10, 2016

Review: MTech hatchet1


I have a great fondness for hatchets and tomahawks, and have quite a collection these days, ranging from the low-key Fuller camping hatchet to the knockabout United Cutlery M48 to the singular Boker Tomahook.

A new addition to my armory was a very blingtastic addition, is the MTech - Tactical axe.

At 36cm (14 1/4") overall, this is a decently sized chopper, and at 650g (1.4lbs) its a lightweight piece. Lighter than I would have expected. The axehead is 18cm (7 1/8") with a 9cm (3 1/2") cutting edge. It has a spike on opposite end, some interesting secondary edges, and to top it all off, it's titanium anodized to a gold finish.

It has a black rubberized ABS handle with lanyard loop, which was lightly textured, and peppered with 7 locking bolt and nuts, with Torx fittings. One thing that struck me was that ABS, it really felt flimsy.

Not that it was flexing under my grip, more that it was light, and sounded hollow. The black nylon sheath was simple enough, with a press stud retention loop, and press-stud closures at the rear to keep it in place.

The blade was shipped-sharp, and had a knife edge, with deep secondary grinds not only along the primary face, but also a deep inwardly curved bite in the top of the axehead, as well as the underside of the beard as well. The top of the axe also features a set of aggressively cut jimping.

 I was hard pressed to think of what that top scalloped edge would be useful for, except as an "upwards" thrust with the axe. However, scalloping the blade inwards, rather than having it sweep forwards into a point like in a Dane Axe seemed counter productive. Perhaps as a branch trimmer? More likely to make it look extra cool and scary. Gold. Plated. Scary.


The edge at the underside of the beard was alright as a down-sweeping cutting edge, although it did come back quite close to the very top handholds, and my delicate pink flesh, when using a choked-up grip.

There are cut-aways in the bottom of the axehead for thumb and forefinger to rest in, and they were well placed, but again, there was no beveling, and the sharp edges seemed too close and unguarded.

At the back of the axehead is a spike, ground down into a diamond cross-section, and down to quite a significant point.

I liked the geometry of it, and it certainly had a fair "bite" when punching holes in logs, chipboard and cans.

Overall, the cutting power of the axe was somewhat limited by its light weight design and whilst the knife-edge blade was sharp, and with a thin cross-section. It chopped into boards well enough, and cut through bike-tyre like no-ones business, but on a meaty target like a log, it bit and stuck.

Too light to travel deep enough to cleave, too narrow to form a splitting wedge.

I gave the butt-end a strike, to test durability and its utility as an impact weapon and THIS happened. The ABS plastic, which is what LEGO is made out of, shattered at the shock of impact.

It also exposed the inside of the axe handle, which is something else that  I wanted to bring up.

Having felt how light and "hollow" it sounded, I had taken the handle apart with my trusty min/Inch TORX screwdrivers, and popped it open.

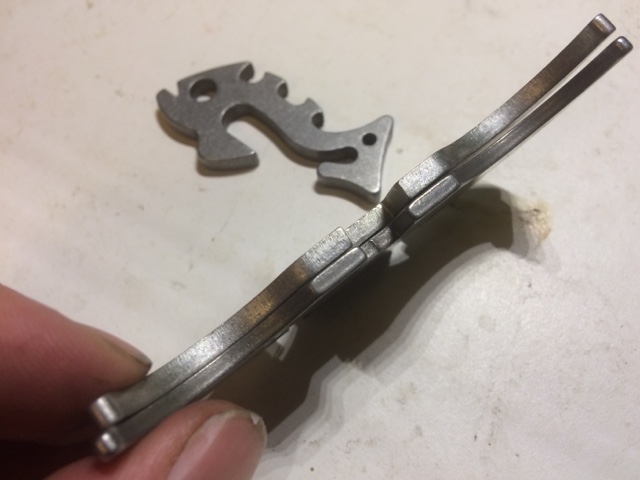
It turns out that as well as the thin and hollow framed handle, which I could have lived with, and probably either filled with resin, or replaced with a cord-wrap, the handle itself was made of three separate pieces of different steel. One for the Ti-anodized blingtastic head, a powder coated lanyard loop piece at the butt-end, and a plain piece through the middle.

I'm sure that made the fabrication easier, but I don't know what kinds of steel are in there, and the welds don't look all that flash to me. I would have some concerns about wailing too hard on a solid door, or a wall, or even a tree-trunk with this.

Perhaps a metallurgist out there can tell me otherwise, but I'm going to relegate to the back of the collection and save the serious work to serious tools.

It seems my MTech Extreme Cleaver was the exception to the rule that these are not hard-use tools.

Monday, August 8, 2016

Review: knock off Gravity Hook

One of my friends lent me this piece to compare. I have covered the Fishbones Gravity Hook a number of times, and have been involved with beta testing, so my appreciation and bias is pretty well known.

It appears that the Kickstarted design that Eldrick Garcia and his team developed, over many iterations, and put into production has been copied and is now for sale and being plugged online. Now, I am all for free market, and it's inevitable that great ideas will be copied, I wanted to try at least to compare and contrast the two designs.

Here are the two hooks side by side, with the Fishbones version on the left, and the Molibao version on the right. You can see they are essentially identical, remarkably so. The "arms" of the hooks are essentially carbon-copy of each other. The arcs, bolt-holes, the middle-notch hole and even the curves of the hooks are identical.

The mounting hardware is different, but bolts and self-locking nuts are ubiquitous, as are the shackle loop at the bottom. No big issues with that, obviously.


The batarang cross-hook pieces indicate pretty well the differences between the two pieces however.


The Fishbone cross-hook is obviously thicker, which is true for the entire construction which is made out of 1/8" thick 304 stainless steel and all of the Gravity Hooks and weighs 360g all told.

You can also see the finish of the Fishbone hook is much neater, with the Molibao finish having a notch still present inside the cross-hook. Thicker steel means stronger steel in my books, assuming it was the same grade, which I have no way of knowing.


The differences between the thicknesses of the steel used between the two Gravity Hooks have been taken into account in the Molibao version, which was good to see.

The notch-holes were differently spaced, and adjusted to still ensure a good fit, so the hook actually works identically to the original.

Essentially, if you didn't know that it wasn't from the original manufactures and had one to had to compare with, you wouldn't know it wasn't an original.


One thing I wanted to cover, then, was the price point. I went back and checked the Fishbone website and the steel Gravity Hook is $39.99, the titanium version is $79.99

On the Nifty Thrifty Store site, where I -think- you can get the real deal (maybe, given the use of the official promo-shots) they are $65.37.

The Molibao versions are on AliExpress and other cheep-gear sites, but really, you get what you pay for. I know you're not supposed to be putting your life on the line (literally) with the Gravity Hooks, but, why not spend a little more, for a better quality, original product, and give back to the people who are doing the innovation in the first place.

Tuesday, August 2, 2016

Events: Snow trip - gear summary

I was lucky enough to be taken up to the snow for my 40th birthday not long ago, by my mum, who kindly took my whole family up for a long weekend at the Falls Creek snow resort in the Victorian Alps. Snow, in Australia? Yes, it snows here. Sometimes, in a few places. When we went there was a base-cover of around 80cm and it was forecast to be between -3oC and -6oC, with 24cm sow expected each night, or thereabouts.

It was a 5 hour drive, including an hour on the shuttle-bus, as we didn't want to go through the hassle of snow-chains and on-mountain parking, as well as windy, icy mountain roads. Leave it to the professionals, I say, and have a nap on the way.

That said, when we arrive mountain-side, it was sleeting pretty heavily, and continued to do so for the majority of the day. We lost a bunch of snow cover and everybody got damp. Some more than others. That's kind of what I wanted to cover in this post. What I wore to stay warm and dry. What gear  I took.
 Now, I cheated to some extent in that I hired ski-boots, and the outer-layer jacket and ski-pants for when we actually went skiing, (my first time in 20 years, since I lived in Calgary, Canada).

However, I also packed accordingly, for the times I wasn't skiing, and I'm glad I did.

I've had quite some experience in cold climates, both Canada, the UK, Danmark, as well as holidaying and I know they key elements to not having a bad time are to stay dry and warm. Not always both, but if you are one, or the other, you can usually get by. Cold AND wet? You're going to have a bad time.

Here's my layered approach to a trip to the snow:
I wore as my base-layer, the Platatac fleece leggings, and DriFire long sleeve shirt. I don't have any fancy socks, but tend to get hefty heavy-duty socks from the supermarket and wear them to death These ones are Kirkland's,, from Costco. nothing special, but long lasting and don't get stinky.
I wore my Danner Striker ii GTX combat boots, which could do with a thorough polishing, but I hit them with a liberal coating of Kiwi boot waterproofing spray and they worked a treat, even when I stepped through slush up past the ankle. Be sure to open the laces right up if you're waterproofing boots, and get in around the tongue to ensure you don't miss any leakage points.

I looped the leggings foot-hole stirrups over my socks, so they didn't ride up, and I had full coverage from toe to belly-button. Tucking my shirt into the elastic waist of the leggings then carried that all the way up to my neck. No cold draughts.

For my outer layer, I took my snow-proven Propper Adventure Tech shell outer pants, which offer a wind and water proofing layer that I really appreciate. They don't have a lot of pocket real-estate, but I made do, and didn't either loose anything, or lack anything on my adventures.

Over the DriFire shirts, I wore the lightweight Propper windcheater which provided me a really good lightweight dry-layer, as well as having a good neck-seal. My one was a bit too shirt, so my super-long arms tended to poke out, but I had a plan for that anyway.

As my outermost top layer, I chose my Baubax multi-function jacket, which is a semi-hard shell with a hood and thumb-hole fitted wrist extensions. I'll be covering this in detail some time soon. It held the sleet off really well, although the cuffs and the wrist extensions got pretty sodden. They could do with a dose of waterproofing spray as well, I think.

As far as outer layers went, it was a spot on combination for what I was expecting, although had I wanted to stay even dryer, I should have packed my Hazard4 Poncho Villa but I erred on the side of less gear. I should have left out my spare 90's era snow-pants I got when we moved to Calgary, but I'll pack it next time.

For head and hands, I wore my Peruvian fleece caps, along with one or two Headsox to keep my neck, mouth and ears warm. I wore my dual layer, long wristed Condor Nomex gloves which I also gave a liberal waterproofing. That can of spray was an excellent addition and I can't recommend them enough. I think I shall trial a few different ones soon.

I wore a skiing helmet, to which I mounted my Contour Cam in its waterproof case. I gave the misty fogging Arena Flakjack goggles, with a smoky lens fitted, which remained mostly useable when I was skiing, but I needed to keep taking them off and wiping them off. The goggles really helped me have a clear and wind-free view of where I was going at upwards of 40kph downhill, who knew? I didn't hit ANYTHING this time. (I killed two aspen saplings at least, when living in Calgary).

I wore my Platatac Bravo hydration pack, with a 3L Source WXP bladder in it. I have a Blackhawk Side Plate carrier mounted to the bottom of my Bravo, as its hook-and-loop top makes it an excellent flat-pack pocket.

All in all, I was really pleased with my loadout, but most of all, I can't go without saying that my favourite bit of cold-weather kit was the SORD StormTrooper belt-fitted muff. Not only did it's pockets keep my needfuls (like my Manta emergency strobe, CLIF bars, and the like), they also were a place for me to stuff my gloves, and also just plain keep my hands warm. Warms hands mean good-times.


Thursday, July 28, 2016

Review: Propper - Genuine Gear Pants


It's been a while since I've covered a non-pouch, non-gadget, so I thought I'd cover one of my other staples. PANTS. Generally, I subscribe to the philosophy that "pants are tyranny"

I wear a lot of cargo-style pants, almost every set of pants I own in fact, not to mention my collection of cargo and tactical kilts. So when it comes to new pants, I have a few requirements and points I look for. I need to have cargo pockets that let me stow my iPad Air, at a minimum. I go to a lot of meetings, and use my technology heavily, but also like to go hands-free as often as possible.

It also helps to have copious loot storage when it becomes necessary. Snacks, shiny and pointies, discarded kit, whatever. Big pockets are a must. I also want strong crotches, as I seem to tear mine with alarming propensity in some pants, so good gusseting is important. The Genuine Gear pants certainly met my needs.

The military-inspired construction and fit of the Genuine Gear pants pulls from some pretty classic design elements. A zippered fly with button closure sits over the reinforced seat, as well as having all the seams, inseam, outseams and seat seams being "felled" which is to say double stitched. This makes them pretty sturdy. There are six pockets in the design, regular front pockets, twin button-closure back pockets with button flaps, and two large cargo pockets with double button flaps.
The bellowed pockets also feature drainage pockets and the pocket flap seams are fused for clean, professional look, however, I wasn't all that impressed with the outcome, as the flaps didn't sit flat.

In fact, the pants are billed as fade, shrink, and wrinkle-resistant, but I found them to take wrinkles quite easily and made them a little higher maintenance than some others I've reviewed. The ripstop material however, was quite resilient, and have both kept their colour and shape very well, and have resisted wear handsomely. They also feature adjustable waist tabs for secure fit which are a nice addition, as well as durable tape drawstring leg closures to keep rainbows, carnivorous cursed scarab beetles, dust and grit out of your pants.

The belt loops were a little narrow, which is probably the weakest point with these pants. I personally prefer thicker beltloops with more reinforcement sewn in, but they are still fully functional.

The fabric is very comfortable, and hasn't chafed or pinched on the inseams like I have had other pants do on occasion, so they have been comfortable for long hikes and adventurous clambouring.

They fit well, and were it not for the less than wrinkle-proof effect, I'd be over the moon with these, but on the whole, they are totally adequate, and robust enough for both outdoorswear, adventure and regular wear.


Tuesday, July 19, 2016

Home Front: Power Outage

We had a scheduled power outage at our place over the weekend, which we had completely ignored, and it took us a little by surprise, but thankfully, we have gas-for cooking and hot-water.

 What we didn't anticipate is the power-hungry nature of the ladies Pokémon GO running iPhone 5's. We might have lost wireless internet, microwaved cooking and refrigeration but they still "gotta catch 'em all!"

 However, that said, we were prepared. I fired up my replacement Power Practical PowerPot XL and set up two battery-packs including the Lithium 4400 and Limeade Blast 18,000mAh.


I also set up my tea-light candle driven Tellurex tPod power system which coupled with the power strength meter Power Practical Practical Meter charged another battery pack inside, as well as having a LED output option.

We were fortunate that even though the power-outage went 3-4 hours over time (apparently the pole-replacement was too big for the hole dug) it was not as cool as it had been, getting down to 5oC at nights, as all our inside heaters are electric. However, running the stove, boiling water in the PowerPot for hot drinks as well as generating power, and our collection of candles and lanterns for lighting.

Outside, I ran our BioLite thermoelectric stove much to the delight of Tactical Baby, who insisted in roasting marshmallows over the flames, whilst I charged yet another Lithium 4400 battery and phones directly. I cut wood to run the BioLite, as it only takes short sized lengths of wood and twigs before dark set in. We were preparing to cook by candlelight when the power came back on.

With good use of ambient light, not opening our fridges and freezers, and gas-cooking and water, we were hardly inconvenienced, and with my collection of thermo-electric power sources, we has device-running power aplenty.

Wednesday, July 13, 2016

Re-Blog: how to remove a fishhook


This was a very interesting piece I saw, from the Walden Labs who offer "Solutions for Self Reliance" which I wanted to share with you all. I've reblogged from Walden Labs before, they have great content. For those of you who have ever been out fishing and are a bit of a klutz, there is the very real chance that you might have stuck yourself with a hook.

The folks at Walden labs found this clip from Total Fisherman which demonstrates five different ways of removing fish hooks that are buried deeply in a persons body. Total Fisherman goes as far as really hooking himself to demonstrate these techniques.


Warning: If you don’t like seeing fish hooks going in and out of skin don’t watch this video.


Published on Apr 24, 2013, he buries and removes five fish hooks from my hand, arm, and leg, to show us whether or not the "best" fish hook removal technique actually works.

It appears to be working by securing the base of the hook as firmly as possible, against the body, and after fitting a larks-head knot to the hook end  and with a quick jerk, aiming to yank the barbed hook out with the tension in the metal itself.

Normally this is pretty bad-first aid advice, to pull a penetrating object out, and there is always a risk that pulling a barbed hook out will do more damage, however, in a field expedient situation, this is probably a better solution than trying to push the hook all the way through and cutting it.

Tuesday, July 12, 2016

Home Front: Old school Cutting Practice

There are all kinds of cool-guy articles about putting lead to steel at the range, also many articles with serious-looking folks in pajamas bending arms and throwing bodies. But something I haven’t seen a lot of are action shots of the Japanese training method known as “tameshigiri“, or practice cutting. Much like ballistic gel is used to simulate how bullets react to human flesh for firearm testing, the practice of tameshigiri involves cutting practice on a realistic simulation of human flesh, without all the mess (and paperwork).

I have fifteen years of kendo (Japanese full-contact fencing) and hold a 3rd Dan grading, but even with all that my school never trained with live blades nor practiced tameshigiri. So whilst I had countless hours of swinging at and hitting my opponents, we did so in the knowledge that it was all blunt-force. Again, we were simulating combat, and simulating cutting.

I am fortunate enough to know a senior instructor of a different art, iaido, another modern Japanese martial art and sport that emphasizes being aware and capable of quickly drawing the sword and responding to a sudden attack.

But whilst its practitioners use metal blades, and at advanced levels, live blades, they don’t participate in full-contact opposed combat. Because, well, dismembering your training mates is poor form.

They do occasionally practice tameshigiri however, to test the techniques they are performing. The targets are made of wet, tightly rolled tatami mat sheets, which need to be cut correctly or they bind up or crumple, immediately demonstrating an ineffective technique.

 Read the rest here on Breach Band & Clear.


Related Posts Plugin for WordPress, Blogger...