Wednesday, May 15, 2013

Review: Platatac - FFE holster


I've mentioned before how good it is to be able to go to a supplier with a problem, and ask for solutions, without getting a hard sell. It's one of the reasons I am so fond of the Platatac guys, and why I point people in their direction when I get asked for equipping questions.

Here's a case in point.

When at Confest I did a bunch of wood chopping with my trusty Fiskars logsplitter and needing some way to carry it about, I slung it behind my Bravo hydration pack. Not very comfortable, but it worked. I wanted a better solution, and posed it to the guys at Platatac.

This is the Fix Freaking* Everything FFE holster. The idea was that the head of the Fiskars axe could sit in the throat of the holster, buckled down and snug under the dual press-stud and hook-and-loop safety of the fully adjustable retention straps. Alas, it was not to be, the geometry of the axe and holster just didn't match up.

However, I did get to play with a very cool holster, which they kindly loaned me to test out the theory.

Here's what I can tell you about it.
Constructed from the same 100d Cordura that almost all the Platatac range is built from, this multi-layered holster is stiffened throughout with extra stitching and layering. This gives it a very sturdy and form fitting shape, perfect for weapon retention.

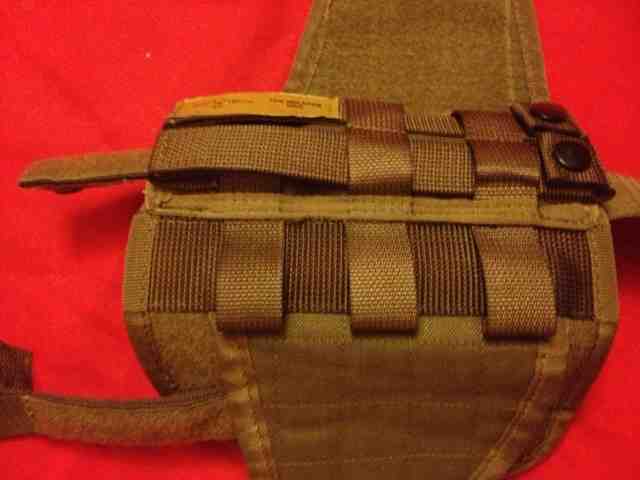
The back side features two channels of 4 row PALS/MOLLE strapping, which gives a very solid attachment to a chest-piece, thigh rig or belt.


Opening up the outer layers, you observe the multiple sandwiching sides of hook-and-loop, giving you a wide range of customisation, both in models of handgun (like, in the extreme, my Plastation lightgun used here) and also accessories (lights, sights).

This is accomplished by having those overlapping layers of double sided hook-and-loop panels, allowing the fit to contour to the system carried. You can see here that the retention strap itself can also be adjusted, to conform to the  back geometry of the pistol retained.
Unfolding further, you can see that the inside of the holster also features a webbing loop, to form a pocket to contain the muzzle end.

From this angle you can also see the snap end of the press-stud retainer. This is also adjustable, but is very tightly fitted between two very closely sewn layers of hook-and-loop, making it a tricky operation, but a very ridged hold when in place. This retainer is further stiffened with a rigid plastic core, for added security.


 Opening the holster up flat exposes more clearly the single channel of three PALS/MOLLE loops, allowing the addition of a single pistol magazine or accessory pouch, to the leading edge of the holster.

Comparing this to the drop-leg holster I reviewed a while back seems unfair, because this is obviously the real deal.

So, an experiment that didn't work out, but a very useful one, and in the end, I -DID- come up with a solution to the "carry the axe about" problem, with the help of the guys.... to follow soon ....


* Actual wording my vary, but I adjusted for delicate USAnian readers.


Tuesday, May 14, 2013

Sneak Peak: Phoenix Jr IR Strobe

So, generally, I don't like surprises. Surprises mean I haven't planned for something adequately. 

The exception is mystery presents... Like this, the Phoenix Jr IR strobe transmitter. 
This showed up this morning in the mail, along with a couple of military cylume sticks, no return address. 

Cal, was this you?

Either way, I'm going to have fun with it and crank up my Yukon NVG to see what I can see with it. 

Presents! Yay. 

Friday, May 10, 2013

Review: HexBright - FLEX Programable light

I'm really excited to be bringing this one to you. This is another Kickstarter project that I backed ages ago, (Launched: May 21, 2011Funding successful : Jul 19, 2011) that finally arrived about a month ago. 

That's a long time, you might say. It was. However, creator Christian Carlberg made it up to me and all the other backers with his constant step-by-step updates, keeping us up to date with every design iteration, testing run and exchange of parts. The included videos of the whole process kept the faith, and my interest the whole, long, wait.

When it finally arrived, I was as thrilled as could be. This is the HexBright FLEX, open-source programmable, rugged, high-performance light. (Here, stacked up against my Surefire 6PX)

Christian pitched the HexBright as "a stylish, rugged, high-power compact light you can use as-is or reprogram however you want using open-source code." and yes, it is all those things!


The Flex has a max light output of 500 lumens thanks to the
CREE XM-L U2 LED super bright LED light source that sits at the pointy end behind the TIR Lens. The lens is made from PMMA, optical grade acrylic.

What does that give me? According to the Kickstarter page, and the Hexbright site, that means you have a High Mode output of 500 Lumens for 1 hour, a Medium Mode output of 175 Lumens for 8 hours or a Low Mode, 50 Lumens for 30 hours. Five HUNDRED Lumens. The Surefire 6Px is listed with a 200L output, and the 5-11 ATAC A1has a 103 Lumen output rating.

For those interested in color temperature, the FLEX sits at  5380K - which apparently is "just shy of daylight". Thanks to all that circuitry, you also have regulated light output, the light stays constant and has a 1.6amp max output, thanks to the USB rechargeable Lithium-Ion battery, which is apparently 3.7 VDC 2400 mAh, 4.8 Amp Protected). All that circuitry however, isn't just for power-metering, it also houses the programability of the unit.


The HexBright Flex comes shipped with default program modes of high (500 LM), medium (350 LM), low (200 LM), and blinky. but by plugging the FLEX into a computer via the micro-USB port, and then loading code with Arduino software. (You need to do some downloads first, both the USB drivers, the Arduino application and then the Arduino code files for whatever programs you want to run.

Part of the fun about this light is that versatility. As well as the press button at the tail-cap, the circuit board also has a temperature sensor, which can be used to monitor the lights heat for emergency shut-off due to overheating, but also can be used to report ambient temperature (reporting through flashes of the tail-button LED's). It also features a accelerometer which enables rotation and tap based signals to be used to govern the light (ie, rotate to dim or brighten, or tap to change settings, or message)

The inner housing rotates out via heavy set threads at the -tip- of the light, rather than the tail, which was a cool addition, and seals up with a well-seated o-ring gasket at the tail end. Accessing the USB port can be achieved by simply unscrewing the tail cap enough to expose it. It also means I can charge it via my solar chargers.


The body of the FLEX was machined from solid hexagonal aircraft-grade aluminium bar stock. both the tailcap, and the internal carrier body with its threaded end are made of the same stock, giving you a rock-solid construction. The tailcap button is a translucent rubber, also fully sealed, allows you to see the green and red status lights (charging, and mode-changing).

 
 At 145mm by 34mm, and weighing in at 215 g  (5.7" long by 1.3" , 7.6 oz) this is big for a pocket torch, but all that body houses the electronics, AND acts as a heat sink for the mighty CREE XM-L U2 LED. The knurled tailcap end is ever so slightly raised above the hexagonal sides of the main body, so the FLEX doesn't sit quite as flat as i'd have liked, but the meaty finger groves and that hexagonal body make it an ergonomic dream to wield or stuff a pocket with. A couple of narrow lanyard holes in the tailcap give you a carry-loop option.

Here's me doing a bit of an indoor test and comparison with my Surefire and ATAC A1, turning a cave into day.

Outside, the limitations of my iPhone to capture good night footage don't do the FLEX justice, but all the same, 500 Lumen is nothing to be scoffed at. I'm not sure if my car-headlights are this bright (bigger, yes, but as bright? I'm not sure).

Once I connected my FLEX to a PC, and messed around with the Arduino programs I found online, I settled with LOW-MED-HIGH, hold for flashy, hold and tap for strobe, and using the accelerometer, "go to sleep after 20 seconds of inactivity/wake on movement" for that "find your light in the dark tent" option. 
Going LOW-MED-HIGH at the tap of the button means I dont dazzle myself unnecessarily, or give my self away too badly if I am being careful about light discipline.  


Here's the comparison shots of the LOW-MED-HIGH settings indoors.


The HexBright FLEX is an awesome piece of engineering, I was really pleased to have received mine, even after the deliciously long wait, thanks to Christian's awesome updates and cute videos. This is definitely going into my EDC load, and my main concern is learn how to code new programs for it!


Non-US enquiries,  contact Christian directly at christian@hexbright.com

Thursday, May 9, 2013

Review: Helinox - Packable chair Tactical Edition


One of the things I love about doing this, is the contacts I make, and being asked for my opinions on things.

Tay Choon Mong from HorNest included this little number along with a pointy purchase and a slingy purchase I made recently (coming soon ...). I've liked working with Tay, he's reached out to a variety of vendors to import some cool items to his Singapore shop, much easier for me to get a variety of cool things that way.

One of the things that I've seen but not previously had a chance to play with is the Helinox portable chair. Ive had a variety of folding camping chairs over the years. The ones you see discarded at the end of every summer, or midway through. Tube steel and cheep nylon, plastic fittings. I've even had chairs like that break whilst sitting in them. They are disposable technology, and a product of the "weekend BBQ camping" culture.

These days I tend to sit on a log, a rock, or the ground for that very reason.

No longer!
 Before we even get tot the chair, have a look at the case: Made of 1000d Cordura type nylon, it sits at 35cm long by 10cm wide by 12cm high.

It features a 10-loop webbing ladder. which gives you a variety of attachment options. You can see here I have looped the bottom compression straps of my Platatac Bullock Echo pack, but you can also see that I have looped a couple of Grimlock clips through them as well, because I wanted to see how I could sling it differently.  

I found slinging it like this was great.  

On to the chair itself! The struts are all held together with shock-cord, and all break down to less than 35cm to fit in the case. The struts are both light and sturdy, being an aluminium TH72M alloy and the joins are exceptional well fitting. The struts all slot into the heavy-duty dense polycarbonate plastic joint pieces. In fact, combined with the shock cords, the chair practically assembles its own skeleton simply by waving it about. 


It half built itself when I pulled it out of the case. i had to stop and look at it to make sure I was doing it right, it was all happening so fast. Two pieces come together for form each of the back struts, and the single piece four rubber-footed legs slot in the bottom, with a single thicker strut joining the two halves.

When assembled, the chair measures 52cm wide by 50cm deep and is 65cm high. The back of the fabric of the chair even has instructions printed on it. Following the advice listed, after seating three of the struts into the stiff plastic cored pockets, I flipped the chair over, and this greatly assisted in seating the fourth strut. 

All up the 940g (including the case) This will support a 145 kg load. 

And then I had a chair!

 
You can also note that the chair features two side pockets, big enough to fit a cold carbonated beverage and a large illumination device at easy elbow reach.  


The  chair was really, really comfortable, and for all its small size, fit me well, and felt sturdy.

This being the Tactical Edition, it is a flat matte design, you can see that there is not only venting slots in the seat of the chair, but also the solid fabric (rather than the mesh-backed version).  

As I've said, I have used camp chairs in the past that were rickety, flimsy and in the end, disposable.
This is not that kind of chair. Its size, ease of use, weight and portability made it a real winner to my mind.

Itis definitely going in my out-and-about kit, not to mention freeing up space in my camping loads.


Tuesday, May 7, 2013

Think Geek Goodness

Think geek (source of some fun accessories) have a sale going on, and I wanted to share the details with you.


$20 Off $100 Affiliate Exclusive

$20 off $100 AFFILIATE EXCLUSIVE!
Code: 20SMACKERS
Starts: NOW
Ends: May 12th EOD

You thought $20 off $100 off of Star Wars Products was cool?! Pfff I got your backs with this WEEK LONG AFFILIATE EXCLUSIVE!
Get $20 off $100 on EVERYTHING when you use the code 20SMACKERS. This code can not be combined with any other offer. This promotion starts NOW and ends May 12th at the end of the day.


You can find the following items I've reviewed there:
M48 Kommando Ranger Hawk Axe

Dead On Annihilator Superhammer

Eat'N Tool Dark Edition

Titanium Spork

Survival Kit in a Sardine Can

The Zombie Survival Guide

check it out and maybe pick your self up a bargain.

Sunday, May 5, 2013

Event: ConFest


Over Easter, I took the family to ConFest, a big "hippie" lifestyle and camping festival. We've been a couple of times before, but this was the first time we had gone with the two littlest ... Triceratops Girl and Tactical Baby. This made it quite the adventure, with the two of us adults, a teenaged lady, a 4yo and an almost 2 yo. Camping for four days, a long way from home.

Its not as if ConFest is really roughing it, by any stretch of the imagination. Ive seen any number of campsites there which were not much more than a sleeping bag on a drop sheet, under a tarp, and yet the inhabitants had hot cooked food, from the large market area.

We took our new (but second hand) 9 person Great Outdoors - Silver Grande 9L  tent, as well as a pair of the Spinifex - Deluxe Padded Camp Stretcher beds (XL)   a folding port-a-cot for Tactical Baby and the very ingenuous Spinifex -  Double Bunk bed cots. We didn't want to spend our holiday with cranky, sleep deprived children.

Where am I going with all this? well, we packed all of our gear into my Toyota RAV4 5-door, including the two kid seats, and drove the 7 hours to ConFest, and I used the exercise as a "get the hell out of Dodge" system check. We could load up x-amount of stuff, and only that. We were cheating because we were planning to buy some food at the market, and stopped for lunch on the way. However, it was a good test of what we would need, and what we could do without.

Here's a shot of us crammed in, the backseat full of kids, the front seat full of road snacks and gear.

We took solar chargers for our electronics, lights and the like, the Australian Easter has no shortage of sunlight. The roof-rack was filled with bedding, the beds, a spare tent, camp-tables and chairs, all covered with a tarp. A cheep tarp. Lesson learned, get a better tarp.

We also packed more food than we ate, never a bad thing, and we chose our food carefully so it would not require excessive care or refrigeration. It would have lasted us a week, if we'd been careful. We had packed baby things, including formula, nappies and changes of clothes.
My big box of camping kit, which included cast iron pots and pan, tripods, spits, fire starters, hatchet, lengths of chain, wire and rope, candles as well as cutlery, plates, bowls and the like. A 30L water jug, ensured we had water at the site, without needing to continually trek to the fresh water hoses. Then there was the luggage, we each packed differently, I wore the same Urban Dax pants each day, changed shirts each day and wore my Paleo Barefoots everywhere. The rest of my kit went into my Platatac Light Field pack which also doubled as a Yoda-carry-rig for Tactical Baby as we wandered the festival.

You can see the Fiskars log splitter I chopped three days worth of redgum firewood and the Zombie Tools Deuce I took with me because ... hippies ... zombie hippies ...

What did I take from all of this?

We took too much stuff. The new camp beds, in combination with the huge tent were worth it for the comfort we gained. Even though we could have done without in an emergency, they were a great investment in comfort. We tool a lot of "snivel gear" and probably not enough food and water for a "get out of Dodge" situation.

A giant festival like this is a good indication of what a well meaning "lets bug out of the city" refugee camp might start out like, and harkens to the chapter in Max Brook's "World War Z" dealing with that.  I looked around at the haphazard sites, and the supplies we had all brought, and reaslised that we in the middle of a couple of thousand people who were a weeks hunger away from barbarism.

Sleep tight campers!


Wednesday, May 1, 2013

Review: CRKT - Eat'N Tool

I really love my pocket tools, and I really love it when they are multifunction. I also love eating, and am really quite fond of proportional violence. I have several pieces of eat-wear in my collection already, the Alpha Set from Sea to Summit being one example, and my Snowgum BattleSpork (same article) being another. So when I felt the need to splurge on a bit of eating tech, I picked some of these up. This is the CRKT Eat'N Tool. I like CRKT, they have elegant and functional tools, like my STIFF KISS camping/car knife and Folding KISS EDC knife

Once again, CKRT have come up with the goods.


The Eat'N Tool is primarily a spork, with a nice dish (although probably not what you'd always want to eat your soup with) and four little tines, very elegantly worked into the tip. Made of
3CR13 steel and available in a bead-blast finish (9100C), or with a food grade black non-stick coating (9100KC) like the once I have here. 

The tool's scalloped sides and center hole give a good comfortable grip, and enough purchase to be used as an improvised mood-adjustment tool (like the Nukotool Skully)

A bottle opener is always a welcome addition! 
 On the back side, three metric wrench reliefs (10 mm, 8 mm, 6 mm) give you some on hand adjustment options of another kind, again aiding to reduce the overall weight down to a mere 43g (1.5 oz). A flathead screw driver adds another on-the-spot fix-it tool to the package, as well as

There is also a lanyard hole, for even more dummy-cording goodness. 


The Eat'N Tool is friendly in the pocket, I haven't gouged myself on it yet, nor did it gouge my hip pocket (proverbially, as I don't carry my wallet back there).


I'm thinking of giving them away to friends for Giftmas...


Eat'N Tool Dark Edition
Click here to go to Think Geek to get one ...


Related Posts Plugin for WordPress, Blogger...